저장 장치 추가하기
생성된 EC2 인스턴스에는 운영 체제를 지원하기에 충분한 저장 용량을 갖춘 루트 볼륨과 분석을 지원하는 데 필요한 몇 가지 추가 애플리케이션이 있습니다. 이제 다운로드하려는 대용량 데이터 세트(예: Raw reads, aligned sequences 등)를 수용하기 위해 추가 스토리지가 필요합니다. 따라서 추가 스토리지를 연결해야 합니다.
이 섹션에서는 다음과 같이 설명합니다:
a. EBS(Elastic Block Store) 볼륨을 생성합니다.
b. 새 볼륨을 EC2 인스턴스에 연결합니다.
c. 새 볼륨을 포맷하고 마운트합니다.
1. 파일 시스템으로 새 볼륨을 포맷합니다.
2. 볼륨을 마운트하고 일부 데이터를 복사합니다.
EBS 볼륨 만들기
-
AWS 관리 콘솔 검색 창에 EC2를 입력하여 EC2 서비스로 이동합니다.
-
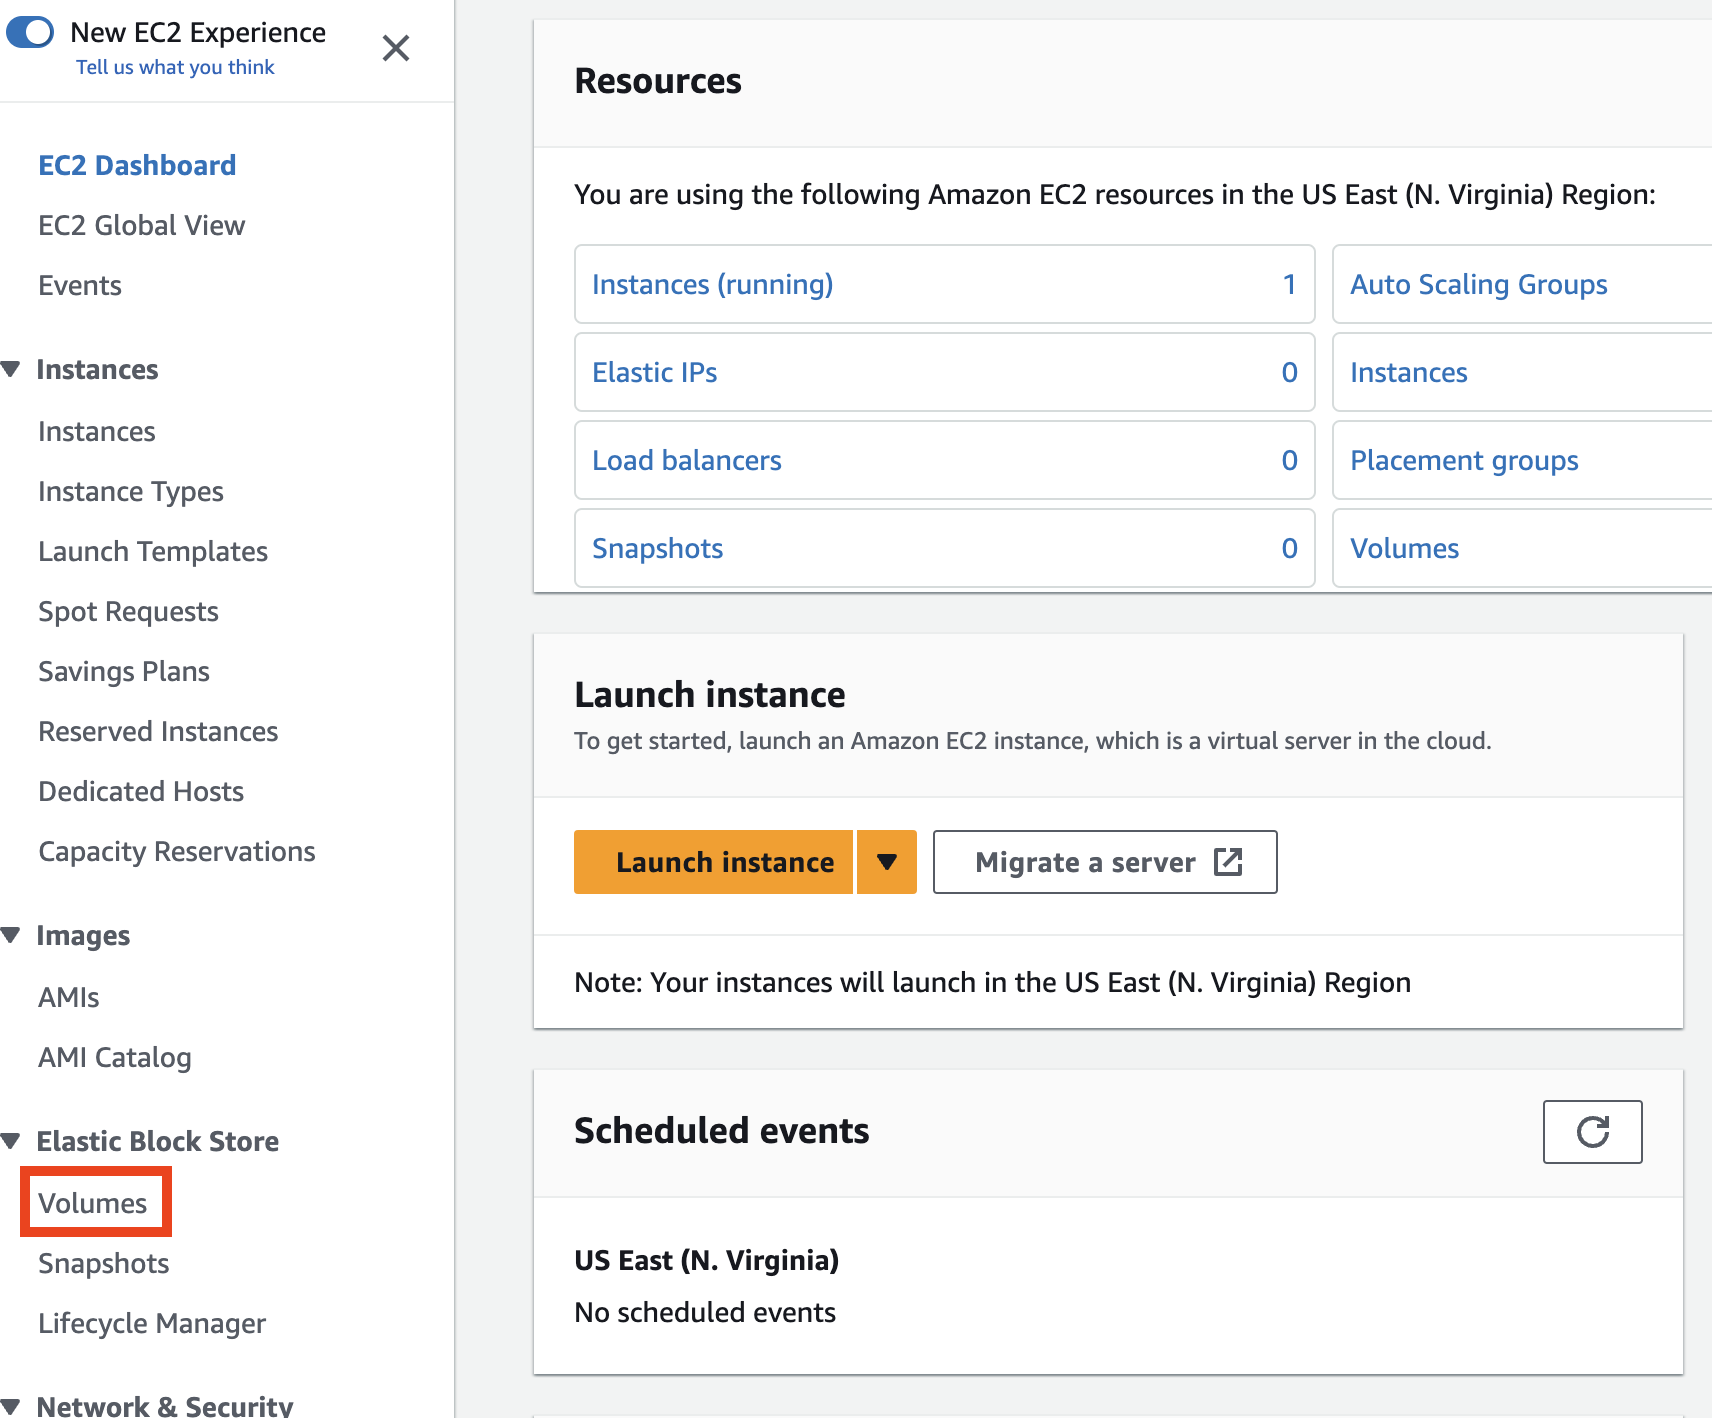
왼쪽 탐색 표시줄에서 Elastic Block Store 아래의 Volumes을 클릭합니다.
-
Create Volume (오른쪽 상단 모서리)를 클릭하여 새 볼륨을 만듭니다.
-
Create Volume 페이지에서 볼륨의 필요한 크기(예: 데이터 세트 크기에 따라 10GB 이상)를 GB 단위로 입력합니다.
이 실습에서는 10GB면 충분합니다.
중요: Availability Zone 이 볼륨을 연결할 EC2 인스턴스와 동일한지 확인하세요.

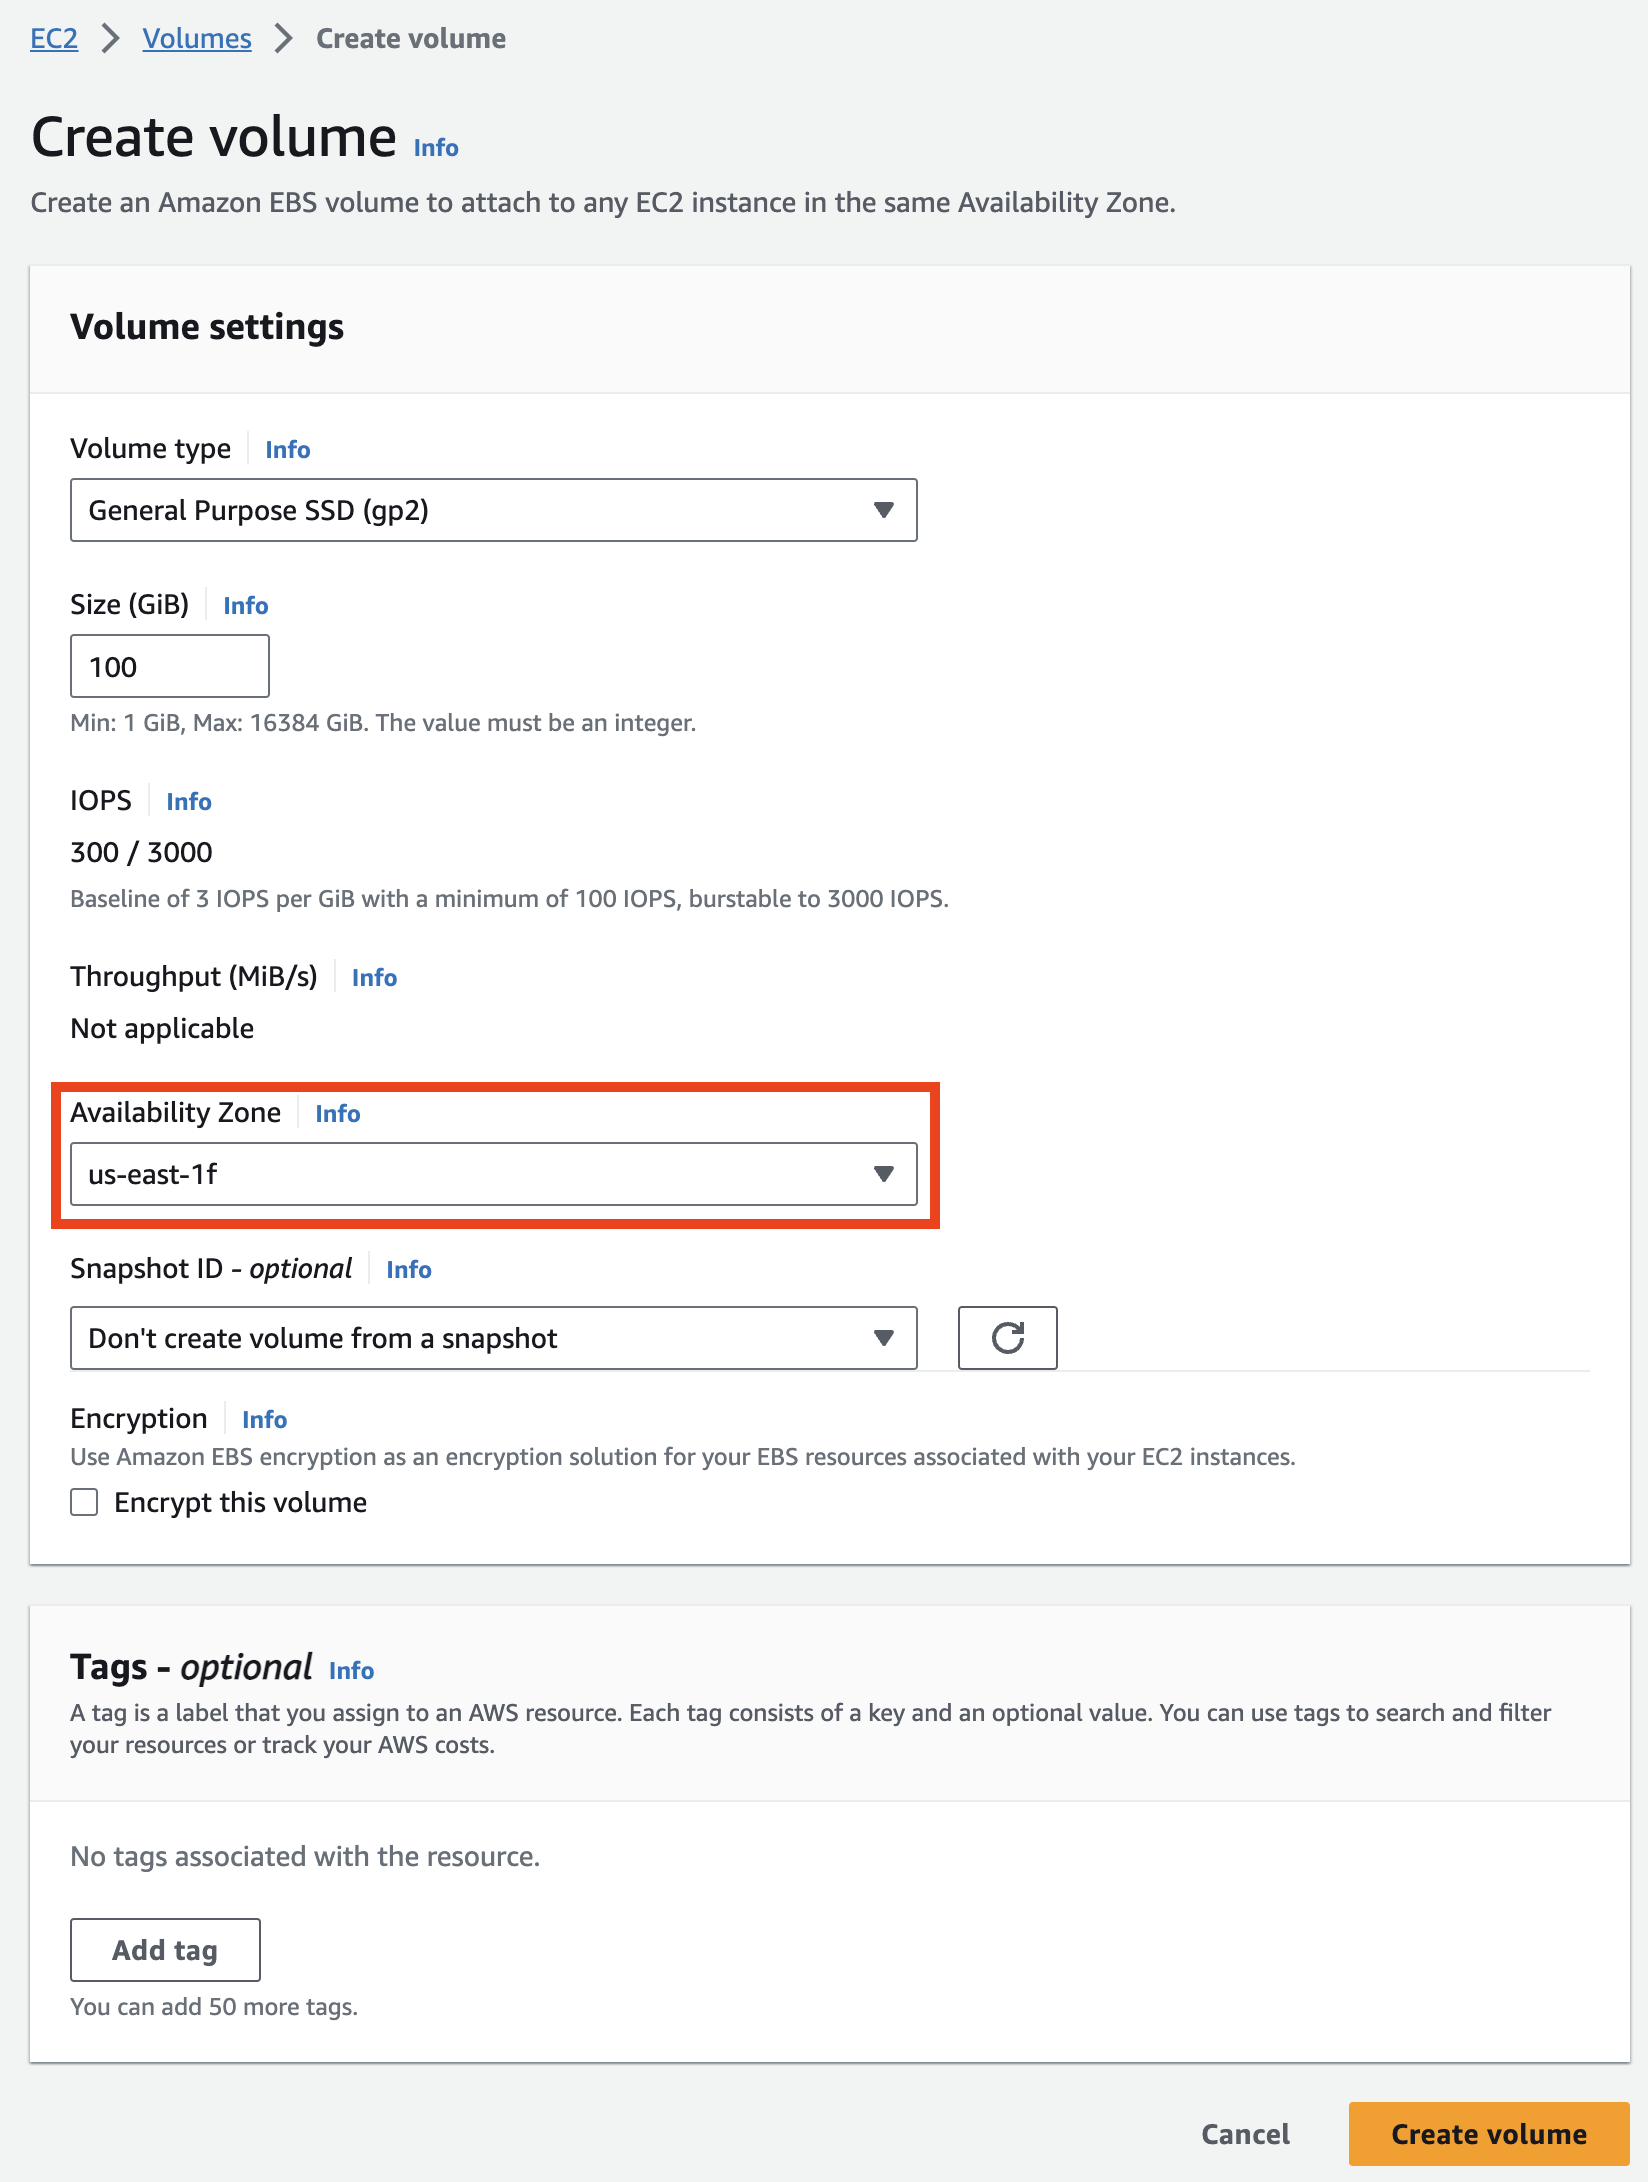
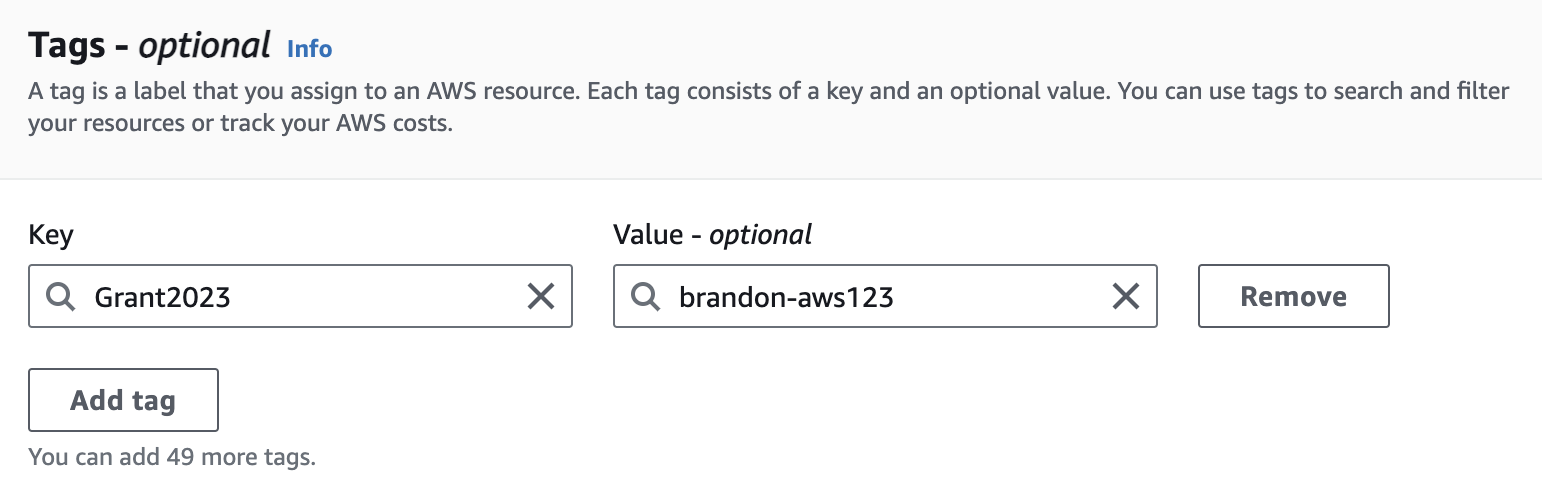
- Add Tag를 클릭하여 리소스에 고유한 태그를 지정합니다. 키에 '이름'을 입력하고 값에 '[your initials]-EBS'를 입력합니다.

실행 중인 인스턴스에 EBS 볼륨 연결하기
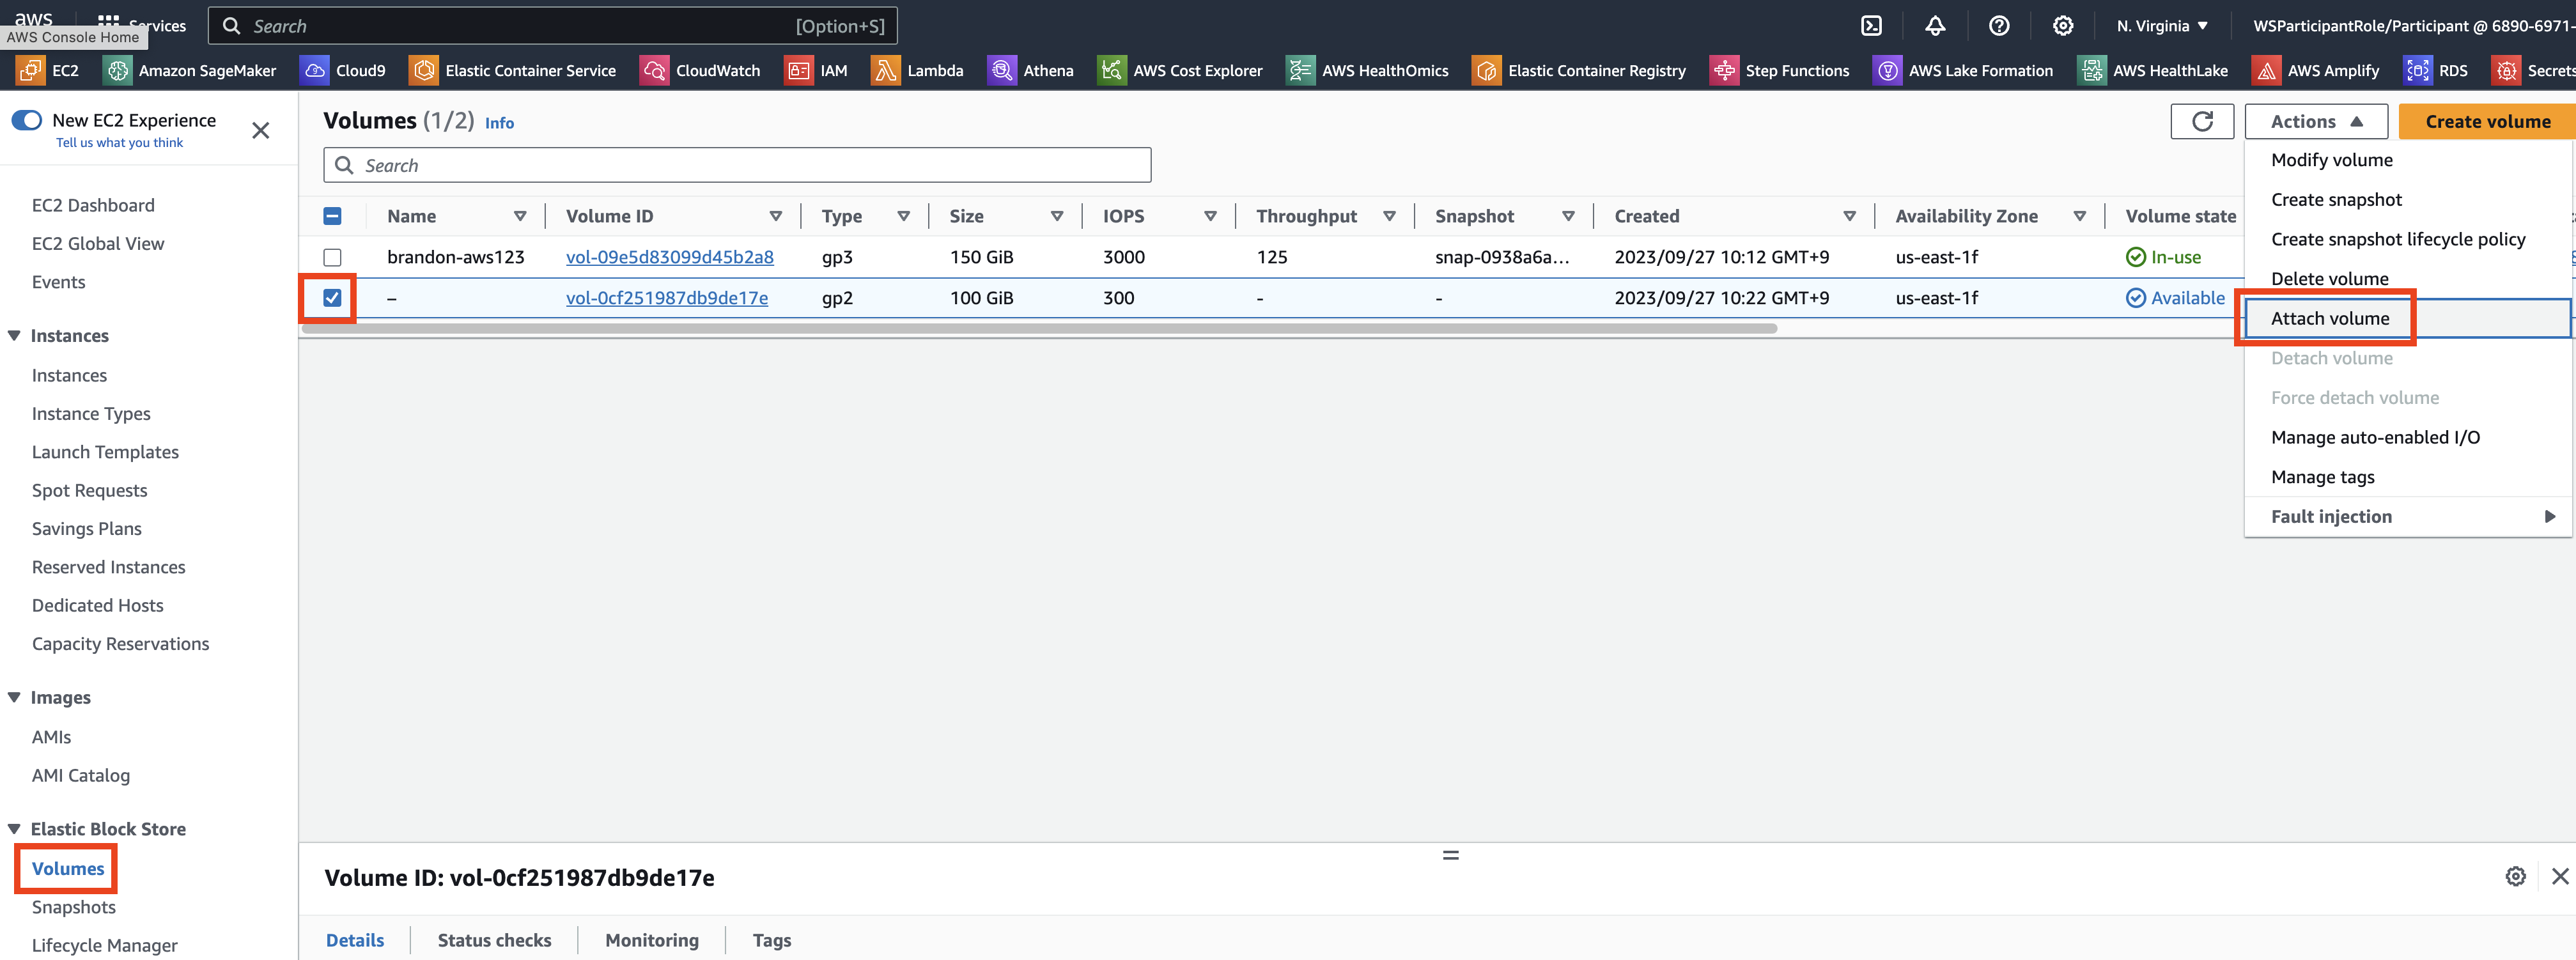
왼쪽 탐색 표시줄에서 Elastic Block Store 아래의 Volumes을 클릭하여 모든 볼륨을 확인합니다. 목록에서 이전 단계에서 제공된 고유 이름 태그를 검색하여 새로 생성한 볼륨을 선택할 수도 있습니다.
-
Actions을 클릭하고 Attach Volume을 추가로 클릭합니다.
-
Attach Volume 대화 상자에서 인스턴스 필드를 클릭하고 목록에서 Instance ID 또는 이름 태그를 찾아 EC2 인스턴스를 선택합니다. Attach(연결)를 클릭하여 볼륨을 연결합니다.
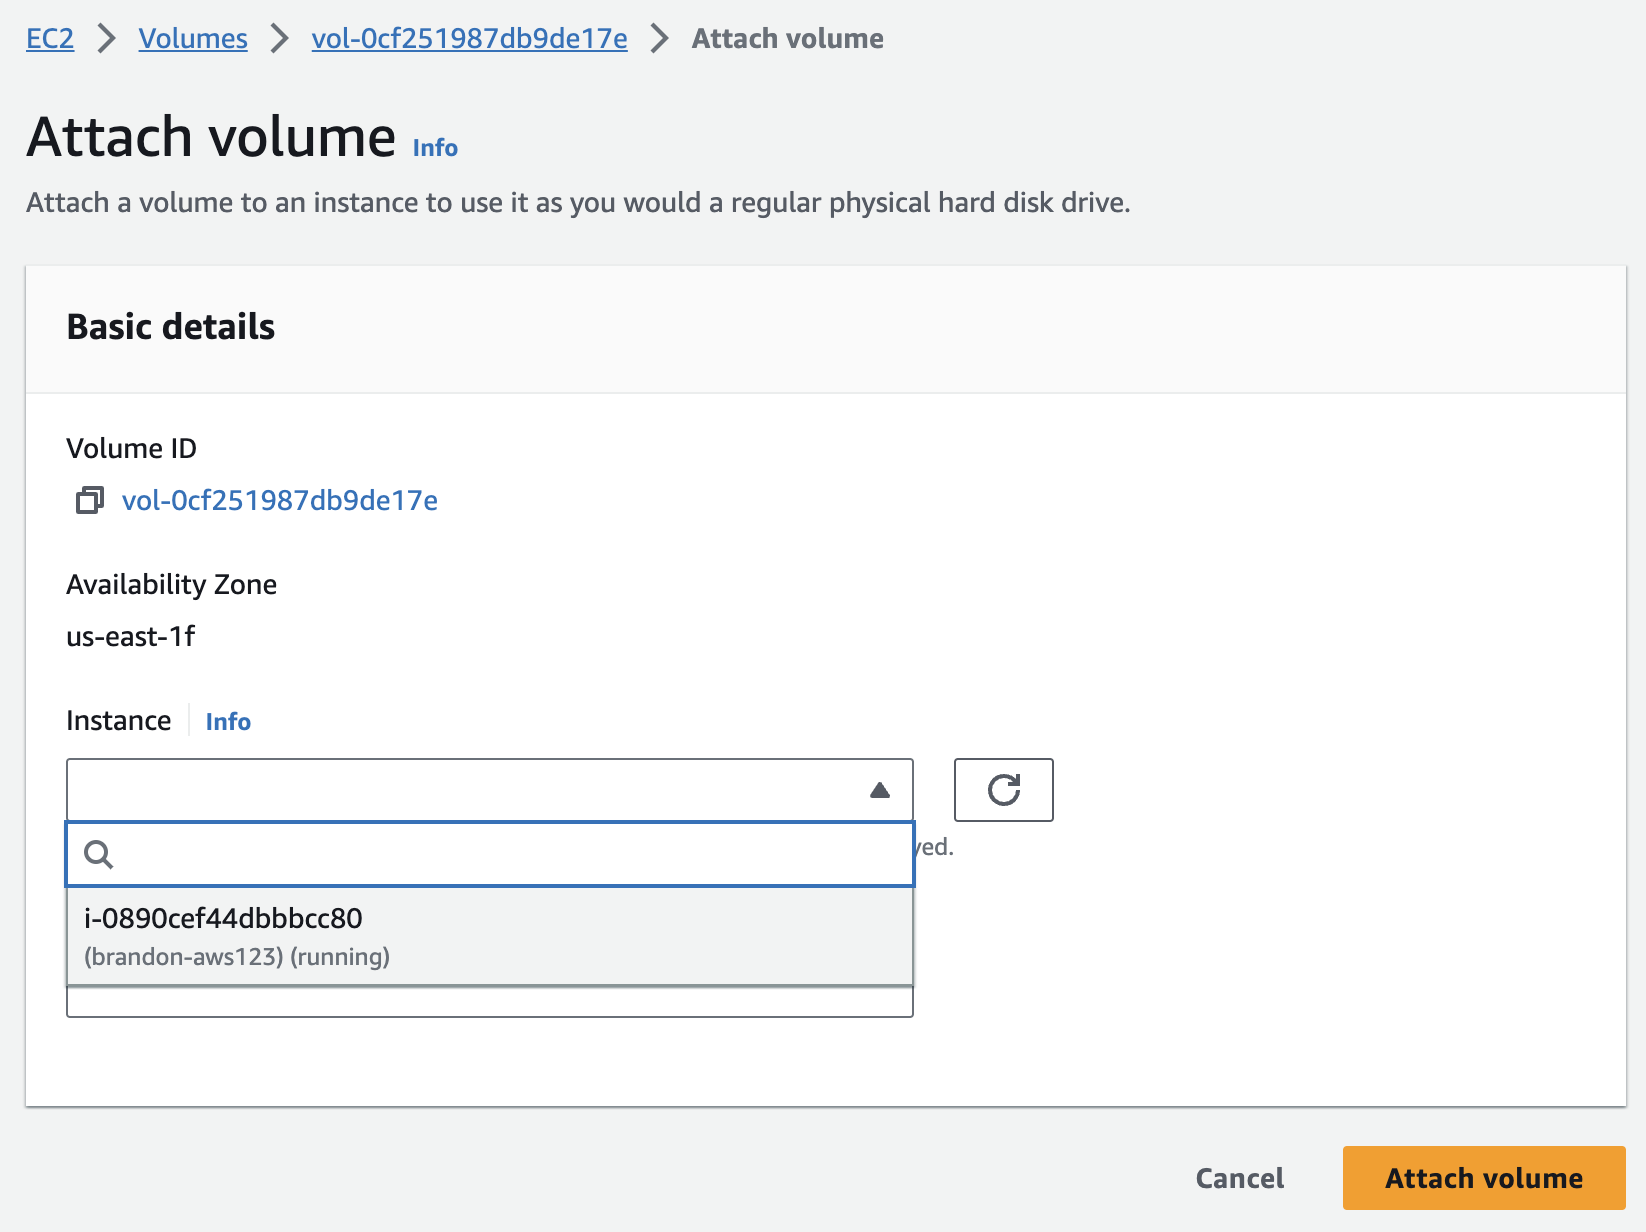
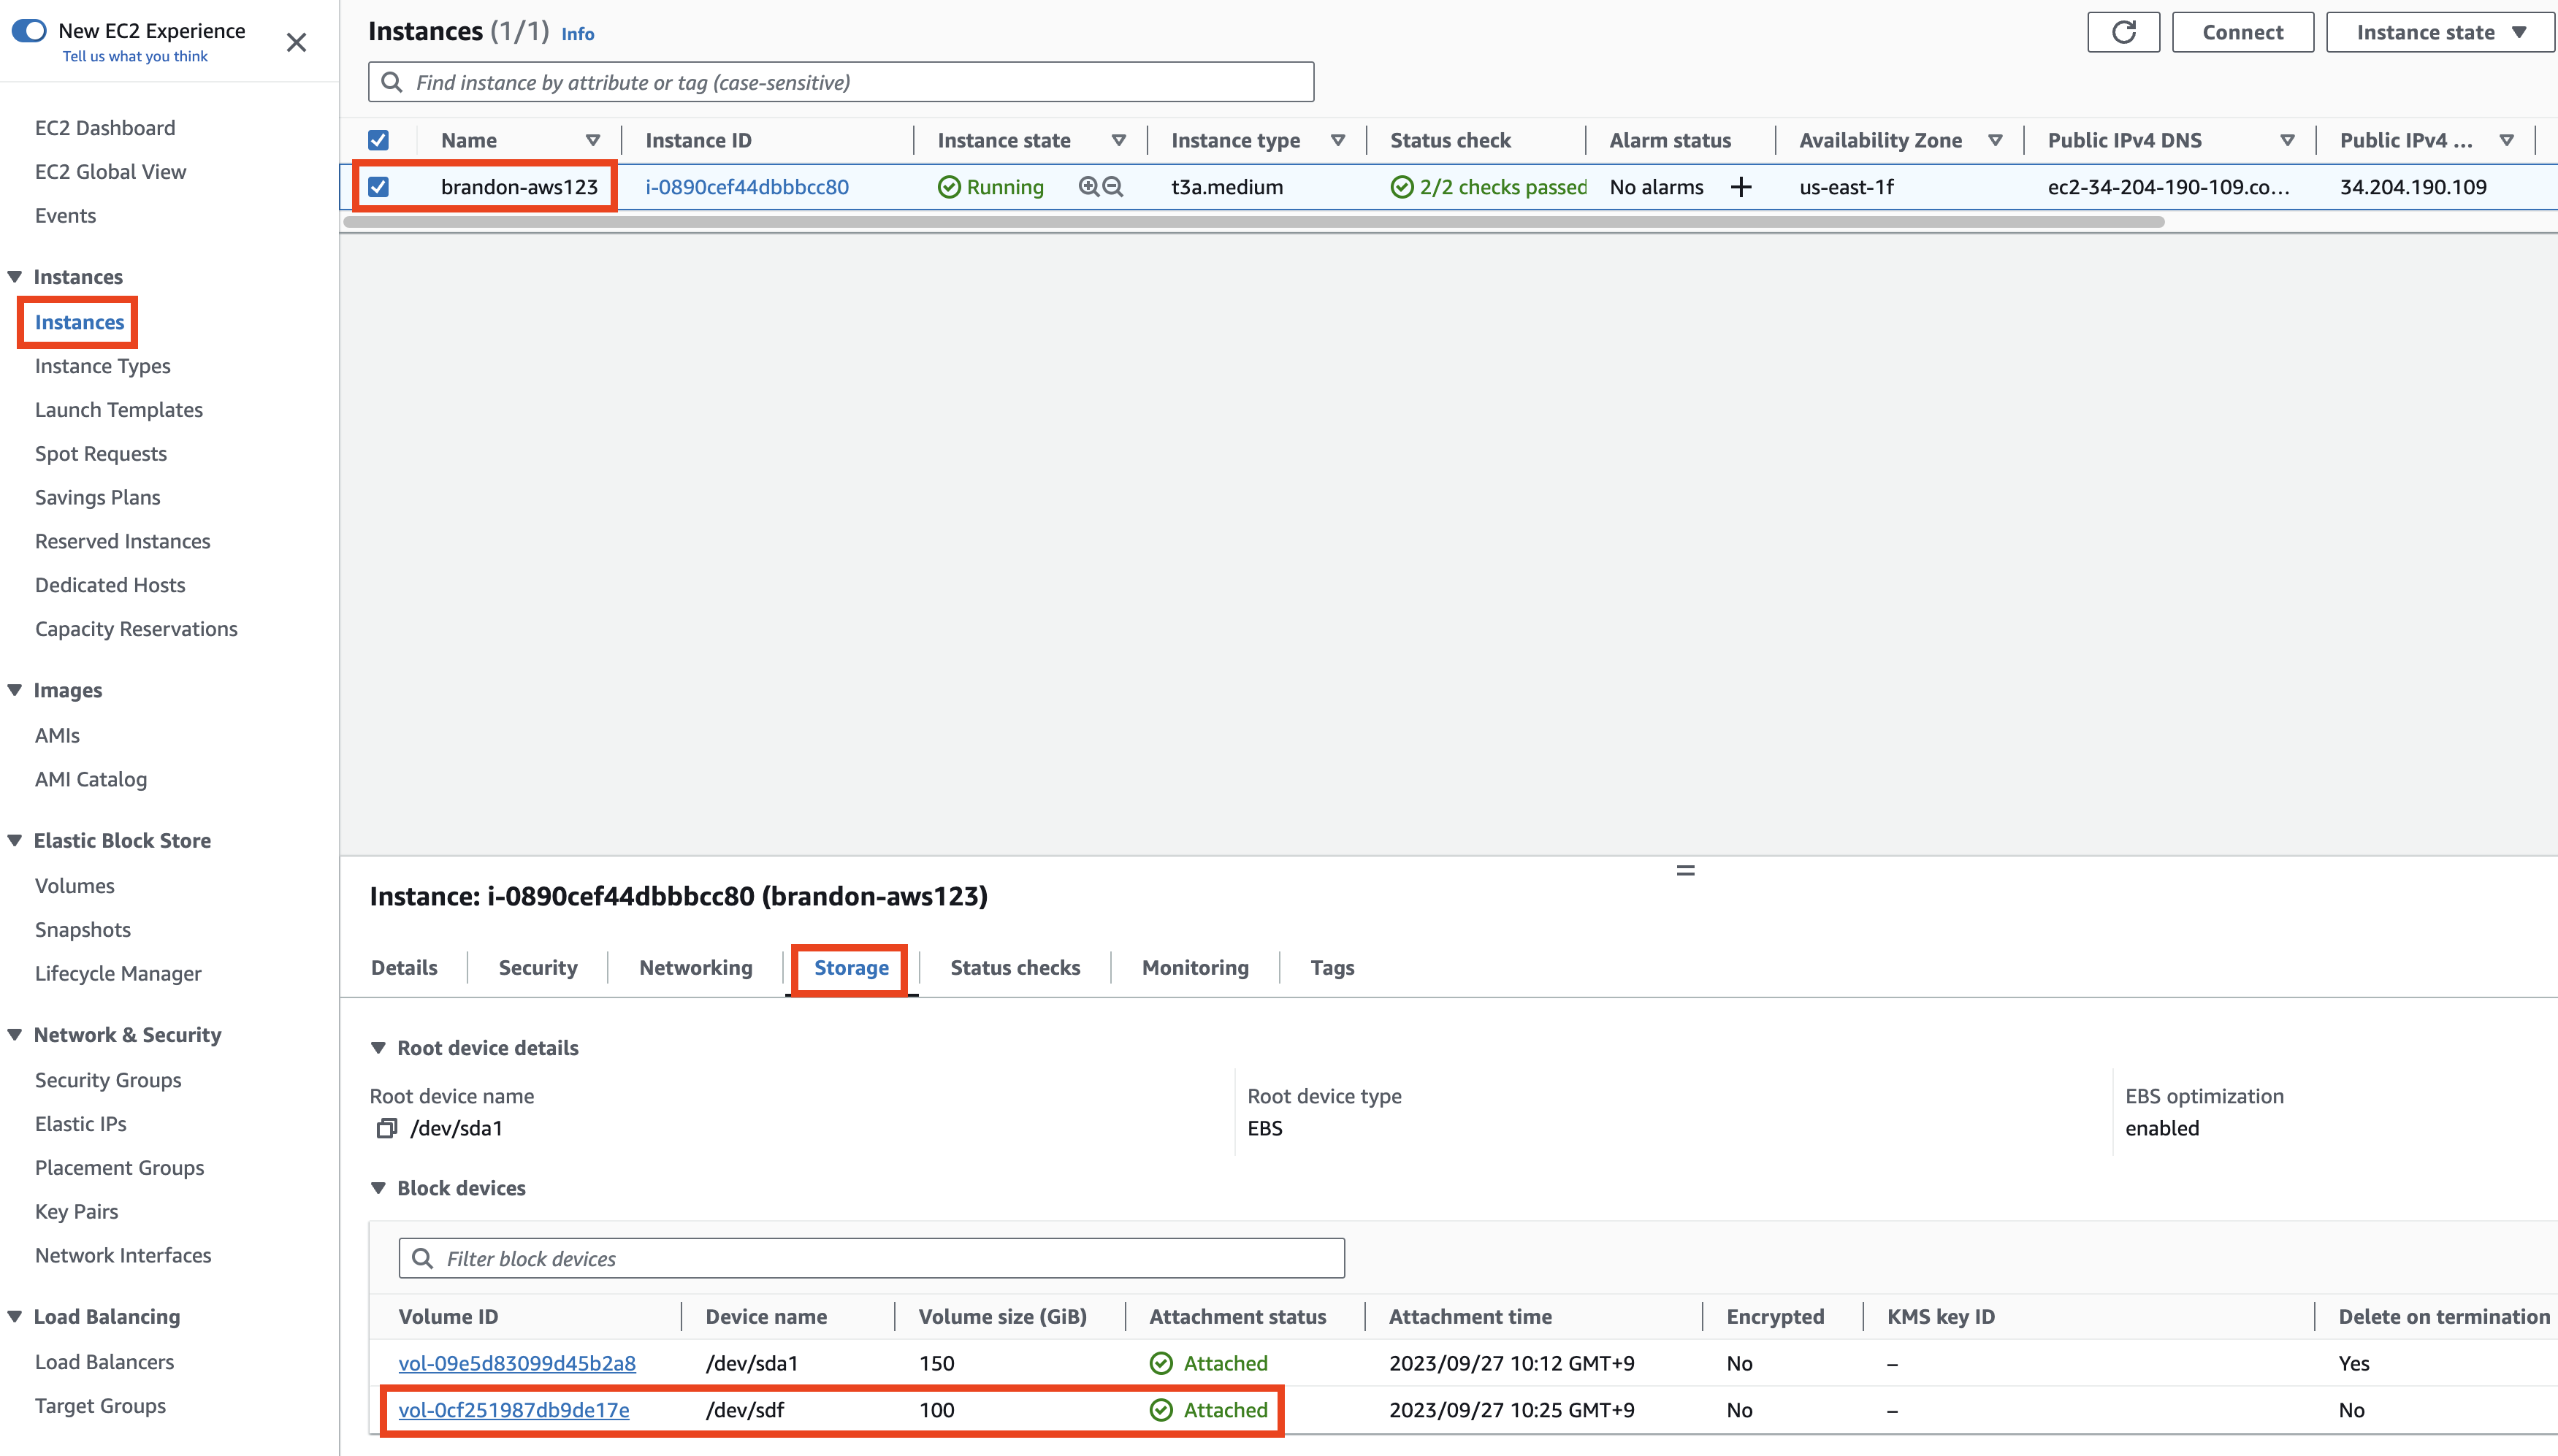
성공적으로 연결된 경우 - 표시된 볼륨 목록에서 새 볼륨의 상태(상태 열 아래)가 In Use임을 나타내는 것을 볼 수 있습니다.

중요: 볼륨을 마운트하는 다음 단계를 위해 특정 장치 이름을 적어 두세요. 드라이브 이름은 표시된 것과 다를 수 있습니다.
NOTE: Depending on the Linux version and the machine type, the device names may differ. The EC2 Console will generally show /dev/sdX, where X is a lower-case letter, but you may see /dev/xvdX or /dev/nvmeYn1. The following table may help with translating. Another way to help track is to pick different sizes for your EBS volumes (such as 151, 152, 153 GB for different volumes). | Device name (Console) | Alternate 1 | Alternate 2 | | — | — | — | | /dev/sda | /dev/xvda | /dev/nvme0n1 | | /dev/sdb | /dev/xvdb | /dev/nvme1n1 | | /dev/sdc | /dev/xvdc | /dev/nvme2n1 | | /dev/sdd | /dev/xvdd | /dev/nvme3n1 | | /dev/sde | /dev/xvde | /dev/nvme4n1 | | /dev/sdf | /dev/xvdf | /dev/nvme5n1 |
볼륨 마운트
-
Log in to yourEC2Instance.인스턴스에 접속 및 로그인합니다. -
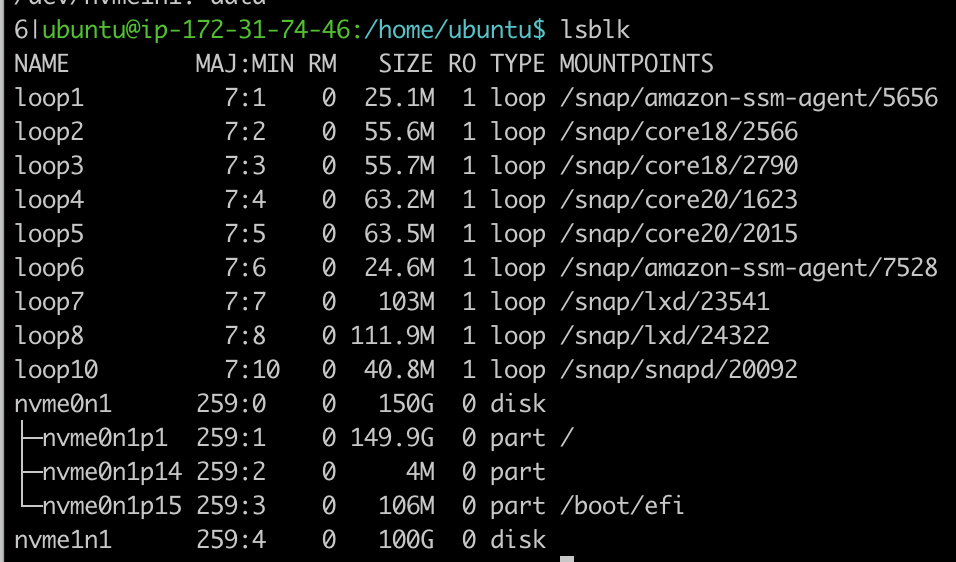
List다음the명령어를available사용해disks사용using가능한the디스크following목록을command:확인합니다.
lsblk
The인스턴스에 output연결된 will디스크의 list목록이 the disks attached to your instance.출력됩니다.
예시예)
NOTE: Depending on the Linux version and the machine type, the device names may differ. The EC2 Console will generally show /dev/sdX, where X is a lower-case letter, but you may see /dev/xvdX or /dev/nvmeYn1. The following table may help with translating. Another way to help track is to pick different sizes for your EBS volumes (such as 151, 152, 153 GB for different volumes).
| Device name (Console) | Alternate 1 | Alternate 2 |
|---|---|---|
| /dev/sda | /dev/xvda | /dev/nvme0n1 |
| /dev/sdb | /dev/xvdb | /dev/nvme1n1 |
| /dev/sdc | /dev/xvdc | /dev/nvme2n1 |
| /dev/sdd | /dev/xvdd | /dev/nvme3n1 |
| /dev/sde | /dev/xvde | /dev/nvme4n1 |
| /dev/sdf | /dev/xvdf | /dev/nvme5n1 |
Check마운트되지for않은an파일unmounted시스템filesystem크기가of100GB인지size확인합니다.100GB.예를For들어example:아래와“nvme1n1”같이as shown below:"nvme1n1":
NAME        MAJ:MIN RM  SIZE RO TYPE MOUNTPOINT
nvme0n1     259:0    0  150G  0 disk
└─nvme0n1p1 259:1    0  150G  0 part /
nvme1n1     259:2    0   100G  0 disk
Check다음if명령을the사용하여volume볼륨에has데이터가any있는지data using the following command:확인합니다:
sudo file -s /dev/nvme1n1
Where여기서 “nvme1n1” is the device you noted from the previous section after attaching the device to the"nvme1n1"은 EC2 Instance.인스턴스에 장치를 연결한 후 이전 섹션에서 언급한 장치입니다.
If the above command output shows "/dev/nvme1n1: data", it means your volume is empty.
예)

![]()
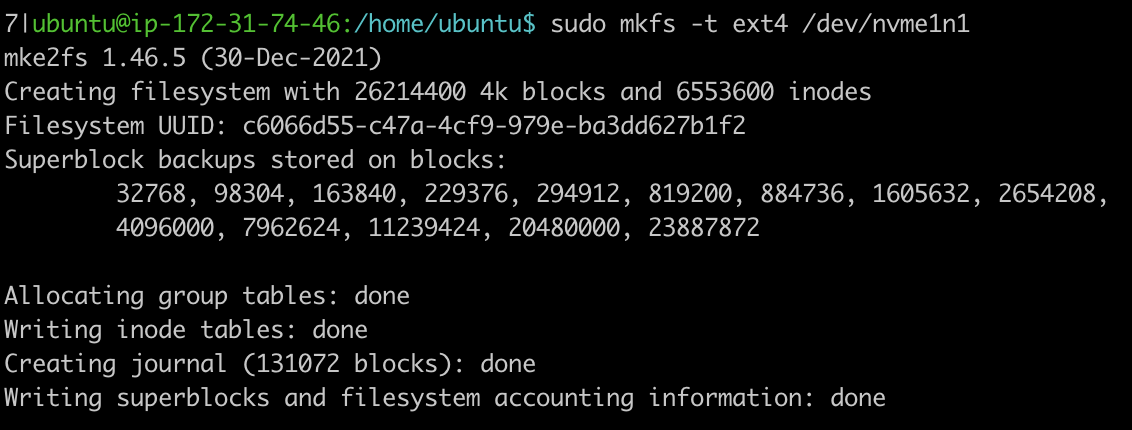
Format다음the명령을volume사용하여to the볼륨을 ext4filesystem파일using시스템으로the following command.포맷합니다.
sudo mkfs -t ext4 /dev/nvme1n1
NOTE:참고:This이file-system파일formatting시스템step포맷is only for a new device,단계는DO새NOT장치에만 해당되며,run기존this볼륨을step마운트하는 동안에는 장치의 모든 데이터가 지워지므로 이 단계를 실행하지 마세요while mounting an existing volume as it will wipe out all data on the device..
예)
Create a directory of your choice to mount our new새 ext4volume.볼륨을Let’s마운트할use디렉터리를the원하는name대로“volume1”.만듭니다. "volume1"이라는 이름을 사용하겠습니다.
sudo mkdir /mnt/volume1
Mount다음the명령을volume사용하여to볼륨을“volume1”"volume1"directory디렉터리에using the following command.마운트합니다.
sudo mount /dev/nvme1n1 /mnt/volume1
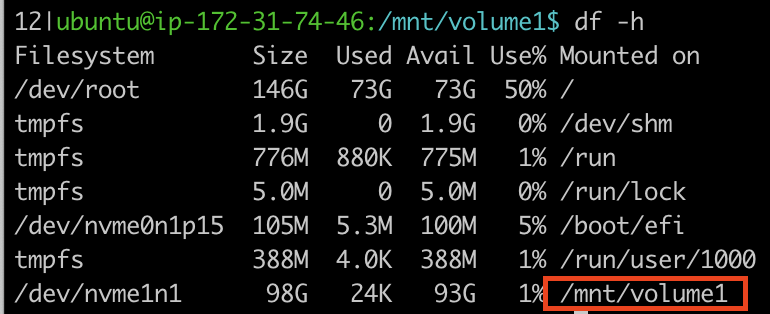
cd디렉터리로into이동하여the디스크volume1공간을directory확인하여and볼륨check마운트를the disk space for confirming the volume mount.확인합니다.
cd /mnt/volume1
df -h .
The위의 above command would show the free space in the명령은 volume1 directory.디렉터리의 여유 공간을 표시합니다.
At이this시점에서point,드라이브의the소유권은drive사용자가is아닌owned루트에by있습니다.root드라이브의and소유권을not변경해야user.드라이브의We콘텐츠(파일will추가/제거want등)를to변경할change수ownership of the drive, so that you can change the contents of the drive (Add/remove files, etc).있습니다.
sudo chown -R ubuntu /mnt/volume1
예)

For참고로your나중에own이information,장치를it제거할is수possible있습니다.to마운트later해제remove후this다시device.마운트하는Practice연습을unmounting,해보세요.then볼륨을remounting마운트it.해제하려면To다음unmount명령을the사용해야volume,합니다.you볼륨을have마운트to해제하려면use디렉터리the외부에following있어야command. Make sure to be outside the directory to unmount the volume.합니다.
sudo umount /dev/nvme1n1
하지만 나중에 이 장치가 필요하므로 다시 마운트하는 것을 잊지 마세요.
sudo mount /dev/nvme1n1 /mnt/volume1