리눅스 머신 실행 (Start a virtual Linux maxhine)
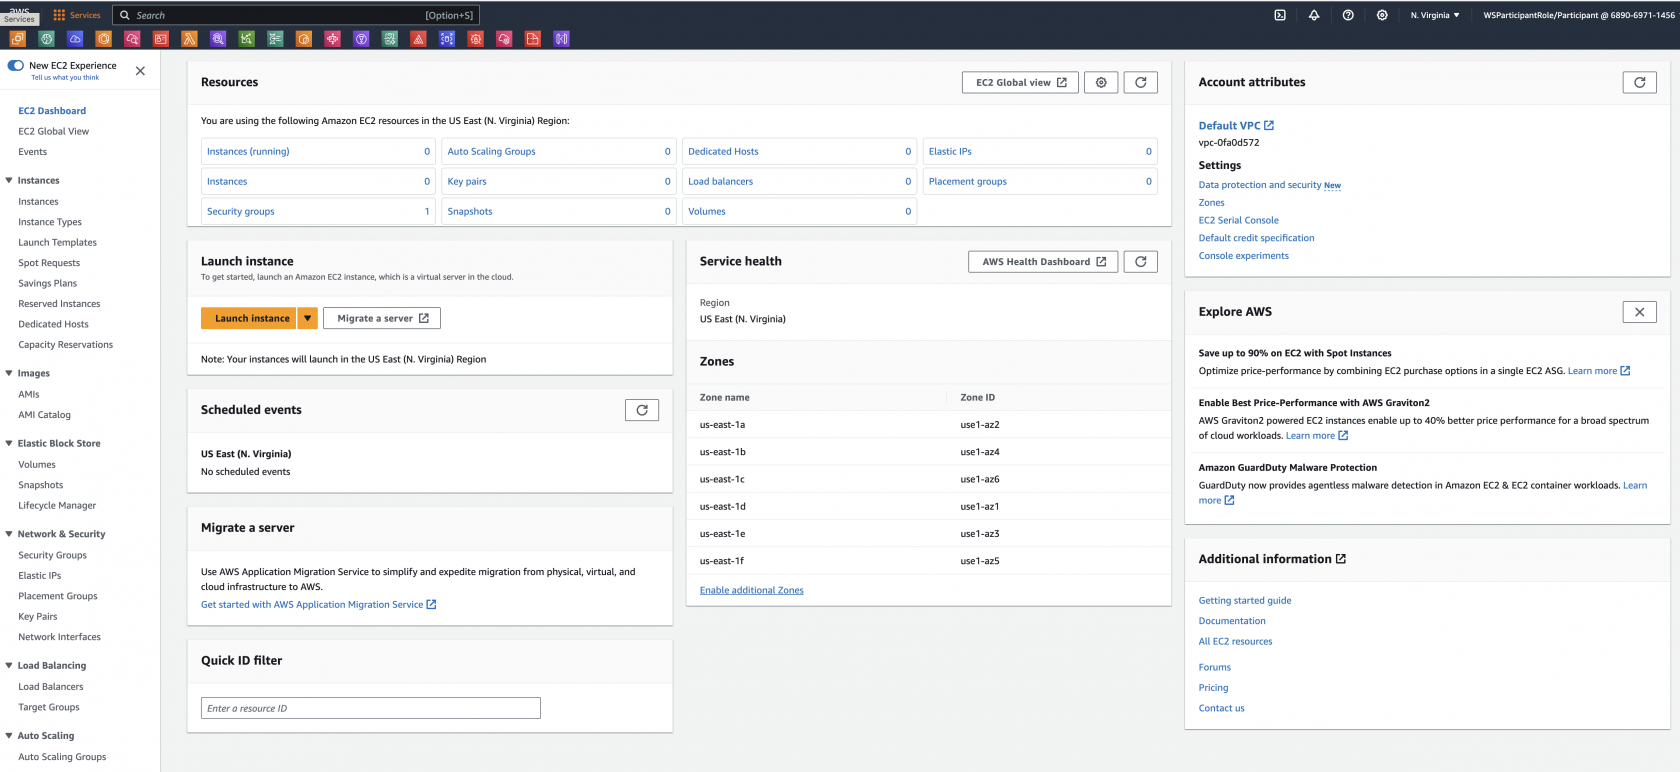
EC2 대시보드 접속하기
AWS 관리 콘솔 검색 창에 EC2를 입력합니다.
EC2를 선택하여 EC2 대시보드를 엽니다.
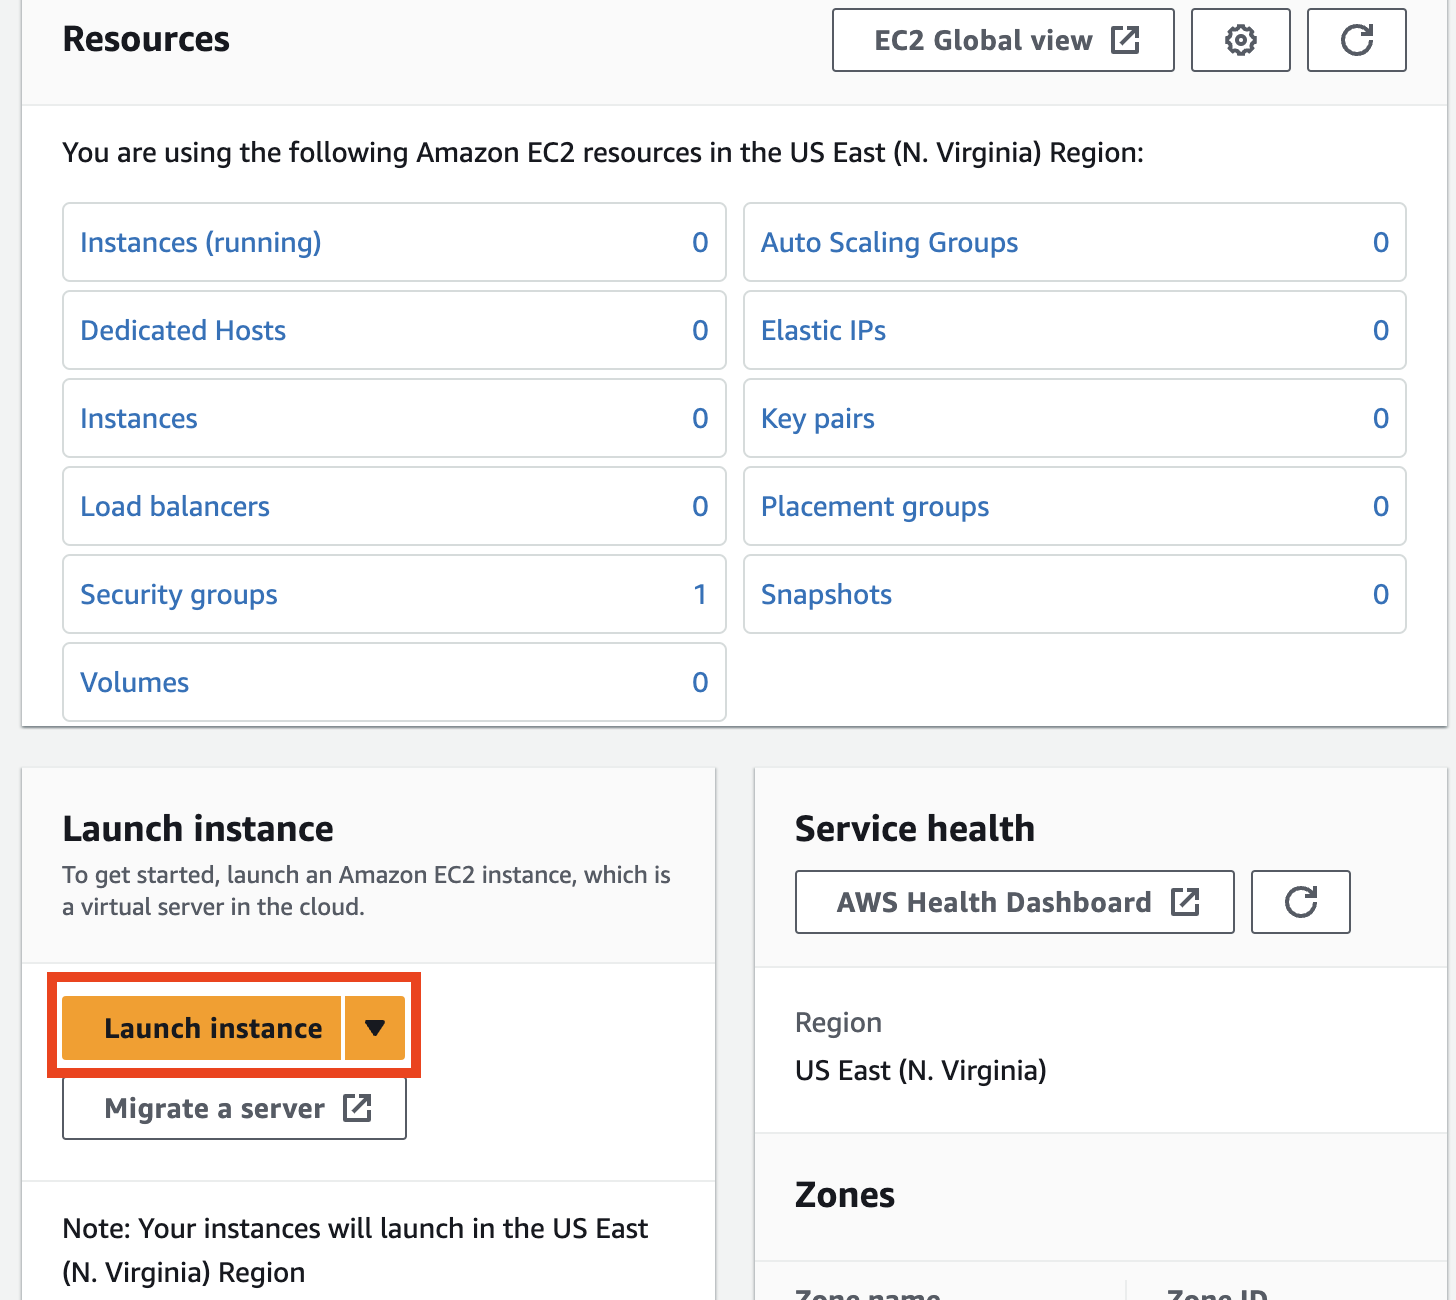
인스턴스는 그래픽 사용자 인터페이스(콘솔) 또는 명령줄 스크립트를 통해 시작할 수 있습니다. 먼저 EC2 대시보드라고 하는 그래픽 콘솔 인터페이스부터 시작하겠습니다.
대시보드의 레이아웃에 익숙해지는 데 몇 분 정도 시간을 투자하세요:
- 왼쪽 탐색 창: 저장된 Amazon 머신 이미지(AMI), 스토리지 볼륨, ssh 키와 같은 도구 및 기능.
- 가운데: 리소스 목록 및 인스턴스 시작 기능.
- 오른쪽 창: 문서 및 가격 등의 일반 정보.
신규 키페어 생성하기
이 실습 섹션에서는 Linux 인스턴스를 생성하고 로그인하여 몇 가지 Linux 명령을 실행합니다. 인스턴스에 로그인하려면 SSH를 통해 연결할 수 있어야 합니다. 인스턴스에 액세스하기 위한 몇 가지 보안 계층이 있으며, AWS에서 기본적으로 사용하도록 설정되어 있습니다. 그 중 하나는 (아주 대략적으로) 고유한 사용자 이름과 비밀번호와 비슷하다고 생각할 수 있는 SSH 키 쌍을 사용하는 것입니다.
다음 단계에서는 새 Linux 인스턴스에 로그인하는 데 사용할 새 SSH 키 쌍을 만드는 방법을 간략하게 설명합니다.
-
AWS 관리 콘솔에 로그인하고 Amazon EC2 콘솔(https://console.aws.amazon.com/ec2)을 엽니다.
-
AWS 관리 콘솔의 오른쪽 상단 모서리에서 원하는 AWS 지역(예: N.Virginia)에 있는지 확인합니다.
실습을 하면서 가끔 사용하는 브라우저의 국가 설정에 의해 다른 리전으로 리전 정보가 바뀌는 경우가 있습니다. 워크샵에 사용하고 있는 리전 정보가 맞는지 꼭 확인해주세요. 다른 리전일 경우 실습이 정상적으로 진행되지 않을 수 있습니다.
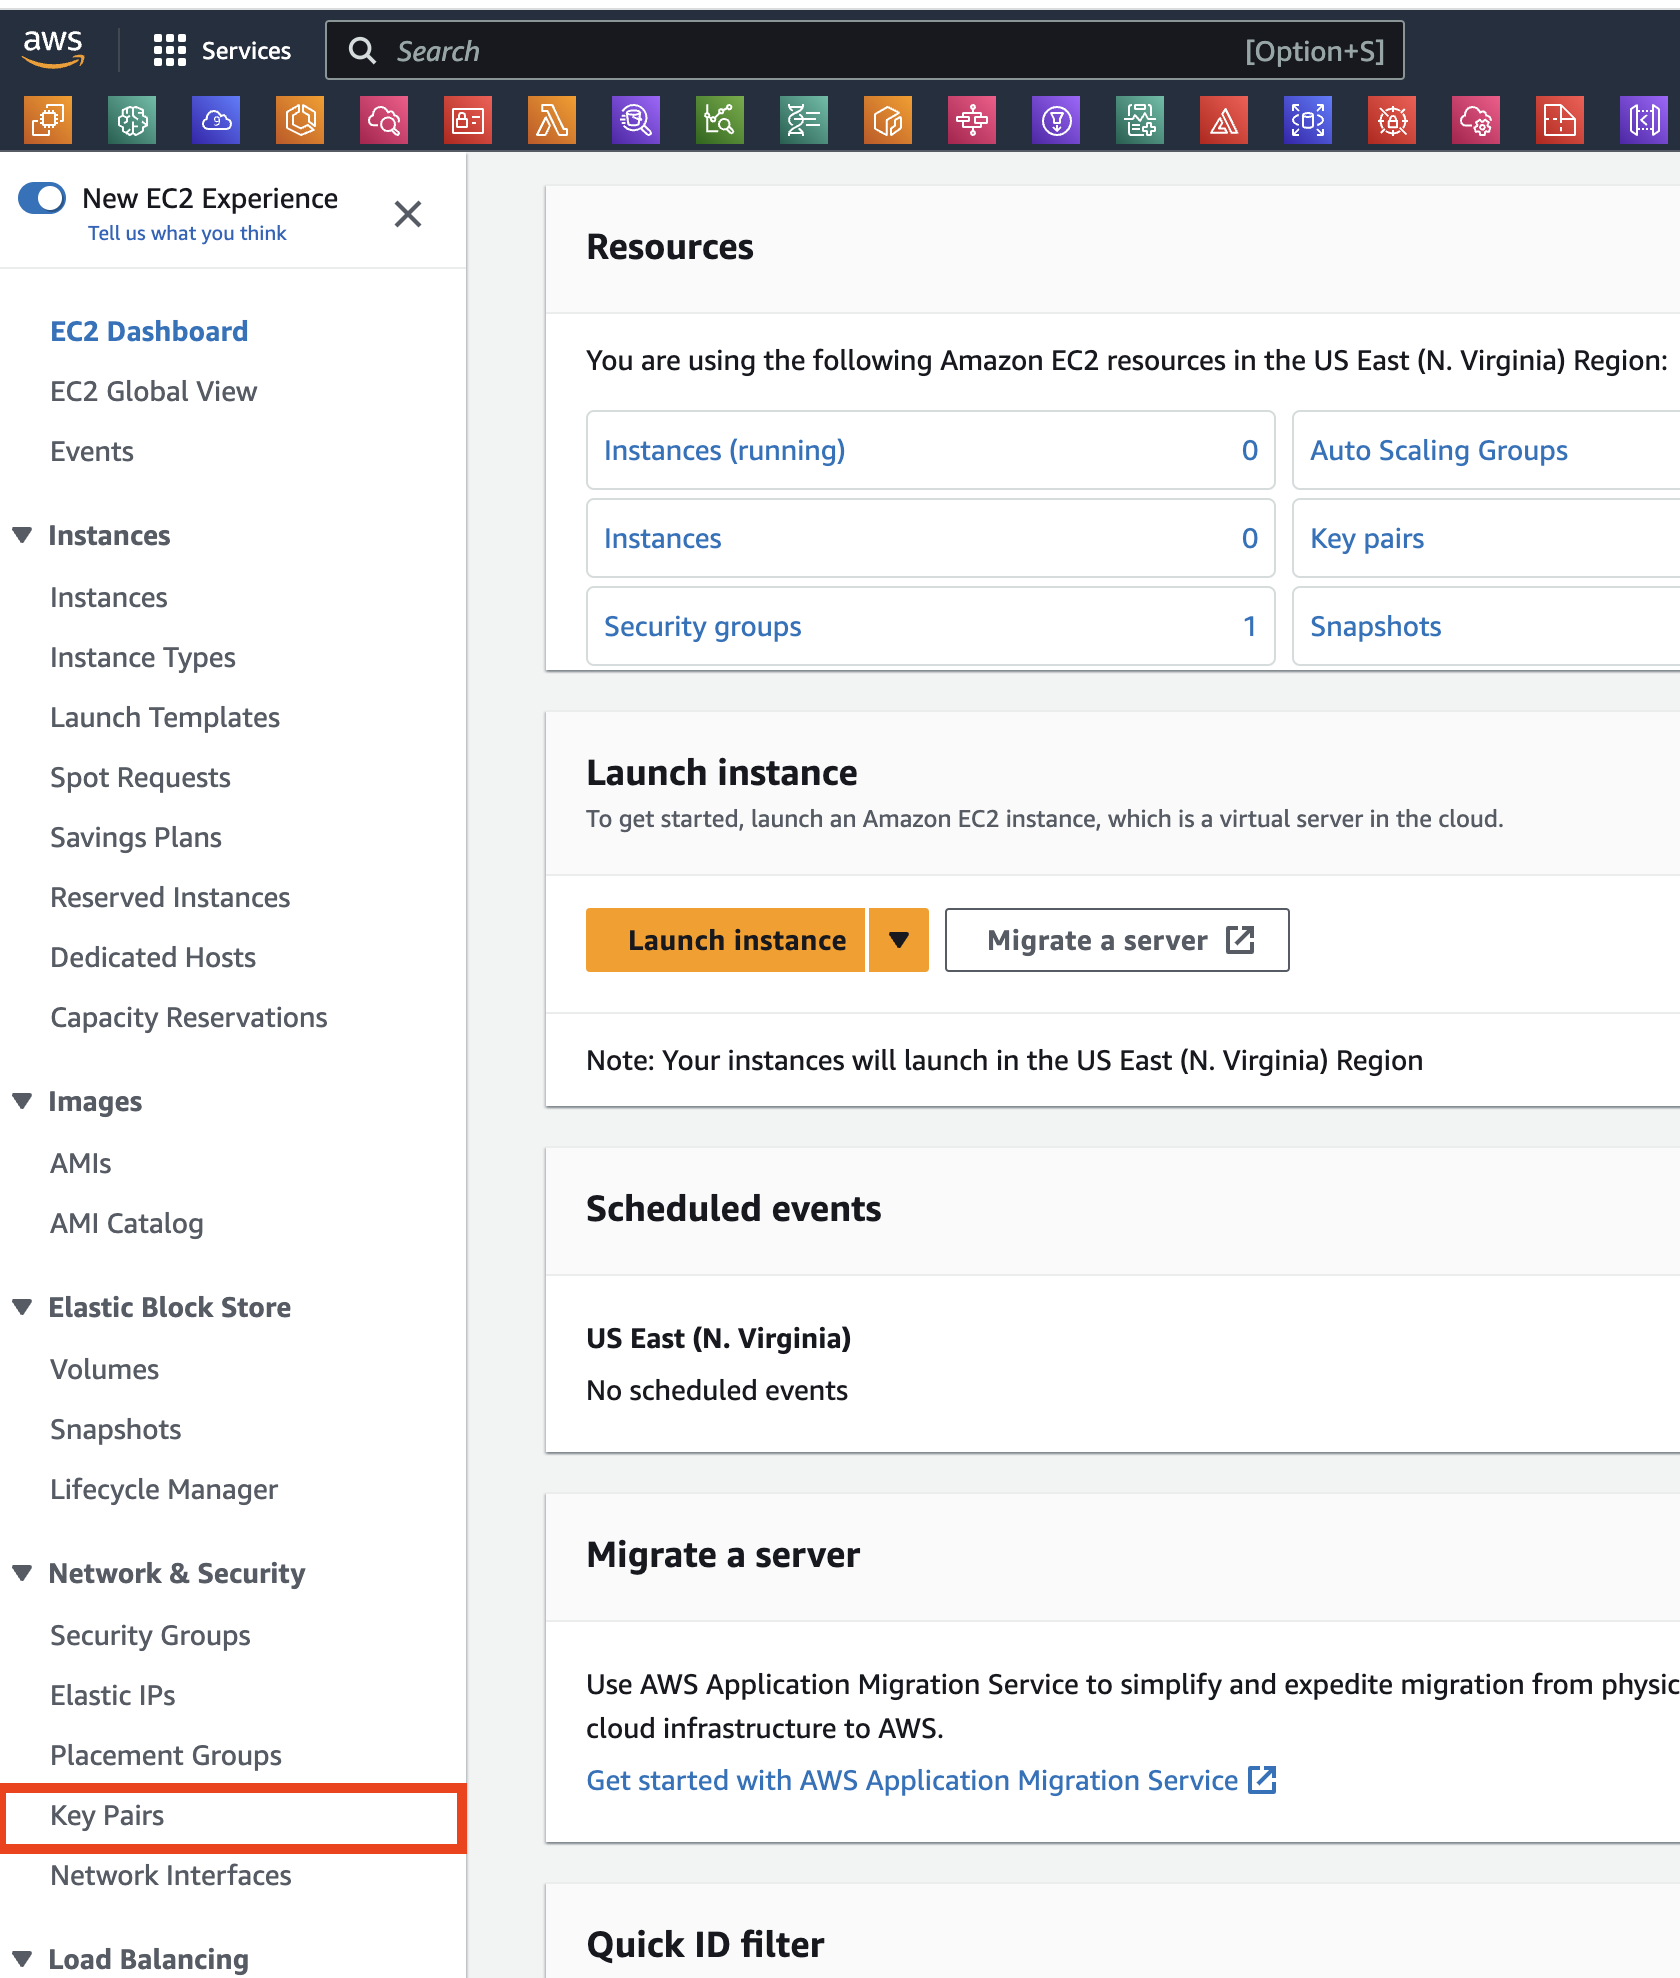
- Key Pairs 페이지에서 브라우저 창 상단의 Create Key Pair 버튼을 클릭합니다.
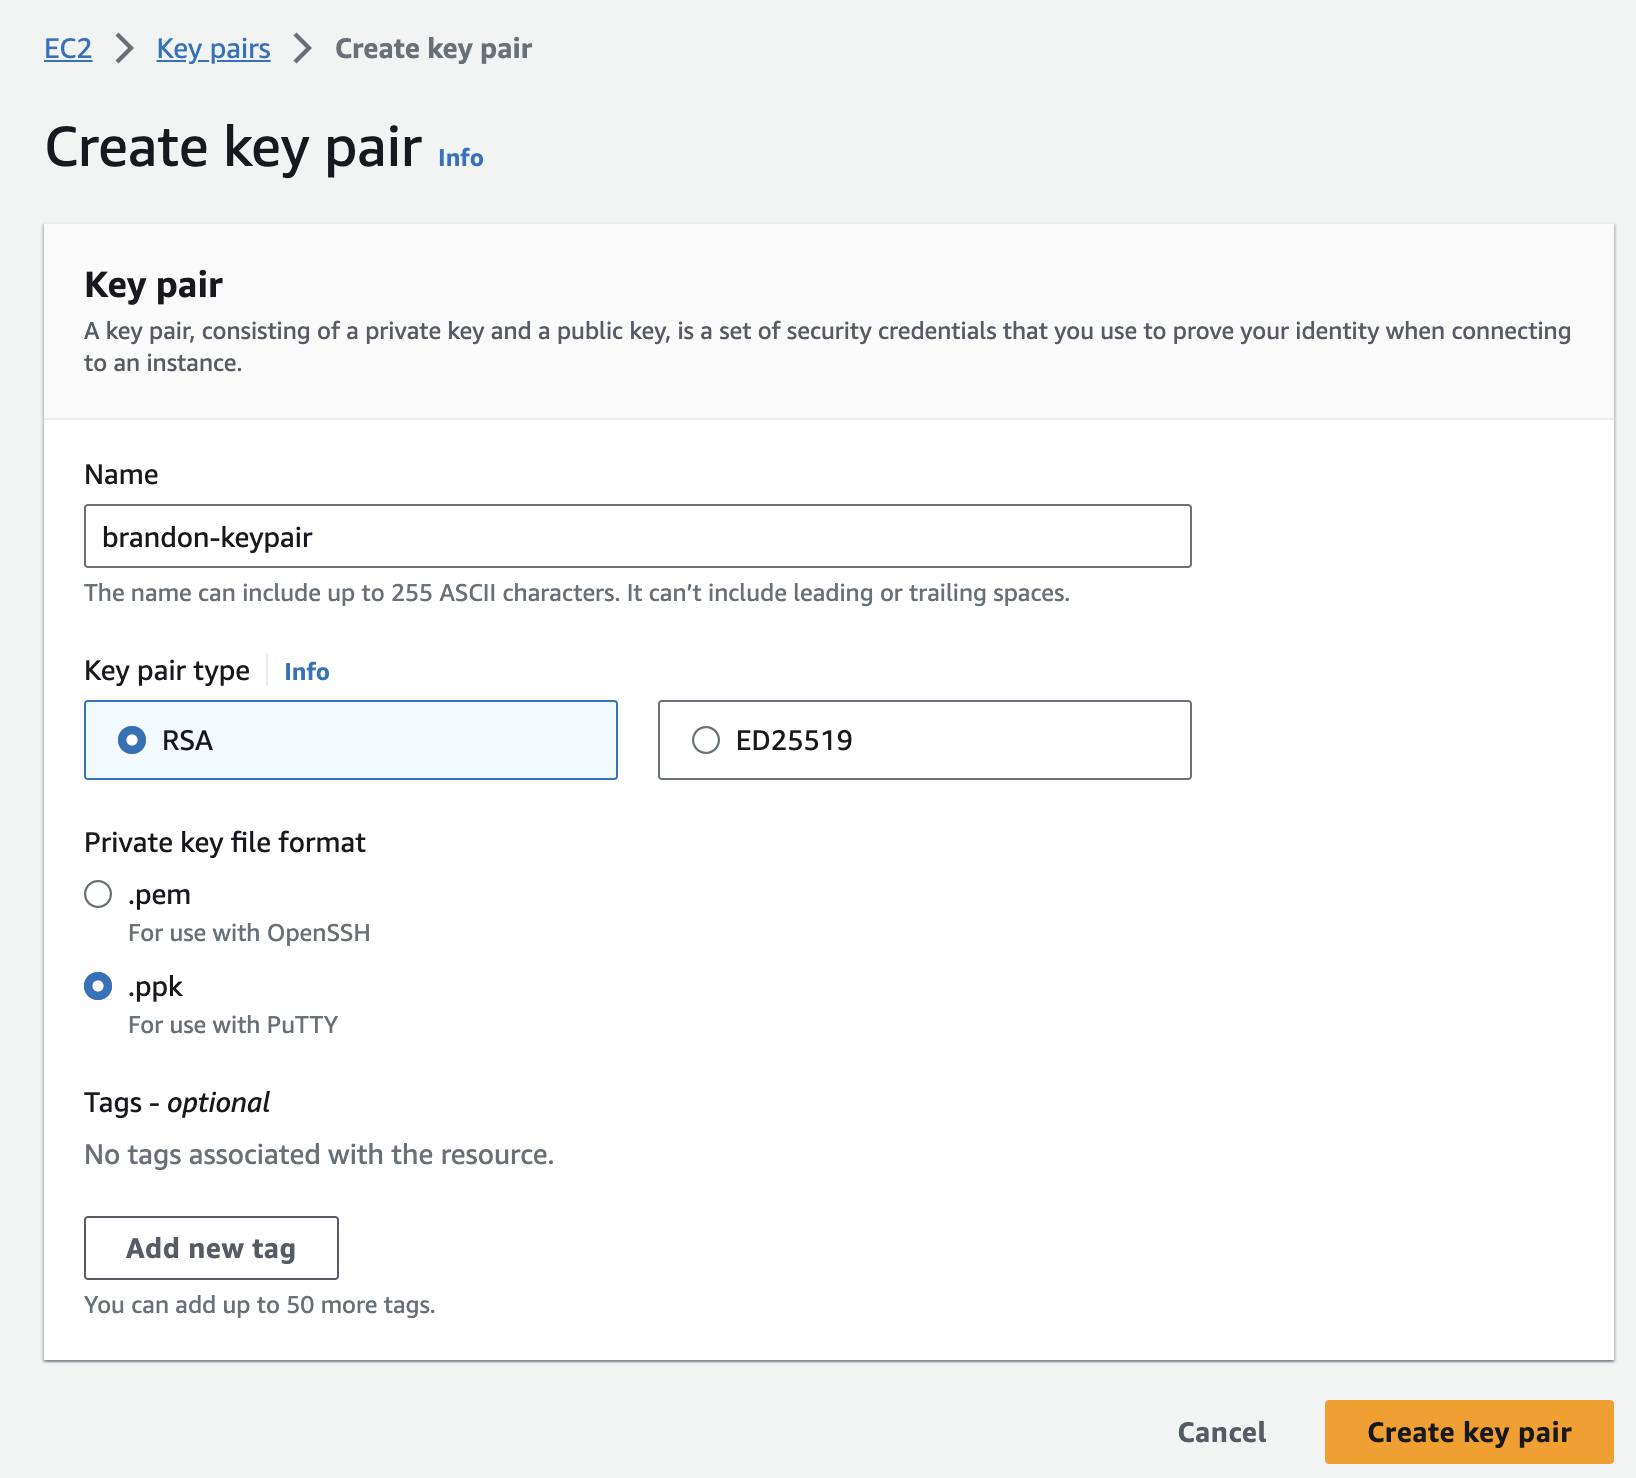
- 결과 팝업 창에서 원하는 키 쌍 (Key pair) 이름을 입력하고 EC2 인스턴스에 연결하는 데 사용할 ssh 클라이언트에 따라 .ppk 또는 .pem을 선택합니다(PuTTY의 경우 .ppk 선택). Windows 하위 시스템 Linux, MacOS-X ssh 클라이언트, Linux ssh 클라이언트, Windows ssh 클라이언트의 경우 .pem을 선택합니다.)
이 워크샵의 목적을 위해 여러 명이 동일한 AWS 계정을 사용하는 경우에는 다른 참가자가 제공한 키 쌍 이름과 충돌하지 않도록 고유한 키 쌍 이름을 제공하세요. 쉽게 식별할 수 있도록 키 쌍에 이름 이니셜을 사용할 수 있습니다.
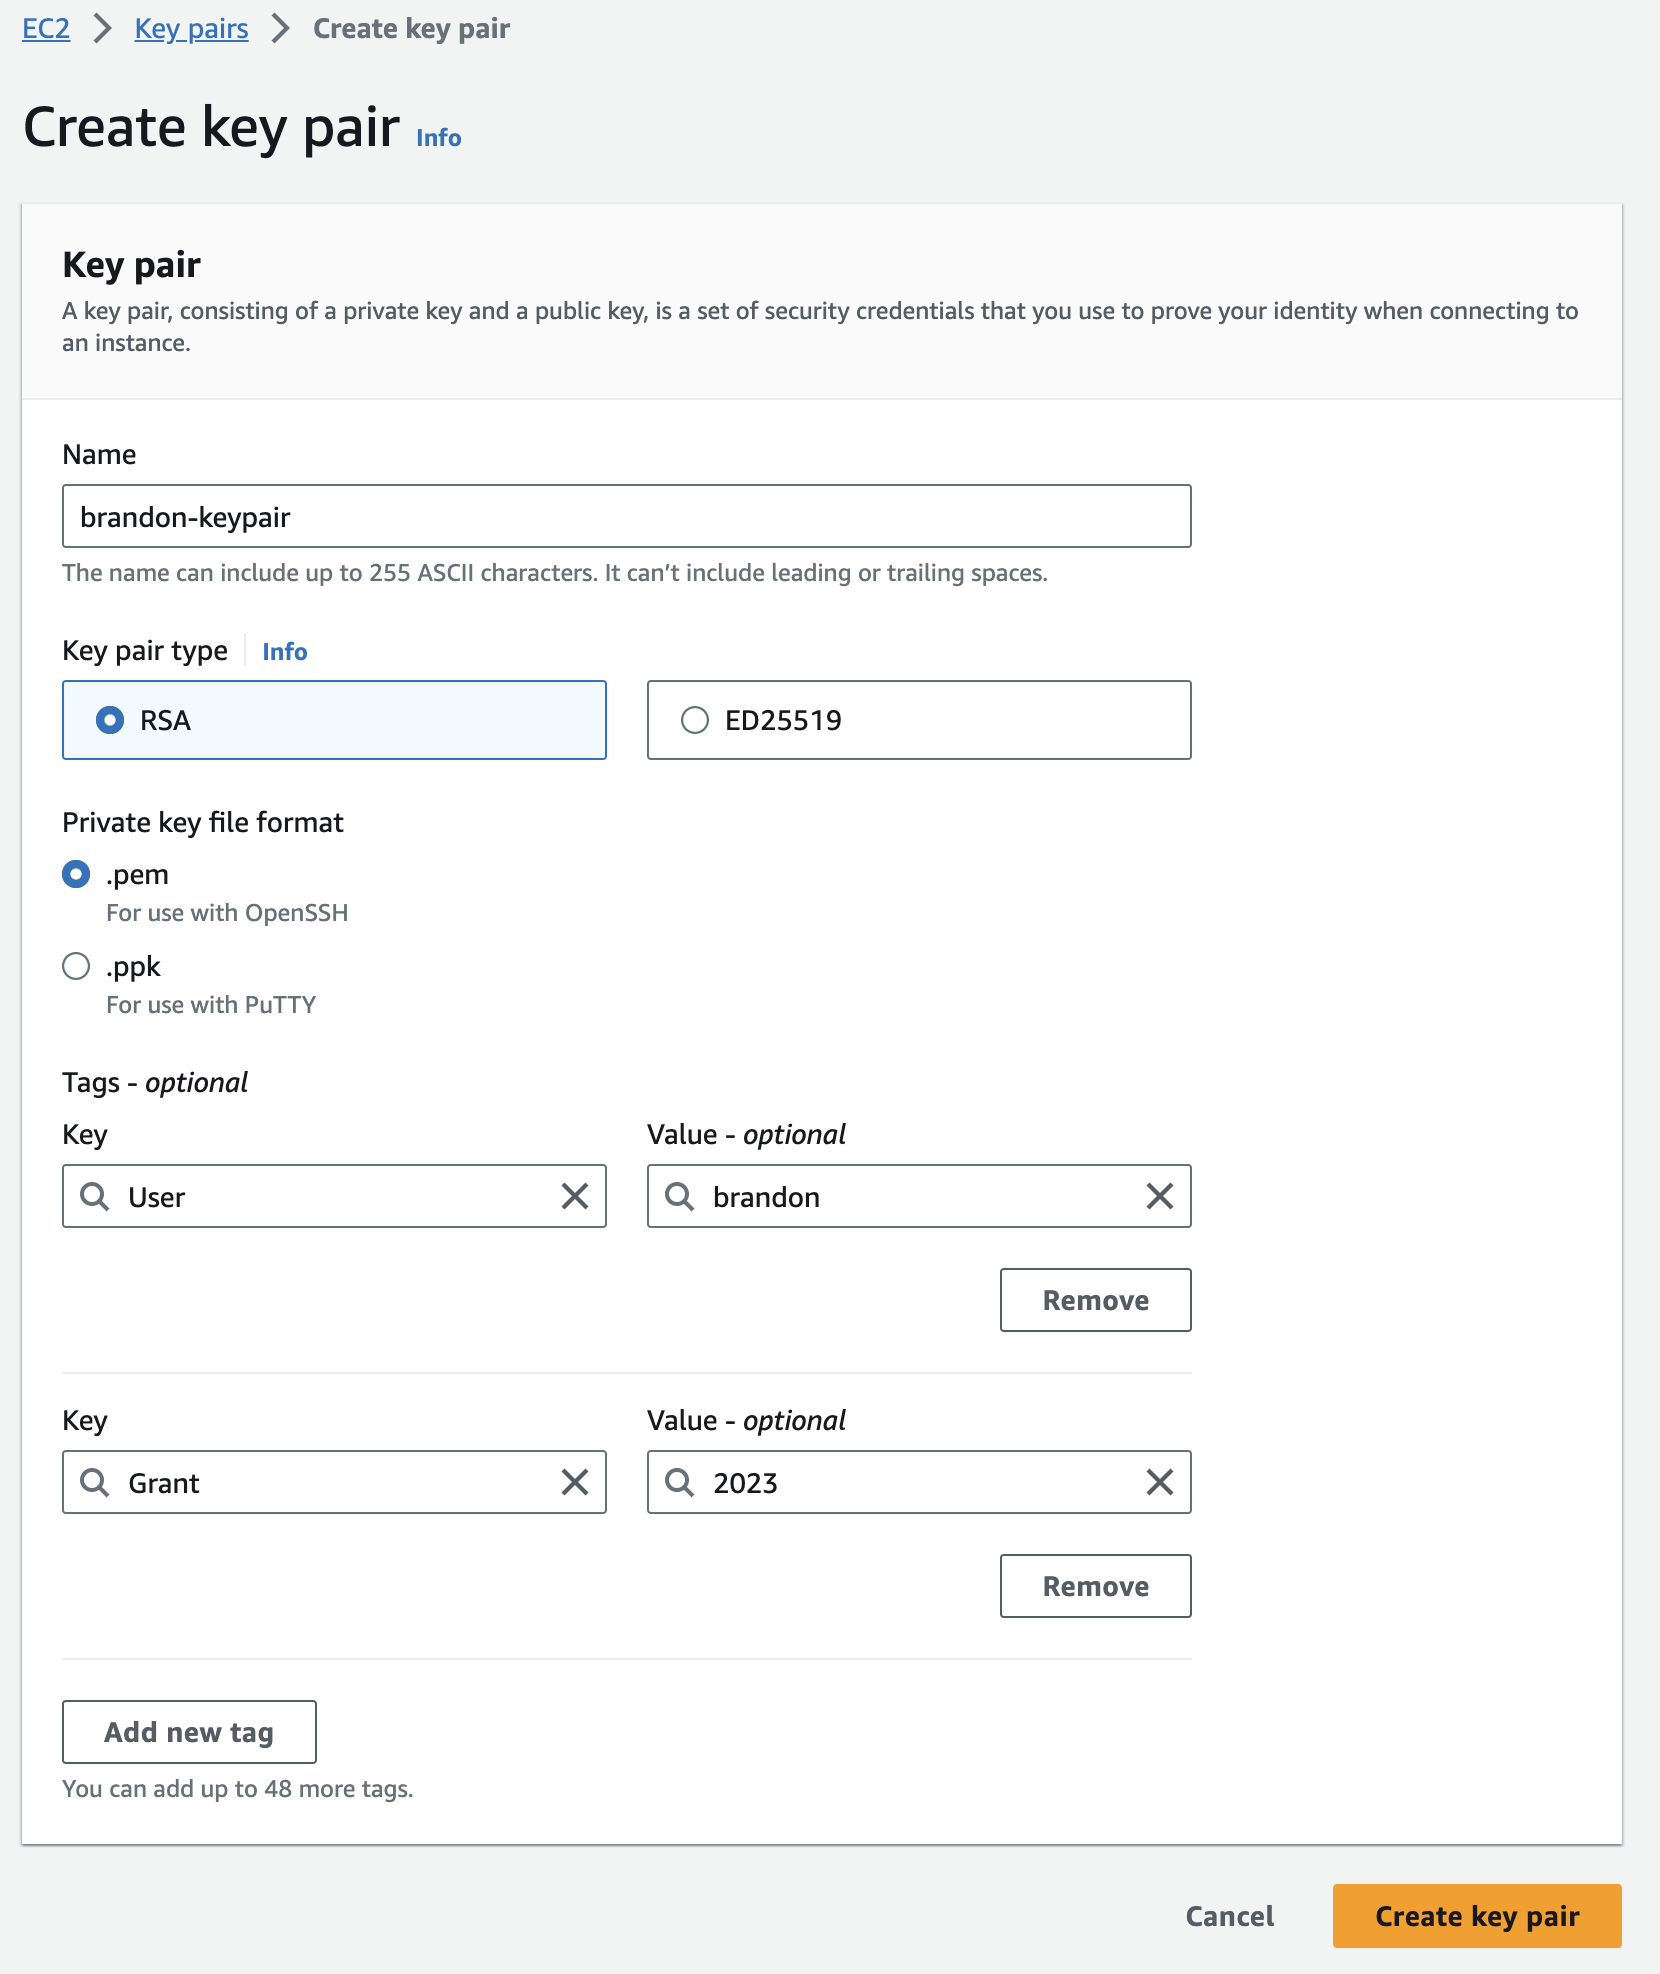
- Add new tag 를 클릭합니다. 나중에 자세히 설명하겠지만 태그는 AWS에서 리소스를 추적하는 효율적인 방법입니다. 이 리소스에 User(이니셜 입력)와 Grant(숫자를 입력하되 일관성 있게 입력)이라는 두 개의 태그를 추가하겠습니다. Create key pair를 클릭합니다.
-
생성한 키 쌍이 시스템에 자동으로 다운로드됩니다. 브라우저의 안내에 따라 파일을 기본 다운로드 위치에 저장합니다. 파일이 다운로드되었는지 확인하고 파일을 찾을 수 있는지 확인합니다. 방금 다운로드한 .ppk/pem 파일의 전체 경로를 기억하세요. 이 파일에는 향후 SSH 연결을 위한 개인 키가 포함되어 있습니다.
-
화면 상단에 Successfully created key pair라는 메시지가 표시됩니다. 생성한 키 쌍을 볼 수 있습니다.
EC2 인스턴스 실행하기
이제 EC2 Linux 기반 인스턴스를 시작합니다.
-
AWS 관리 콘솔로 돌아가서 Amazon EC2 대시보드를 엽니다.
-
AWS 관리 콘솔의 오른쪽 상단 모서리에서 원하는 AWS 지역(예: N. Virginia)에 있는지 확인합니다.
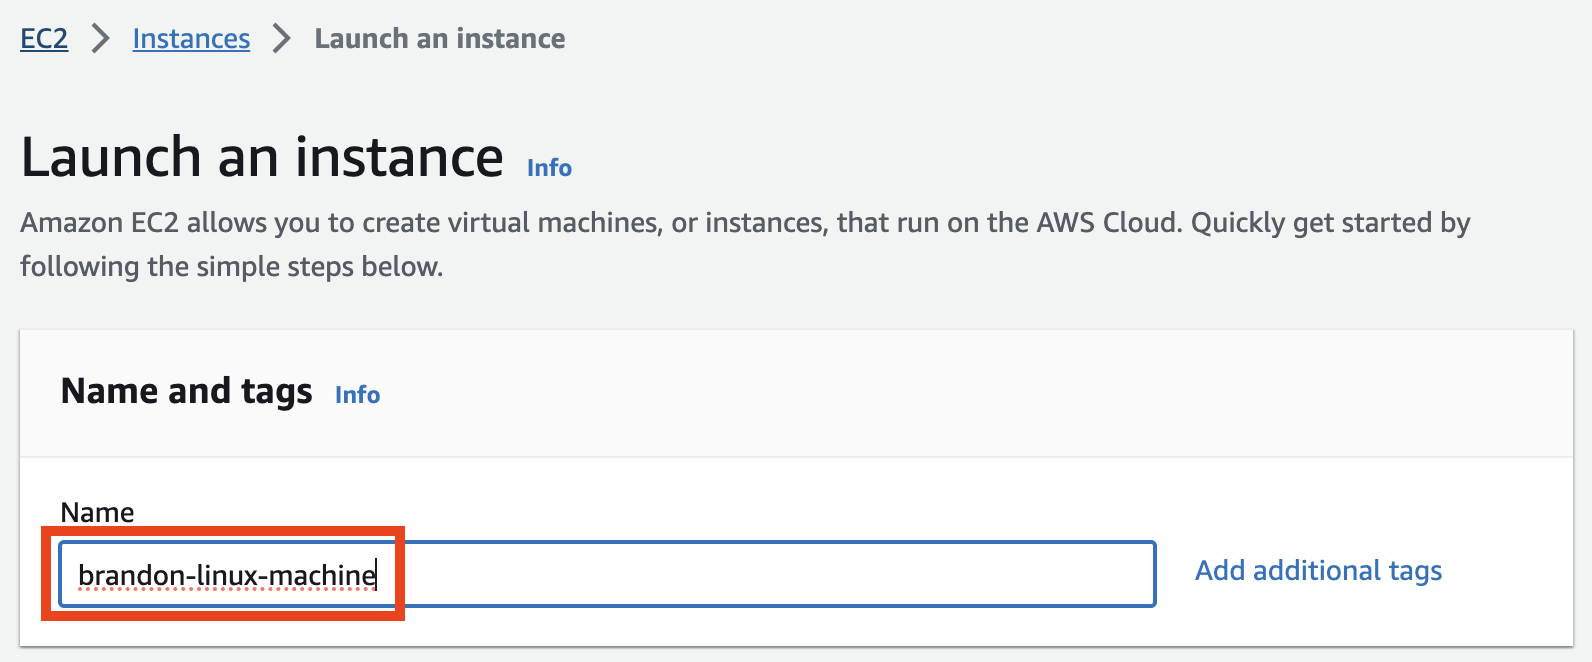
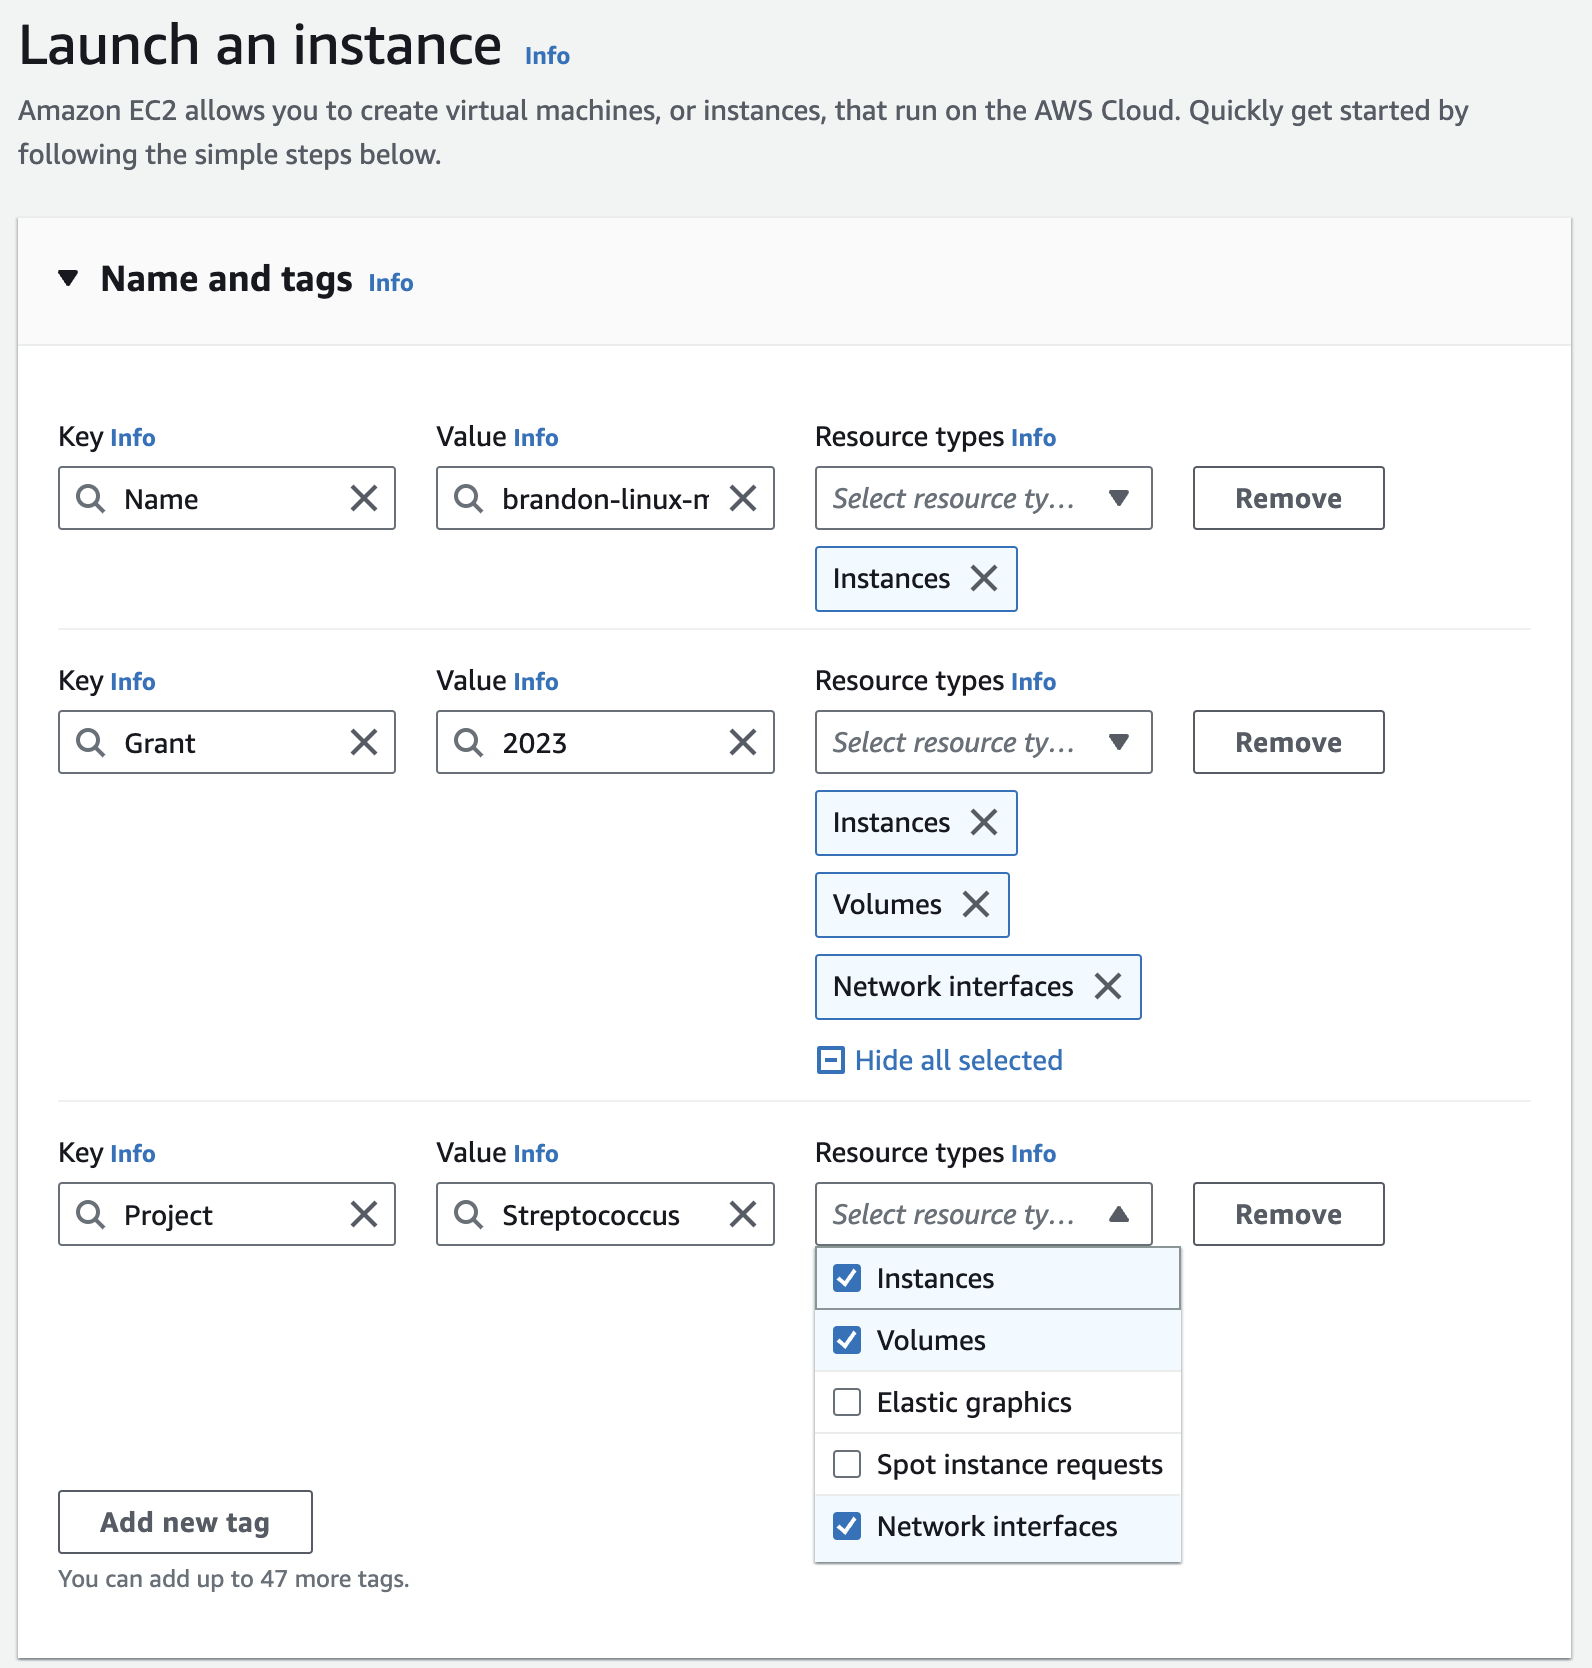
- Click on “Add additional tags” and “Add Tag”. You will find the “Name” you provided for your instance. Now enter the key and value. These keys, more correctly known as a tags, will appear in the console once the instance launches. It makes it easy to keep track of running machines in a complex environment. Create additional tags similar for the ones you used for the key pair previously - give a user and grant key to this machine, and enter the same values. When ready, select Instances, Volumes, Network interfaces under the Resource types.
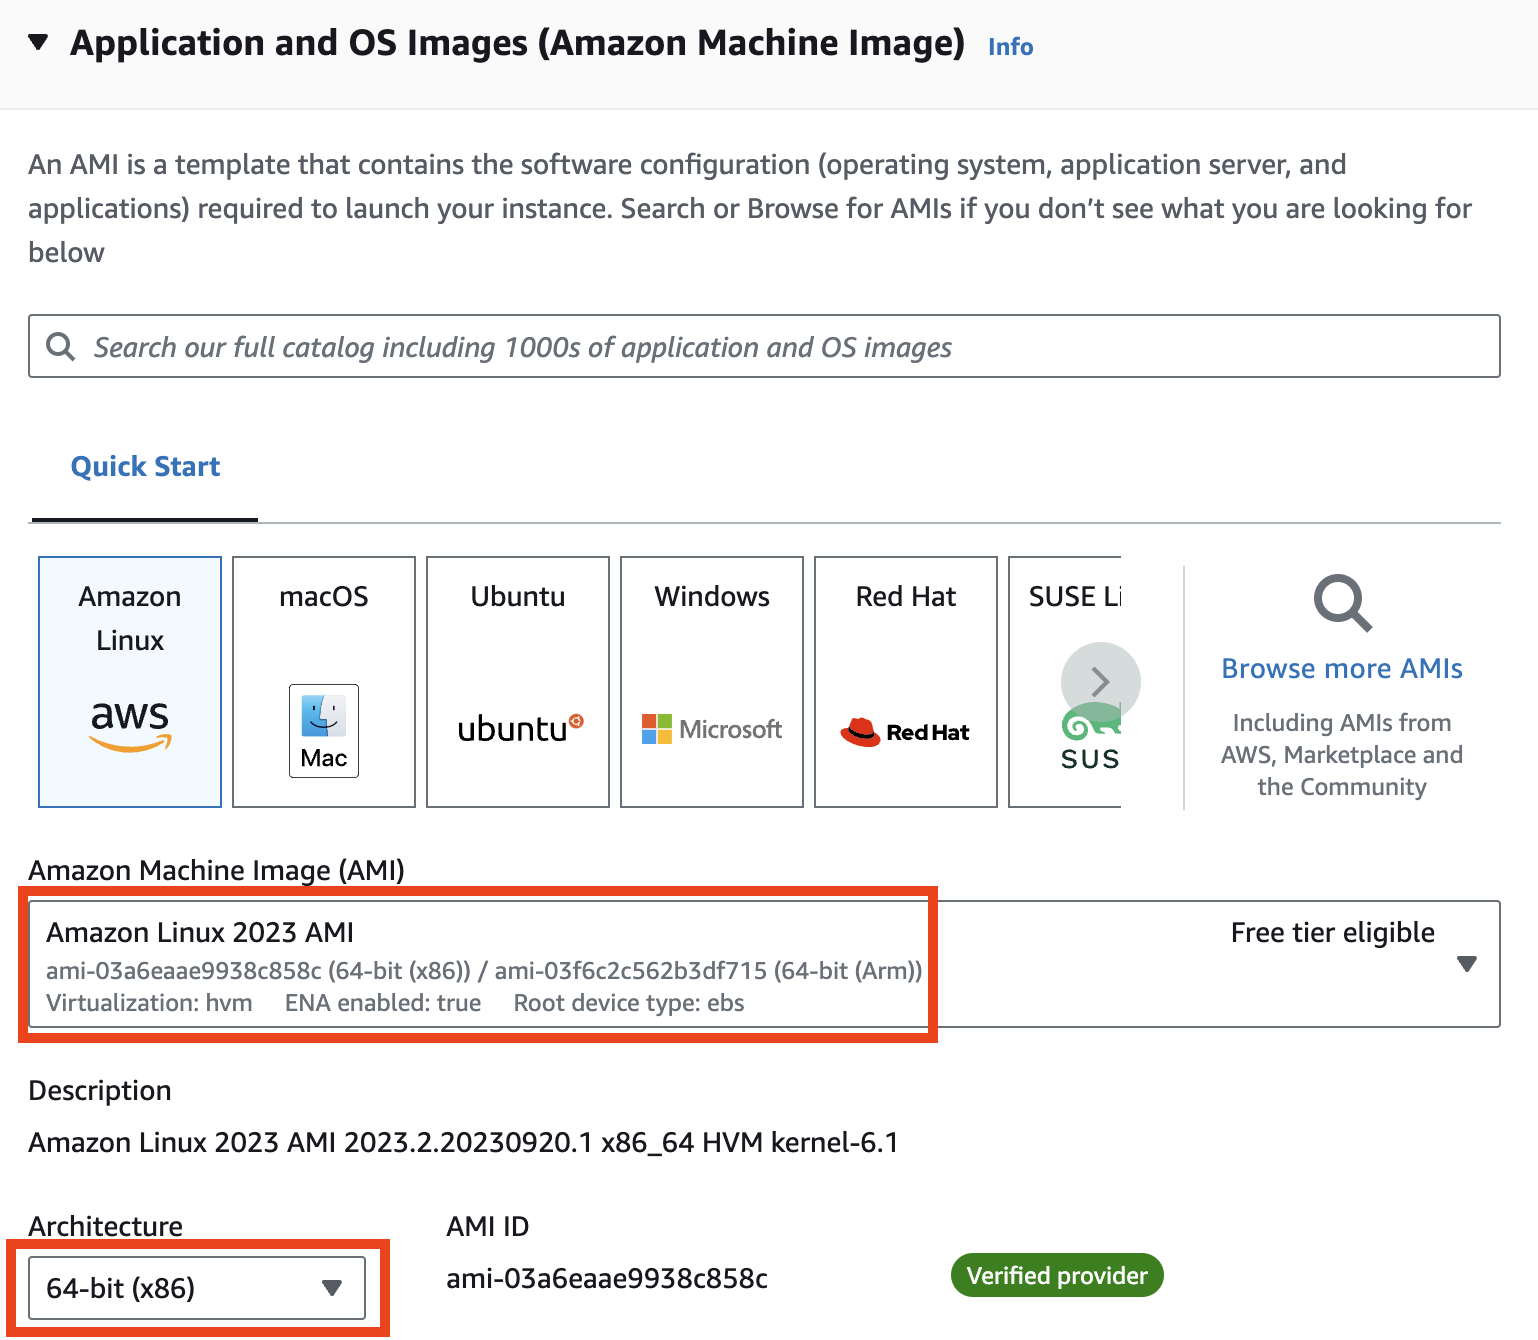
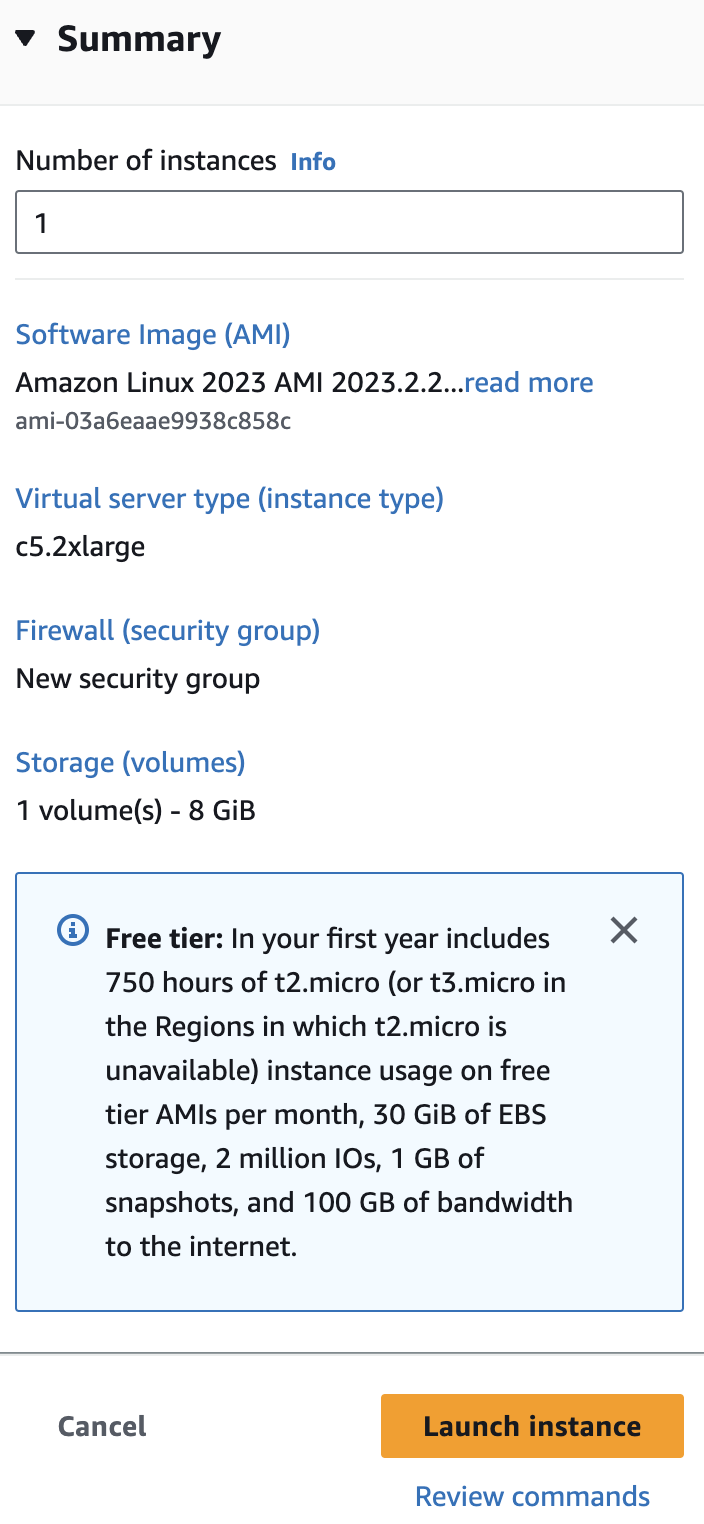
- 이제 첫 번째 Amazon Linux 2023 AMI를 선택하고 Architecture 드롭다운 목록에서 64-bit(x86)를 선택합니다.
설치된 패키지의 ami-xxxxxxxxx 레이블 및 특정 버전은 아래 이미지와 다를 수 있습니다.
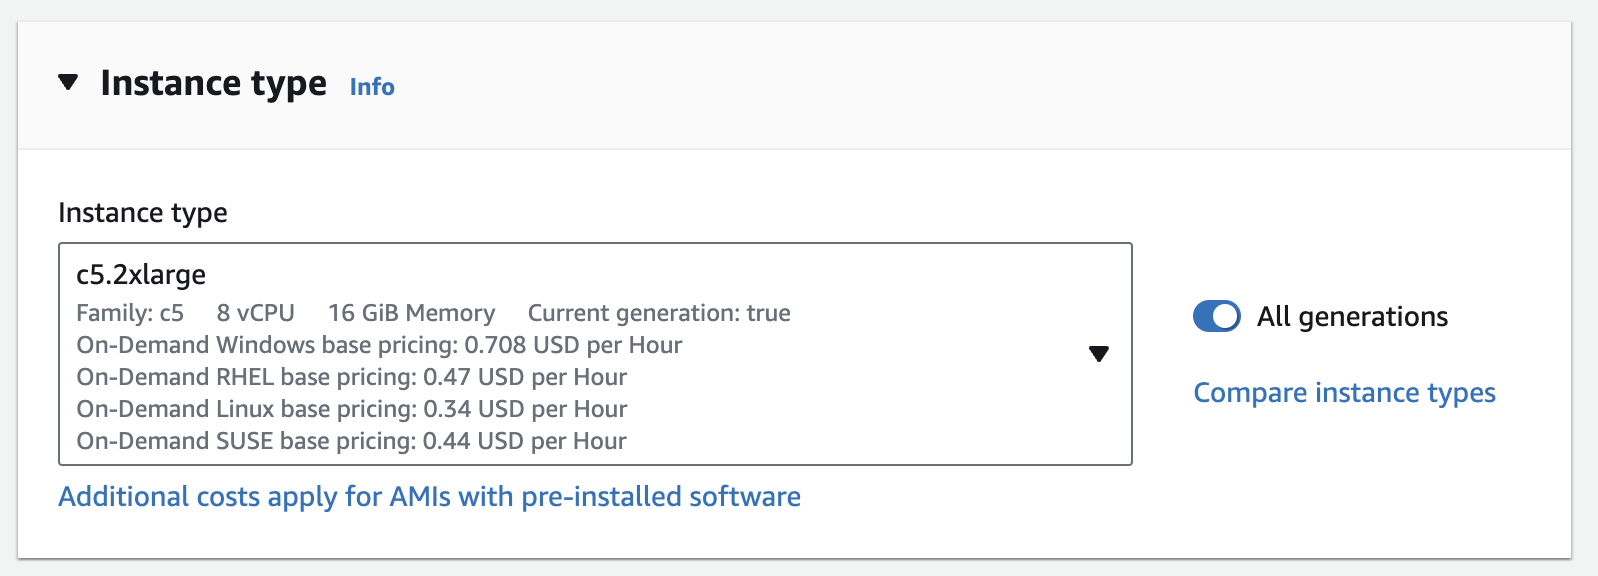
- Instance type에서 드롭다운 화살표를 클릭하고 검색창에 c5.2xlarge를 입력합니다.
일반적으로 작업/분석에 필요한 RAM 및 CPU의 양을 분석하여 이러한 인스턴스를 선택해야 합니다.
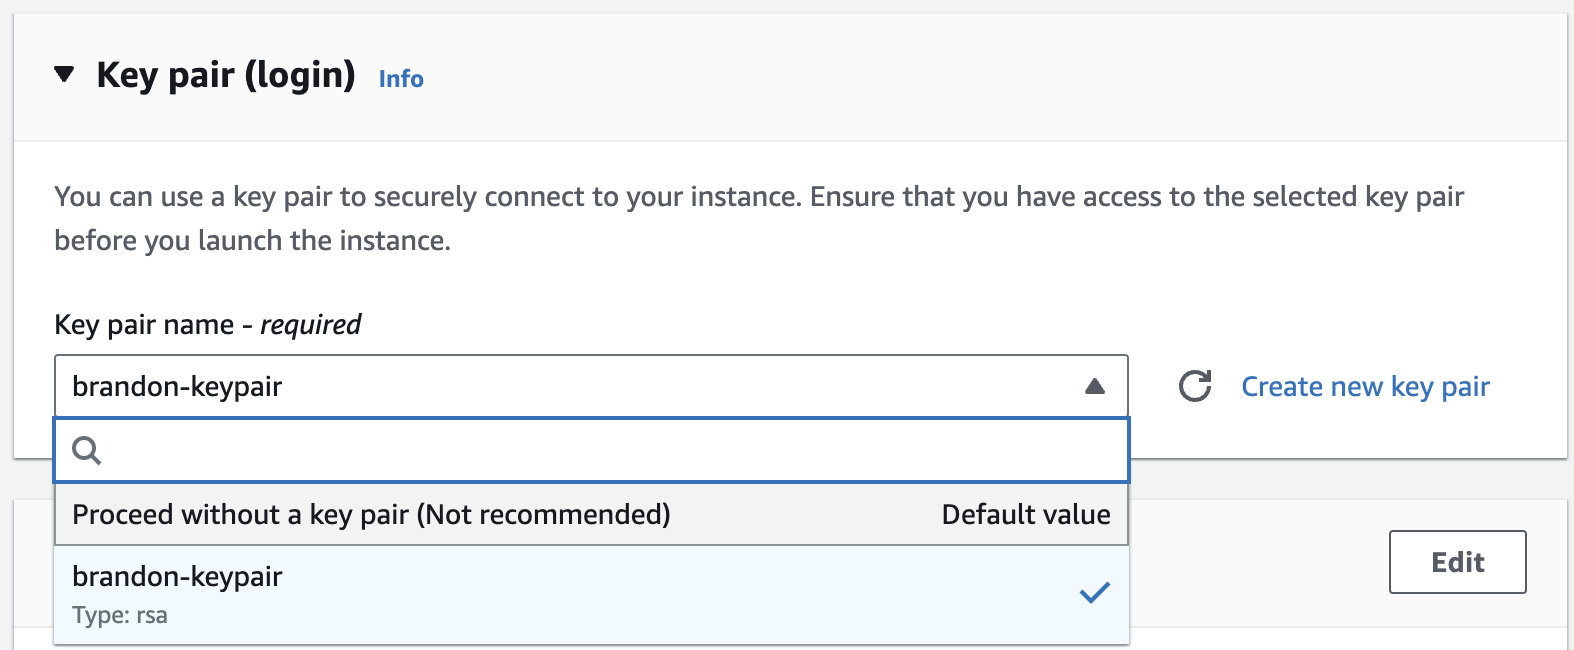
- Key pair (login) 아래의 드롭다운 목록에서 이 실습의 시작 부분에서 만든 키 쌍을 선택합니다.
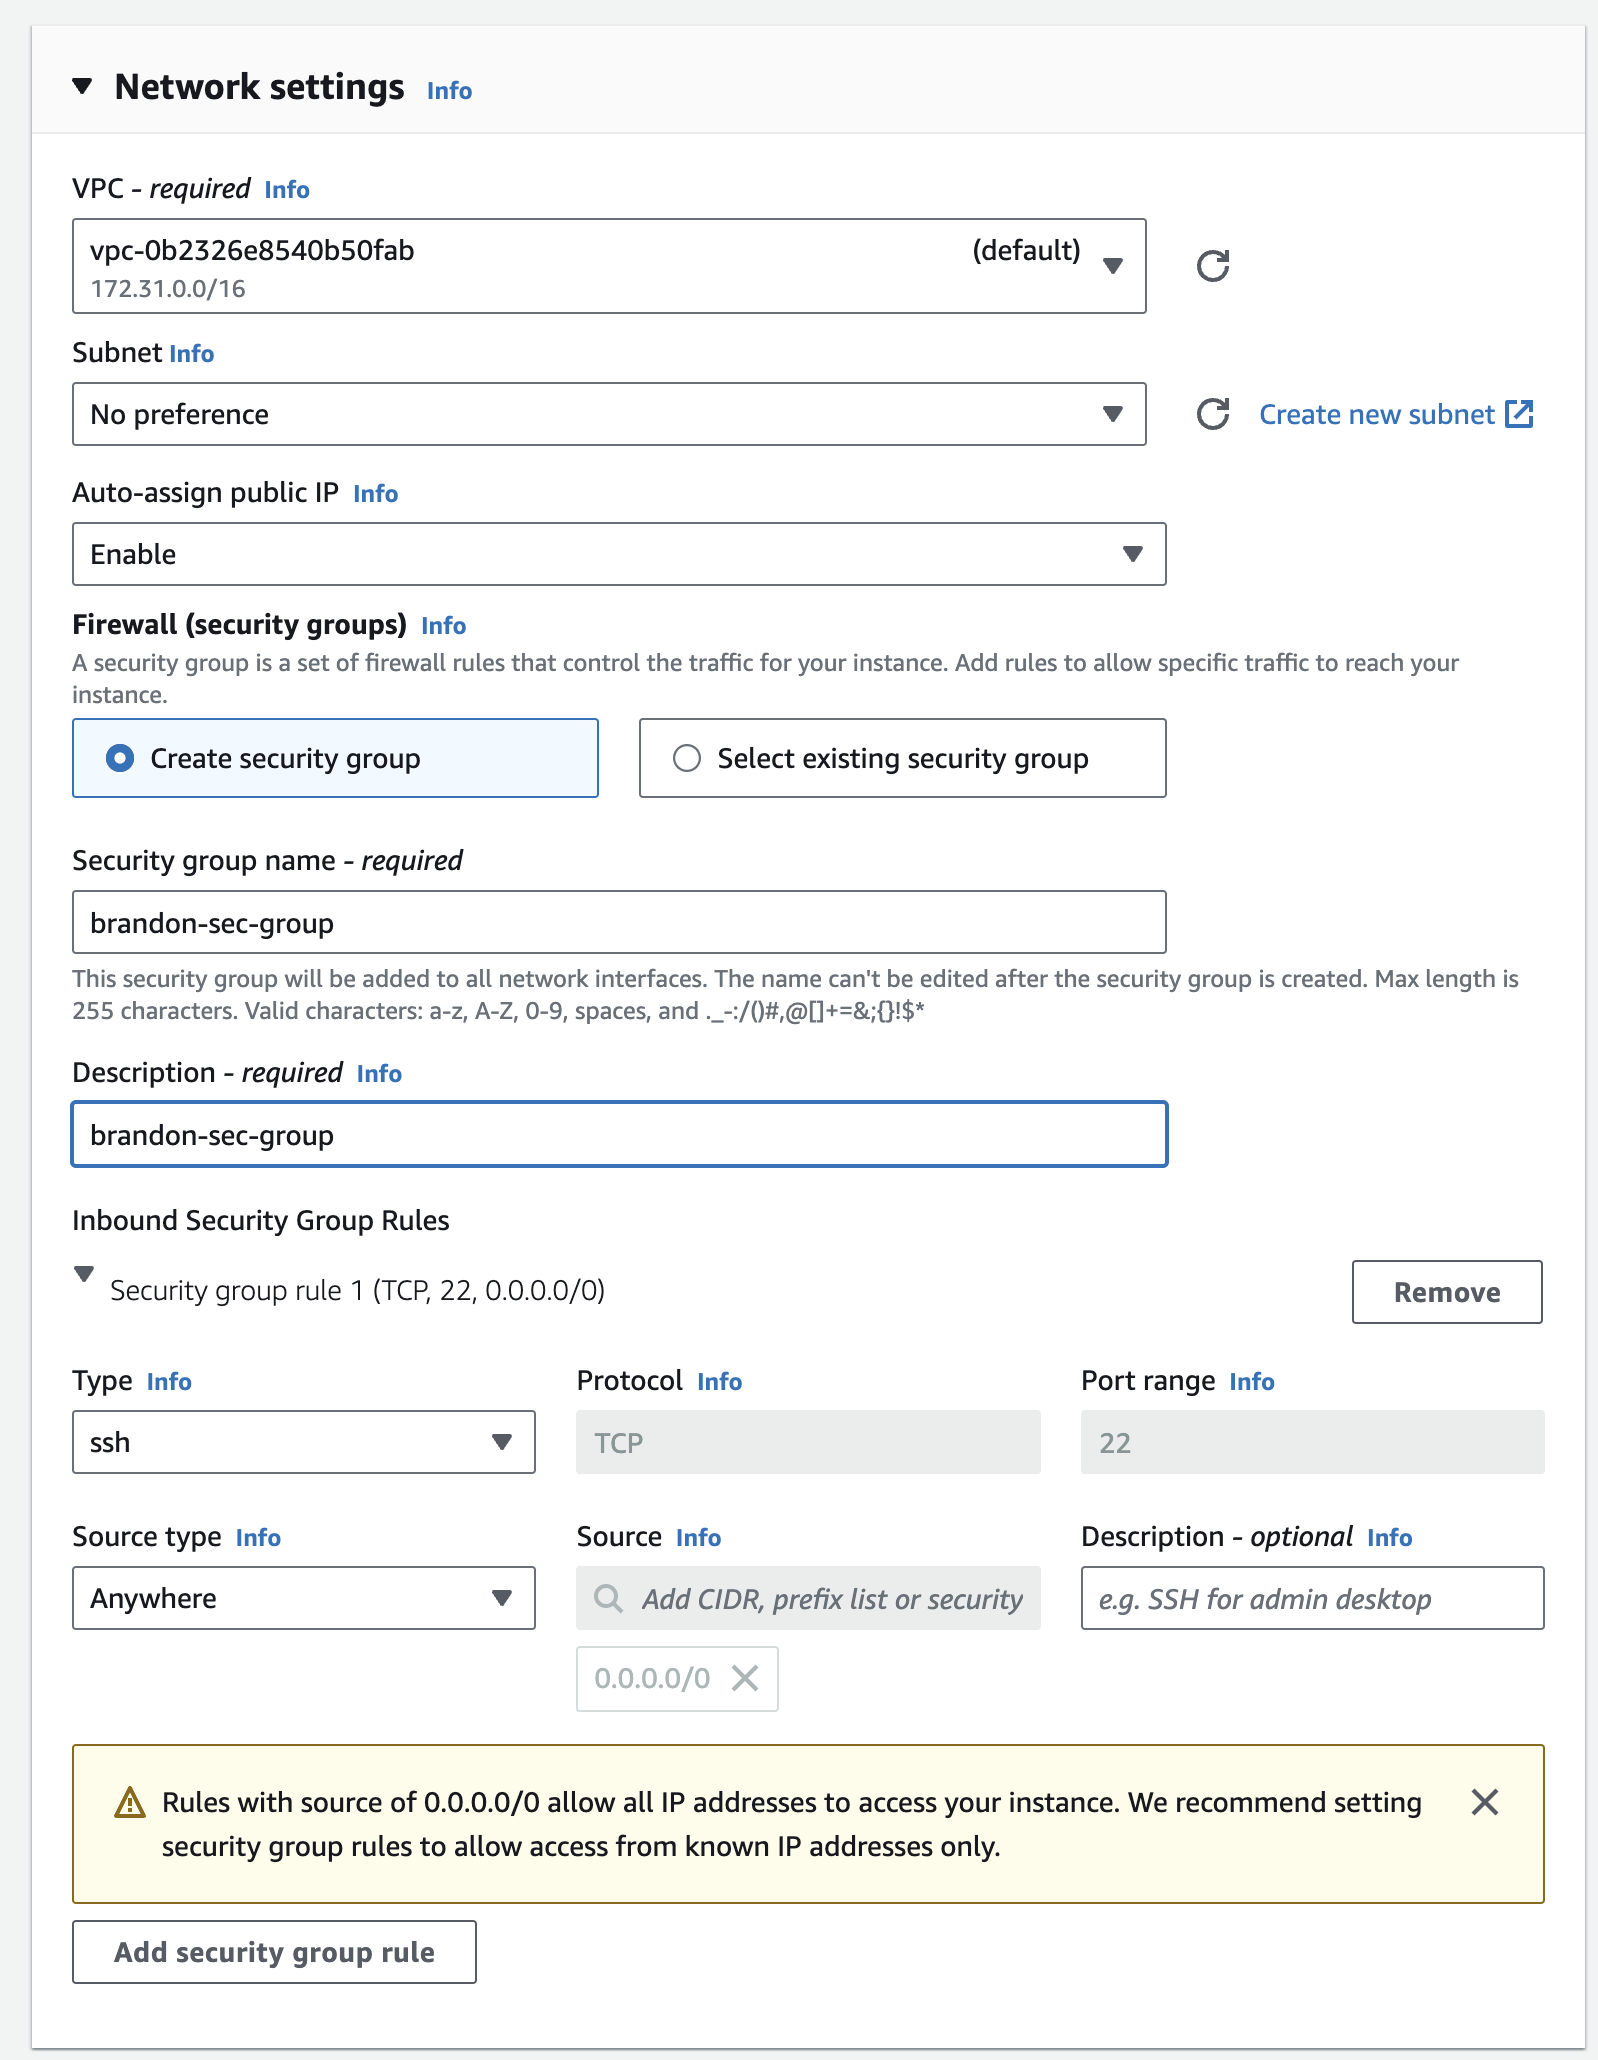
- 다음으로 Network settings 에 대해 Edit을 클릭합니다. Subnet 및 Security group 세부 정보를 입력하라는 메시지가 표시됩니다. 보안 그룹은 방화벽 규칙이 됩니다.
a. 서브넷(Subnet) 필드는 특정 가용 영역(AZ)에서 인스턴스를 시작하도록 구성할 수 있습니다. 이 워크샵에서는 기본값을 유지하지만, 이렇게 하면 컴퓨터의 위치를 제어할 수 있습니다.
b. 새 Security group name과 Description을 입력합니다. 참고: 이 실습에서는 "[사용자 이니셜]-sec-group"을 사용합니다.
c. TCP 포트 22를 허용하는 기존 SSH 규칙이 있는지 확인합니다.
d. 어디서든 연결을 허용하려면 Source type 열 아래의 드롭다운 상자를 선택하고 0.0.0.0/0에 해당하는 Anywhere를 선택합니다.
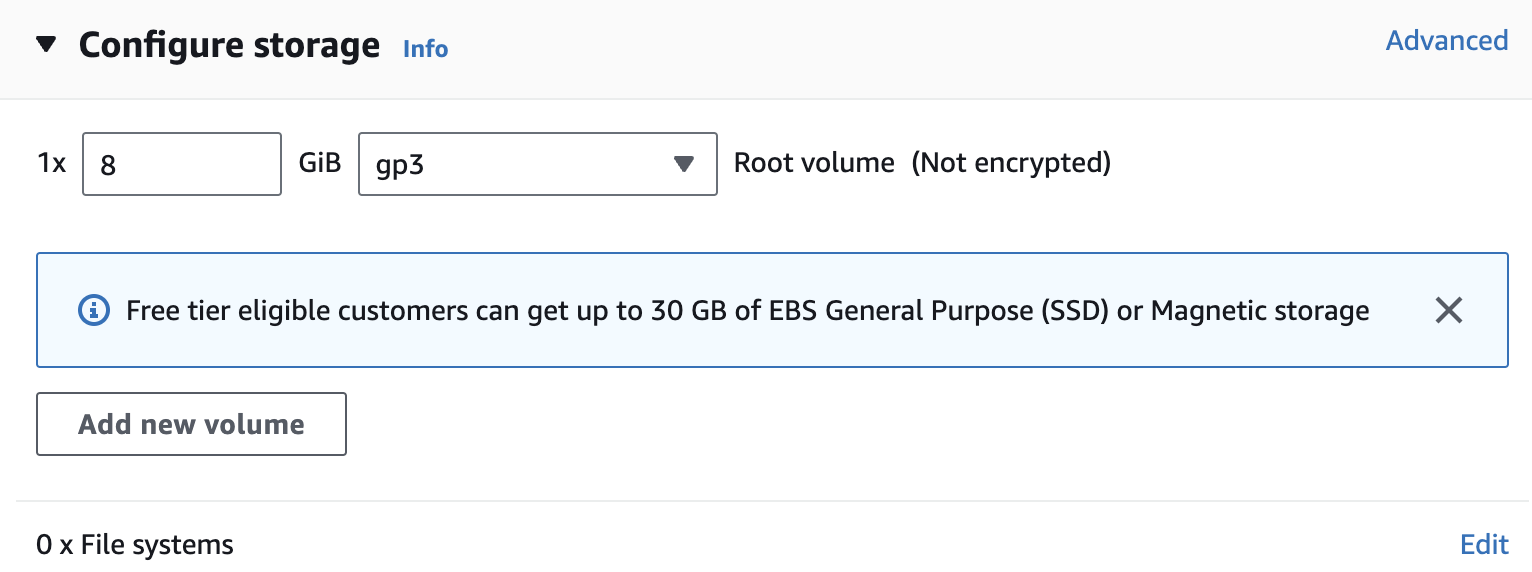
- Configure storage에서 인스턴스에 스토리지 및 디스크 드라이브를 수정하거나 추가할 수 있습니다. 이 실습에서는 스토리지 기본값을 그대로 사용하겠습니다.
- Summary에서 구성을 검토하고 Launch Instance을 클릭합니다.
이제 인스턴스가 시작되며 잠시 시간이 걸릴 수 있습니다. Successfully initiated launch of instance 라는 메시지와 함께 Launch Status 페이지가 표시됩니다.
- 페이지 오른쪽 하단에서 View all Instances를 클릭하여 EC2 인스턴스 목록을 확인합니다. 인스턴스를 클릭합니다. 초기화 프로세스를 거치게 됩니다. 인스턴스가 시작되면 Linux 서버는 물론 인스턴스가 속한 가용 영역(Availability Zone)과 공개적으로 라우팅할 수 있는 DNS 이름이 표시됩니다.
SSH into an EC2 instance
The operating system of your local computer determines the options that you have to connect from your local computer to your Linux instance. Here are directions to connect from Windows Using PuTTY or OpenSSH, From Linux & MacOS-X using ssh client and from Windows Subsystem for Linux (WSL) using ssh client.
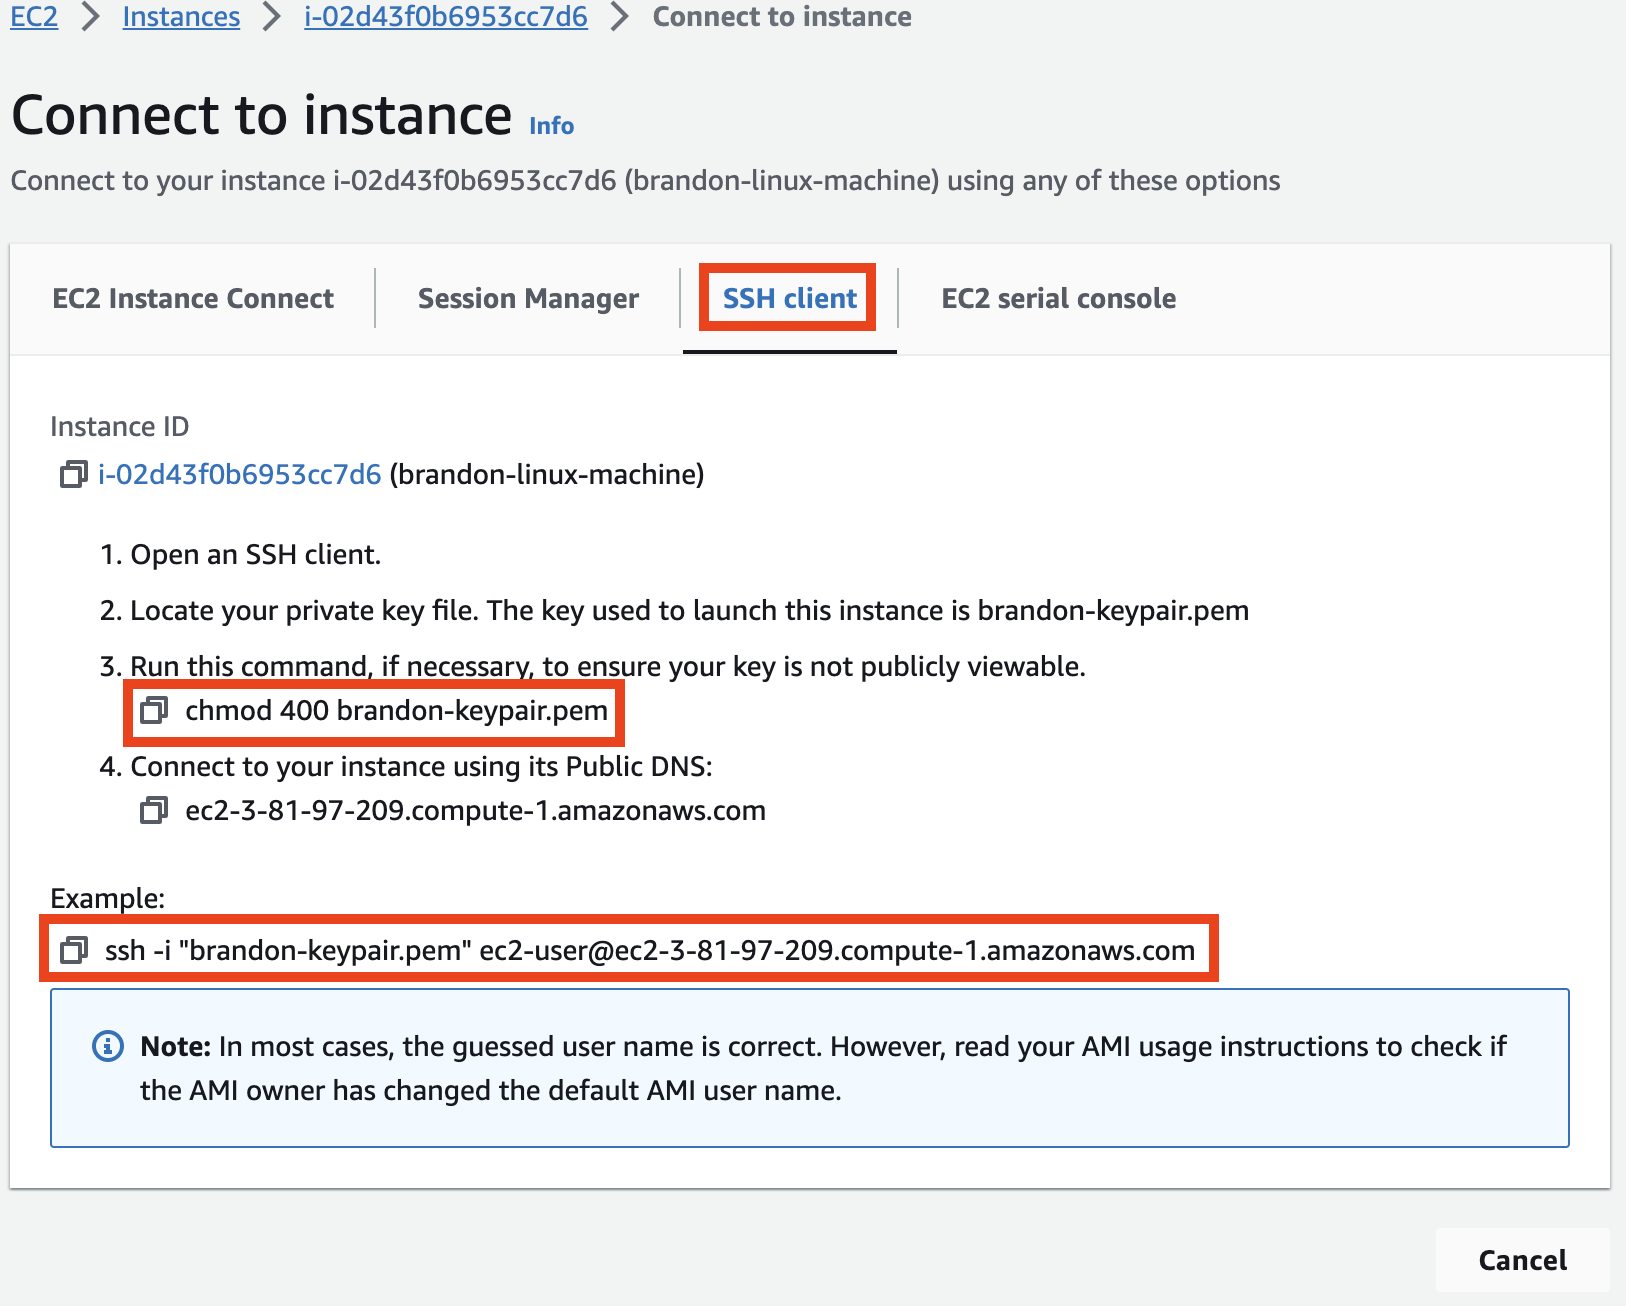
각 사용자의 OS 별로 아래의 내용을 참고하되 위와 같이 Connect 버튼을 눌러서도 쉽게 명령어를 참고할 수 있습니다.
Note: The AMI used is that of an Amazon Linux machine, so your username will be “ec2-user”
Connecting from Windows using PuTTY
We will now use the private .ppk file of the key pair generated earlier to open a SSH session to the EC2 instance.
-
Start the PuTTY application.
-
Enter in the IP address of the EC2 instance in the Host Name (or IP address) field.
-
To save the session (so we dont have to repeat the configuration everytime) provide a name in the Saved Sessions field.
-
In the left navigation pane under Connections click on SSH and next click on Auth.
-
In the Private key file for authentication field click Browse and browse in the .ppk file downloaded when creating the key pair earlier.
-
Next in the left navigation pane click on Session (scroll up if you need to) and and further click on Save to save the session.
-
Next click on Open to start the SSH session.
-
PuTTy will now attempt to start an SSH Session.
NOTE: You will get a security alert The Servers host key is not cached in the registry, click on Yes to continue.
-
You will now be presented with the login as prompt.
-
At the login as prompt type ec2-user and hit enter.
NOTE: Username to be used here is ec2-user if your image is Amazon Linux OS and ubuntu if your image is Ubuntu Linux OS.
You would have now logged into the EC2 instance on AWS.
Connecting from Windows using MobaXterm
We will use the private .pem key pair to open an SSH session to the EC2 instance.
-
Start the MobaXterm application.
-
To open a session, click on Session in the top-left corner, then click SSH.
-
Enter in the IP address of the EC2 instance in the Host Name field.
-
To the right, select username and enter your username for the session.
NOTE: Username to be used here is ec2-user if your image is Amazon Linux OS and ubuntu if your image is Ubuntu Linux OS.
-
Below, click on Advanced Settings, and select private key (use your .pem file).
-
Click Ok.
MobaXterm will have logged you in to your EC2 instance.
Connecting from Windows using Windows Subsystem for Linux
We will now use the private .pem file of the key pair generated earlier to open a SSH session to the EC2 instance.
- Copy the private key from Windows to WSL - In a WSL terminal window, copy the .pem file (for the key pair that you specified when you launched the instance) from Windows to WSL. Note the fully-qualified path to the .pem file on WSL to use when connecting to your instance.
cp /mnt/<Windows drive letter>/path/my-key-pair.pem ~/WSL-path/my-key-pair.pem
- In a terminal window, use the ssh command to connect to the instance. Specify the path and file name of the private key (.pem), the user name for your instance, and the public DNS name or IP Address.
NOTE: Username to be used here is ec2-user if your image is Amazon Linux OS and ubuntu if your image is Ubuntu Linux OS.
sudo ssh -i /path/my-key-pair.pem ec2-user@<ip-address>
You will see the following response:
The authenticity of host '<ip-address>'
can't be established.
RSA key fingerprint is 1f:51:ae:28:bf:89:e9:d8:1f:25:5d:37:2d:7d:b8:ca:9f:f5:f1:6f.
Are you sure you want to continue connecting (yes/no)?
- Enter Yes
you will now be logged into the EC2 Instance.
Connecting using SSH on Linux & MacOS and OpenSSH on Windows
We will now use the private .pem file of the key pair generated earlier to open a SSH session to the EC2 instance.
- In a terminal window, use the ssh command to connect to the instance. Specify the path and file name of the private key (.pem), the user name for your instance, and the public DNS name or IP Address of your instance.
NOTE: You might need to change the permissions of the key file by running the chmod command as follows
NOTE: Username to be used here is ec2-user if your image is Amazon Linux OS and ubuntu if your image is Ubuntu Linux OS.
chmod 400 /path/my-key-pair.pem
ssh -i /path/my-key-pair.pem ec2-user@<ip-address>
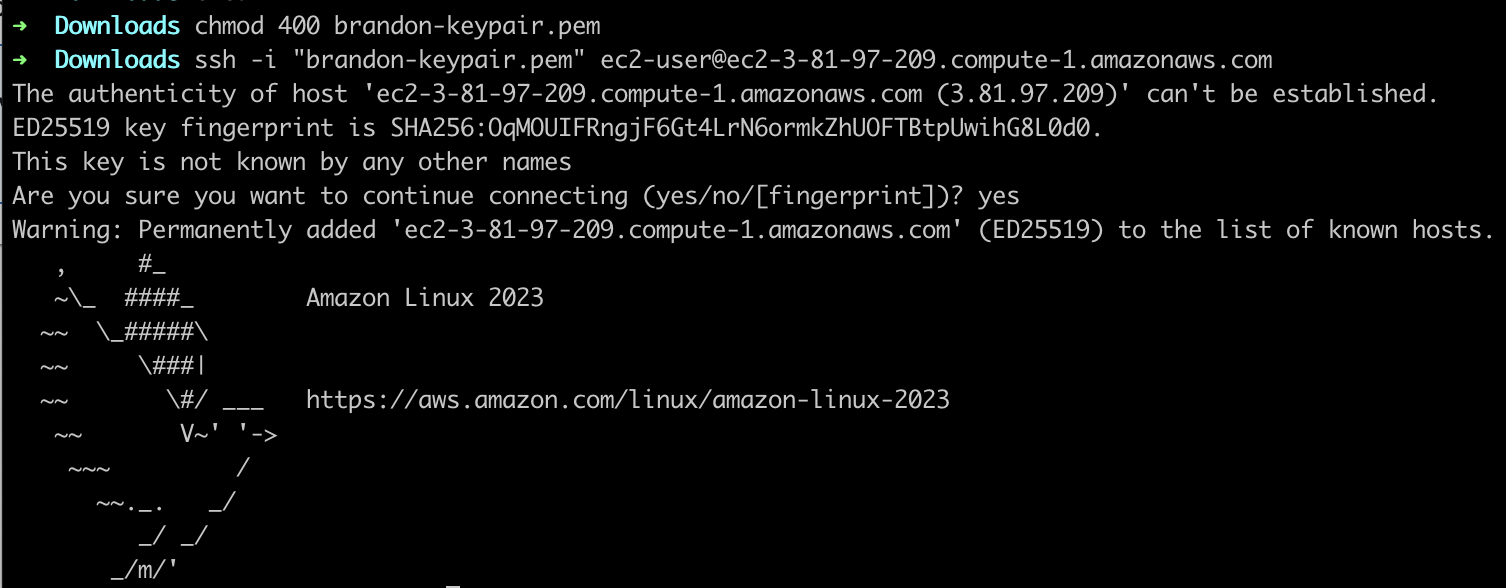
You see a response like the following:
The authenticity of host 'ec2-198-51-100-1.compute-1.amazonaws.com (198-51-100-1)' can't be established.
ECDSA key fingerprint is l4UB/neBad9tvkgJf1QZWxheQmR59WgrgzEimCG6kZY.
Are you sure you want to continue connecting (yes/no)?
- Enter Yes
You will now be logged into the Instance.
예시
For detailed directions on these please have a look at the following links:
PuTTY, Windows Susbsystem for Linux, MacOS-X ssh Client, Linux ssh client
Run Linux commands
Let us run a few Linux commands to install a few software packages. Enter the following commands, and press y and enter when necessary. The instance that we have started is completely blank and does not contain any downloaded programs or software. We will need to build it up from scratch.
From yum (nmap): just to install a network tool
sudo yum install nmap
From source (seqtk):
sudo su -
yum install git make gcccd /usr/local/src
git clone https://github.com/lh3/seqtk.git
cd seqtk/
make
Whoops! That command failed. We’re still missing something. Now install gcc zlib-devel:
yum install make gcc zlib-devel
make
Now the command should be recognized! There we go. Try seqtk again:
./seqtk
As you can see, the default “base” images are exactly that - clean initial installations of just the operating system. These are perfect for customizing so that you have exactly the software you might need - but some setup will be required. Another option is to use an AMI (Amazon Machine Image) that already has some software installed. We’ve made our lab’s AMI, which has quite a bit of genomics sofware pre-installed, available for all to use. We’ll do this in the next section.


