
EC2 instance 종료와 Volume snapshot 저장
Costs클라우드에서 are워크로드를 an실행할 important때 consideration비용은 while중요한 running고려 workloads사항입니다. on서비스에서 the비용이 cloud.발생하는 Being방식을 cognizant인식하면 about비용을 how절감하고 services효율적인 incur워크플로우를 costs채택하며 helps현재 in워크로드에 savings,더 adoption적합한 of정교한 efficient서비스를 workflows,사용하는 and데 use도움이 of됩니다. sophisticated특정 services기능과 that서비스의 are사용이 better어떻게 tailored비용 for절감으로 your이어질 current수 workload.있는지 It이해하는 is것은 a좋은 good practice to understand how the usage of specific features and services can lead to saving costs.습관입니다.
In이 this워크샵 section섹션에서는 ofAWS의 the서비스와 workshop관련된 we비용에 will대해 provide간략하게 a brief introduction to costs associated with services on AWS as well as demonstrate how costs could be saved for specific services taking services like소개하고, EC2 and및 EBS.EBS와 같은 서비스를 사용하는 특정 서비스에 대해 비용을 절감할 수 있는 방법을 보여드리겠습니다.
Exploring EC2 Instance Lifecycle
An Amazon EC2 instance인스턴스는 transitions수명 through주기 different동안 states다양한 throughout상태로 its lifecycle.전환됩니다.
To view the current instance state of an EC2 Instance:인스턴스의 현재 인스턴스 상태를 보려면 다음과 같이 하세요:
-
In theAWSManagement관리Console콘솔search검색bar, type창에 EC2를 입력합니다. -
ChooseEC2를 선택하여 EC2toDashboard를open엽니다.theEC2 Dashboard. -
In왼쪽the탐색left창에서navigationInstancespane섹션select아래의 Instancesunder를the선택합니다.Instancessection. -
To현재see인스턴스the상태를current instance state, select your확인하려면 EC2Instance인스턴스를and선택하고observe the value under theInstanceInstances statecolumn.열The아래의status값을will관찰합니다.indicate상태는Running,실행Stopped중or(Running),Terminated.중지됨(Stopped) 또는 종료됨 (Terminated)으로 표시됩니다.

Below is a diagram of an아래는 EC2 instance인스턴스 lifecycle.수명 Note주기의 that다이어그램입니다. the인스턴스 instance상태는 stateEC2를 affects사용하는 the동안 costs비용에 while영향을 using줍니다. EC2.자세한 For more information see내용은 Instance Lifecycle를 참조하세요.
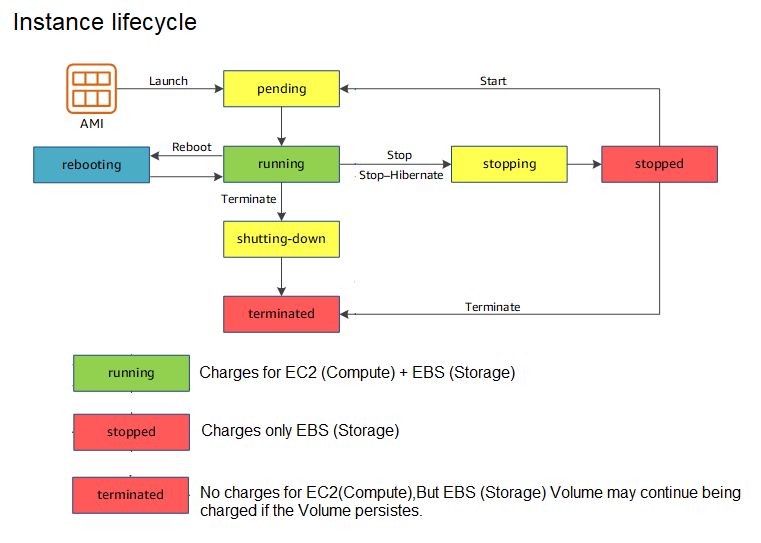
Very간단히 briefly, an설명하자면, EC2 instance인스턴스는 will실행되는 accumulate동안 cost비용이 while it is running. When you stop the누적됩니다. EC2 instance,인스턴스를 you중지하면 no더 longer이상 accumulate관련 costs비용이 associated누적되지 with it.않습니다.
However,하지만 you머신의 will스토리지에 always대한 be비용은 charged항상 for청구됩니다. the루트 storage드라이브의 on스토리지든 your루트에 machine. Whether it’s the storage on the root drive or연결된 EBS volumes볼륨이든, attached머신이 to중지되어도 your이러한 root,비용은 these중지되지 costs않습니다. do이러한 not볼륨을 stop영구적으로 when삭제할 your때만 machine중단됩니다. is또한 stopped.사용하는 They용량뿐만 will아니라 only디스크에 cease있는 when전체 you스토리지에 permanently대한 delete비용도 these지불해야 volumes.합니다. Furthermore,프로젝트에 you적합한 pay리소스를 for선택해야 the entire storage present on the disk, not just what you use. Make sure to select resources appropriate for your project.
합니다.
Detach the additional EBS Volume
-
In the AWS Management Console search bar, type EC2.
-
In the left Navigation pane click on Instances under the Instances section.
-
Select your EC2 Instance and in the Instance Details pane below, select Storage to view the Block Devices and then click on the Volume ID of your additional EBS Volume attached previously (e.g. /dev/sdh; the device name may be different in your case).
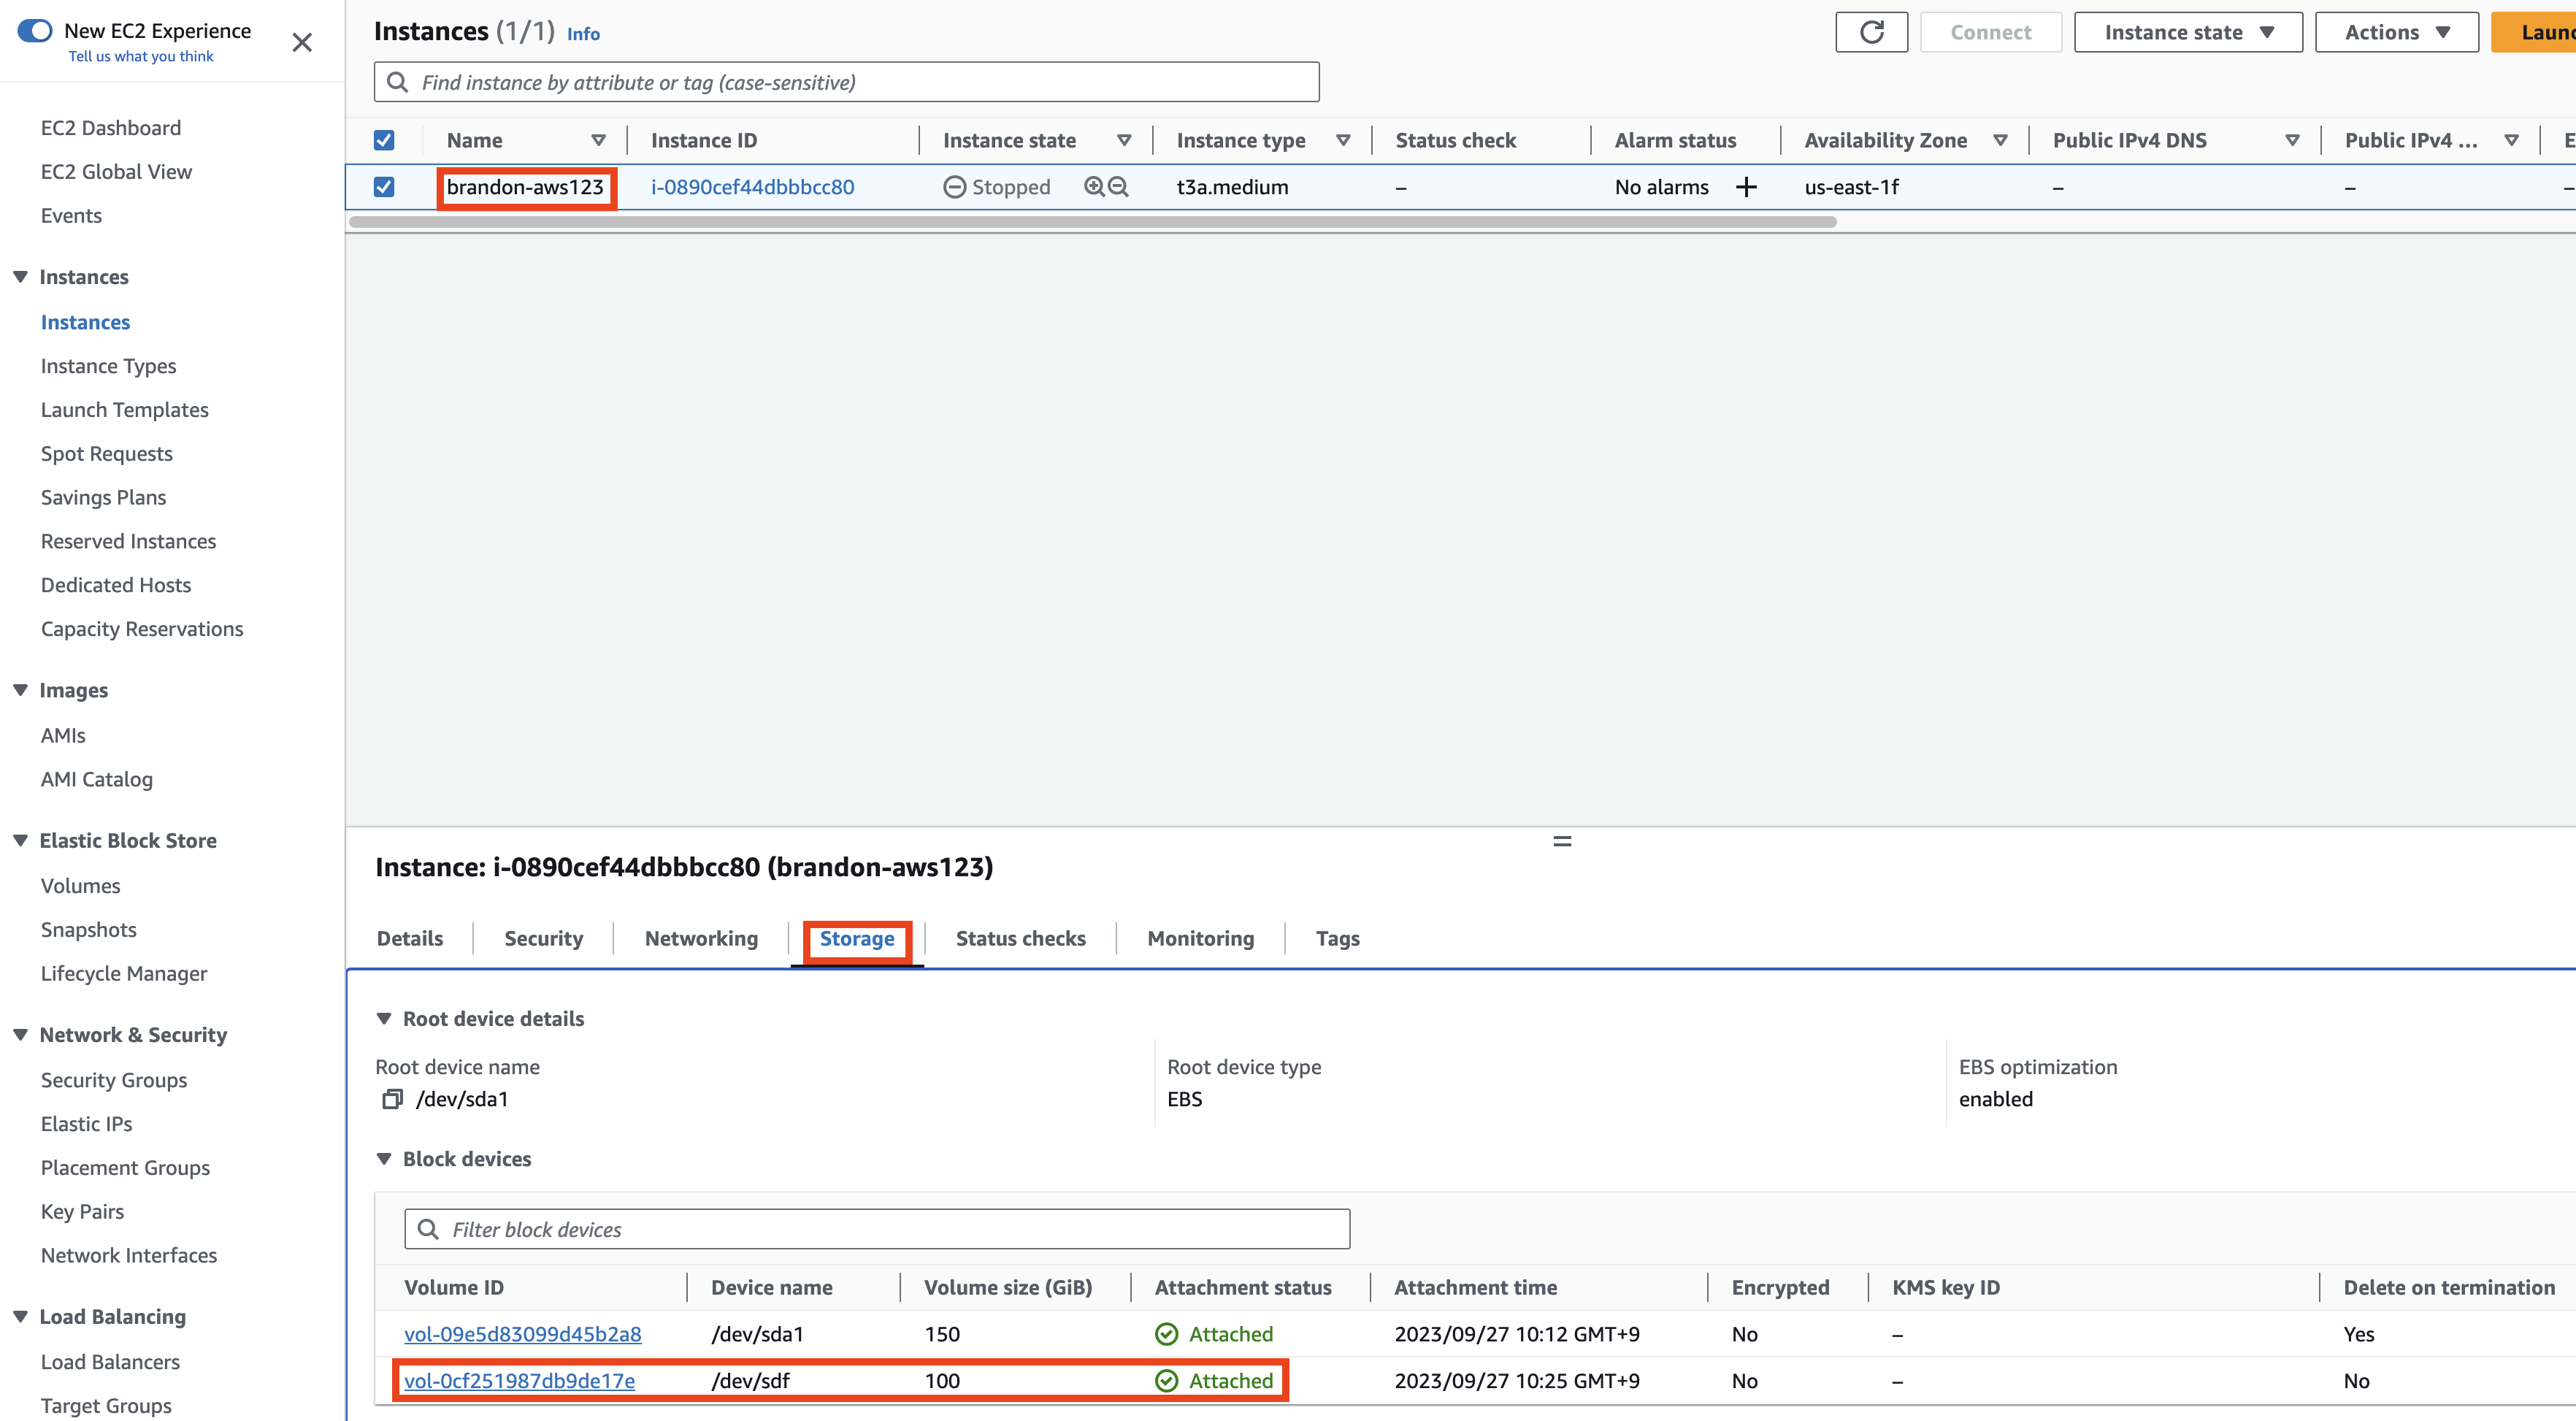
This will open the Volumes page showing the specific Volume details.
- Click on the Actions button and further click on Detach Volume to detach the volume from the EC2 Instance.
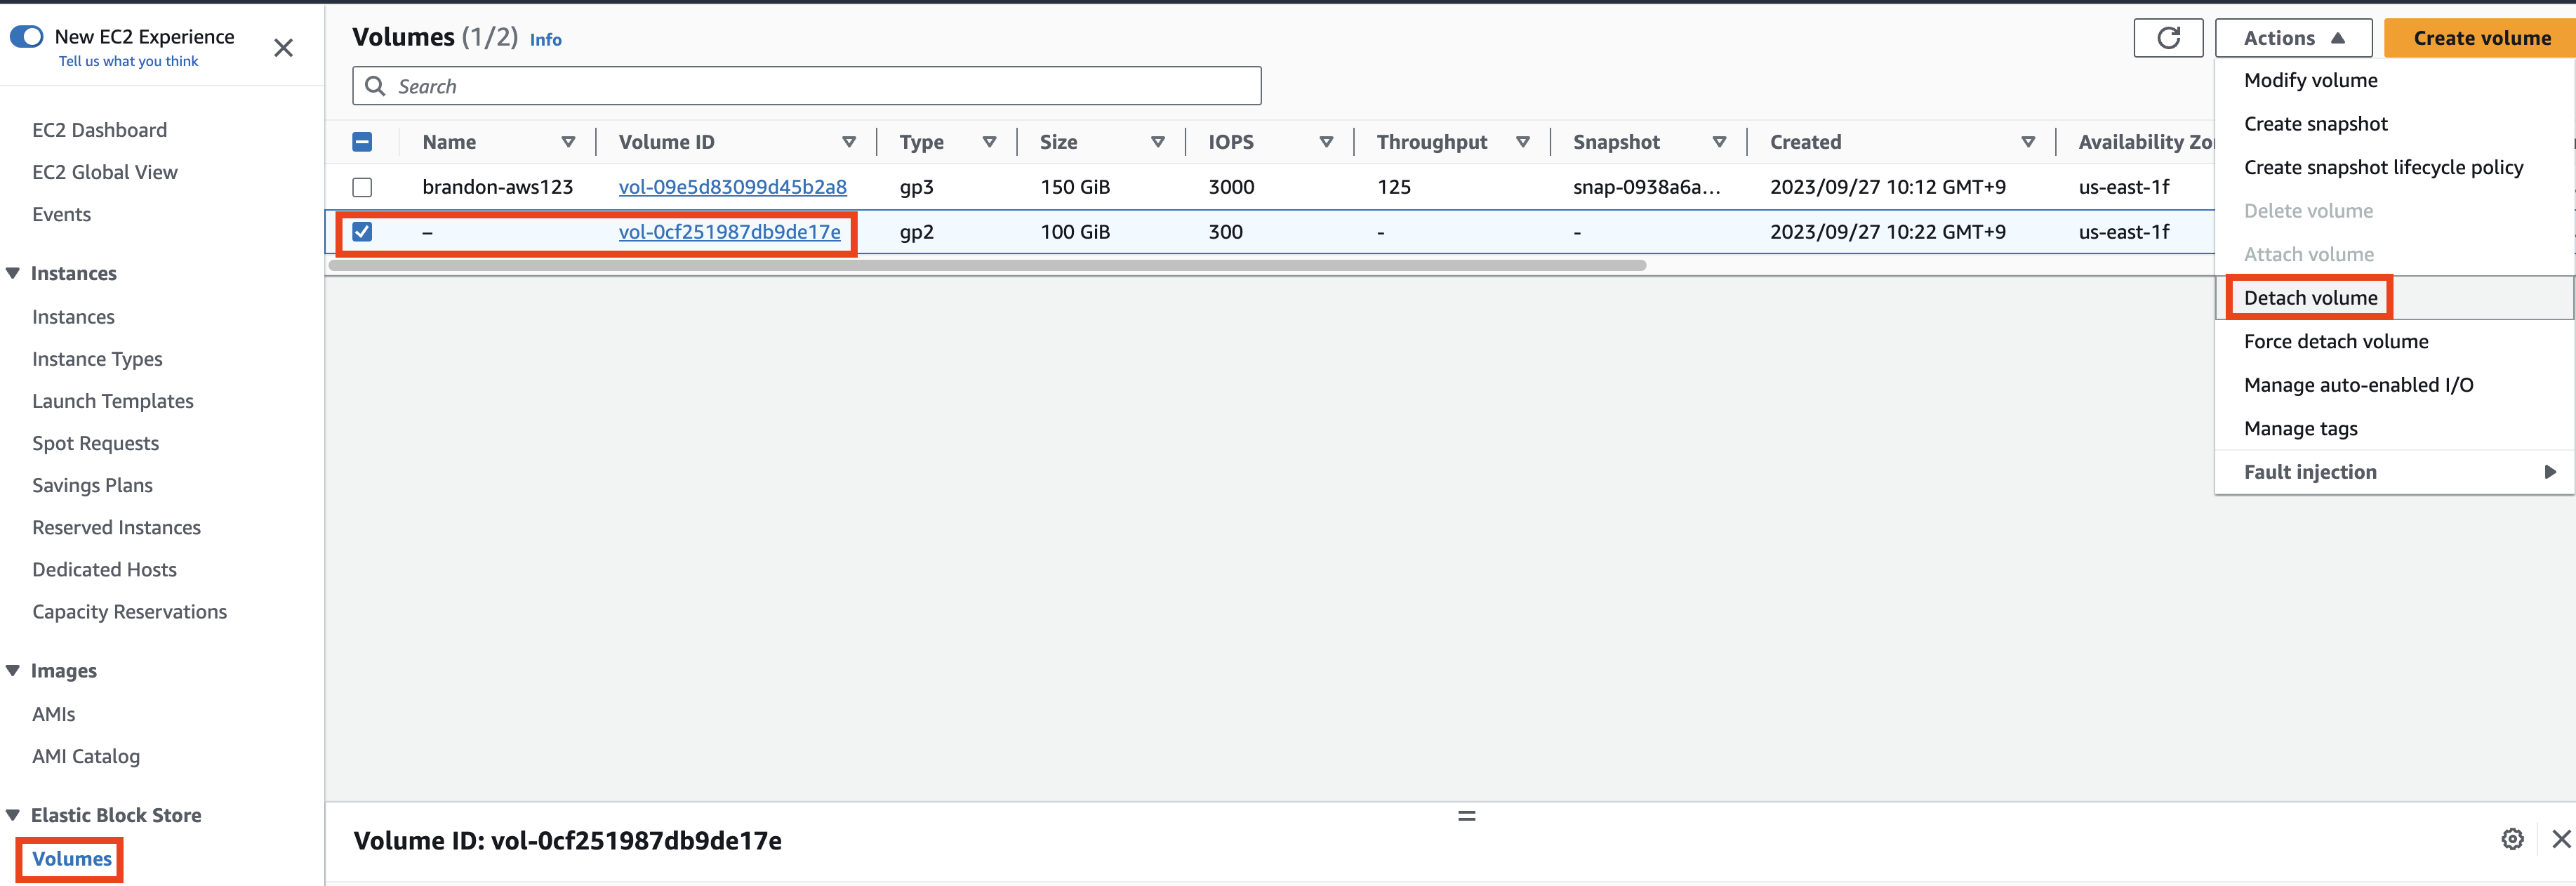
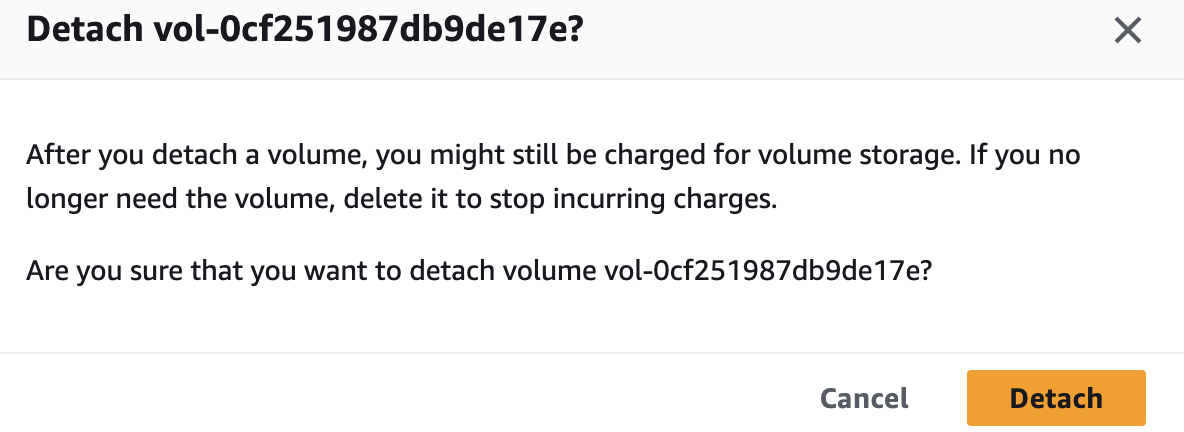
- In the Detach Volume dialog box, click Detach; the volume will now be detached and in a few moments the Status of the volume will change to available, indicating that it could be attached to another instance if required.
 Create snapshot of detached Volume
- lick on Actions, then select Create Snapshot.

- In the Create Snapshot screen, provide a Description for the Volume; this will be an identifier to search for the Snapshot of the Volume.
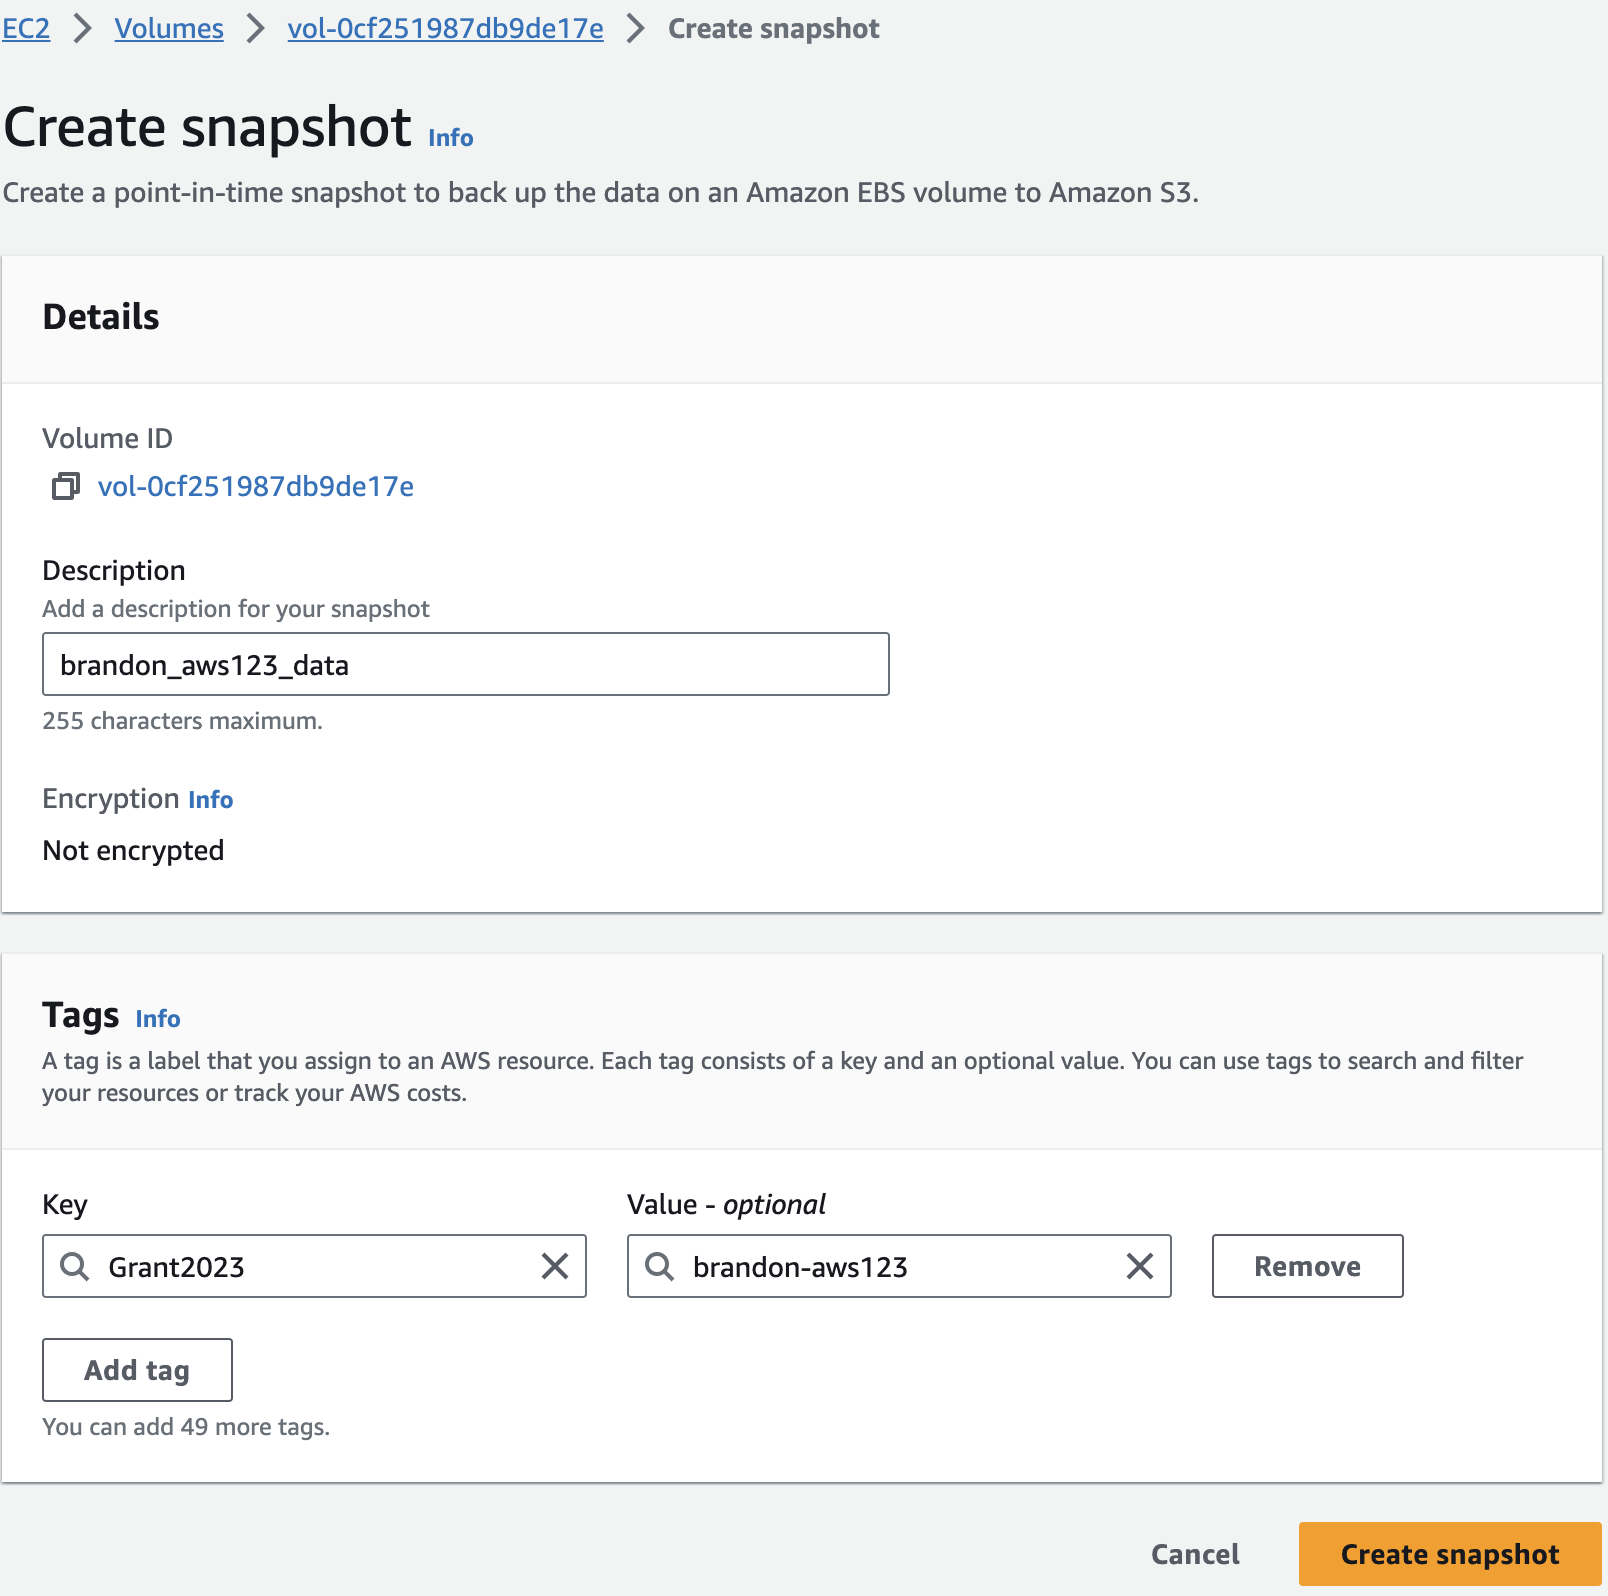
- Click on Add Tag to provide a unique name tag for better identificaiton of the snapshot. Enter “Name” in the Key field, and “[your initials]-snapshot” for the Value field. Add the “User” and “Grant” tag you’ve previously used as well.
-
Click on Create Snapshot.
-
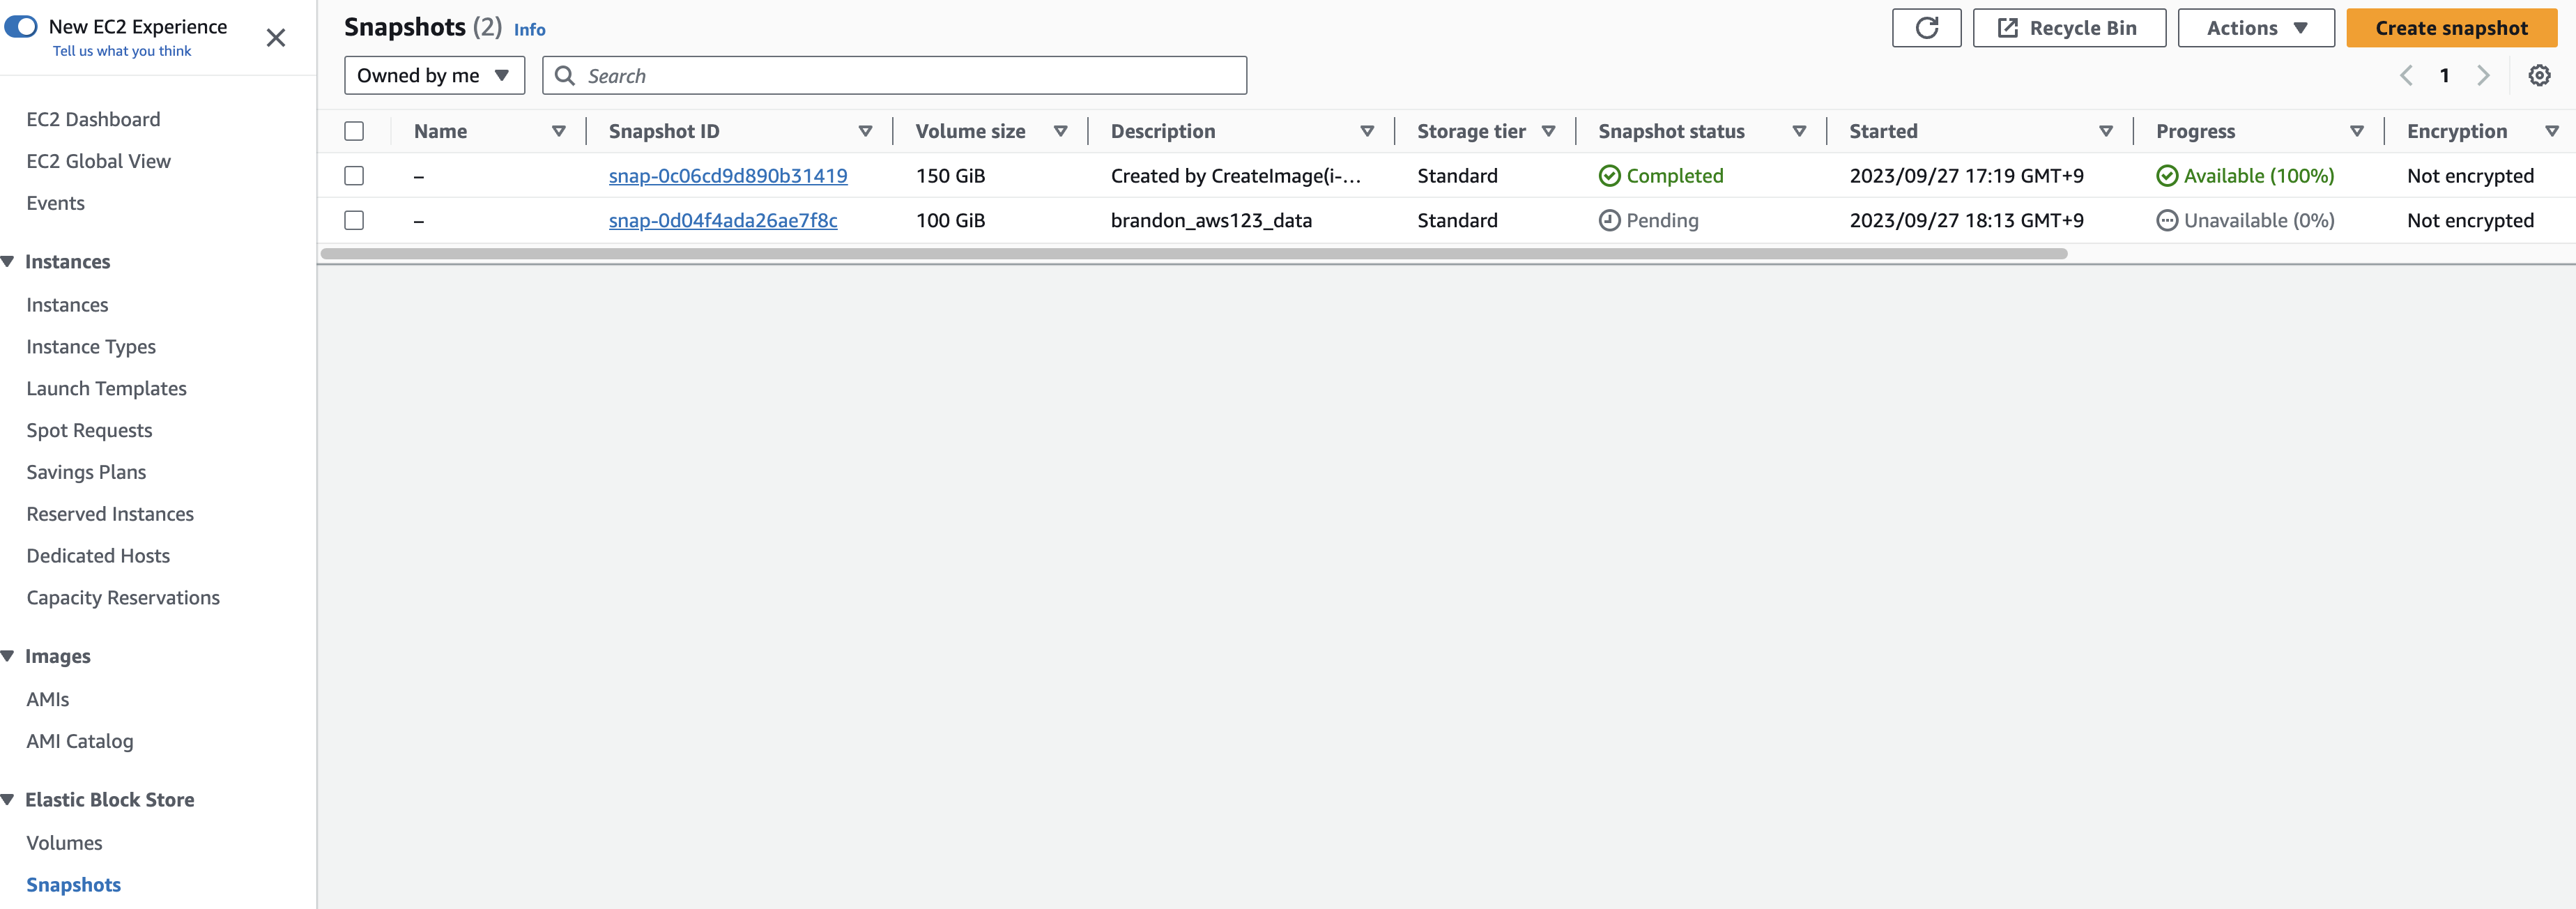
A Snapshot creation task will be started, and a message indicating the same will be displayed in a green bar on the top of the screen.
-
Click on Snapshots under the Elastic Block Store section in the left Navigation pane to view all the snapshots created.
Delete the detached Volume
Now that a Snapshot has been taken of the volume, we will delete the volume itself.
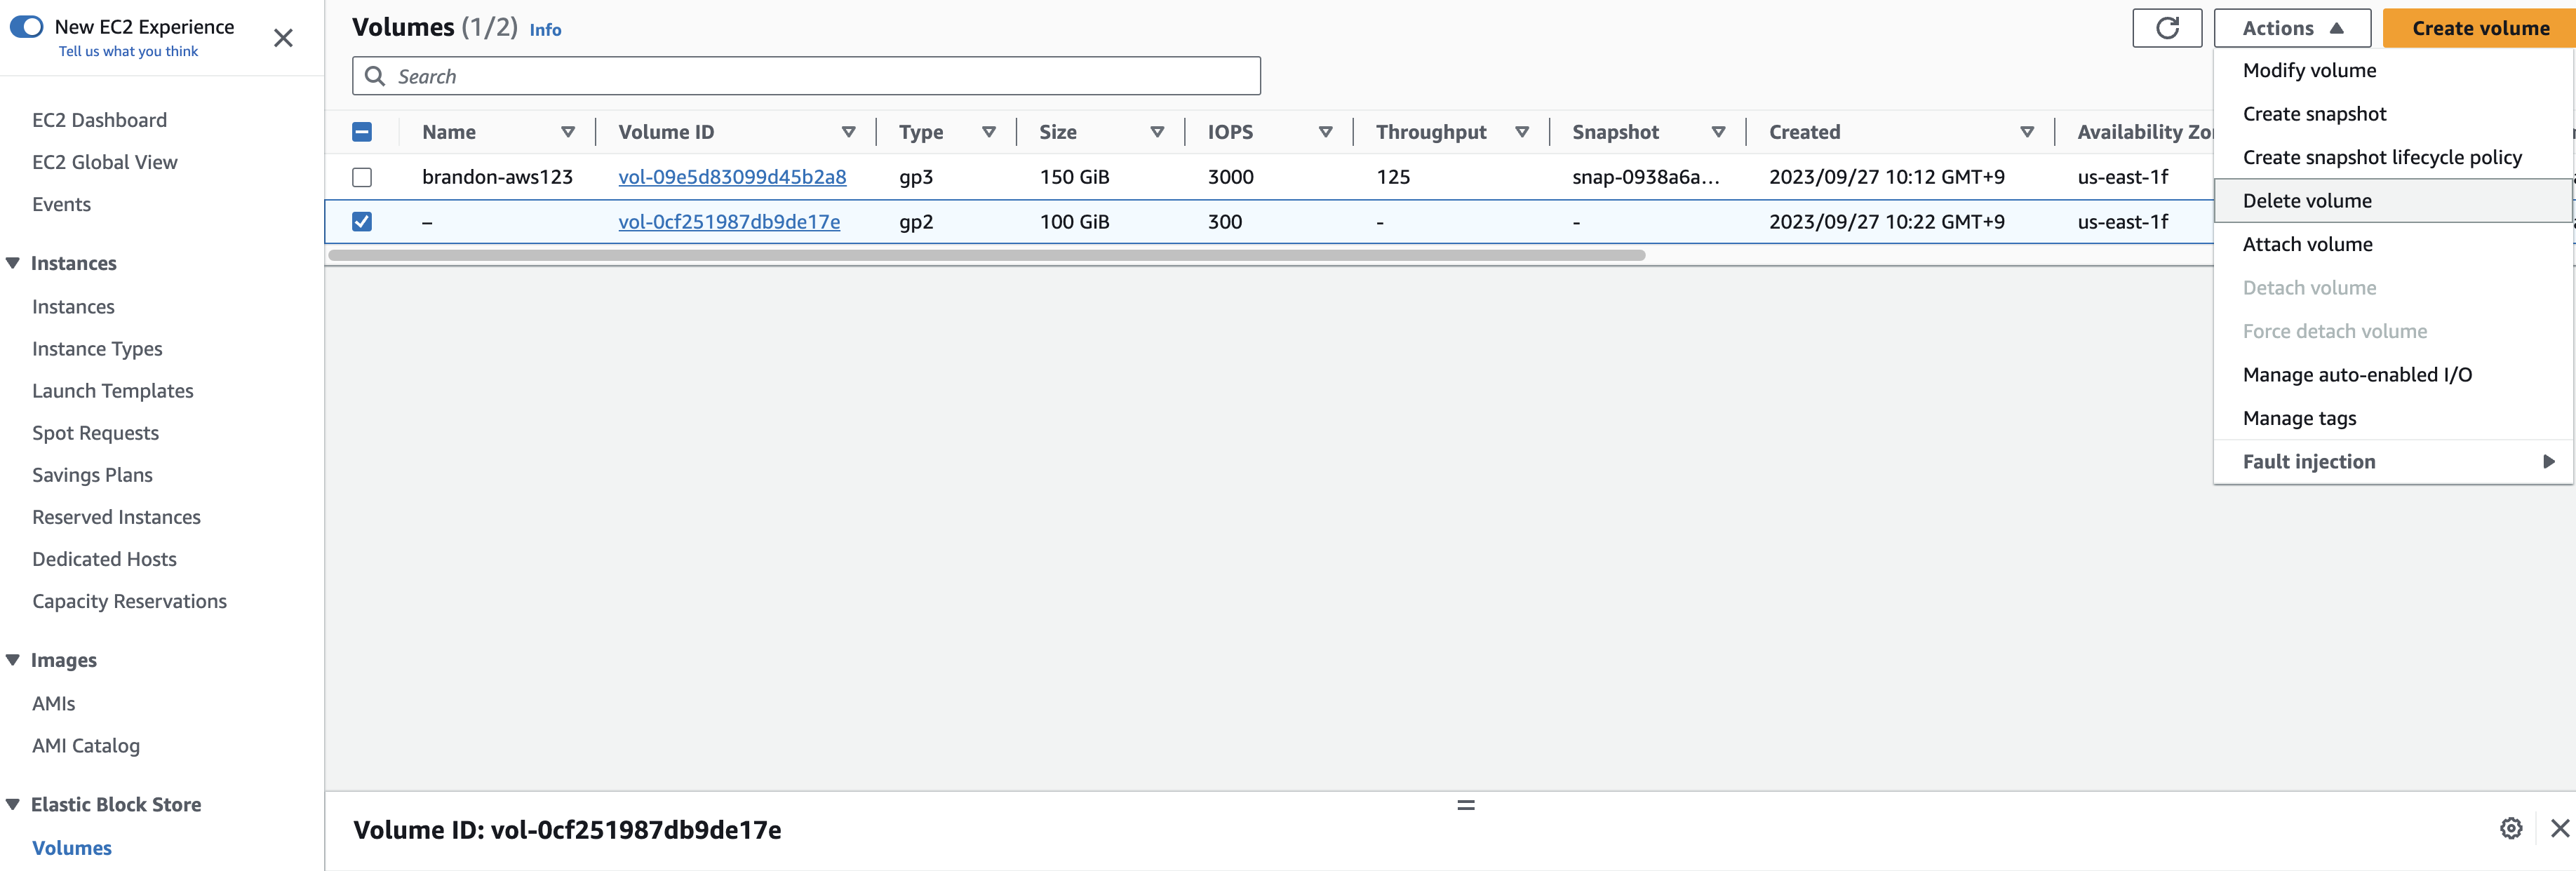
- Click on Actions and select Delete Volume.
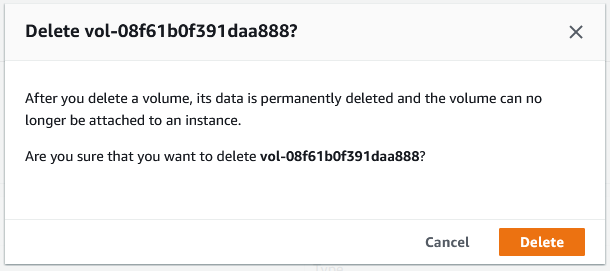
- On the Delete Volume dialog click on Delete to confirm the delete. The EBS Volume will now be deleted. This volume no longer exists on AWS, and you will no longer be charged for it.
Terminate EC2 Instance
We will now Terminate the EC2 Instance.
NOTE: Ensure your previous EC2 Image was successful; we’ll be using it in the next portion of the workshop. In this segment, you will be terminating your EC2 Instance. This is permanent and irreversible. However, using this EC2 Image, it is possible to spin up an identical machine. In general, be very cautious when terminating machines.
- Select the EC2 Instance from the list of instances. Click on Instance State > Terminate Instance.

- On the Terminate Instance dialog, observe the note “Associated resources may incur costs after these instances are terminated” and click Delete EBS Volume. Read the additional note. To proceed, select Yes, terminate. This is an important safeguard, and never click this automatically!

The instance will now be terminated.
- After a minute view the Instance State of the instance, it will indicate Terminated.