AWS HealthOmics
- AWS HealthOmics now supports DSL and Nextflow version detection (2024년 8월 14일)
- 워크플로우 언어의 버전을 지정하여 사용할 수 있습니다. (공식 문서)
- AWS HealthOmics 소개 및 주요 링크
- Nf-core 워크플로우 마이그레이션 하기 (scrnaseq)
- Nf-core 워크플로우 마이그레이션 하기 (rnaseq)
- Nf-core 워크플로우 마이그레이션 하기 (spatialvi)
- WDL 워크플로우 마이그레이션 하기 (HiFi-human-WGS-WDL)
- AWS HealthOmics로 유전체 분석 (Fastq to VCF, Annotation) 자동화하기
- AWS HealthOmics - Storage
- AWS HealthOmics에서 Annotation 작업 수행하기
- AWS HealthOmics - Troubleshooting
- 몇 가지 기능과 알아둘 것들
AWS HealthOmics 소개 및 주요 링크
AWS HealthOmics는 생물정보학자, 연구원, 과학자와 같은 사용자가 유전체학 및 기타 생물학적 데이터를 저장, 쿼리, 분석 및 분석하여 인사이트를 생성할 수 있도록 지원하는 AWS 서비스입니다.연구 및 임상 조직의 게놈 정보 저장 및 분석 프로세스를 단순화하고 가속화하며 과학적 발견과 통찰력 생성을 가속화합니다.
HealthOmics에는 세 가지 주요 구성 요소가 있습니다. Healthomics Storage를 사용하면 기가베이스당 저렴한 비용으로 페타바이트의 게놈 데이터를 효율적으로 저장하고 공유할 수 있습니다. Healthomics Analytics는 멀티오믹스 및 멀티모달 분석을 위한 유전체학 데이터를 준비하는 방법을 간소화합니다. Healthomics 워크플로는 생물정보학 계산을 위한 기본 인프라를 자동으로 프로비저닝하고 확장합니다.
AWS HealthOmics는 무엇입니까?
중요 공지
HealthOmics는 전문적인 의학적 조언, 진단 또는 치료를 대체하지 않으며 질병이나 건강 상태를 치료, 치료, 완화, 예방 또는 진단하기 위한 것이 아닙니다.임상 의사 결정에 정보를 제공하기 위한 타사 제품과 연계하는 것을 포함하여 AWS Healthomics를 사용할 때 인적 검토를 실시할 책임은 귀하에게 있습니다.
HealthOmics는 데이터를 전송, 저장, 형식 지정 또는 표시하고 워크플로 관리를 위한 인프라 및 구성 지원을 제공하기 위한 용도로만 사용됩니다. AWS Healthomics는 변종 호출 또는 유전체 분석 및 해석을 직접 수행하기 위한 것이 아닙니다. AWS HealthOmics는 임상 실험실 테스트 또는 기타 디바이스 데이터, 결과 및 결과를 해석하거나 분석하기 위한 것이 아니며, 게놈 분석에 사용하기 위한 타사 도구를 대체하지도 않습니다.
- Storage - 저장 (FASTQ, BAM, CRAM과 같은 유전체학 포멧을 저장하기 위한 서비스)
- Analytics - 데이터레이크 전처리 (즉, VCF를 다루기 위한 서비스)
- Workflows - 워크플로우 (Nextflow, WDL, CWL 등 유전체학 워크플로우를 간단하게 실행할 수 있도록 하는 인프라에 대한 관리형 서비스)
이점
- 게놈 데이터를 안전하게 저장하고 결합. HealthOmics는 AWS 레이크 포메이션 및 Amazon Athena와 같은 다른 AWS 서비스와 통합됨. 유전체학 데이터를 안전하게 저장한 후 이를 쿼리하거나 병력 데이터와 결합하여 더 나은 진단과 맞춤형 치료 계획을 수립할 수 있음
- 환자 개인 정보 보호 — HealthOmics는 HIPAA 자격을 갖추고 있음. 또한 IAM 및 Amazon CloudWatch와 통합되므로 데이터 액세스를 제어 및 기록하고 데이터가 분석에 사용되는 방식을 추적할 수 있음
- 확장 가능한 설계 — 간소화된 청구 및 새로운 협업 도구를 사용하여 대규모 데이터 분석을 지원
- 효율성 극대화 — 자동화된 워크플로우와 통합 도구를 사용하여 데이터 처리 및 분석을 간소화
Storage
- Reference store는 무료
- Sequence store는 S3의 Intelligent Tiering보다 저렴하게 사용 가능함; 블로그
Workflows
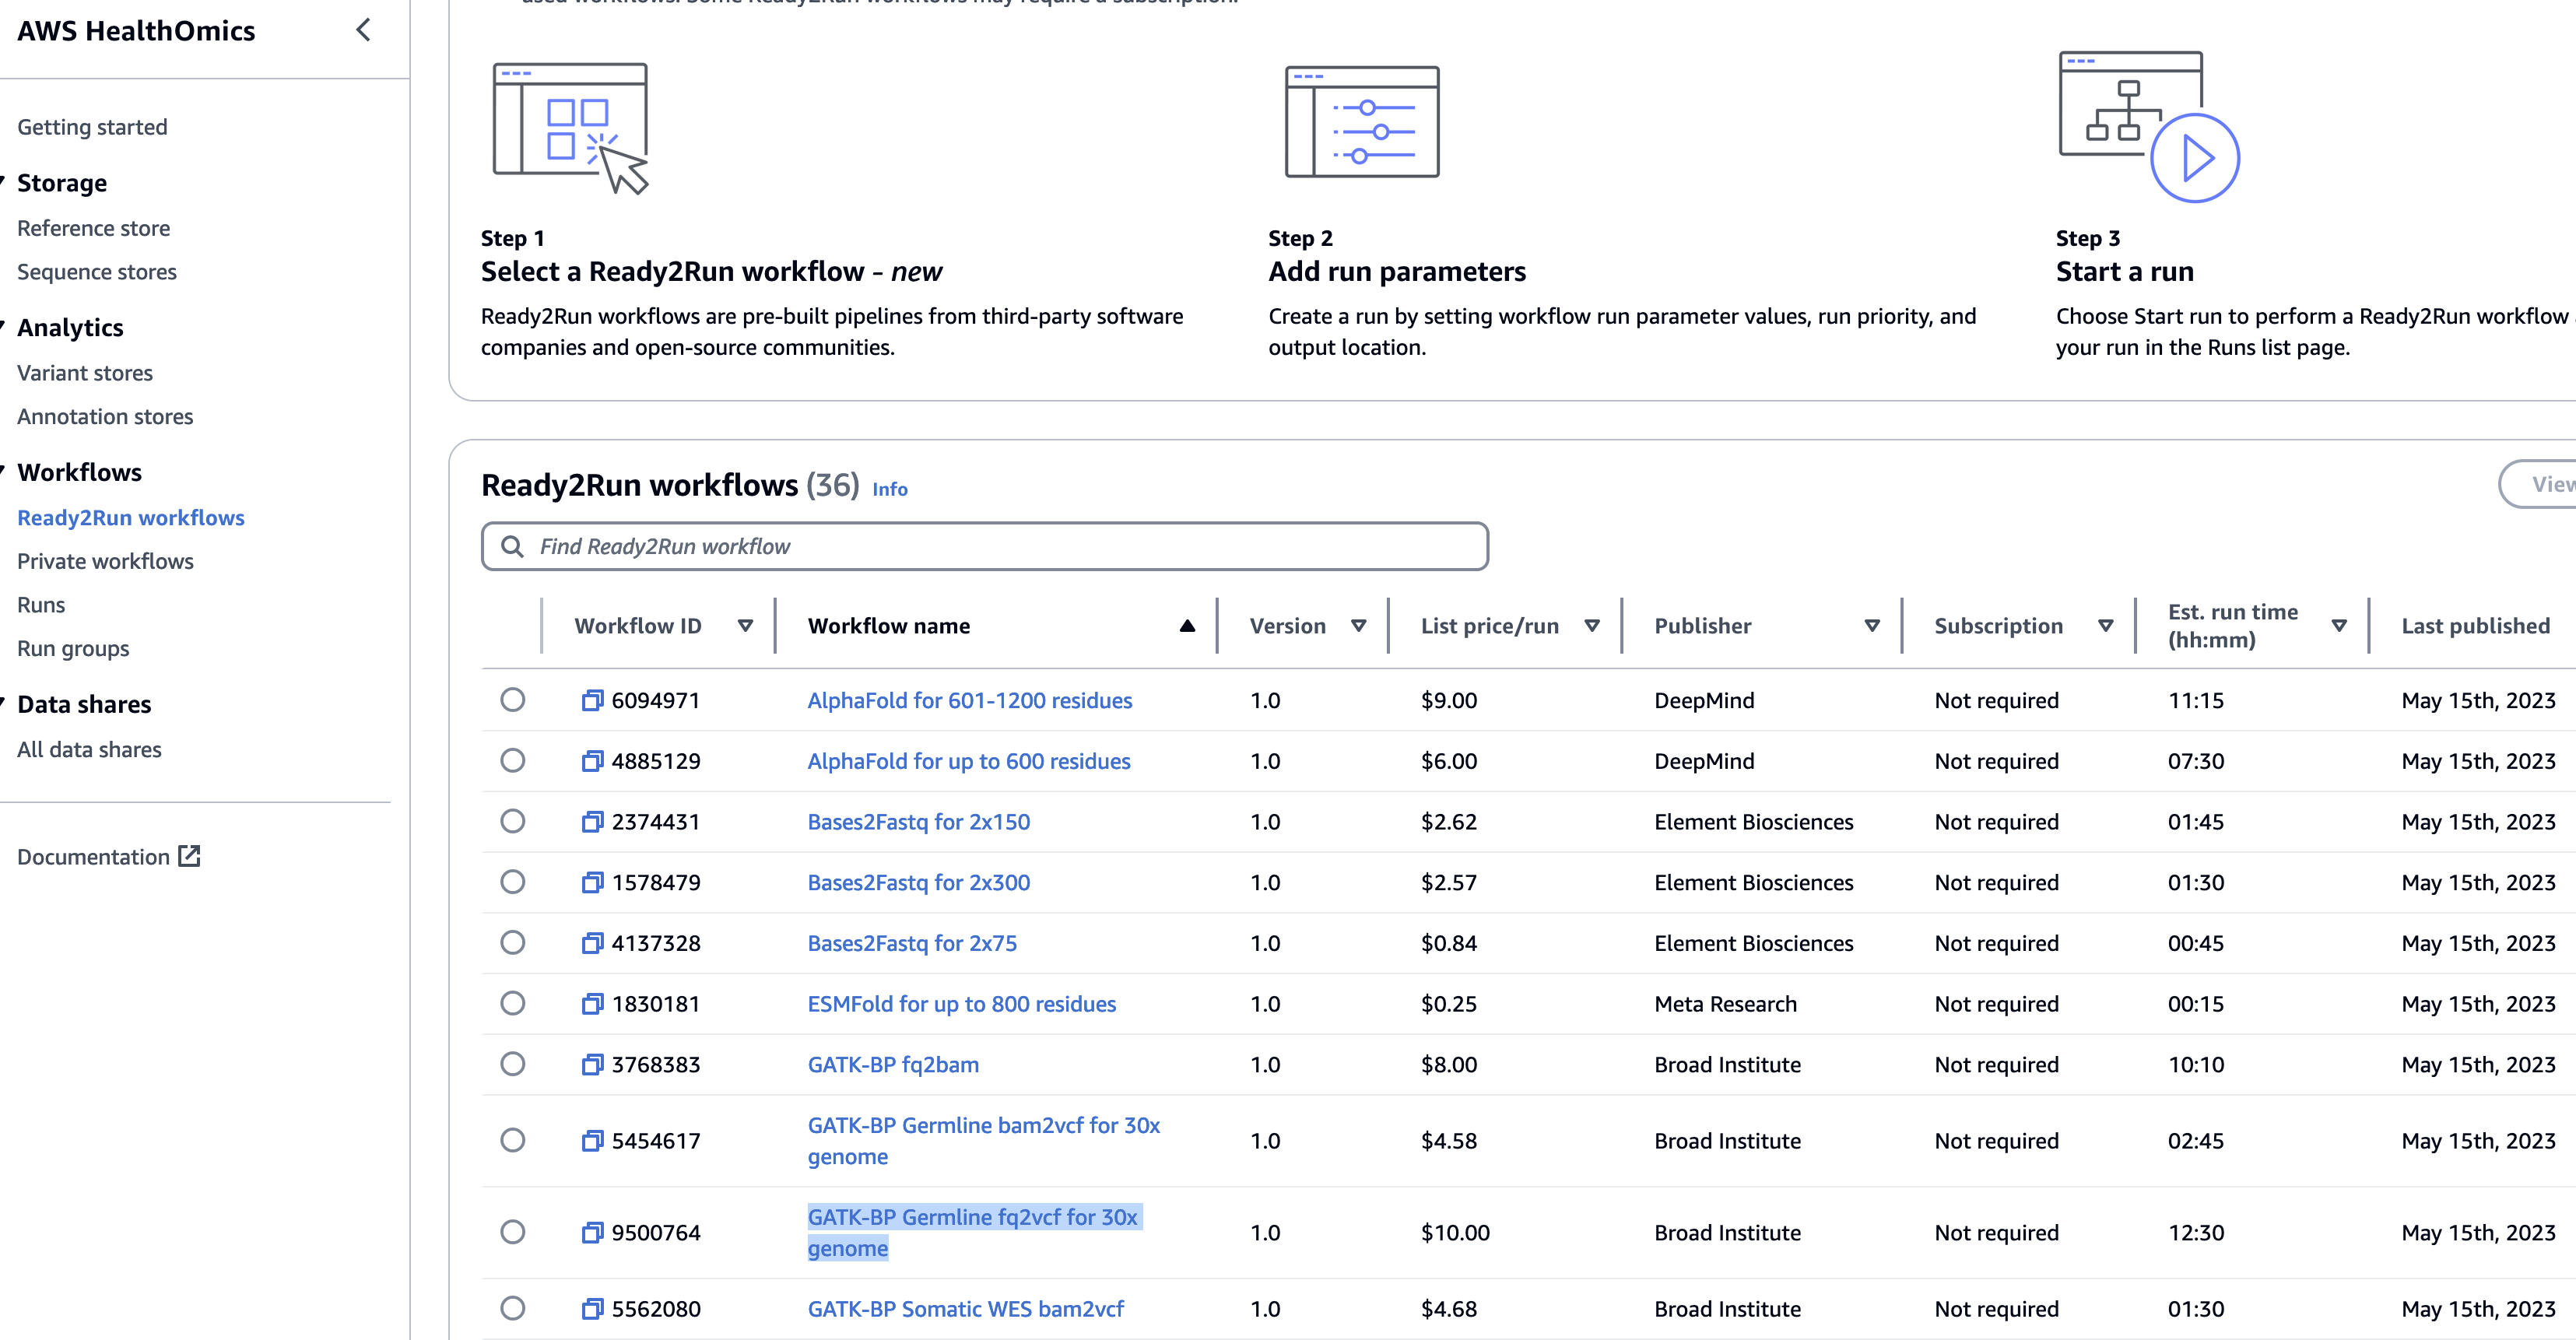
Ready2Run
Ready2Run (R2R) 워크플로우를 제공합니다. GATK, Singlecell, AlphaFold 등 이미 최적화된 파이프라인을 사용해보세요.
Private workflow
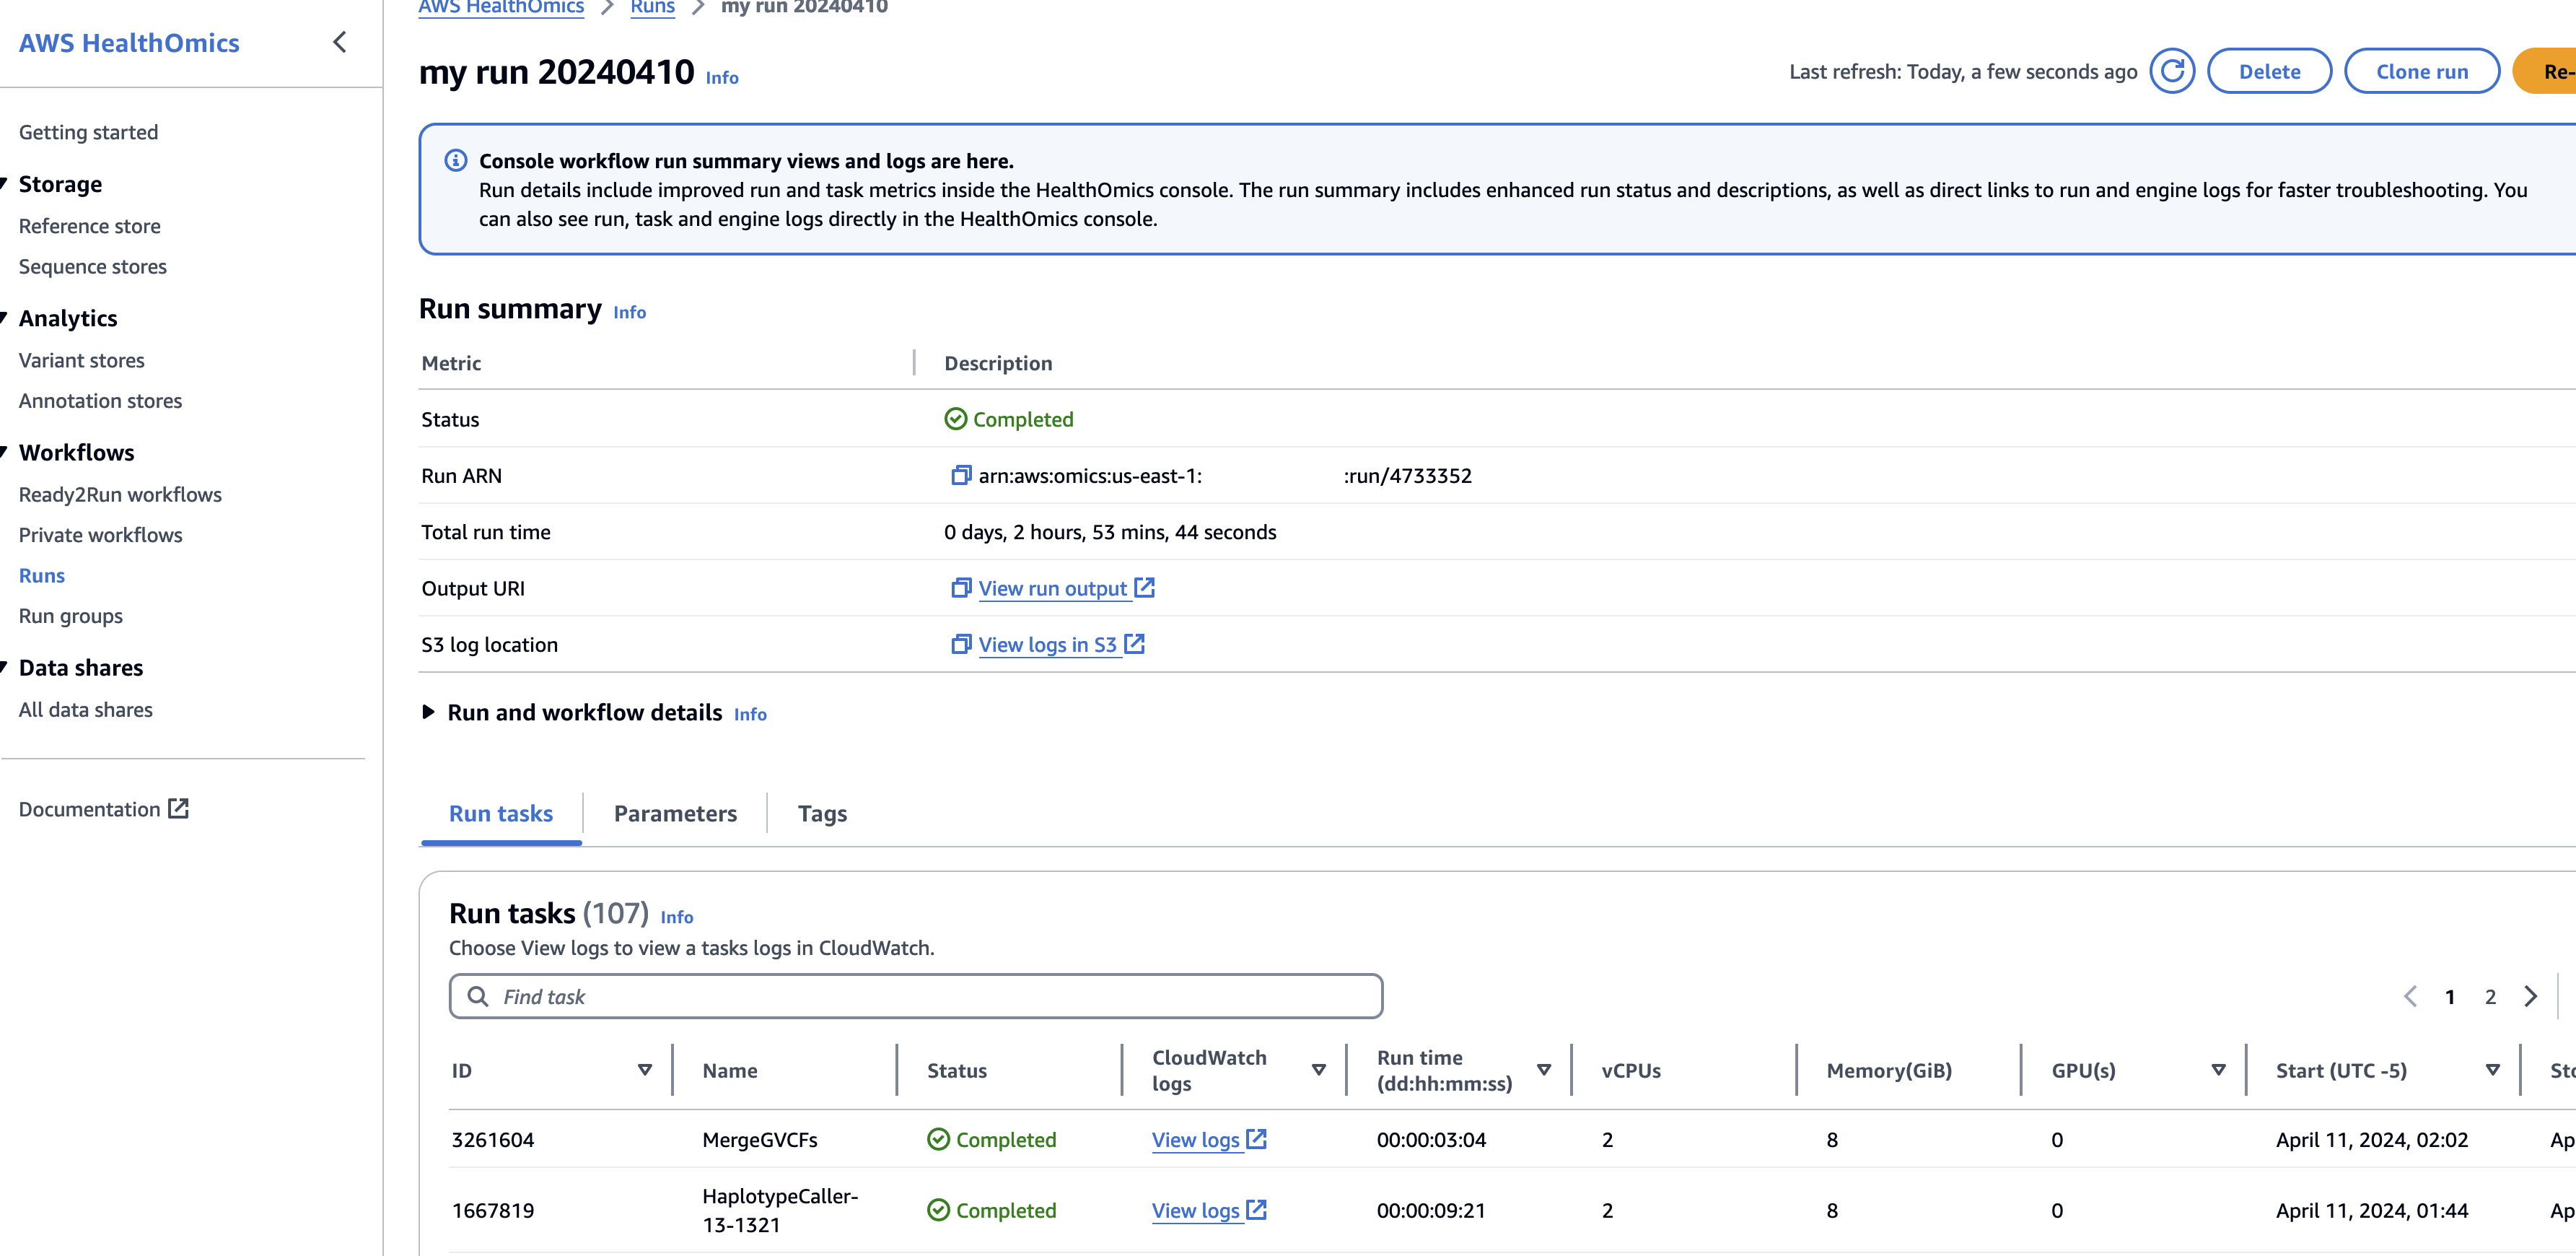
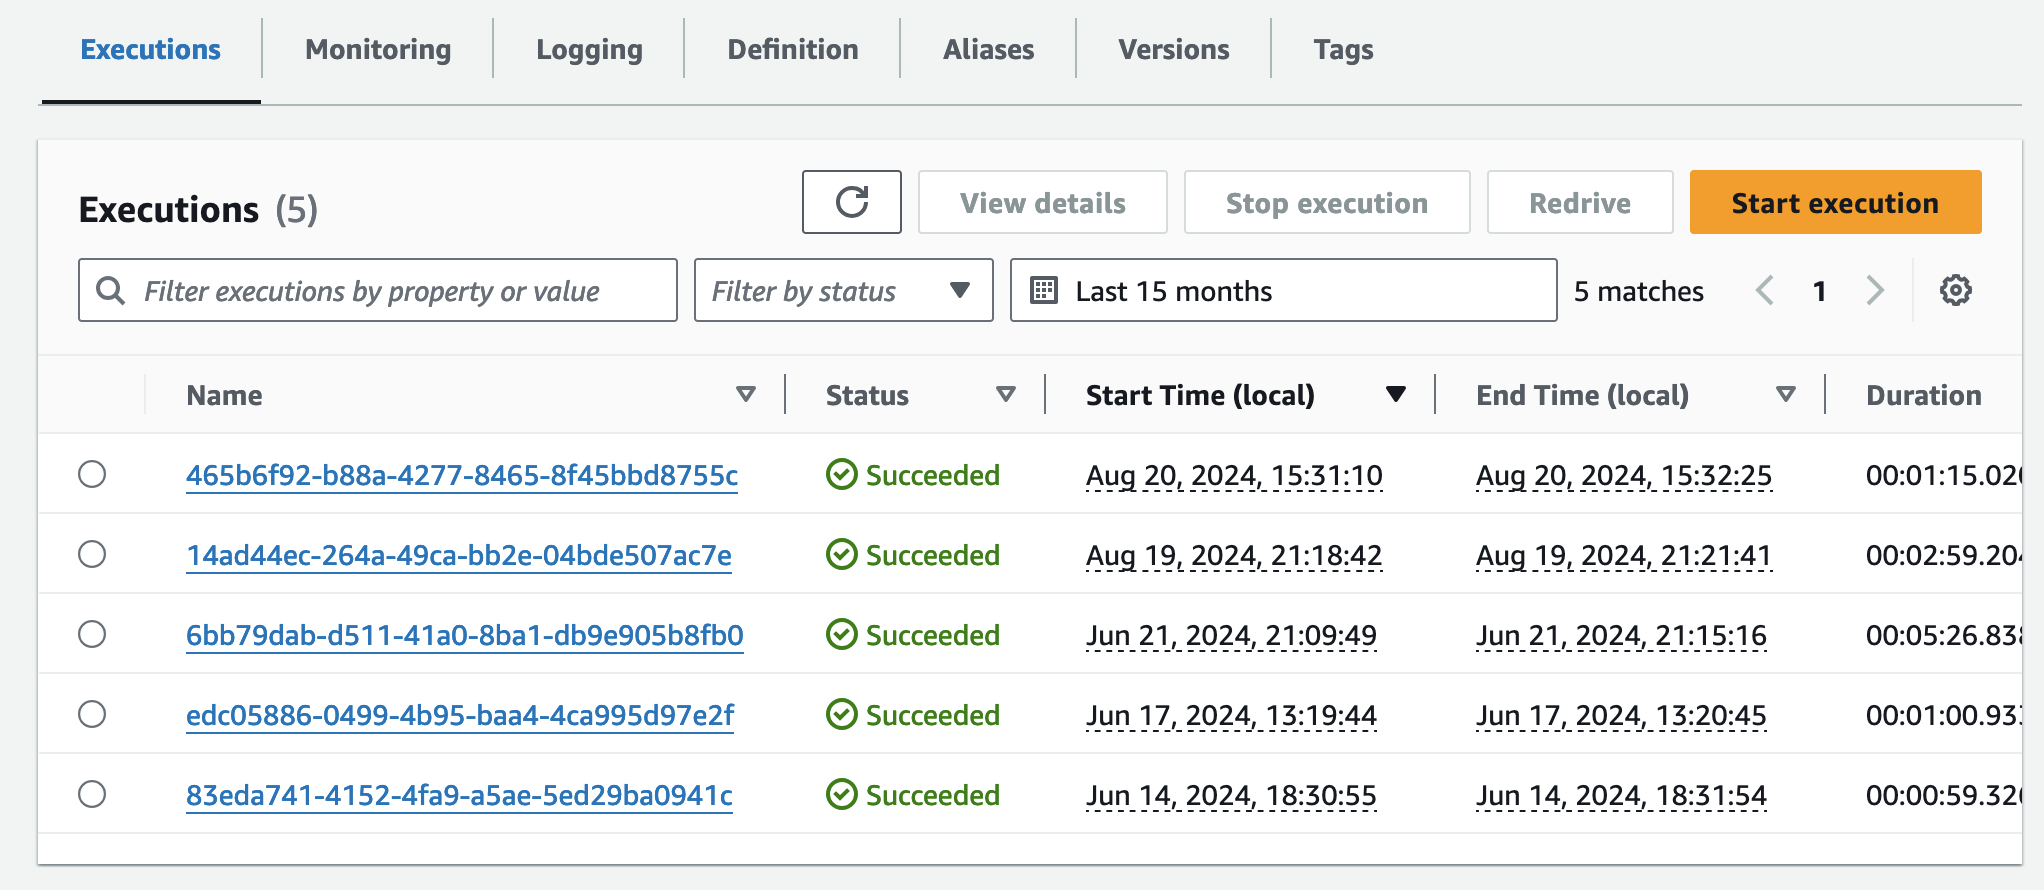
Private 워크플로우 또는 R2R 워크플로우를 사용해 분석을 수행하면 아래와 같이 하나의 Run 에 수많은 Task단위의 로그 및 컴퓨팅 사용량을 확인할 수도 있습니다.
Analytics
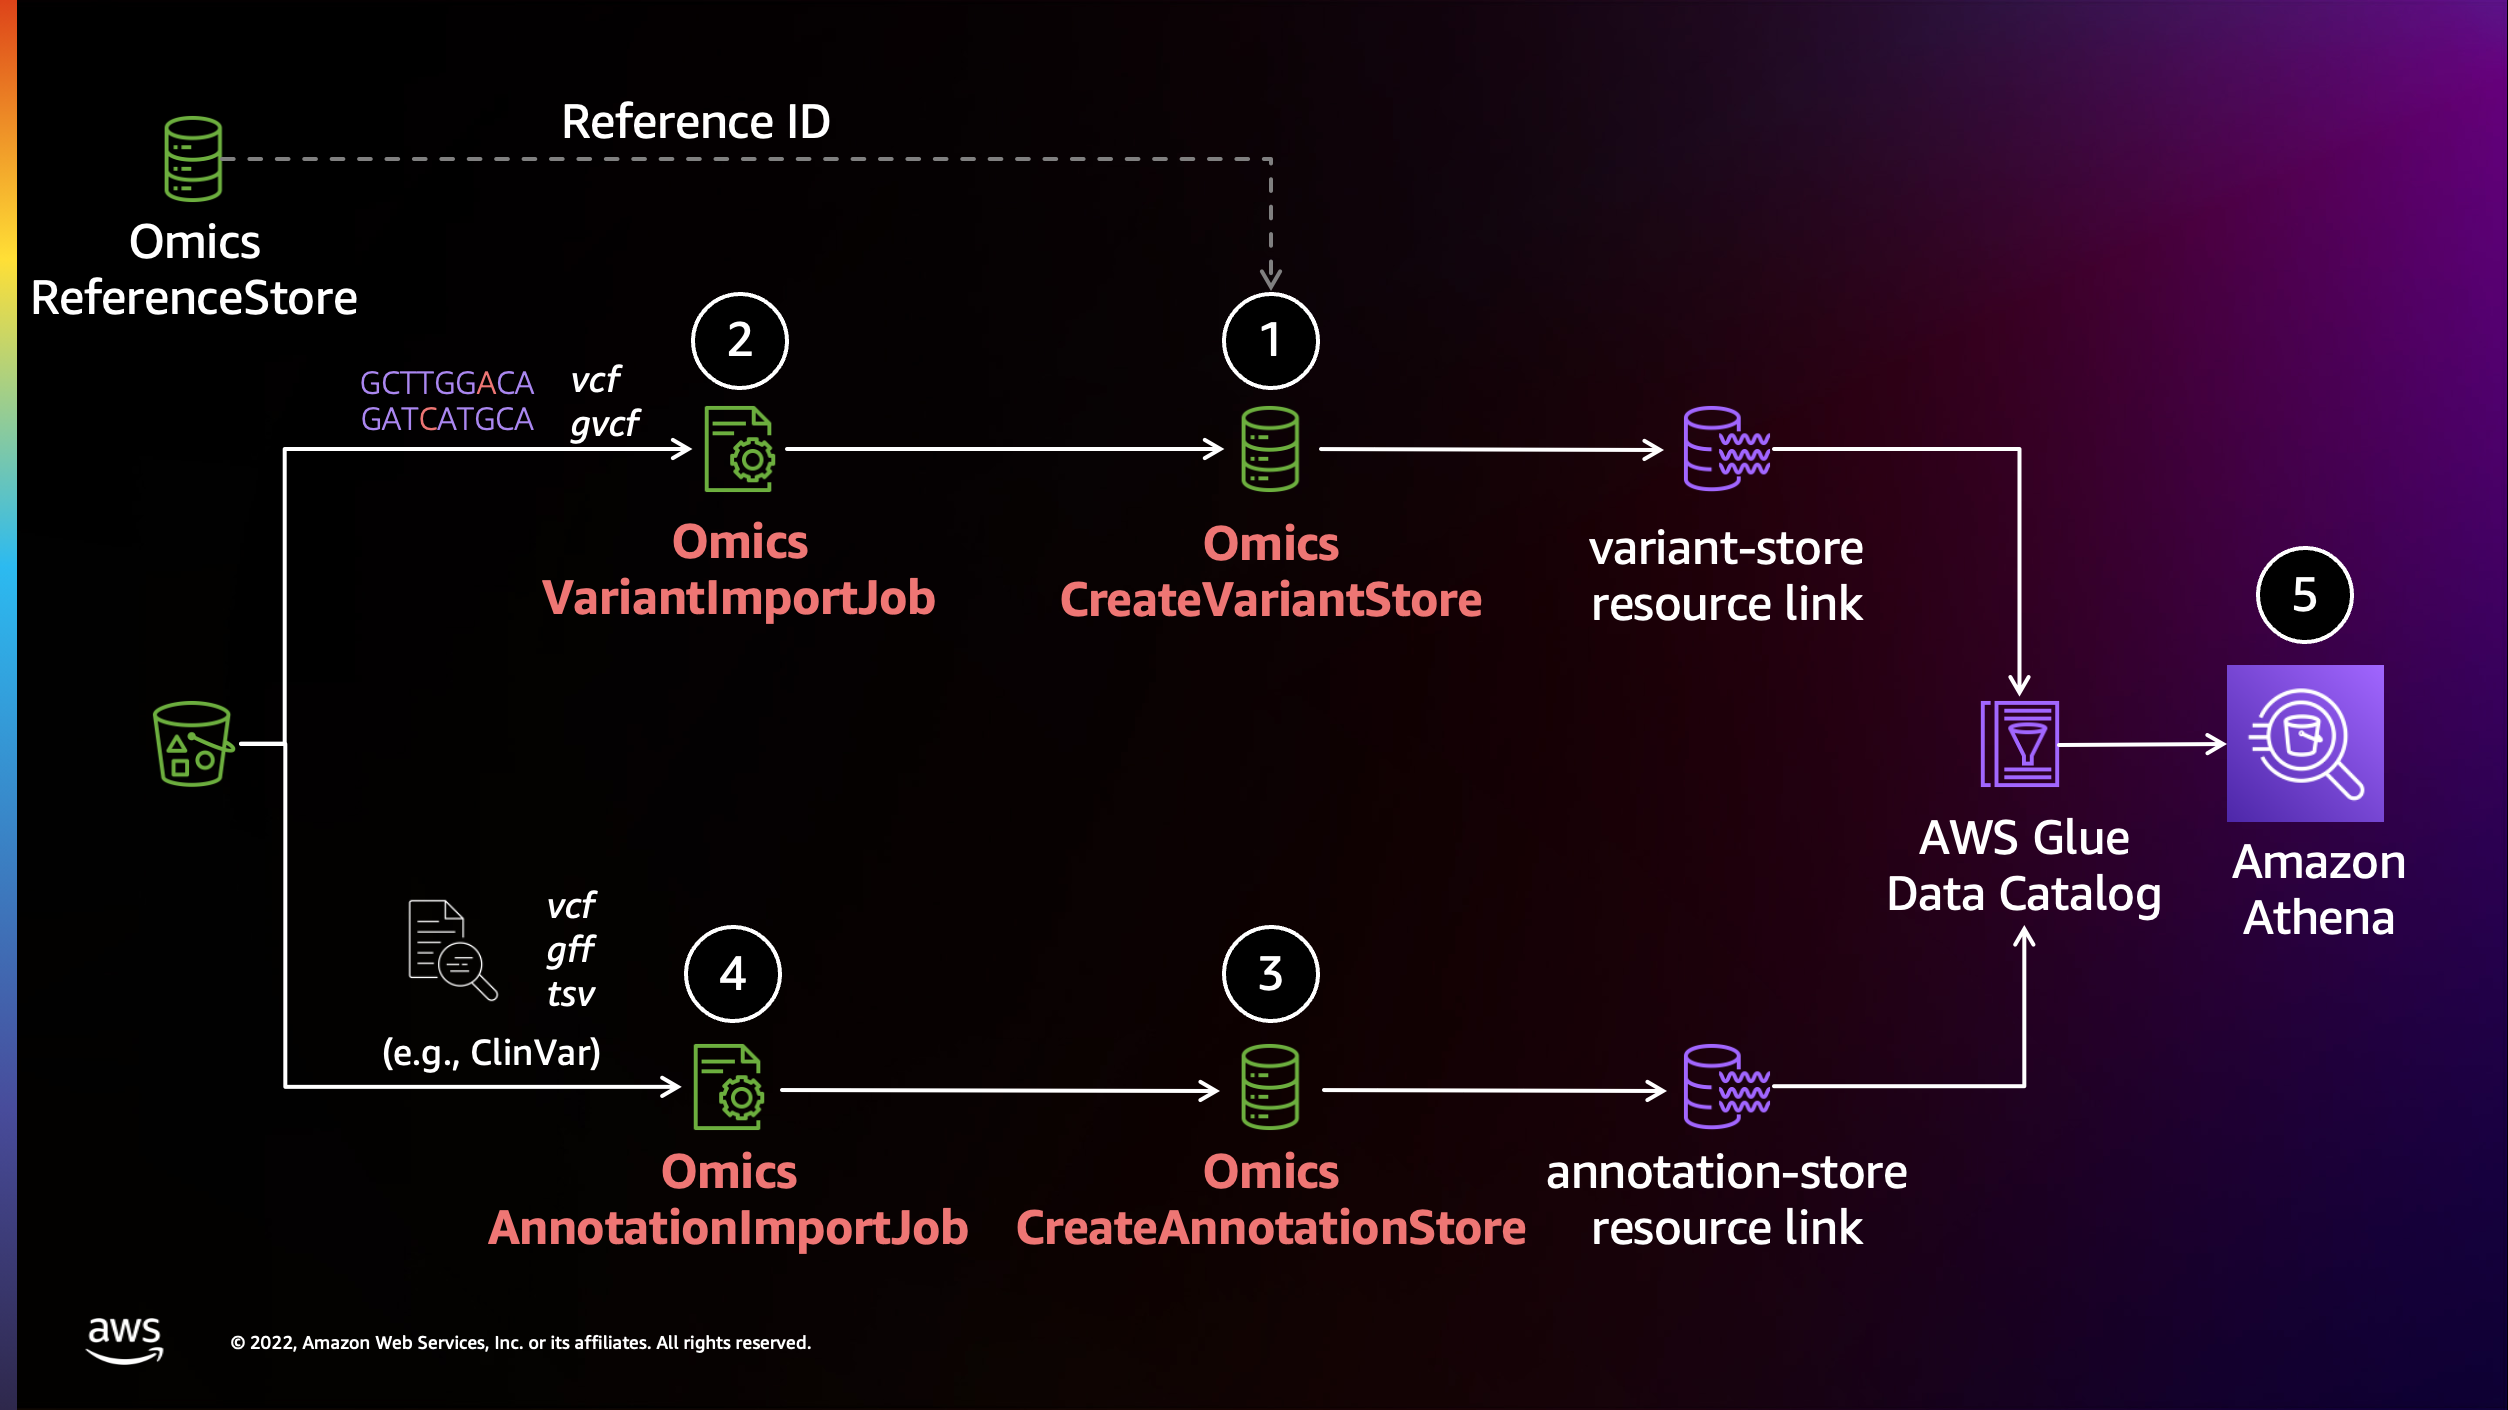
Healthomics 분석은 유전체 변이 및 주석의 저장 및 분석을 지원합니다.애널리틱스는 변형 저장소와 주석 저장소라는 두 가지 유형의 스토리지 리소스를 제공합니다.이러한 리소스를 사용하여 유전체 변이 데이터 및 주석 데이터를 저장, 변환 및 쿼리할 수 있습니다.데이터를 데이터저장소로 가져온 후 Athena를 사용하여 데이터에 대한 고급 분석을 수행할 수 있습니다.
HealthOmics 콘솔 또는 API를 사용하여 스토어를 생성 및 관리하고, 데이터를 가져오고, 분석 스토어 데이터를 공동 작업자와 공유할 수 있습니다.
- VCF 형식의 데이터를 지원하고 주석 저장소는 TSV/CSV 및 GFF3 형식을 지원
- 데이터가 Healthomics 분석 데이터 스토어에 있는 경우 AWS Lake Formation을 통해 VCF 파일에 대한 액세스를 관리
- 그런 다음 Amazon Athena를 사용하여 VCF 파일을 쿼리 가능 (Athena 쿼리 엔진 버전 3을 사용해야 함)
변이 데이터에 대한 지원 포멧: VCF ( Variant Effect Predictor (VEP) annotations 호환 가능.)
Annotation 데이터에 대한 지원 포멧: TSV, VCF, or GFF
사용 방법
AWS 관리 콘솔 — HealthOmics에 액세스하는 데 사용할 수 있는 웹 인터페이스를 제공합니다.
AWS 명령줄 인터페이스 (AWS CLI) — AWS 헬스 오믹스를 비롯한 다양한 AWS 서비스에 대한 명령을 제공하며 윈도우, macOS 및 Linux에서 지원됩니다.AWS CLI 설치에 대한 자세한 내용은 AWS 명령줄 인터페이스를 참조하십시오.
AWS SDK — AWS는 다양한 프로그래밍 언어 및 플랫폼 (자바, Python, Ruby, .NET, iOS 및 Android 포함) 용 라이브러리와 샘플 코드로 구성된 SDK (소프트웨어 개발 키트) 를 제공합니다.SDK는 헬스오믹스를 프로그래밍 방식으로 사용할 수 있는 편리한 방법을 제공합니다.자세한 내용은 AWS SDK 개발자 센터를 참조하십시오.
AWS API — API 작업을 사용하여 프로그래밍 방식으로 HealthOmics에 액세스하고 관리할 수 있습니다.자세한 내용은 헬스오믹스 API 레퍼런스를 참조하십시오.
사용 가능한 리전 및 Quota
https://docs.aws.amazon.com/general/latest/gr/healthomics-quotas.html
기타 링크
아래에는 HealthOmics에서 Private workflow로 등록하여 돌릴 수 있는 예제 파이프라인들을 제공합니다.
-
WDL workflows
-
Nextflow workflows
https://github.com/aws-samples/amazon-omics-tutorials/tree/main/example-workflows
Learn more about HealthOmics from these workshops and tutorials:
-
HealthOmics workshop – HealthOmics end to end workshop
-
AWS genomics resources – Public Amazon ECR repositories related to genomics
-
Python tutorials – Jupyter notebook tutorials on GitHub, covering HealthOmics storage, analytics, and workflows
Become familiar with additional HealthOmics tools that AWS provides:
-
WDL linter – HealthOmics linter for WDL
-
Nextflow linter – HealthOmics linter for Nextflow
-
HealthOmics Amazon ECR helper tool – Amazon ECR helper tool for HealthOmics
-
HealthOmics tools on GitHub – Tools for working with HealthOmics (Transfer manager, URI parser, Omics rerun, Run analyzer).
관련 블로그
- Secure Your Genomic Workflows and Data with AWS HealthOmics
- Category: AWS HealthOmics / AWS for Industries
Nf-core 워크플로우 마이그레이션 하기 (scrnaseq)
참고문서: https://catalog.us-east-1.prod.workshops.aws/workshops/76d4a4ff-fe6f-436a-a1c2-f7ce44bc5d17/en-US
이 문서를 참고하여 환경을 준비합니다. 여기서는 이 과정은 생략합니다.
2025년 6월 6일기준 scrnaseq v4.0.0 도 지원합니다. (nextflow의 플러그인인 nf-scheam 지원 참고)
다만 현재 아래 내용은 2.7.1 기준으로 작성되었습니다.
프로젝트 셋업
버킷 생성 및 Bash 환경변수 선언
cd ~
export yourbucket="your-bucket-name"
export your_account_id="your-account-id"
export region="your-region"
export workflow_name="your-workflow-name"
export omics_role_name="your_omics_rolename"
# if not exist the bucket, let's create.
#aws s3 mb $yourbucket
nf-core repository로부터 워크플로우 복제
cd ~
git clone https://github.com/nf-core/scrnaseq --branch 2.7.1 --single-branchDocker Image Manifest의 생성
cp ~/amazon-ecr-helper-for-aws-healthomics/lib/lambda/parse-image-uri/public_registry_properties.json namespace.configinspect_nf.py 를 실행합니다.
python3 amazon-omics-tutorials/utils/scripts/inspect_nf.py \
--output-manifest-file scrnaseq_271_docker_images_manifest.json \
-n namespace.config \
--output-config-file omics.config \
--region $region \
~/scrnaseq/
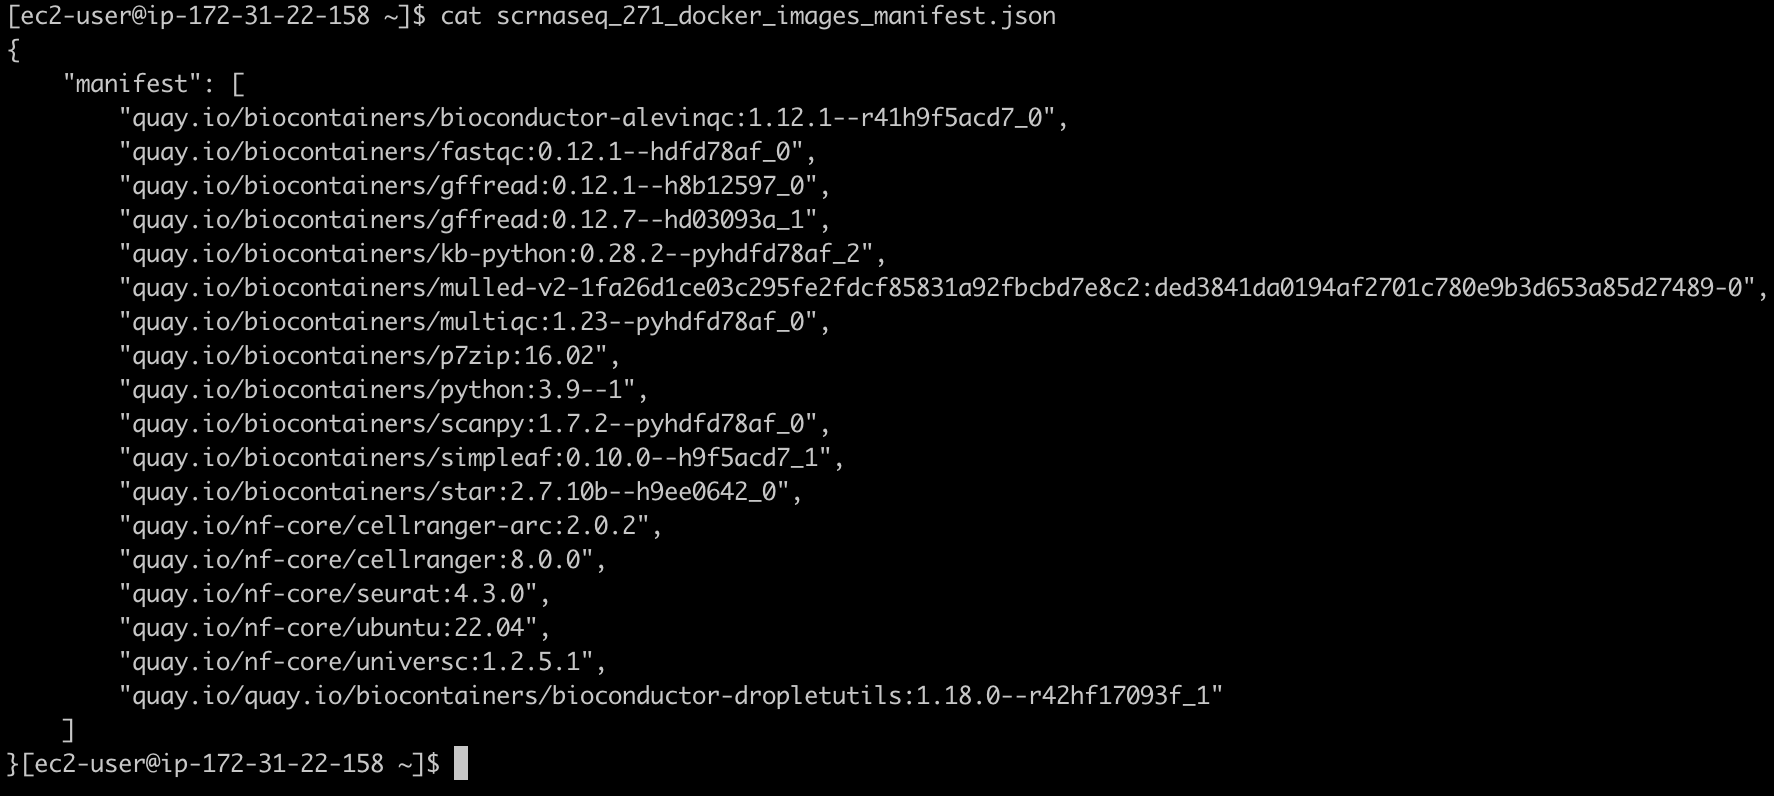
생성되는 두 개의 출력은 scrnaseq_271_docker_images_manifest.json과 omics.config입니다.
scrnaseq_271_docker_images_manifest.json 파일은 예를들어 다음과 같은 모습이어야 합니다:
컨테이너 사설화 (into Amazon ECR)
aws stepfunctions start-execution \
--state-machine-arn arn:aws:states:$region:$your_account_id:stateMachine:omx-container-puller \
--input file://scrnaseq_271_docker_images_manifest.json
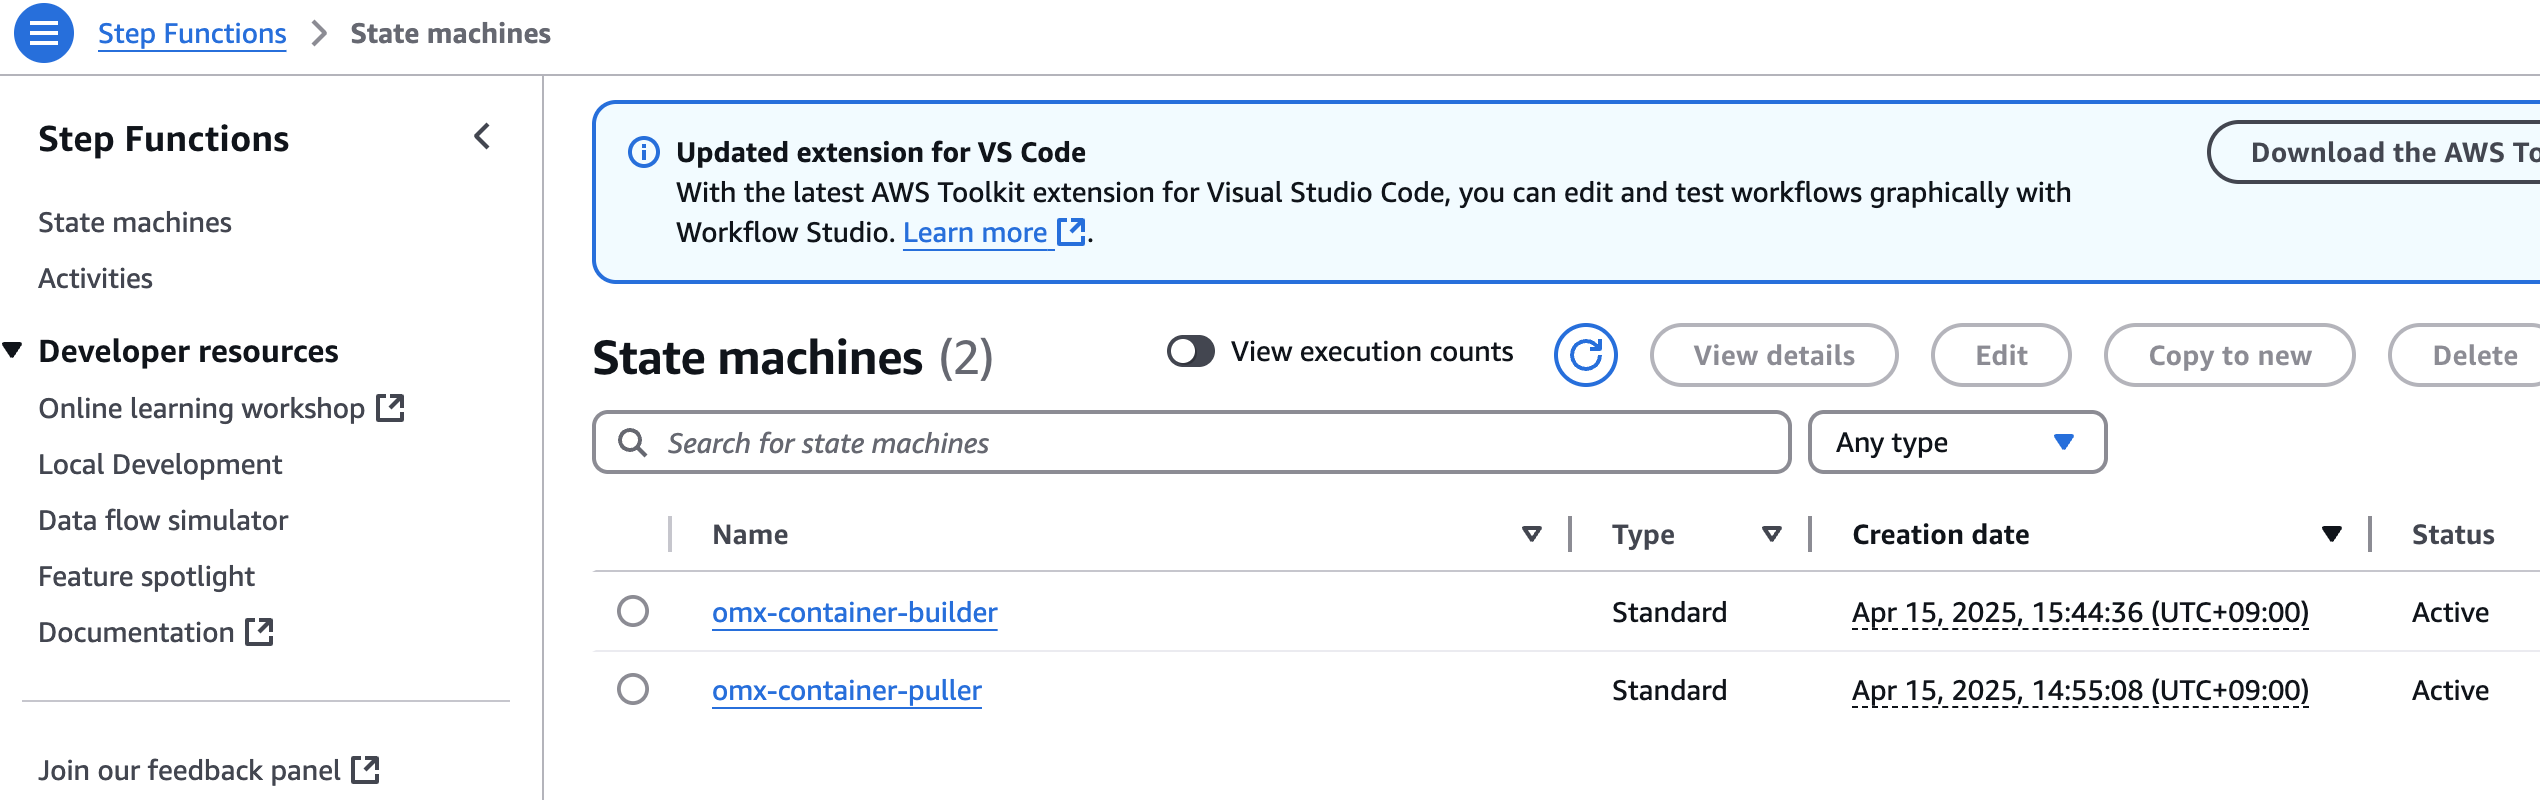
step function 콘솔에서 state machines중에 omx-container-puller를 확인하여 Execution이 완료되었는지 확인합니다.
nf-core project 코드 업데이트
mv omics.config scrnaseq/conf
echo "includeConfig 'conf/omics.config'" >> scrnaseq/nextflow.config
AWS HealthOmics 워크플로우 만들기
단계1. AWS HealthOmics 파라미터 파일
parameter-description.json을 만들어 아래와 같이 저장합니다.
cat << EOF > parameter-description.json
{
"input": {"description": "Samplesheet with sample locations.",
"optional": false},
"protocol" : {"description": "10X Protocol used: 10XV1, 10XV2, 10XV3",
"optional": false},
"aligner": {"description": "choice of aligner: alevin, star, kallisto",
"optional": false},
"barcode_whitelist": {"description": "Optional whitelist if 10X protocol is not used.",
"optional": true},
"gtf": {"description": "S3 path to GTF file",
"optional": false},
"fasta": {"description": "S3 path to FASTA file",
"optional": false},
"skip_emptydrops": {"description": "module does not work on small dataset",
"optional": true}
}
EOF단계2. 워크플로우 스테이징
zip -r scrnaseq-workflow.zip scrnaseq -x "*/\.*" "*/\.*/**"
aws s3 cp scrnaseq-workflow.zip s3://${yourbucket}/workshop/scrnaseq-workflow.zip
aws omics create-workflow \
--name ${workflow_name} \
--definition-uri s3://${yourbucket}/workshop/scrnaseq-workflow.zip \
--parameter-template file://parameter-description.json \
--engine NEXTFLOW
단계3. 워크플로우 생성 확인
workflow_id=$(aws omics list-workflows --name ${workflow_name} --query 'items[0].id' --output text)
echo $workflow_id워크플로우 테스트하기
작은 크기의 예제 샘플
입력파일 준비
parameter-description.json에 사용된 것과 동일한 키를 사용하여 input.json 파일을 새로 만듭니다. 값은 워크플로에서 허용되는 실제 S3 경로 또는 문자열이 됩니다.
아래는 테스트 샘플의 파라미터 예시입니다. (참고)
데이터 준비 참고
예제 데이터는 다음과 같이 다운로드 해볼 수 있습니다.
wget https://github.com/nf-core/test-datasets/raw/scrnaseq/samplesheet-2-0.csv
wget https://github.com/nf-core/test-datasets/raw/scrnaseq/reference/GRCm38.p6.genome.chr19.fa
wget https://github.com/nf-core/test-datasets/raw/scrnaseq/reference/gencode.vM19.annotation.chr19.gtf이제 현재 디렉토리에 다운로드 된 파일들을 버킷에 업로드할 수 있습니다.
aws s3 sync . s3://omics-output-us-east-1-462922227709/workflow_migration_workshop/nfcore-scrnaseq-v4.0.0/sample sheet 만들기
cat << EOF > samplesheet-2-0.csv
sample,fastq_1,fastq_2,expected_cells,seq_center
Sample_X,s3://aws-genomics-static-${region}/workflow_migration_workshop/nfcore-scrnaseq-v2.3.0/Sample_X_S1_L001_R1_001.fastq.gz,s3://aws-genomics-static-${region}/workflow_migration_workshop/nfcore-scrnaseq-v2.3.0/Sample_X_S1_L001_R2_001.fastq.gz,5000,"Broad Institute"
Sample_Y,s3://aws-genomics-static-${region}/workflow_migration_workshop/nfcore-scrnaseq-v2.3.0/Sample_Y_S1_L001_R1_001.fastq.gz,s3://aws-genomics-static-${region}/workflow_migration_workshop/nfcore-scrnaseq-v2.3.0/Sample_Y_S1_L001_R2_001.fastq.gz,5000,"CRG Barcelona"
Sample_Y,s3://aws-genomics-static-${region}/workflow_migration_workshop/nfcore-scrnaseq-v2.3.0/Sample_Y_S1_L002_R1_001.fastq.gz,s3://aws-genomics-static-${region}/workflow_migration_workshop/nfcore-scrnaseq-v2.3.0/Sample_Y_S1_L002_R2_001.fastq.gz,5000,"CRG Barcelona"
EOF위에서 만든 samplesheet를 s3로 복사
aws s3 cp samplesheet-2-0.csv s3://${yourbucket}/nfcore-scrnaseq/samplesheet-2-0.csv입력 json 만들기 (위 sample sheet경로가 아래 내용중 input에 값으로 들어가게됨)
cat << EOF > input.json
{
"input": "s3://${yourbucket}/nfcore-scrnaseq/samplesheet-2-0.csv",
"protocol": "10XV2",
"aligner": "star",
"fasta": "s3://aws-genomics-static-${region}/workflow_migration_workshop/nfcore-scrnaseq-v2.3.0/GRCm38.p6.genome.chr19.fa",
"gtf": "s3://aws-genomics-static-${region}/workflow_migration_workshop/nfcore-scrnaseq-v2.3.0/gencode.vM19.annotation.chr19.gtf",
"skip_emptydrops": true
}
EOF실제 크기의 샘플
(출처: 참고)
데이터 내 버킷내에 준비
aws s3 sync s3://ngi-igenomes/test-data/scrnaseq/ s3://${yourbucket}/test-data/scrnaseq/ --exclude "*" --include "pbmc8k_S1_L00*"
sample sheet 만들기
cat << EOF > samplesheet_2.0_full.csv
sample,fastq_1,fastq_2,expected_cells
pbmc8k,s3://${yourbucket}/test-data/scrnaseq/pbmc8k_S1_L007_R1_001.fastq.gz,s3://${yourbucket}/test-data/scrnaseq/pbmc8k_S1_L007_R2_001.fastq.gz,10000
pbmc8k,s3://${yourbucket}/test-data/scrnaseq/pbmc8k_S1_L008_R1_001.fastq.gz,s3://${yourbucket}/test-data/scrnaseq/pbmc8k_S1_L008_R2_001.fastq.gz,10000
EOF위에서 만든 samplesheet를 s3로 복사
aws s3 cp samplesheet_2.0_full.csv s3://${yourbucket}/nfcore-scrnaseq/samplesheet_2.0_full.csv입력 json 만들기 (위 sample sheet경로가 아래 내용중 input에 값으로 들어가게됨)
cat << EOF > input_full.json
{
"input": "s3://${yourbucket}/nfcore-scrnaseq/samplesheet_2.0_full.csv",
"protocol": "10XV2",
"aligner": "star",
"fasta": "s3://aws-genomics-static-${region}/workflow_migration_workshop/nfcore-scrnaseq-v2.3.0/GRCm38.p6.genome.chr19.fa",
"gtf": "s3://aws-genomics-static-${region}/workflow_migration_workshop/nfcore-scrnaseq-v2.3.0/gencode.vM19.annotation.chr19.gtf",
"skip_emptydrops": true
}
EOFPolicy 준비
Prepare IAM service role to run AWS HealthOmics workflow
your-bucket-name, your-account-id, your-region을 모두 본인 환경에 맞게 수정하여 사용하세요.
omics_workflow_policy.json 만들기
cat << EOF > omics_workflow_policy.json
{
"Version": "2012-10-17",
"Statement": [
{
"Effect": "Allow",
"Action": [
"s3:GetObject"
],
"Resource": [
"arn:aws:s3:::${yourbucket}/*",
"arn:aws:s3:::aws-genomics-static-${region}/workflow_migration_workshop/nfcore-scrnaseq-v2.3.0/*"
]
},
{
"Effect": "Allow",
"Action": [
"s3:ListBucket"
],
"Resource": [
"arn:aws:s3:::${yourbucket}",
"arn:aws:s3:::aws-genomics-static-${region}/workflow_migration_workshop/nfcore-scrnaseq-v2.3.0",
"arn:aws:s3:::aws-genomics-static-${region}/workflow_migration_workshop/nfcore-scrnaseq-v2.3.0/*"
]
},
{
"Effect": "Allow",
"Action": [
"s3:PutObject"
],
"Resource": [
"arn:aws:s3:::${yourbucket}/*"
]
},
{
"Effect": "Allow",
"Action": [
"logs:DescribeLogStreams",
"logs:CreateLogStream",
"logs:PutLogEvents"
],
"Resource": [
"arn:aws:logs:${region}:${your_account_id}:log-group:/aws/omics/WorkflowLog:log-stream:*"
]
},
{
"Effect": "Allow",
"Action": [
"logs:CreateLogGroup"
],
"Resource": [
"arn:aws:logs:${region}:${your_account_id}:log-group:/aws/omics/WorkflowLog:*"
]
},
{
"Effect": "Allow",
"Action": [
"ecr:BatchGetImage",
"ecr:GetDownloadUrlForLayer",
"ecr:BatchCheckLayerAvailability"
],
"Resource": [
"arn:aws:ecr:${region}:${your_account_id}:repository/*"
]
}
]
}
EOF
echo "omics_workflow_policy.json 파일이 생성되었습니다."trust_policy.json 만들기
cat << EOF > trust_policy.json
{
"Version": "2012-10-17",
"Statement": [
{
"Effect": "Allow",
"Principal": {
"Service": "omics.amazonaws.com"
},
"Action": "sts:AssumeRole",
"Condition": {
"StringEquals": {
"aws:SourceAccount": "${your_account_id}"
},
"ArnLike": {
"aws:SourceArn": "arn:aws:omics:${region}:${your_account_id}:run/*"
}
}
}
]
}
EOF
echo "trust_policy.json 파일이 생성되었습니다."IAM Role 생성
aws iam create-role --role-name ${omics_role_name} --assume-role-policy-document file://trust_policy.json
Policy document 생성
aws iam put-role-policy --role-name ${omics_role_name} --policy-name OmicsWorkflowV1 --policy-document file://omics_workflow_policy.json
워크플로우 실행
작은 샘플의 예제는 input.json, 큰 샘플의 예제는 input_full.json
aws omics start-run \
--name scrnaseq_workshop_test_run_1 \
--role-arn arn:aws:iam::${your_account_id}:role/${omics_role_name}\
--workflow-id ${workflow_id} \
--parameters file://input.json \
--output-uri s3://${yourbucket}/output/Nf-core 워크플로우 마이그레이션 하기 (rnaseq)
참고 문서: https://catalog.us-east-1.prod.workshops.aws/workshops/76d4a4ff-fe6f-436a-a1c2-f7ce44bc5d17/en-US
이 문서를 참고하여 환경을 준비합니다. 여기서는 이 과정은 생략합니다.
프로젝트 셋업
nf-core repository로부터 워크플로우 복제
cd ~
git clone https://github.com/nf-core/rnaseq --branch 3.14.0 --single-branchDocker Image Manifest의 생성
cp ~/amazon-ecr-helper-for-aws-healthomics/lib/lambda/parse-image-uri/public_registry_properties.json namespace.configinspect_nf.py 를 실행합니다.
python3 amazon-omics-tutorials/utils/scripts/inspect_nf.py \
--output-manifest-file rnaseq_3140_docker_images_manifest.json \
-n namespace.config \
--output-config-file omics.config \
--region <region> \
~/rnaseq/
생성되는 두 개의 출력은 rnaseq_3140_docker_images_manifest.json 과 omics.config입니다.
rnaseq_3140_docker_images_manifest.json 파일은 다음과 같은 모습이어야 합니다:
{
"manifest": [
"quay.io/biocontainers/bbmap:39.01--h5c4e2a8_0",
"quay.io/biocontainers/bedtools:2.30.0--hc088bd4_0",
"quay.io/biocontainers/bioconductor-dupradar:1.28.0--r42hdfd78af_0",
"quay.io/biocontainers/bioconductor-summarizedexperiment:1.24.0--r41hdfd78af_0",
"quay.io/biocontainers/bioconductor-tximeta:1.12.0--r41hdfd78af_0",
"quay.io/biocontainers/fastp:0.23.4--h5f740d0_0",
"quay.io/biocontainers/fastqc:0.12.1--hdfd78af_0",
"quay.io/biocontainers/fq:0.9.1--h9ee0642_0",
"quay.io/biocontainers/gffread:0.12.1--h8b12597_0",
"quay.io/biocontainers/hisat2:2.2.1--h1b792b2_3",
"quay.io/biocontainers/kallisto:0.48.0--h15996b6_2",
"quay.io/biocontainers/mulled-v2-1fa26d1ce03c295fe2fdcf85831a92fbcbd7e8c2:1df389393721fc66f3fd8778ad938ac711951107-0",
"quay.io/biocontainers/mulled-v2-1fa26d1ce03c295fe2fdcf85831a92fbcbd7e8c2:59cdd445419f14abac76b31dd0d71217994cbcc9-0",
"quay.io/biocontainers/mulled-v2-8849acf39a43cdd6c839a369a74c0adc823e2f91:ab110436faf952a33575c64dd74615a84011450b-0",
"quay.io/biocontainers/mulled-v2-a97e90b3b802d1da3d6958e0867610c718cb5eb1:2cdf6bf1e92acbeb9b2834b1c58754167173a410-0",
"quay.io/biocontainers/mulled-v2-cf0123ef83b3c38c13e3b0696a3f285d3f20f15b:64aad4a4e144878400649e71f42105311be7ed87-0",
"quay.io/biocontainers/multiqc:1.19--pyhdfd78af_0",
"quay.io/biocontainers/perl:5.26.2",
"quay.io/biocontainers/picard:3.0.0--hdfd78af_1",
"quay.io/biocontainers/preseq:3.1.2--h445547b_2",
"quay.io/biocontainers/python:3.9--1",
"quay.io/biocontainers/qualimap:2.3--hdfd78af_0",
"quay.io/biocontainers/rseqc:5.0.3--py39hf95cd2a_0",
"quay.io/biocontainers/salmon:1.10.1--h7e5ed60_0",
"quay.io/biocontainers/samtools:1.16.1--h6899075_1",
"quay.io/biocontainers/samtools:1.17--h00cdaf9_0",
"quay.io/biocontainers/sortmerna:4.3.4--h9ee0642_0",
"quay.io/biocontainers/stringtie:2.2.1--hecb563c_2",
"quay.io/biocontainers/subread:2.0.1--hed695b0_0",
"quay.io/biocontainers/trim-galore:0.6.7--hdfd78af_0",
"quay.io/biocontainers/ucsc-bedclip:377--h0b8a92a_2",
"quay.io/biocontainers/ucsc-bedgraphtobigwig:445--h954228d_0",
"quay.io/biocontainers/umi_tools:1.1.4--py38hbff2b2d_1",
"quay.io/nf-core/ubuntu:20.04"
]
}컨테이너 사설화
aws stepfunctions start-execution \
--state-machine-arn arn:aws:states:<region>:<your-account-id>:stateMachine:omx-container-puller \
--input file://rnaseq_3140_docker_images_manifest.json
nf-core project 코드 업데이트
mv omics.config rnaseq/conf
echo "includeConfig 'conf/omics.config'" >> rnaseq/nextflow.config
AWS HealthOmics 워크플로우 만들기
단계1. AWS HealthOmics 파라미터 파일
paramter-descrption.json을 만들어 아래와 같이 저장합니다.
새 워크플로마다 다른 매개변수를 사용할 수 있습니다. 위의 매개변수 템플릿 파일은 SCRNA-Seq nf-core 워크플로에만 해당됩니다. 새 파라미터 파일을 만들 때는 이 워크플로우에 대한 파라미터를 확인해야 합니다.
NF-Core 워크플로우에 대한 파라미터를 찾으려면 설명서를 참조하세요(예: RNA-Seq 파이프라인 파라미터는 여기).
{
"input": {
"description": "S3 URI to samplesheet.csv. Rows therein point to S3 URIs for fastq data",
"optional": false
},
"genome": {
"description": "Name of iGenomes reference. - e.g. GRCh38",
"optional": true
},
"igenomes_base": {
"description": "URI base for iGenomes references. (e.g. s3://ngi-igenomes/igenomes/)",
"optional": true
},
"fasta": {
"description": "Path to FASTA genome file. This parameter is mandatory if --genome is not specified. If you don't have the appropriate alignment index available this will be generated for you automatically.",
"optional": true
},
"gtf": {
"description": "Path to GTF annotation file. This parameter is mandatory if --genome is not specified.",
"optional": true
},
"gff": {
"description": "Path to GFF3 annotation file. This parameter must be specified if `--genome` or `--gtf` are not specified.",
"optional": true
},
"pseudo_aligner": {
"description": "Specifies the pseudo aligner to use - available options are 'salmon'. Runs in addition to `--aligner`",
"optional": true
},
"transcript_fasta": {
"description": "Path to FASTA transcriptome file.",
"optional": true
},
"additional_fasta": {
"description": "FASTA file to concatenate to genome FASTA file e.g. containing spike-in sequences.",
"optional": true
},
"bbsplit_fasta_list": {
"description": "Path to comma-separated file containing a list of reference genomes to filter reads against with BBSplit. You have to also explicitly set `--skip_bbsplit` false if you want to use BBSplit.",
"optional": true
},
"hisat2_index": {
"description": "Path to directory or tar.gz archive for pre-built HISAT2 index.",
"optional": true
},
"salmon_index": {
"description": "Path to directory or tar.gz archive for pre-built Salmon index.",
"optional": true
},
"rsem_index": {
"description": "Path to directory or tar.gz archive for pre-built RSEM index",
"optional": true
},
"skip_bbsplit": {
"description": "Skip BBSplit for removal of non-reference genome reads.",
"optional": true
},
"pseudo_aligner": {
"description": "Specifies the pseudo aligner to use - available options are 'salmon'. Runs in addition to '--aligner'.",
"optional": true
},
"umitools_bc_pattern": {
"description": "The UMI barcode pattern to use e.g. 'NNNNNN' indicates that the first 6 nucleotides of the read are from the UMI.",
"optional": true
}
}단계2. 워크플로우 스테이징
zip -r rnaseq-workflow.zip rnaseqaws s3 cp rnaseq-workflow.zip s3://<yourbucket>/workshop/rnaseq-workflow.zip
aws omics create-workflow \
--name rnaseq-v3140 \
--definition-uri s3://<yourbucket>//workshop/rnaseq-workflow.zip \
--parameter-template file://parameter-description.json \
--engine NEXTFLOW단계3. 워크플로우 생성 확인
aws omics list-workflows --name rnaseq-v3140워크플로우 테스트하기
입력파일 준비
samplesheet_full
아래의 입력 파일들은 여기를 참고하여 준비할 수 있습니다.
레퍼런스 데이터 다운로드
nf-core/rnaseq repository에 있는 igenomes.config 를 참고하여 필요한 GRCh37 레퍼런스 관련 파일들을 모두 healthomics의 사용 리전에 만든 버킷으로 준비합니다.
aws s3 sync s3://ngi-igenomes/igenomes/Homo_sapiens/ s3://{mybucketname}/workshop/igenomes/Homo_sapiens/샘플시트 예제 템플릿 다운로드
wget https://raw.githubusercontent.com/nf-core/test-datasets/rnaseq/samplesheet/v3.10/samplesheet_full.csvparameter-description.json에 사용된 것과 동일한 키를 사용하여 input_rnaseq.json 파일을 새로 만듭니다. 값은 워크플로에서 허용되는 실제 S3 경로 또는 문자열이 됩니다.
samplesheet_full.csv 파일을 새로 작성합니다. 이때 HealthOmics와 같은 리전에 있는 s3 bucket에 FASTQ 입력파일을 준비합니다. (aws s3 sync 나 aws s3 cp 와 같은 명령어 활용 가능)
예)
aws s3 sync s3://ngi-igenomes/test-data/rnaseq/ s3://{mybucketname}/workshop/samplesheet_full.csv 예시
sample,fastq_1,fastq_2,strandedness
GM12878_REP1,s3://{mybucketname}/test-data/rnaseq/SRX1603629_T1_1.fastq.gz,s3://{mybucketname}/test-data/rnaseq/SRX1603629_T1_2.fastq.gz,reverse
GM12878_REP2,s3://{mybucketname}/test-data/rnaseq/SRX1603630_T1_1.fastq.gz,s3://{mybucketname}/test-data/rnaseq/SRX1603630_T1_2.fastq.gz,reverse
K562_REP1,s3://{mybucketname}/test-data/rnaseq/SRX1603392_T1_1.fastq.gz,s3://{mybucketname}/test-data/rnaseq/SRX1603392_T1_2.fastq.gz,reverse
K562_REP2,s3://{mybucketname}/test-data/rnaseq/SRX1603393_T1_1.fastq.gz,s3://{mybucketname}/test-data/rnaseq/SRX1603393_T1_2.fastq.gz,reverse
MCF7_REP1,s3://{mybucketname}/test-data/rnaseq/SRX2370490_T1_1.fastq.gz,s3://{mybucketname}/test-data/rnaseq/SRX2370490_T1_2.fastq.gz,reverse
MCF7_REP2,s3://{mybucketname}/test-data/rnaseq/SRX2370491_T1_1.fastq.gz,s3://{mybucketname}/test-data/rnaseq/SRX2370491_T1_2.fastq.gz,reverse
H1_REP1,s3://{mybucketname}/test-data/rnaseq/SRX2370468_T1_1.fastq.gz,s3://{mybucketname}/test-data/rnaseq/SRX2370468_T1_2.fastq.gz,reverse
H1_REP2,s3://{mybucketname}/test-data/rnaseq/SRX2370469_T1_1.fastq.gz,s3://{mybucketname}/test-data/rnaseq/SRX2370469_T1_2.fastq.gz,revers편집한 samplesheet 를 버킷으로 복사
aws s3 mv samplesheet_full.csv s3://{mybucket}/workshop/input_rnaseq_full.json
{
"input": "s3://{mybucket}/workshop/samplesheet_full.csv",
"genome": "GRCh37",
"igenomes_base": "s3://{mybucket}/workshop/igenomes/",
"pseudo_aligner": "salmon"
}samplesheet_test
아래의 입력 파일들은 여기를 참고하여 준비할 수 있습니다.
앞의 samplesheet_full.csv 와 달리 본 샘플시트 런은 미니 샘플이기때문에 관련 레퍼런스 및 파라미터 입력을 모두 준비해야 합니다.
wget https://raw.githubusercontent.com/nf-core/test-datasets/7f1614baeb0ddf66e60be78c3d9fa55440465ac8/reference/genome.fasta
wget https://raw.githubusercontent.com/nf-core/test-datasets/7f1614baeb0ddf66e60be78c3d9fa55440465ac8/reference/genes_with_empty_tid.gtf.gz
wget https://raw.githubusercontent.com/nf-core/test-datasets/7f1614baeb0ddf66e60be78c3d9fa55440465ac8/reference/genes.gff.gz
wget https://raw.githubusercontent.com/nf-core/test-datasets/7f1614baeb0ddf66e60be78c3d9fa55440465ac8/reference/transcriptome.fasta
wget https://raw.githubusercontent.com/nf-core/test-datasets/7f1614baeb0ddf66e60be78c3d9fa55440465ac8/reference/gfp.fa.gz
wget https://raw.githubusercontent.com/nf-core/test-datasets/7f1614baeb0ddf66e60be78c3d9fa55440465ac8/reference/bbsplit_fasta_list.txt
wget https://raw.githubusercontent.com/nf-core/test-datasets/7f1614baeb0ddf66e60be78c3d9fa55440465ac8/reference/hisat2.tar.gz
wget https://raw.githubusercontent.com/nf-core/test-datasets/7f1614baeb0ddf66e60be78c3d9fa55440465ac8/reference/salmon.tar.gz
wget https://raw.githubusercontent.com/nf-core/test-datasets/7f1614baeb0ddf66e60be78c3d9fa55440465ac8/reference/rsem.tar.gz다운로드 받은 파일들을 s3 bucket 으로 업로드
aws s3 sync . s3://{mybucket}/workshop/reference/샘플시트 예제 템플릿 다운로드
wget https://raw.githubusercontent.com/nf-core/test-datasets/rnaseq/samplesheet/v3.10/samplesheet_test.csvsamplesheet_test.csv 예시
sample,fastq_1,fastq_2,strandedness
WT_REP1,s3://{mybucketname}/workshop/test_fastq/SRR6357070_1.fastq.gz,s3://{mybucketname}/workshop/test_fastq/SRR6357070_2.fastq.gz,auto
WT_REP1,s3://{mybucketname}/workshop/test_fastq/SRR6357071_1.fastq.gz,s3://{mybucketname}/workshop/test_fastq/SRR6357071_2.fastq.gz,auto
WT_REP2,s3://{mybucketname}/workshop/test_fastq/SRR6357072_1.fastq.gz,s3://{mybucketname}/workshop/test_fastq/SRR6357072_2.fastq.gz,reverse
RAP1_UNINDUCED_REP1,s3://{mybucketname}/workshop/test_fastq/SRR6357073_1.fastq.gz,,reverse
RAP1_UNINDUCED_REP2,s3://{mybucketname}/workshop/test_fastq/SRR6357074_1.fastq.gz,,reverse
RAP1_UNINDUCED_REP2,s3://{mybucketname}/workshop/test_fastq/SRR6357075_1.fastq.gz,,reverse
RAP1_IAA_30M_REP1,s3://{mybucketname}/workshop/test_fastq/SRR6357076_1.fastq.gz,s3://{mybucketname}/workshop/test_fastq/SRR6357076_2.fastq.gz,reverse편집한 samplesheet 를 버킷으로 복사
aws s3 mv samplesheet_test.csv s3://{mybucket}/workshop/input_rnaseq_test.json
{
"input": "s3://{mybucketname}/workshop/samplesheet_test.csv",
"fasta": "s3://{mybucketname}/workshop/reference/genome.fasta",
"gtf": "s3://{mybucketname}/workshop/reference/genes_with_empty_tid.gtf.gz",
"gff": "s3://{mybucketname}/workshop/reference/genes.gff.gz",
"transcript_fasta": "s3://{mybucketname}/workshop/reference/transcriptome.fasta",
"additional_fasta": "s3://{mybucketname}/workshop/reference/gfp.fa.gz",
"bbsplit_fasta_list": "s3://{mybucketname}/workshop/reference/bbsplit_fasta_list.txt",
"hisat2_index": "s3://{mybucketname}/workshop/reference/hisat2.tar.gz",
"salmon_index": "s3://{mybucketname}/workshop/reference/salmon.tar.gz",
"rsem_index": "s3://{mybucketname}/workshop/reference/rsem.tar.gz",
"skip_bbsplit" : false,
"pseudo_aligner" : "salmon",
"umitools_bc_pattern" : "NNNN"
}상기 bbsplit_fasta_list.txt 파일 내용도 s3 bucket을 지정합니다.
s3://{mybucket}/workshop/reference/bbsplit_fasta_list.txt 의 내용
sarscov2,s3://{mybucket}/workshop/reference/GCA_009858895.3_ASM985889v3_genomic.200409.fna
human,s3://{mybucket}/workshop/reference/chr22_23800000-23980000.faS3 policy 관련 참고사항
위의 입력데이터로 필요한 S3 버킷에 대해 아래 Policy 준비에 반영되어야 합니다.
마찬가지로 결과 데이터를 작성할 버킷에 대한 권한도 Policy 준비에 반영해주세요.
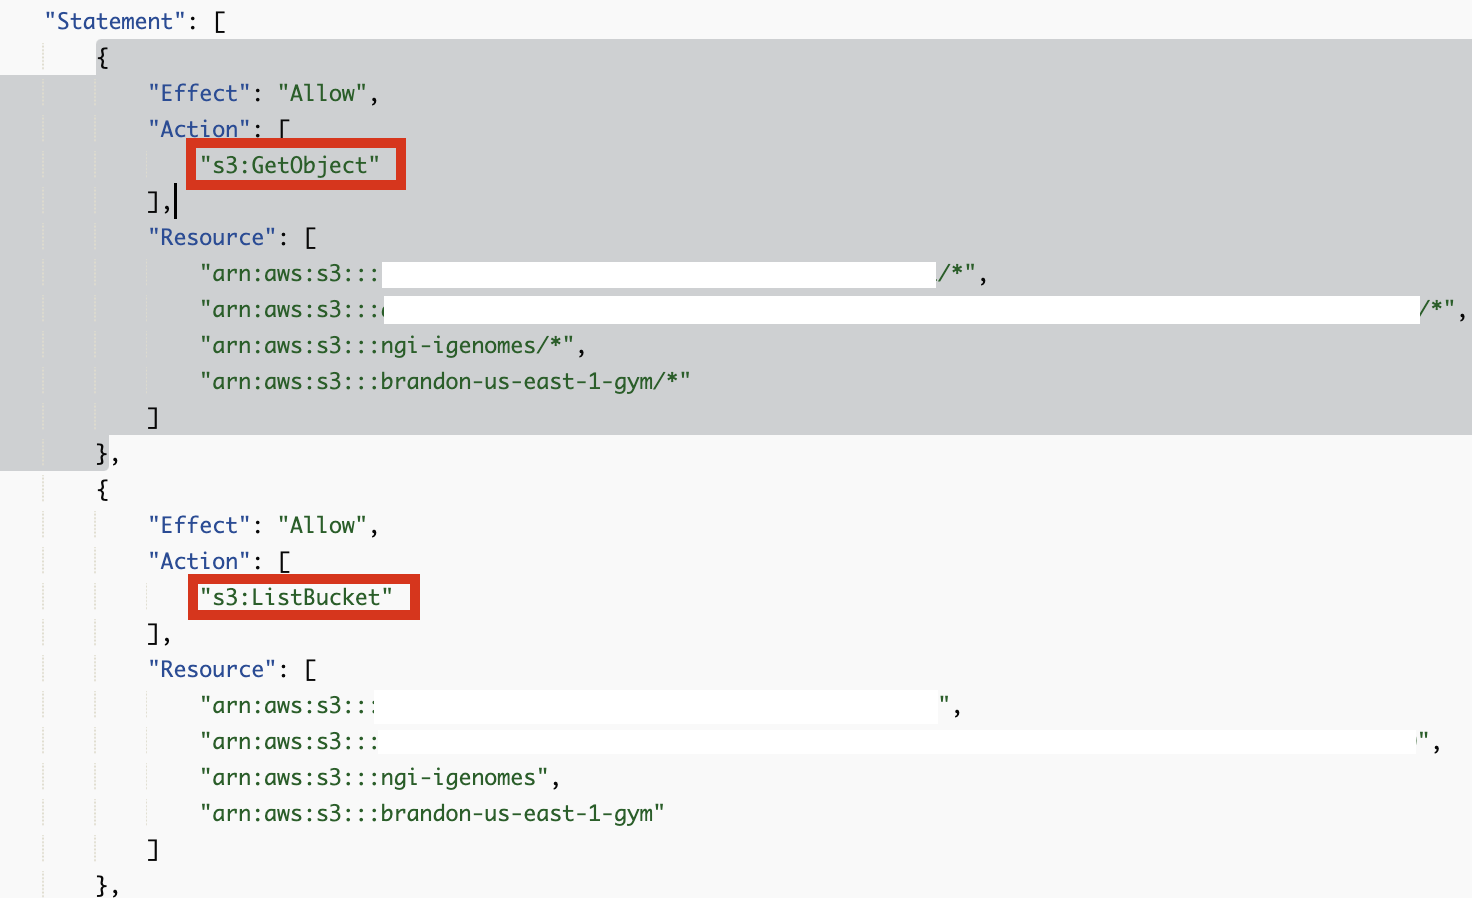
s3:GetObject, s3:ListBucket 권한
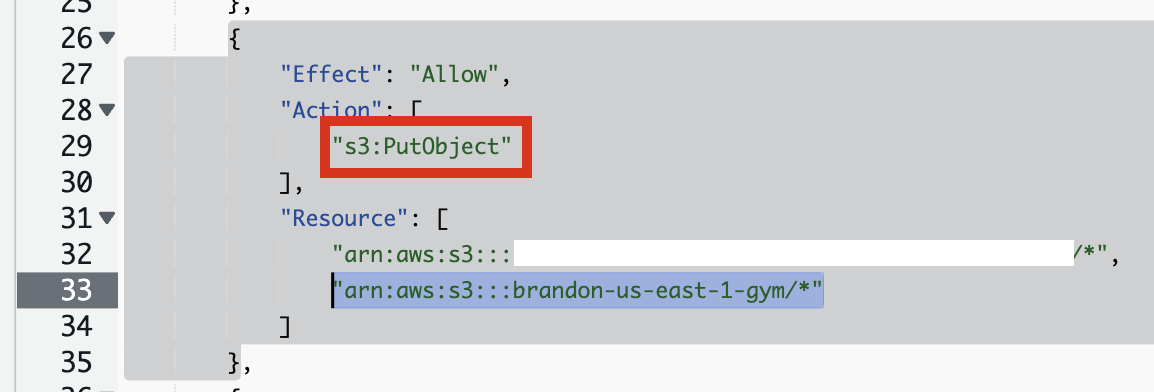
s3:PutObject 권한
Policy 준비
Prepare IAM service role to run AWS HealthOmics workflow
omics_workflow_policy.json 만들기
# 환경 변수 설정
export yourbucket="your-bucket-name"
export your_account_id="your-account-id"
export region="your-region"
# JSON 내용 생성 및 파일로 저장
cat << EOF > omics_workflow_policy.json
{
"Version": "2012-10-17",
"Statement": [
{
"Effect": "Allow",
"Action": [
"s3:GetObject"
],
"Resource": [
"arn:aws:s3:::${yourbucket}/*"
]
},
{
"Effect": "Allow",
"Action": [
"s3:ListBucket"
],
"Resource": [
"arn:aws:s3:::${yourbucket}"
]
},
{
"Effect": "Allow",
"Action": [
"s3:PutObject"
],
"Resource": [
"arn:aws:s3:::${yourbucket}/*"
]
},
{
"Effect": "Allow",
"Action": [
"logs:DescribeLogStreams",
"logs:CreateLogStream",
"logs:PutLogEvents"
],
"Resource": [
"arn:aws:logs:${region}:${your_account_id}:log-group:/aws/omics/WorkflowLog:log-stream:*"
]
},
{
"Effect": "Allow",
"Action": [
"logs:CreateLogGroup"
],
"Resource": [
"arn:aws:logs:${region}:${your_account_id}:log-group:/aws/omics/WorkflowLog:*"
]
},
{
"Effect": "Allow",
"Action": [
"ecr:BatchGetImage",
"ecr:GetDownloadUrlForLayer",
"ecr:BatchCheckLayerAvailability"
],
"Resource": [
"arn:aws:ecr:${region}:${your_account_id}:repository/*"
]
}
]
}
EOF
echo "omics_workflow_policy.json 파일이 생성되었습니다."trust_policy.json 만들기
# 환경 변수 설정
export your_account_id="your-account-id"
export region="your-region" # 예: us-east-1
# JSON 내용 생성 및 파일로 저장
cat << EOF > trust_policy.json
{
"Version": "2012-10-17",
"Statement": [
{
"Effect": "Allow",
"Principal": {
"Service": "omics.amazonaws.com"
},
"Action": "sts:AssumeRole",
"Condition": {
"StringEquals": {
"aws:SourceAccount": "${your_account_id}"
},
"ArnLike": {
"aws:SourceArn": "arn:aws:omics:${region}:${your_account_id}:run/*"
}
}
}
]
}
EOF
echo "trust_policy.json 파일이 생성되었습니다."IAM Role 생성
aws iam create-role --role-name omics_start_run_role_v1 --assume-role-policy-document file://trust_policy.jsonPolicy document 생성
aws iam put-role-policy --role-name omics_start_run_role_v1 --policy-name OmicsWorkflowV1 --policy-document file://omics_workflow_policy.json워크플로우 실행
--storage-type 파라미터를 사용하지 않으면 기본값은 STATIC 입니다. (참고)
동적 실행 스토리지 (DYNAMIC)는 정적 실행 스토리지 (STATIC) 보다 프로비저닝/디프로비저닝 시간이 더 빠릅니다. 빠른 설정은 자주 실행되는 소규모 워크플로우에 유리하며 개발/테스트 주기 동안에도 이점이 있습니다. 따라서 처음에 마이그레이션 하면서 테스트할 경우 이 옵션을 DYNAMIC으로 설정한 뒤 스토리지 사용량에 따라 STATIC으로 설정 하는 것을 추천드립니다.
aws omics start-run \
--name rnaseq_workshop_run_1 \
--role-arn arn:aws:iam::<your-account-id>:role/omics_start_run_role_v1 \
--workflow-id <your-workflow-id> \
--parameters file://input_rnaseq.json \
--output-uri s3://<yourbucket>/output/ \
--storage-type DYNAMIC
aws omics start-run \
--name rnaseq_workshop_run_1 \
--role-arn arn:aws:iam::<your-account-id>:role/omics_start_run_role_v1 \
--workflow-id <your-workflow-id> \
--parameters file://input_rnaseq.json \
--output-uri s3://<yourbucket>/output/
--storage-type STATIC \
--storage-capacity 2048test 샘플로 할 경우 예시
aws omics start-run \
--name rnaseq_workshop_test_run_1 \
--role-arn arn:aws:iam::<your-account-id>:role/omics_start_run_role_v1 \
--workflow-id <your-workflow-id> \
--parameters file://input_rnaseq_test.json \
--output-uri s3://<yourbucket>/output/
참고문서
- https://github.com/aws-samples/amazon-omics-tutorials/tree/main/example-workflows/nf-core/workflows/rnaseq
Nf-core 워크플로우 마이그레이션 하기 (spatialvi)
2025년 5월 22일 현재 dev 버전 branch에서 테스트 되었습니다.
연구 목적이며 반드시 실제 샘플과 시나리오상에서 개별적으로 결과데이터와 파이프라인 검증을 필요로 할 것입니다.
2025년 5/30일 경 nf-schema 지원을 위한 HealthOmics 업데이트가 예정되어 있습니다. 그전에는 nf-schema를 기존의구 플러그인인 nf-validation으로 변경해야 합니다. 워크플로우 내 코드 수정은 다음을 참고하여 모두 교체해주세요. (링크)
마이그레이션을 위한 환경 구성
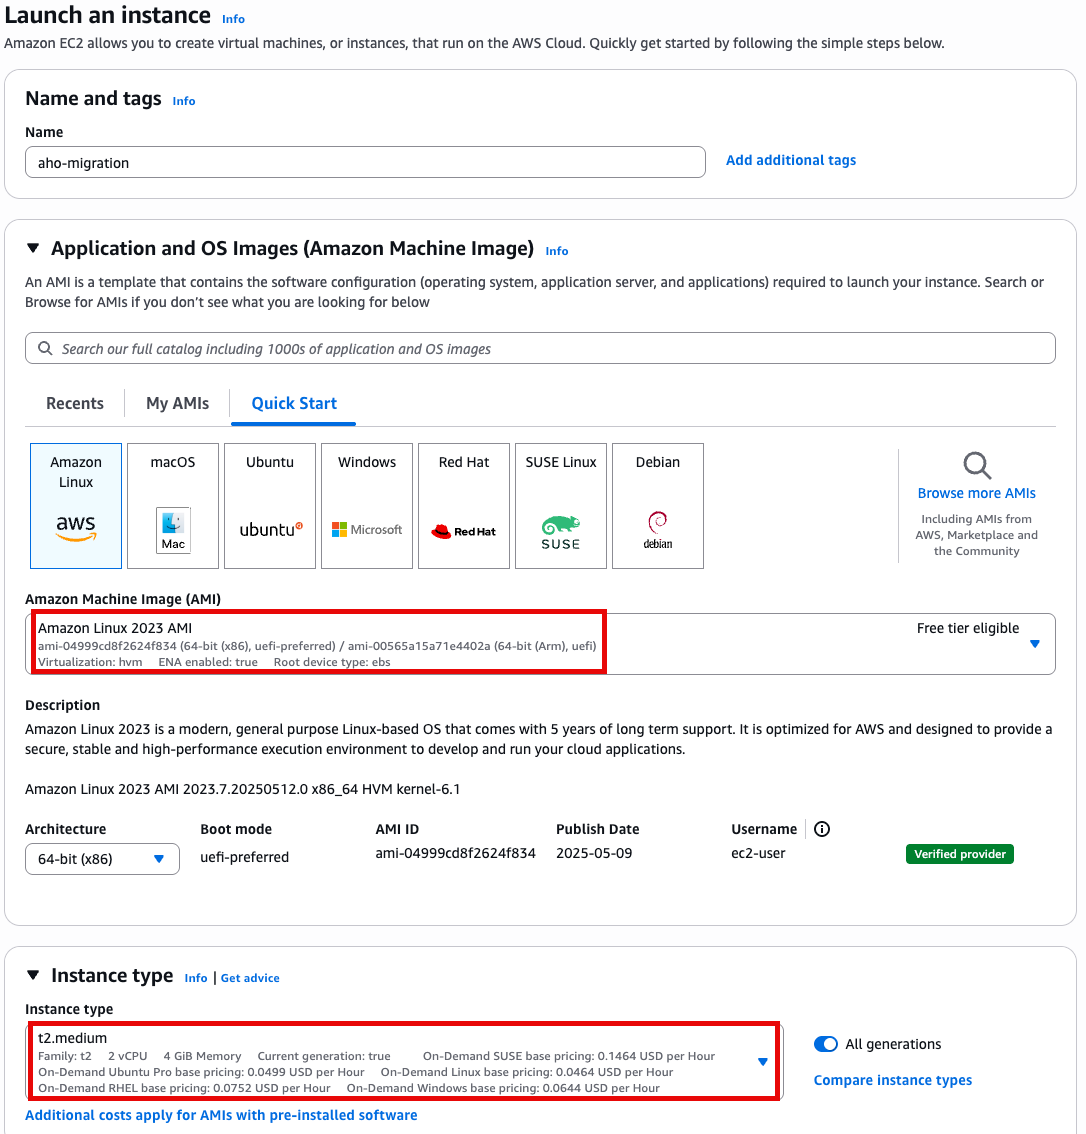
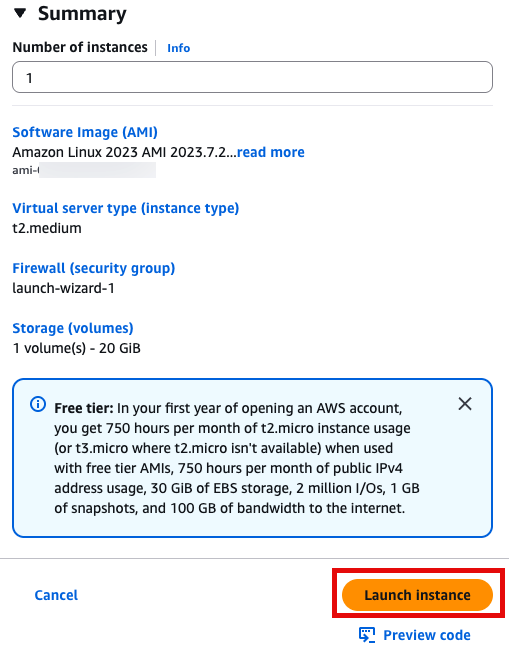
Step1 - Ec2 기반 환경 구성
Ec2기반이 아닌 CloudShell 기반으로도 세팅할 수 있습니다. (참고) 선호하는 환경에서 작업하세요.
- t2.medium
- Amazon linux 2023 AMI
- 64 bit x86
Specify instance type options
Generate key pairs
If you don't already have a key pair then select create keypair

Give the key pair a name and select the key pair type and format.
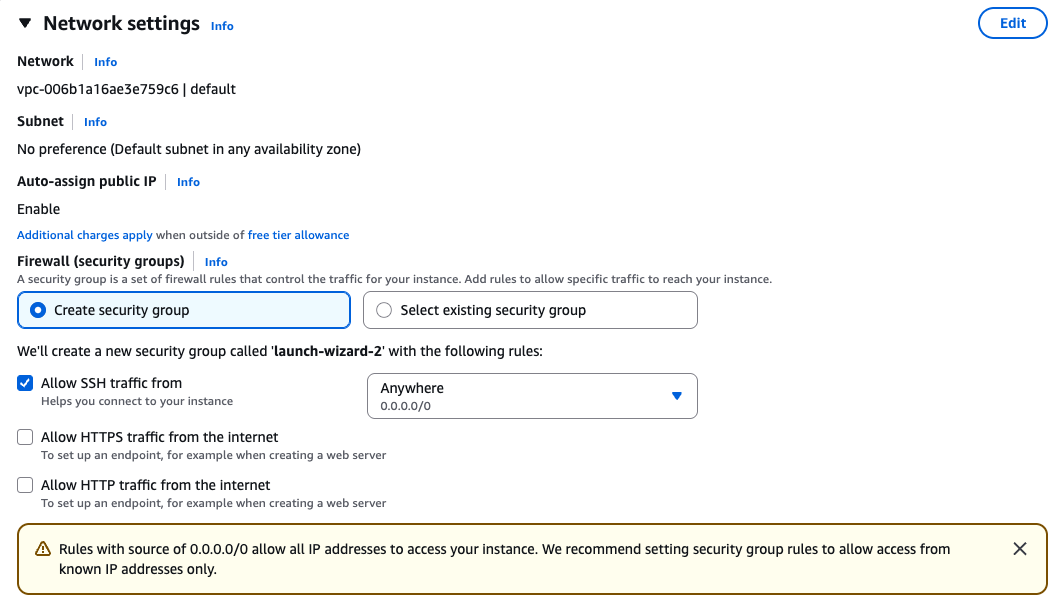
Security groups
Ensure that you have access to the instance via SSH.
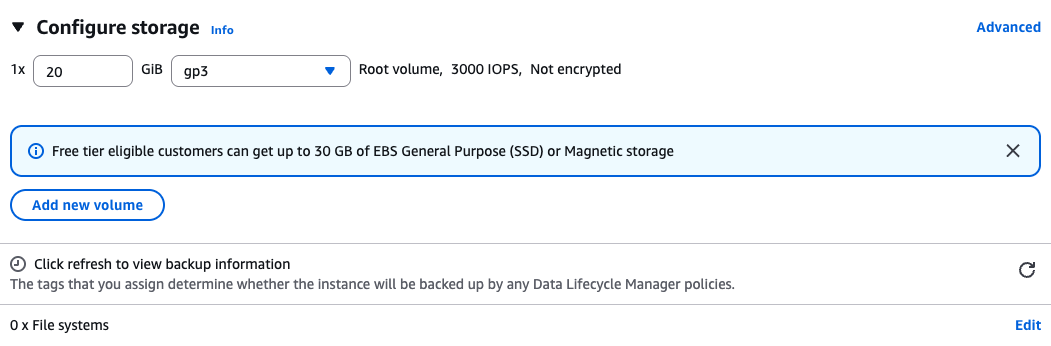
Storage
Create a root volume of 20GB
Instance Profile
We will create an IAM instance profile to allow administrator permissions for the EC2 instance, for the purpose of this workshop. However, in general, AWS security best practices recommendation is that you create an instance profile with least privilege. This configuration is not recommended in your own account, you should discuss organizational best-practices with your IT team to configure appropriate permissions.
Advanced Details 토글

IAM Instance profile에서 Create new IAM profile 선택
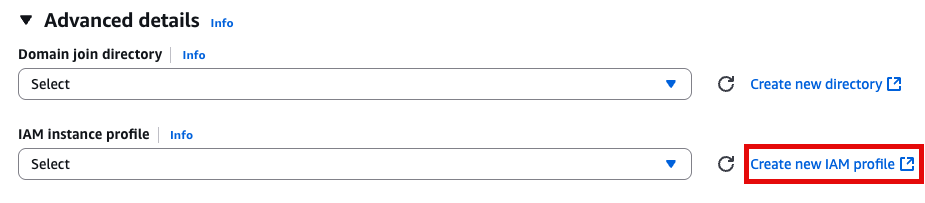
AWS service, EC2 선택
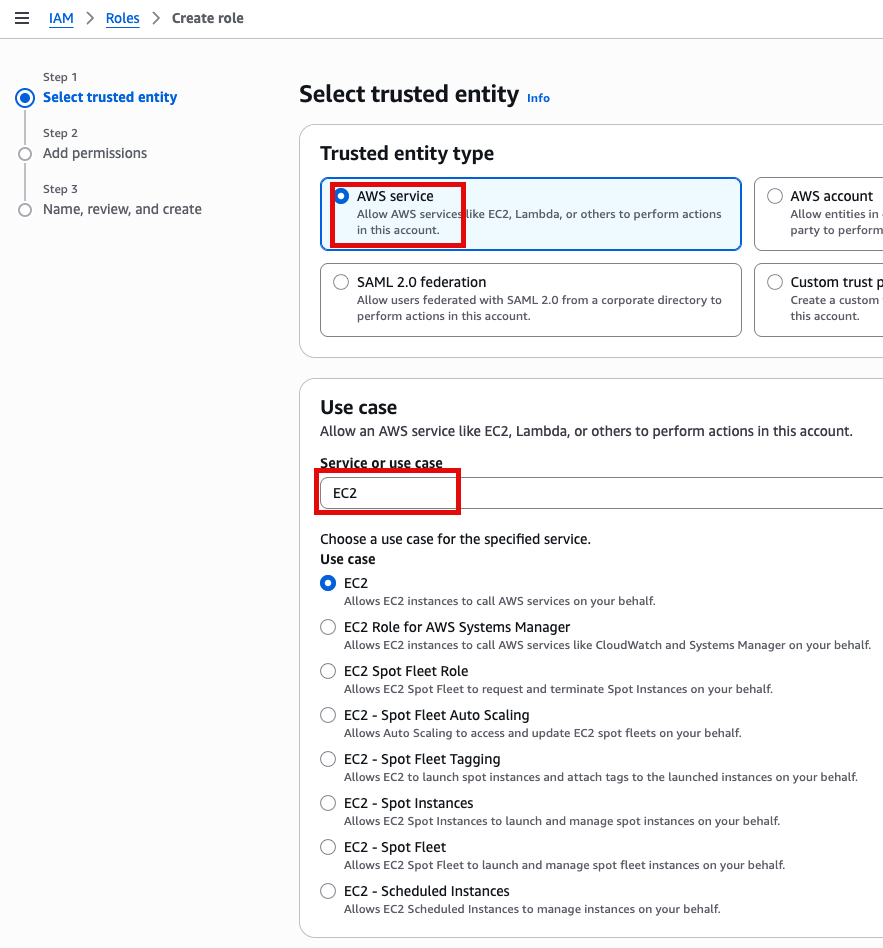
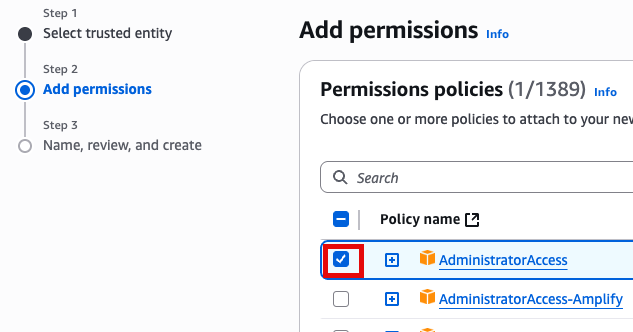
Add Permissions 화면에서 AdministratorAccess 추가(선택)
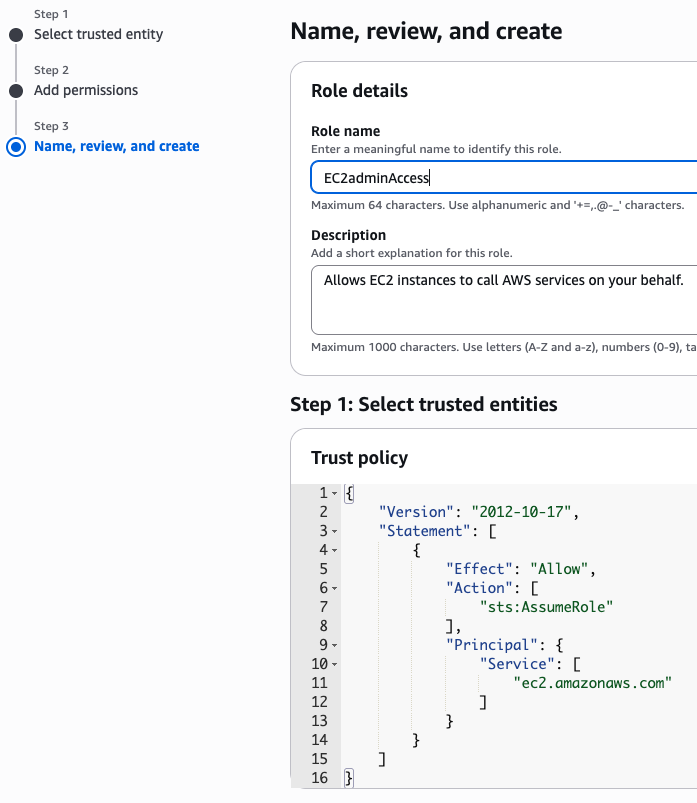
새로운 role name을 지정 (여기서는 EC2adminAccess라고 작성했음)
이제 EC2 instance 실행 화면으로 돌아가서 앞에서 만든 EC2adminAccess 선택

User Data
맨 아래의 User data 섹션에 내용 추가
#!/bin/bash
echo "Setting up NodeJS Environment"
curl https://raw.githubusercontent.com/nvm-sh/nvm/v0.34.0/install.sh | bash
echo 'export NVM_DIR="/.nvm"' >> /home/ec2-user/.bashrc
echo '[ -s "$NVM_DIR/nvm.sh" ] && . "$NVM_DIR/nvm.sh" # This loads nvm' >> /home/ec2-user/.bashrc
# Dot source the files to ensure that variables are available within the current shell
. /.nvm/nvm.sh
. ~/.bashrc
nvm install --lts
python3 -m ensurepip --upgrade
pip3 install boto3
npm install -g aws-cdk
sudo yum -y install git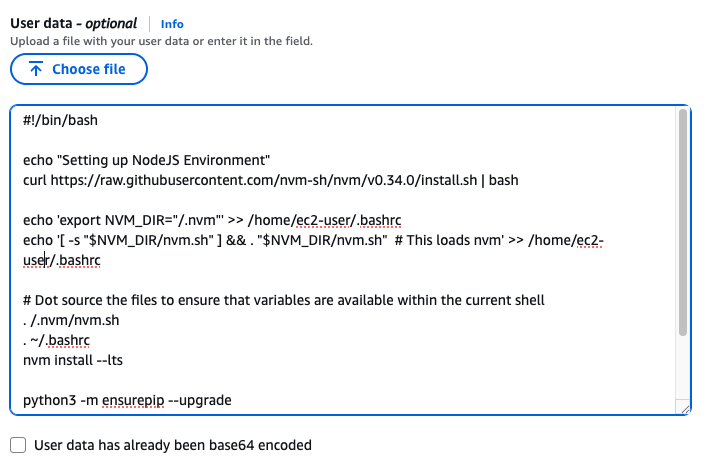
Launch instance 눌러서 인스턴스 실행
Step 2 - workflow migration code를 세팅하기
SSH 접속, 앞에서 만든 console로 접속합니다.


Use SSH to access the instance, you will need to ensure the key you created earlier is in the .ssh folder in your home directory and has the correct permissions(chmod 400). You will need replace ec2-user@10.11.12.123 with the IP address of your instance. This can be found in the EC2 management console.
ssh -i .ssh/omics-tutorial.pem ec2-user@10.11.12.123Get the region using the ec2-metadata command. This handy oneliner stores it as a variable
REGION=$(ec2-metadata --availability-zone | sed 's/placement: \(.*\).$/\1/')Get the account number (if you don't already know it)
ACCOUNT_NUMBER=$(aws sts get-caller-identity --query 'Account' --output text)Bootstraping
Now you can bootstrap cdk replacing ACCOUNT-NUMBER with your account number nad using the $REGION variable created earlier.
cdk bootstrap aws://$ACCOUNT_NUMBER/$REGIONDownload the workflow migration code
This step downloads the code which is used to migrate the workflow into AWS HealthOmics Workflows
cd ~
git clone https://github.com/aws-samples/amazon-ecr-helper-for-aws-healthomics.git
git clone https://github.com/aws-samples/aws-healthomics-tutorials.git
cd amazon-ecr-helper-for-aws-healthomics
Install and deploy the code.
npm install
cdk deploy --all프로젝트 셋업
이제 원하는 nf-core의 워크플로우를 HealthOmics private workflow에 마이그레이션을 하기 위해 다음 과정이 필요합니다.
- Cloning a workflow from nf-core
- Generating artifacts for migration
- Privatizing containers by migrating them to your private Amazon ECR
버킷 생성 및 Bash 환경변수 선언
export yourbucket="your-bucket-name"
export your_account_id="your-account-id" #ACCOUNT_NUMBER
export region="your-region"
export workflow_name="your-workflow-name"
export omics_role_name="your_omics_rolename"
# if not exist the bucket, let's create.
#aws s3 mb $yourbucketClone nf-core repository that you want to migrate
cd ~
git clone https://github.com/nf-core/spatialvi.gitDocker Image Manifest의 생성
cp /home/workshop/amazon-ecr-helper-for-aws-healthomics/lib/lambda/parse-image-uri/public_registry_properties.json namespace.config준비된 namespace.config파일의 내용은 다음과 같습니다.

This file will be used as one of the inputs for the inspect_nf.py script. This script parses the entire nextflow workflow project and identifies all public docker images across all the tools and generates a manifest which will be passed as an input to the migration tool.
inspect_nf.py 를 실행합니다.
python3 aws-healthomics-tutorials/utils/scripts/inspect_nf.py \
--output-manifest-file spatialvi_dev_docker_images_manifest.json \
-n namespace.config \
--output-config-file omics.config \
--region $region \
~/spatialvi/
생성되는 두 개의 출력은 spatialvi_dev_docker_images_manifest.json 과 omics.config입니다.
spatialvi_dev_docker_images_manifest.json 파일은 예를들어 다음과 같은 모습이어야 합니다:
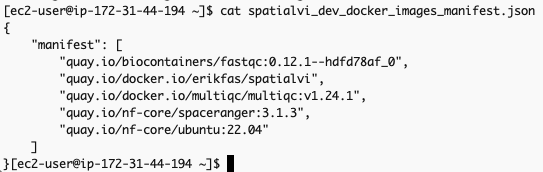
해당 파일의 내용을 다음과 같이 수정합니다. (기존의 container 주소가 더이상 작동하지 않는 것이 많아서 임의로 공개된 것을 찾아 수정하였습니다, 예를들어 spaceranger에 대한 컨테이너 주소 quay.io/nf-core/spaceranger:3.1.3 가 작동하지 않아서 dockerhub의 공개 Image로부터 검색하여 대응시켰습니다. https://hub.docker.com/search?q=spaceranger
{
"manifest": [
"quay.io/biocontainers/fastqc:0.12.1--hdfd78af_0",
"erikfas/spatialvi:latest",
"multiqc/multiqc:v1.24.1",
"cumulusprod/spaceranger:3.1.3",
"ubuntu:22.04"
]
}The omics.config output file is also generated, which needs to be added to the nextflow workflow project. The purpose of this config is to inform nextflow to use the ECR docker image locations instead of the ones specified in the nextflow project code. The omics.config should look like this:
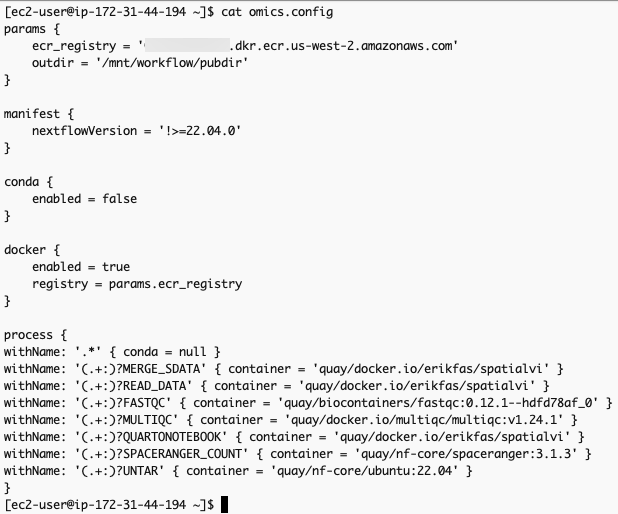
omics.config 내용 중 process에 정의된 내용도 아래와 같이 변경합니다.
process {
withName: '.*' { conda = null }
withName: '(.+:)?MERGE_SDATA' { container = 'erikfas/spatialvi' }
withName: '(.+:)?READ_DATA' { container = 'erikfas/spatialvi' }
withName: '(.+:)?FASTQC' { container = 'quay/biocontainers/fastqc:0.12.1--hdfd78af_0' }
withName: '(.+:)?MULTIQC' { container = 'multiqc/multiqc:v1.24.1' }
withName: '(.+:)?QUARTONOTEBOOK' { container = 'erikfas/spatialvi' }
withName: '(.+:)?SPACERANGER_COUNT' { container = 'quay/nf-core/spaceranger:3.1.3' }
withName: '(.+:)?UNTAR' { container = 'quay/nf-core/ubuntu:22.04' }
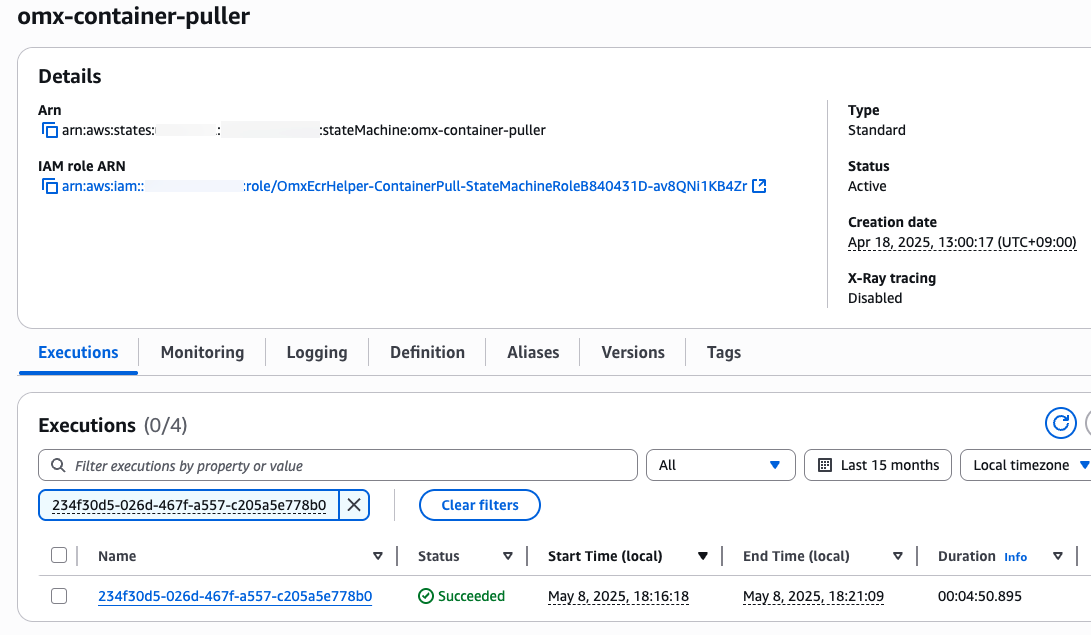
}컨테이너 사설화 (into Amazon ECR)
aws stepfunctions start-execution \
--state-machine-arn arn:aws:states:$region:$your_account_id:stateMachine:omx-container-puller \
--input file://spatialvi_dev_docker_images_manifest.json
step function 콘솔에서 state machines중에 omx-container-puller를 확인하여 Execution이 완료되었는지 확인합니다.
nf-core project 코드 업데이트
To use the newly migrated containers for our workflow, copy the omics.config generated from inspect_nf.py in the /conf dir of the spatialvi project.
mv omics.config spatialvi/confUpdate the nextflow.config file in the root dir of the scrnaseq project by adding to the bottom of the file:
echo "includeConfig 'conf/omics.config'" >> spatialvi/nextflow.config 신규 HealthOmics 워크플로우 만들기
단계1. 파라미터 파일
parameter-description.json을 만들어 아래와 같이 저장합니다.
cat > parameter-description.json <<EOF
{
"input":{
"description":"CSV samplesheet containing sample information",
"optional":false
},
"spaceranger_probeset":{
"description":"Probe set file for Space Ranger analysis",
"optional":false
},
"spaceranger_reference":{
"description":"Reference genome tarball for Space Ranger",
"optional":false
},
"qc_min_counts":{
"description":"Minimum count threshold for QC filtering",
"optional":true
},
"qc_min_genes":{
"description":"Minimum number of genes threshold for QC filtering",
"optional":true
}
}
EOF단계2. 워크플로우 스테이징
zip -r spatialvi.zip spatialvi/ -x "*/\.*" "*/\.*/**"aws s3 cp spatialvi.zip s3://${yourbucket}/workshop/spatialvi.zip
aws omics create-workflow \
--name ${workflow_name} \
--definition-uri s3://${yourbucket}/workshop/spatialvi-workflow.zip \
--parameter-template file://parameter-description.json \
--engine NEXTFLOW단계3. 워크플로우 생성 확인
workflow_id=$(aws omics list-workflows --name ${workflow_name} --query 'items[0].id' --output text)
echo $workflow_id워크플로우 테스트하기
입력파일 준비
parameter-description.json에 사용된 것과 동일한 키를 사용하여 input.json 파일을 새로 만듭니다. 값은 워크플로에서 허용되는 실제 S3 경로 또는 문자열이 됩니다.
아래는 테스트 샘플의 파라미터 예시입니다. (참고)
데이터 준비 참고
예제 데이터는 다음과 같이 다운로드 해볼 수 있습니다.
wget "https://raw.githubusercontent.com/nf-core/test-datasets/spatialvi/testdata/human-brain-cancer-11-mm-capture-area-ffpe-2-standard_v2_ffpe_cytassist/samplesheet_spaceranger.csv"
wget "https://raw.githubusercontent.com/nf-core/test-datasets/spatialvi/testdata/human-brain-cancer-11-mm-capture-area-ffpe-2-standard_v2_ffpe_cytassist/outs/probe_set.csv"
wget "https://raw.githubusercontent.com/nf-core/test-datasets/spatialvi/testdata/homo_sapiens_chr22_reference.tar.gz"이제 현재 디렉토리에 다운로드 된 파일들을 버킷에 업로드할 수 있습니다.
aws s3 mv samplesheet_spaceranger.csv s3://${yourbucket}/spatialvi/
aws s3 mv probe_set.csv s3://${yourbucket}/spatialvi/
aws s3 mv homo_sapiens_chr22_reference.tar.gz s3://${yourbucket}/spatialvi/sample sheet 만들기
cat << EOF > samplesheet_spaceranger.csv
sample,fastq_dir,cytaimage,slide,area,manual_alignment,slidefile
CytAssist_11mm_FFPE_Human_Glioblastoma_2,s3://${bucket}/spatialvi/fastq_dir.tar.gz,s3://${bucket}/spatialvi/CytAssist_11mm_FFPE_Human_Glioblastoma_image.tif,V52Y10-317,B1,,s3://${bucket}/spatialvi/V52Y10-317.gpr
EOF위에서 만든 samplesheet를 s3로 복사
aws s3 cp samplesheet_spaceranger.csv s3://${yourbucket}/spatialvi/samplesheet_spaceranger.csv입력 json 만들기 (위 sample sheet경로가 아래 내용중 input에 값으로 들어가게됨)
마찬가지로 probe_set.csv, homo_sapiens_chr22_reference.tar.gz도 모두 버킷에 준비해야합니다.
cat > input.json <<EOF
{
"input": "s3://${yourbucket}/spatialvi/samplesheet_spaceranger.csv",
"spaceranger_probeset": "s3://${yourbucket}/spatialvi/probe_set.csv",
"spaceranger_reference": "s3://${yourbucket}/spatialvi/homo_sapiens_chr22_reference.tar.gz",
"qc_min_counts": 5,
"qc_min_genes": 3
}
EOFPolicy 준비
Prepare IAM service role to run AWS HealthOmics workflow
your-bucket-name, your-account-id, your-region을 모두 본인 환경에 맞게 수정하여 사용하세요.
omics_workflow_policy.json 만들기
cat << EOF > omics_workflow_policy.json
{
"Version": "2012-10-17",
"Statement": [
{
"Effect": "Allow",
"Action": [
"s3:GetObject"
],
"Resource": [
"arn:aws:s3:::${yourbucket}/*",
"arn:aws:s3:::aws-genomics-static-${region}/workflow_migration_workshop/nfcore-scrnaseq-v2.3.0/*"
]
},
{
"Effect": "Allow",
"Action": [
"s3:ListBucket"
],
"Resource": [
"arn:aws:s3:::${yourbucket}",
"arn:aws:s3:::aws-genomics-static-${region}/workflow_migration_workshop/nfcore-scrnaseq-v2.3.0",
"arn:aws:s3:::aws-genomics-static-${region}/workflow_migration_workshop/nfcore-scrnaseq-v2.3.0/*"
]
},
{
"Effect": "Allow",
"Action": [
"s3:PutObject"
],
"Resource": [
"arn:aws:s3:::${yourbucket}/*"
]
},
{
"Effect": "Allow",
"Action": [
"logs:DescribeLogStreams",
"logs:CreateLogStream",
"logs:PutLogEvents"
],
"Resource": [
"arn:aws:logs:${region}:${your_account_id}:log-group:/aws/omics/WorkflowLog:log-stream:*"
]
},
{
"Effect": "Allow",
"Action": [
"logs:CreateLogGroup"
],
"Resource": [
"arn:aws:logs:${region}:${your_account_id}:log-group:/aws/omics/WorkflowLog:*"
]
},
{
"Effect": "Allow",
"Action": [
"ecr:BatchGetImage",
"ecr:GetDownloadUrlForLayer",
"ecr:BatchCheckLayerAvailability"
],
"Resource": [
"arn:aws:ecr:${region}:${your_account_id}:repository/*"
]
}
]
}
EOF
echo "omics_workflow_policy.json 파일이 생성되었습니다."trust_policy.json 만들기
cat << EOF > trust_policy.json
{
"Version": "2012-10-17",
"Statement": [
{
"Effect": "Allow",
"Principal": {
"Service": "omics.amazonaws.com"
},
"Action": "sts:AssumeRole",
"Condition": {
"StringEquals": {
"aws:SourceAccount": "${your_account_id}"
},
"ArnLike": {
"aws:SourceArn": "arn:aws:omics:${region}:${your_account_id}:run/*"
}
}
}
]
}
EOF
echo "trust_policy.json 파일이 생성되었습니다."IAM Role 생성
aws iam create-role --role-name ${omics_role_name} --assume-role-policy-document file://trust_policy.json
Policy document 생성
aws iam put-role-policy --role-name ${omics_role_name} --policy-name OmicsWorkflowV1 --policy-document file://omics_workflow_policy.json
워크플로우 실행
작은 샘플의 예제는 input.json, 큰 샘플의 예제는 input_full.json
aws omics start-run \
--name spatialvi_test_run_1 \
--role-arn arn:aws:iam::${your_account_id}:role/${omics_role_name}\
--workflow-id ${workflow_id} \
--parameters file://input.json \
--output-uri s3://${yourbucket}/output/참고문서
WDL 워크플로우 마이그레이션 하기 (HiFi-human-WGS-WDL)
다음 문서는 WDL 워크플로우를 HealthOmics의 Private workflow에 등록하는 내용을 다루고 있습니다.
대상 워크플로우 주소: https://github.com/PacificBiosciences/HiFi-human-WGS-WDL
일단 가장 먼저 해볼만한 일은 이 WDL 워크플로우가 로컬에서 잘 동작하는지 확인해보는 일일 것입니다.
EC2 인스턴스의 사양 역시 문서 내용을 참고 ( 64 cpu cores and 256 GB of RAM) 하여 c6i.32xlarge 에서 테스트했습니다.
EC2 인스턴스의 사양 역시 문서 내용을 참고 ( 64 cpu cores and 256 GB of RAM) 하여 c6i.32xlarge 에서 테스트했습니다.
시간당 $5.440 달러, 비용 참고: https://instances.vantage.sh/aws/ec2/c6i.32xlarge
개발 환경을 위해 tmux, git을 설치했습니다.
sudo dnf -y install git tmux tree위 워크플로우 주소의 Readme를 참고하여 관련 파일과 워크플로우 내용을 EC2 인스턴스 상에서 다운로드 받았습니다.
데이터 다운로드
wget https://github.com/PacificBiosciences/HiFi-human-WGS-WDL/releases/download/v2.1.1/hifi-human-wgs-singleton.zip
wget https://github.com/PacificBiosciences/HiFi-human-WGS-WDL/releases/download/v2.1.1/hifi-human-wgs-family.zip워크플로우 다운로드
git clone \
--depth 1 --branch v2.1.1 \
--recursive \
https://github.com/PacificBiosciences/HiFi-human-WGS-WDL.gitAWS HealthOmics로 유전체 분석 (Fastq to VCF, Annotation) 자동화하기
cd aws-healthomics-eventbridge-integration/workflows/vep
aws stepfunctions start-execution \
--state-machine-arn arn:aws:states:<aws-region>:<aws-account-id>:stateMachine:omx-container-puller \
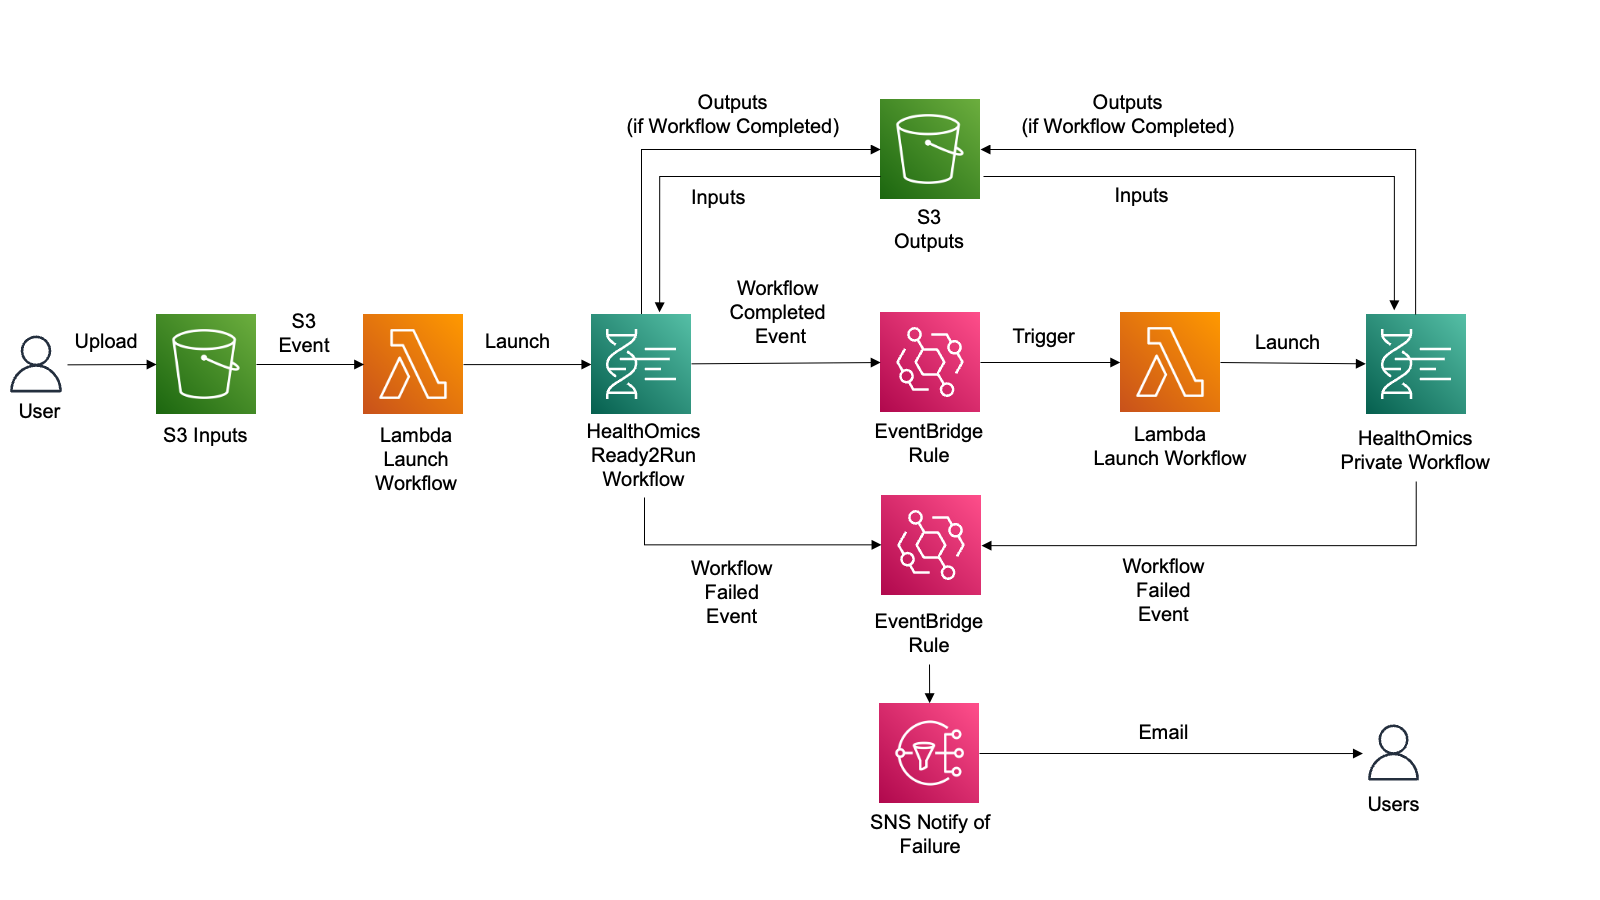
--input file//container_image_manifest.jsonAWS HealthOmics 워크플로 기능을 사용해 자체 워크플로를 가져오거나 기존의 Ready2Run 워크플로를 실행하여 유전체학 또는 기타 다중 오믹스 데이터를 처리할 수 있습니다.
고객은 종종 워크플로우를 자동으로 시작하고, 첫 번째 워크플로우가 성공적으로 완료된 후 다른 AWS HealthOmics 워크플로우와 같은 새로운 프로세스를 트리거하며, 워크플로우 실패 시 사용자에게 알림을 제공하는 자동화를 원합니다.
여기서는 이것을 다뤄봅니다.
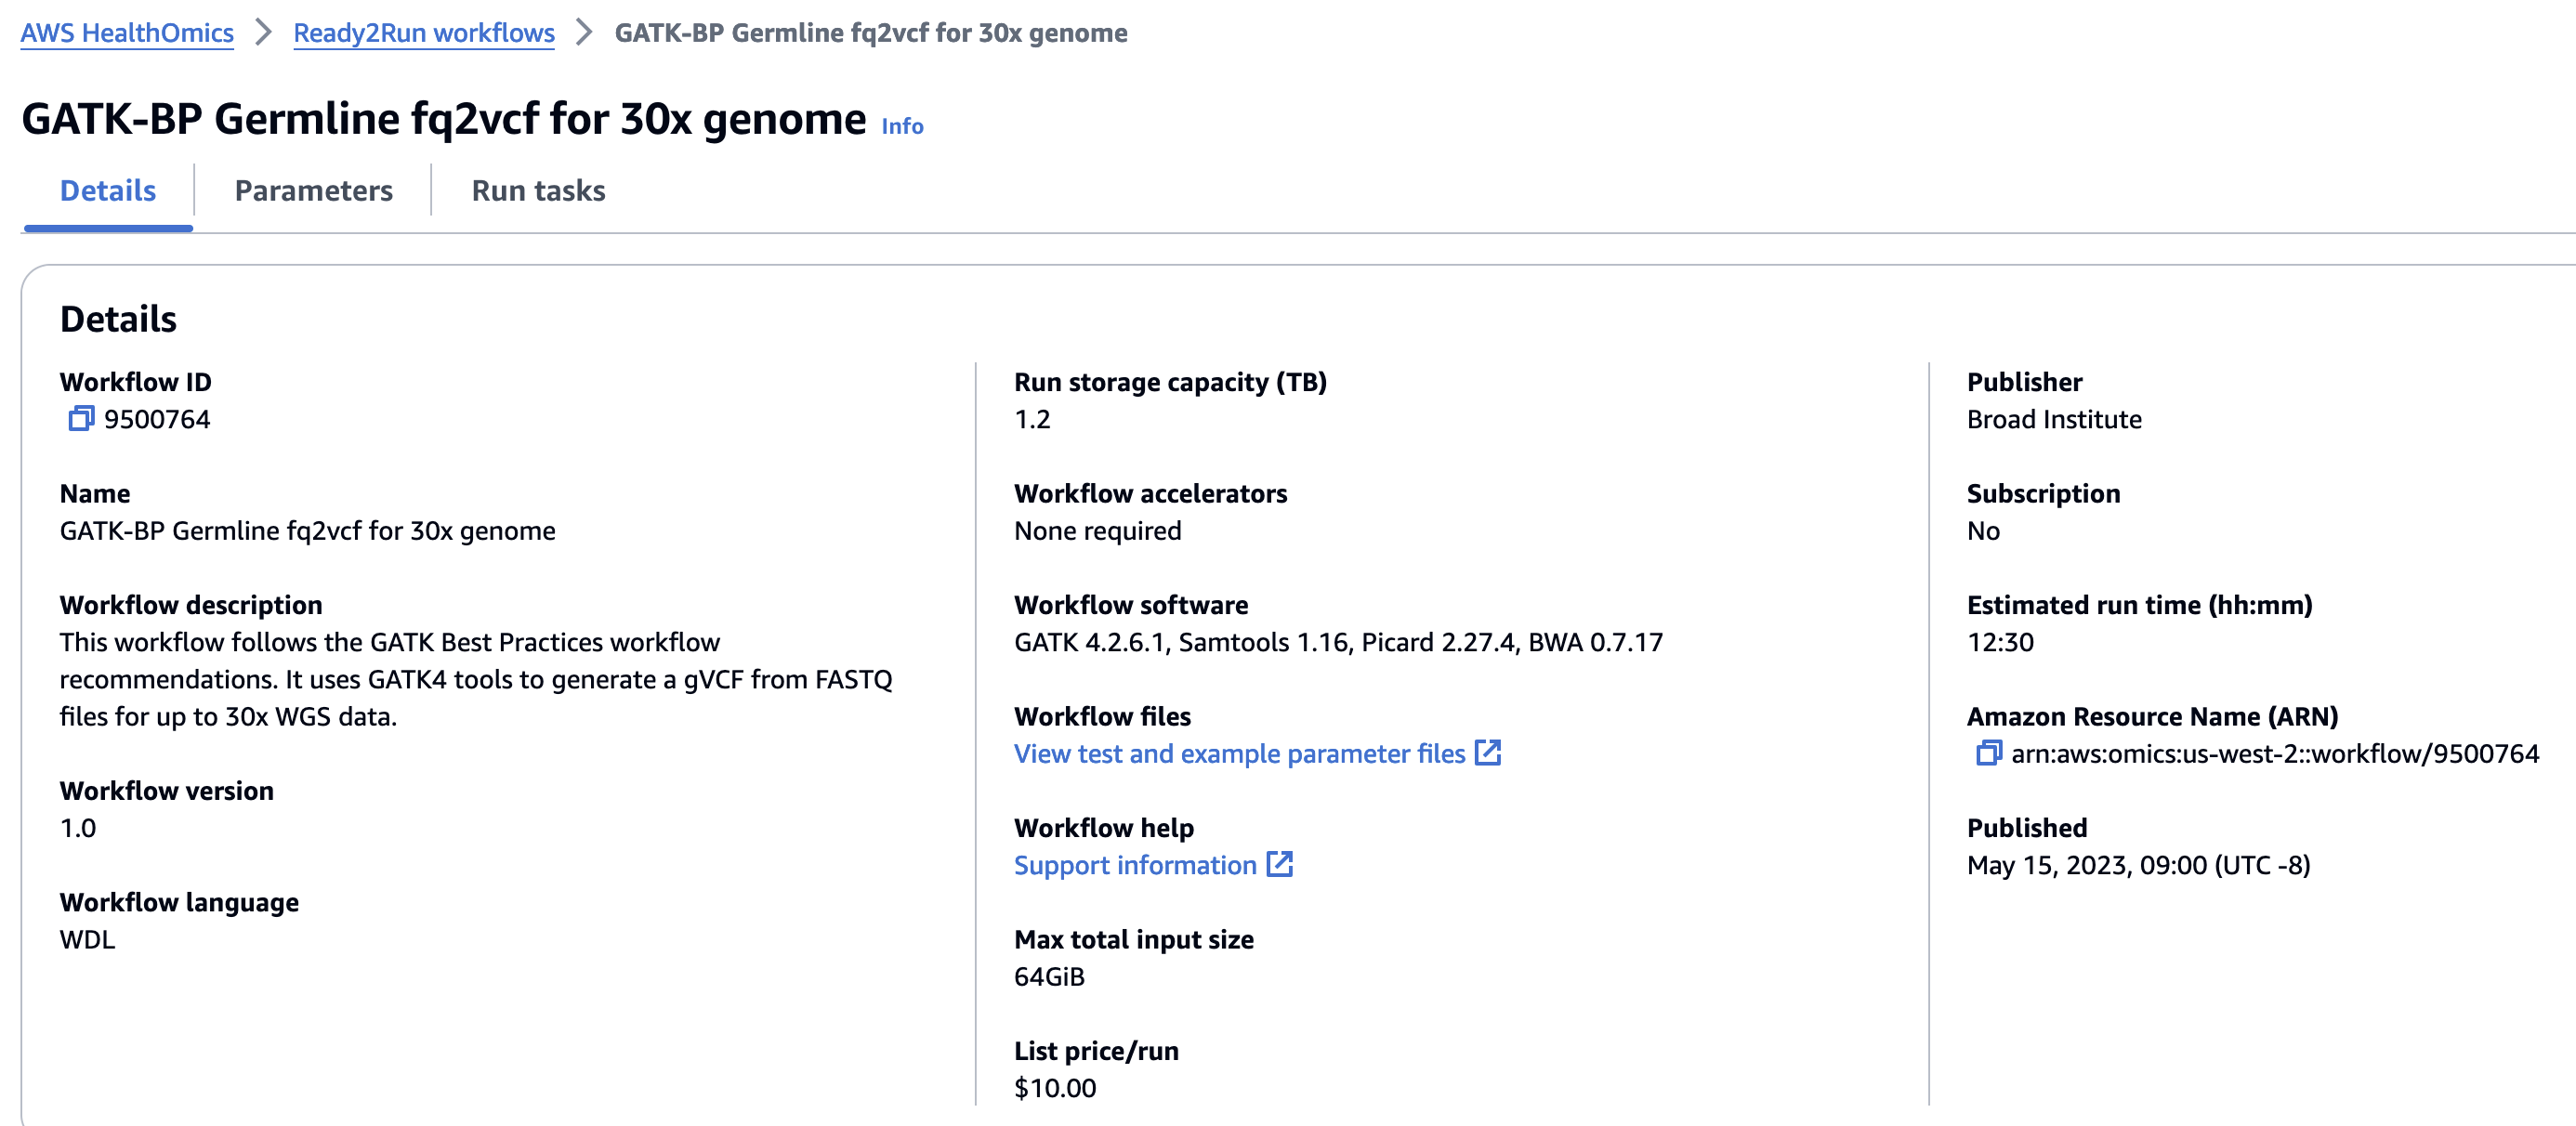
Ready2Run의 GATK-BP Germline fq2vcf for 30x genome 워크플로우로부터 입력한 FASTQ 를 VCF로 변환하고 이 VCF파일에 대해 VEP workflow (Private workflow에 등록하여)를 수행하여 최종적으로 Annotation된 결과 VCF를 얻게 됩니다.
사전 요구사항
- Access to an AWS account and relevant permissions to create/use the following services:
- AWS Lambda, AWS HealthOmics, Amazon S3, Amazon Eventbridge, AWS IAM, Amazon SNS, Amazon ECR, Amazon CloudWatch Logs, AWS KMS, Cloud9 (optional)
- Node.js and npm installed
- Python 3 installed
- AWS CLI installed and configured
- AWS CDK CLI installed
구현
이 솔루션은 클라우드에서 리소스를 배포하고 관리하기 위해 CDK 및 Python과 함께 IaC를 사용합니다. 다음 단계는 솔루션을 초기화하고 배포하는 방법을 보여줍니다.
초기 설정
아래 명령을 실행하여 배포를 위한 CDK 파이프라인을 초기화합니다.
python3 -m pip install aws-cdk-lib
npm install -g aws-cdk
npm install -g aws-cdk --force
cdk bootstrap aws://<ACCOUNTID>/<AWS-REGION> # do this if your account hasn't been bootstraped
cdk --version
- Make sure to replace "ACCOUNTID" placeholder with actual account number
- Replace “AWS-REGION” with a valid AWS region where you plan to deploy the solution. e.g. us-east-1
인프라스트럭처 생성
아래 명령을 실행하여 CDK를 사용하여 HealthOmics-EventBridge 통합 솔루션을 복제하고 배포하세요. "cdk deploy"를 실행하면 인프라를 배포하기 위한 AWS CloudFormation 템플릿이 생성됩니다.
아래 예시에서 github은 예를들어 https://github.com/hmkim/aws-healthomics-eventbridge-integration
proj-dir은 개별적으로 만든 프로젝트 디렉토리명으로 바꿔야합니다.
git clone <github>
cd <proj-dir>
python3 -m venv .venv
source .venv/bin/activate
pip install -r requirements.txt
cdk synth
cdk deploy --allAmazon ECR 에 VEP 툴 이미지 저장
VEP workflow 수행을 위해 vep 툴 정보가 준비되있는 container정보를 자동으로 Amazon ECR의 private repository에 등록하기 위한 솔루션을 다운받습니다.
git clone https://github.com/hmkim/amazon-ecr-helper-for-aws-healthomics다음을 사용하여 AWS HealthOmics 워크플로우를 실행하려는 각 리전에서 애플리케이션에 사용되는 AWS CloudFormation 스택을 배포합니다:
# install package dependencies
npm install
# in your default region (specify profile if other than 'default')
cdk deploy --all --profile <aws-profile>앞에서 받은 본 솔루션의 폴더로 이동하여 container image 주소로부터 ECR에 자동 등록할 수 있습니다. (AWS Step Function 을 활용하게 됨)
Execute the following to pull this list of container images into your ECR private registry:
cd aws-healthomics-eventbridge-integration/workflows/vep
aws stepfunctions start-execution \
--state-machine-arn arn:aws:states:<aws-region>:<aws-account-id>:stateMachine:omx-container-puller \
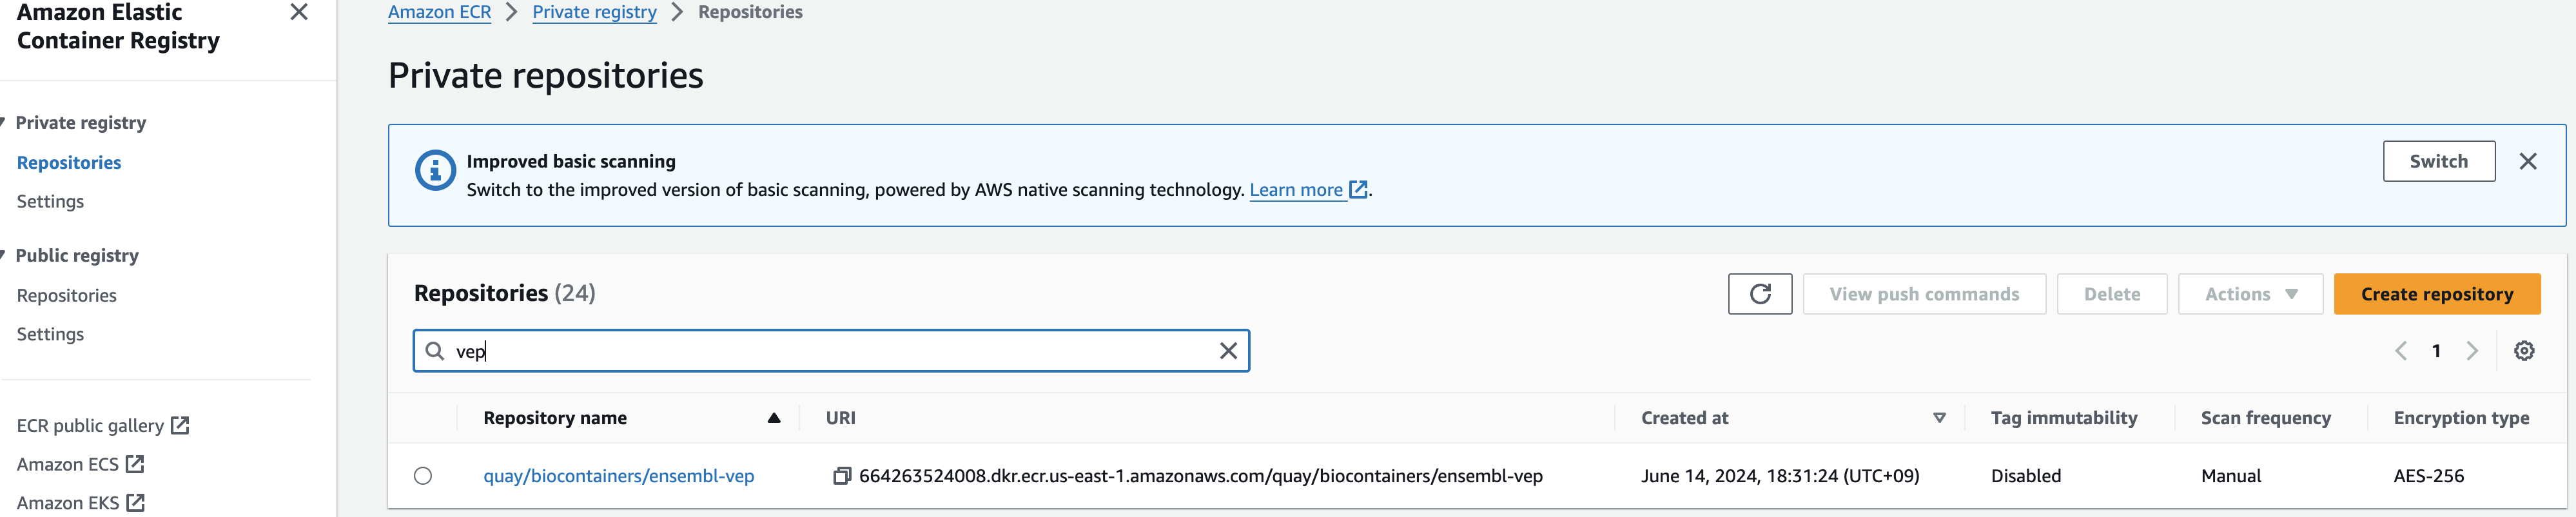
--input file//container_image_manifest.json최종적으로 Amazon ECR에 접속해서 컨테이너 이미지 정보가 repository에 잘 등록되었는지 확인해볼 수 있습니다.
솔루션 살펴보기 및 테스트
워크플로우 오류 SNS 알림 구독
솔루션을 테스트하기 전에 이메일 주소로 Amazon SNS 주제(이름은 *_workflow_status_topic이어야 함)를 구독하여 HealthOmics 워크플로우 실행이 실패할 경우 이메일 알림을 받아야 합니다. 구독 방법은 여기를 참조하세요: https://docs.aws.amazon.com/sns/latest/dg/sns-create-subscribe-endpoint-to-topic.html
Amazon SNS 로 진입해 healthomics workflow status topic 주제 세부 페이지에서 Subscrition을 만들면됩니다.

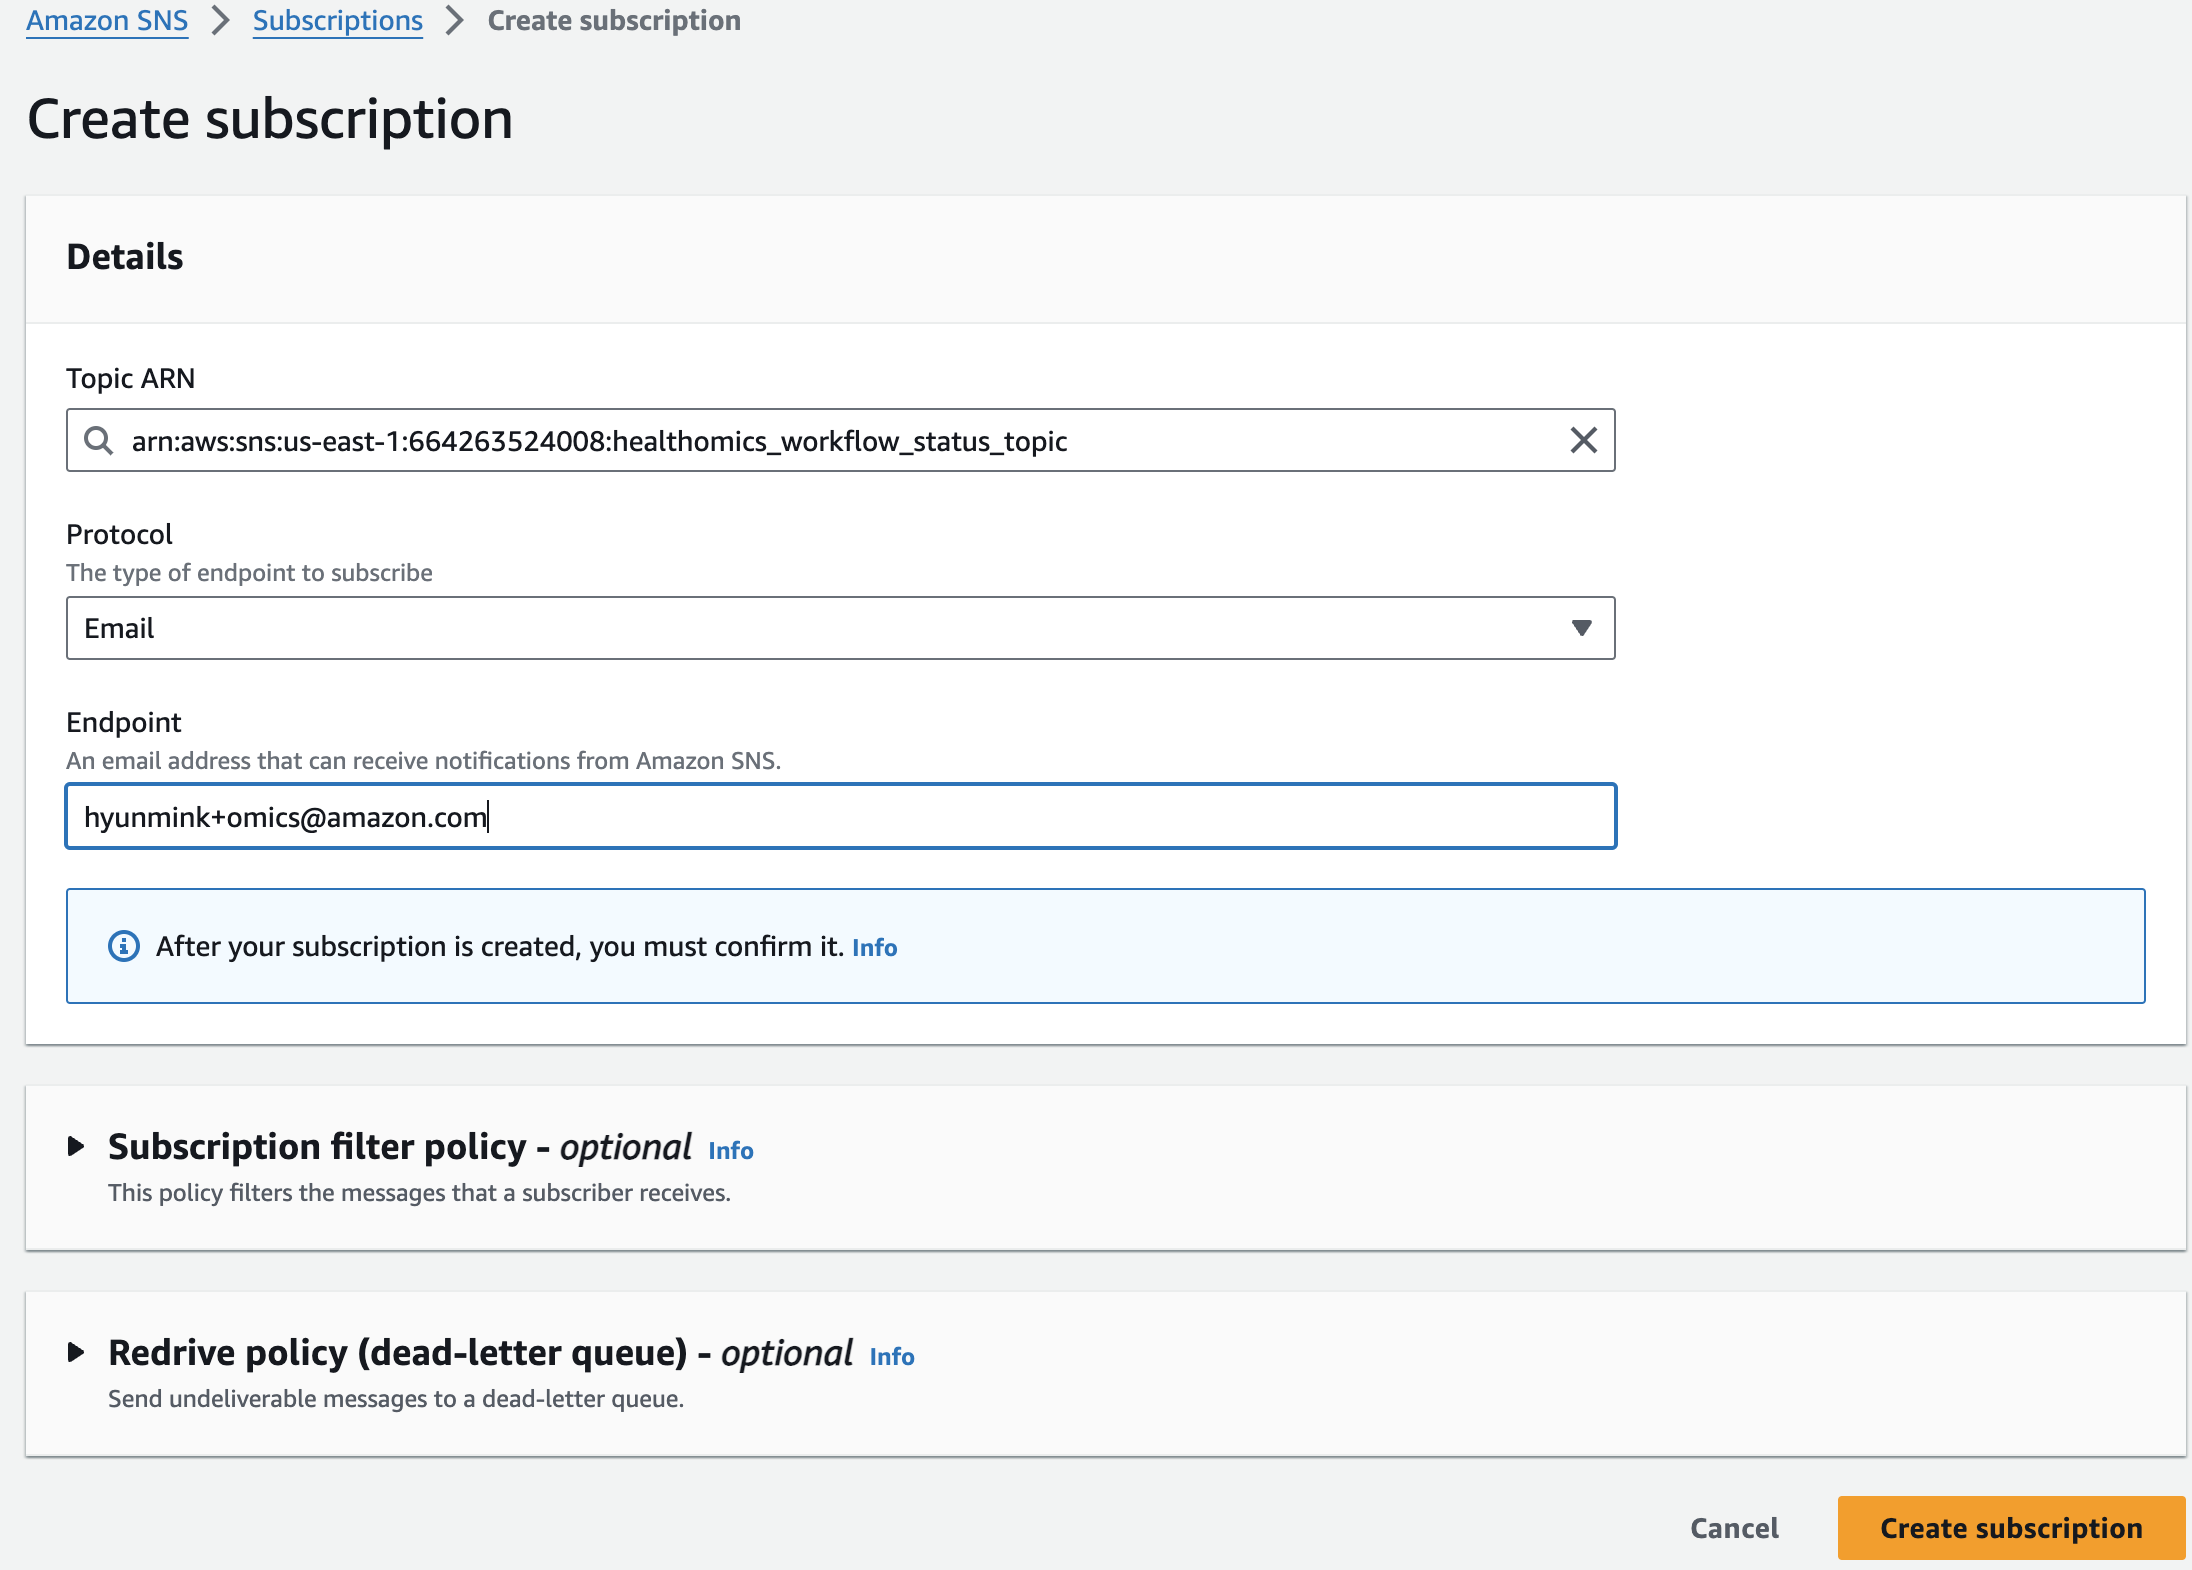
이메일을 통해 구독 확인을 하면 아래와 같이 최종적으로 구독이 완료됬음을 알 수 있습니다.

샘플 manifest CSV 파일 만들기 및 업로드
샘플의 시퀀스 데이터 배치가 생성되어 생물정보학 워크플로를 사용하여 분석이 필요한 경우, 사용자 또는 실험실 정보 관리 시스템(LIMS)과 같은 기존 시스템은 샘플과 샘플 이름 및 시퀀싱 기기 관련 메타데이터와 같은 관련 메타데이터를 설명하는 매니페스트(샘플 시트라고도 함)를 생성합니다. 아래는 이 솔루션에서 테스트에 사용되는 CSV의 예시입니다:
sample_name,read_group,fastq_1,fastq_2,platform
NA12878,Sample_U0a,s3://aws-genomics-static-{aws-region}/omics-tutorials/data/fastq/NA12878/Sample_U0a/U0a_CGATGT_L001_R1_001.fastq.gz,s3://aws-genomics-static-{aws-region}/omics-tutorials/data/fastq/NA12878/Sample_U0a/U0a_CGATGT_L001_R2_001.fastq.gz,illumina우리는 공용 AWS 테스트 데이터 버킷에서 호스팅되는 공개적으로 사용 가능한 테스트 FASTQ 파일을 사용할 것입니다. S3 버킷에서도 자체 FASTQ 파일을 사용할 수 있습니다.
- 솔루션 코드에 제공된 테스트 파일을 사용하세요: "workflows/vep/test_data/sample_manifest_with_test_data.csv". 파일 내용 중 {aws-region} 문자열을 솔루션을 배포한 AWS 리전으로 바꿉니다. CSV에서 참조된 공개적으로 사용 가능한 FASTQ 데이터는 AWS HealthOmics를 사용할 수 있는 모든 지역에서 사용할 수 있습니다.
- 이 파일을 솔루션에서 생성한 입력 버킷에 "fastq" 접두사를 붙여 업로드합니다.
aws s3 cp sample_manifest_with_test_data.csv s3://<INPUTBUCKET>/fastqs/이제 위 솔루션에 구축한 워크플로우가 자동으로 실행됩니다. 여러 서비스들을 살펴보면서 솔루션 전체 내용을 이해하는 과정이 필요할 것입니다.
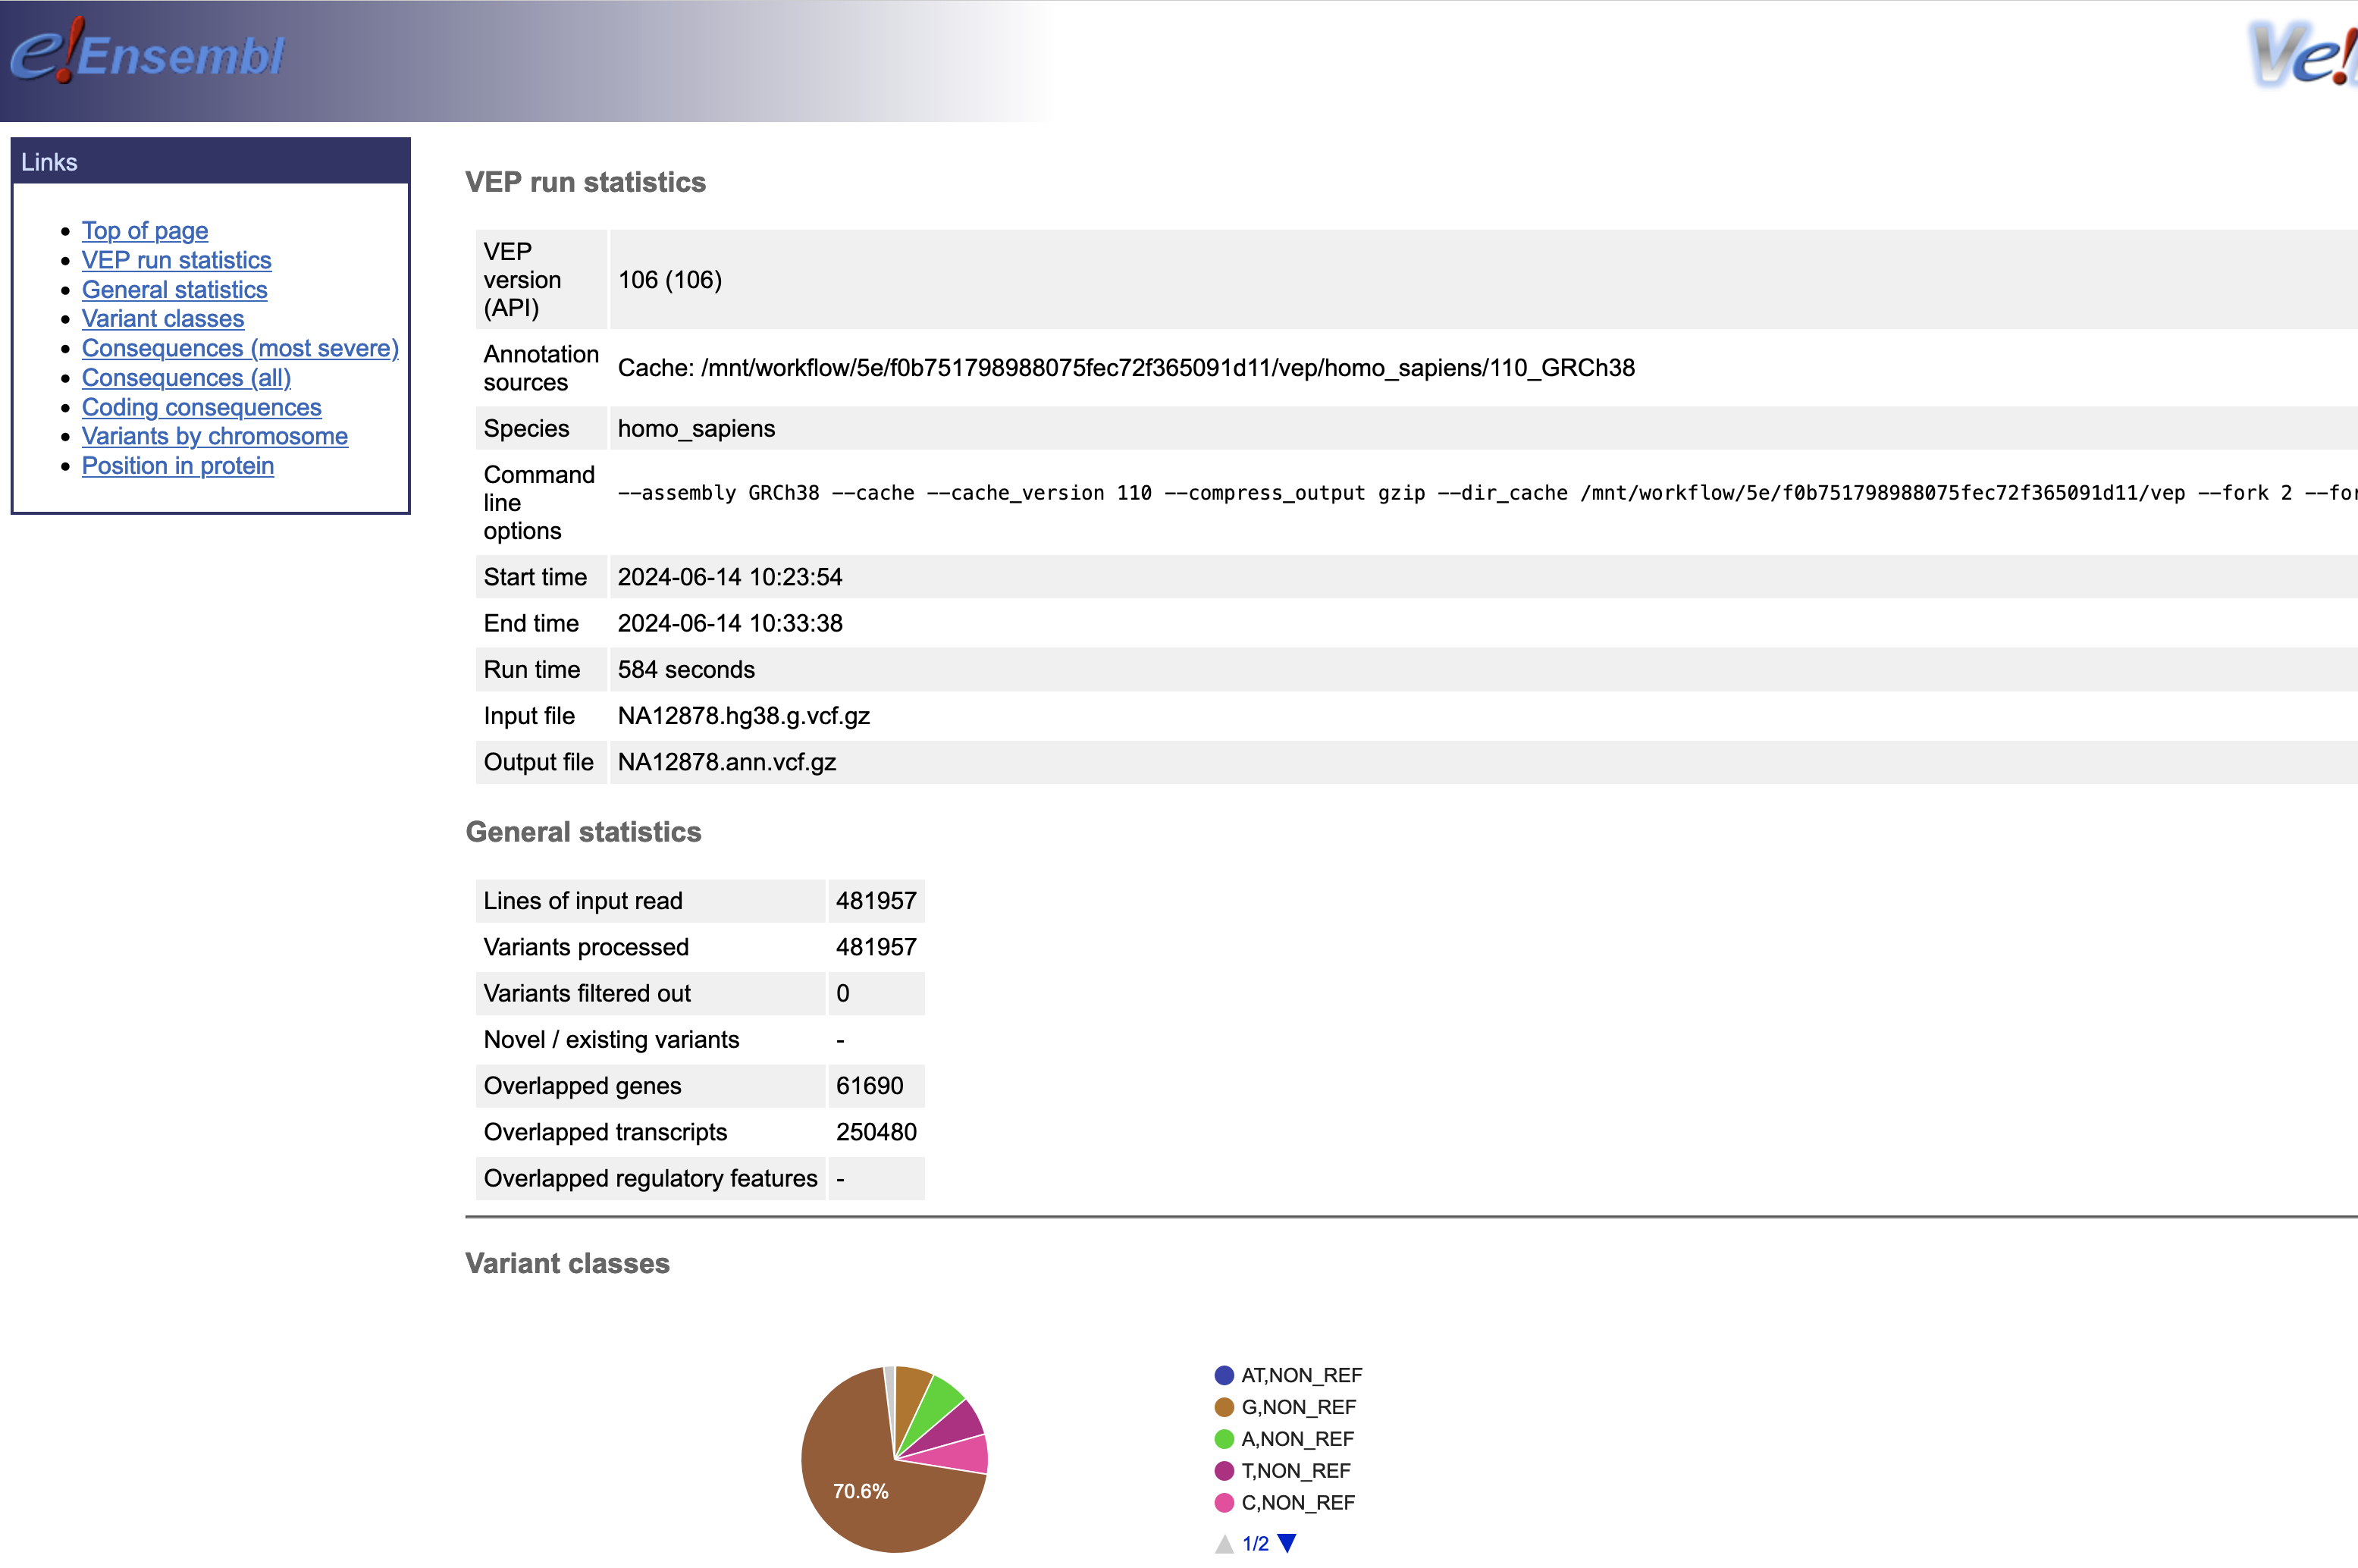
결과파일
Omics Run 내에 연결된 정보를 통해 최종 결과는 S3에서 확인할 수 있습니다.

참고
- https://github.com/hmkim/aws-healthomics-eventbridge-integration
- https://github.com/hmkim/amazon-ecr-helper-for-aws-healthomics
AWS HealthOmics - Storage
오믹스의 스토리지 컴포넌트는 2개가 있습니다.
- Reference store
- Sequence stores
이름에서도 알 수 있듯이 레퍼런스 스토어는 1개만 생성이 가능하며, 이 스토어 1개 안에 다수의 레퍼런스를 등록할 수 있습니다. 사람 유전체 지도 외에도 모델 Organism등 FASTA 파일 형식의 데이터는 모두 레퍼런스로 등록하여 관리할 수 있습니다. 가장 놀라운 사실은 Reference 스토어에 관리되는 참조 유전체 데이터의 저장 비용은 무료 입니다.
레퍼런스 스토어
아래와 같이 GRCh38 참조 유전체 정보를 하나 등록해보았습니다.
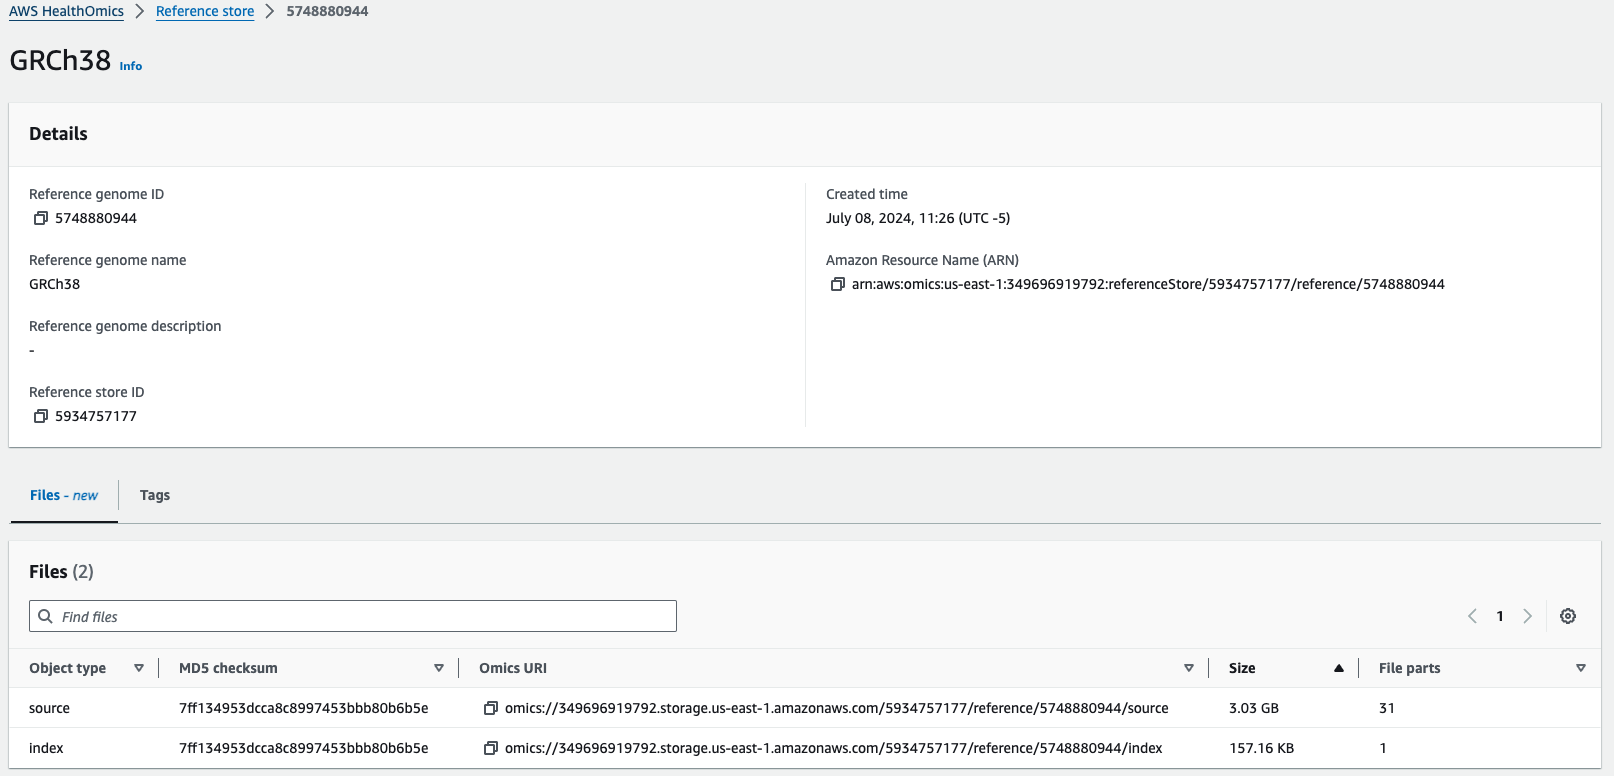
Omics URI 즉, omics://로 시작하는 주소로 언제든지 참조 유전체 정보에 접속할 수 있습니다.
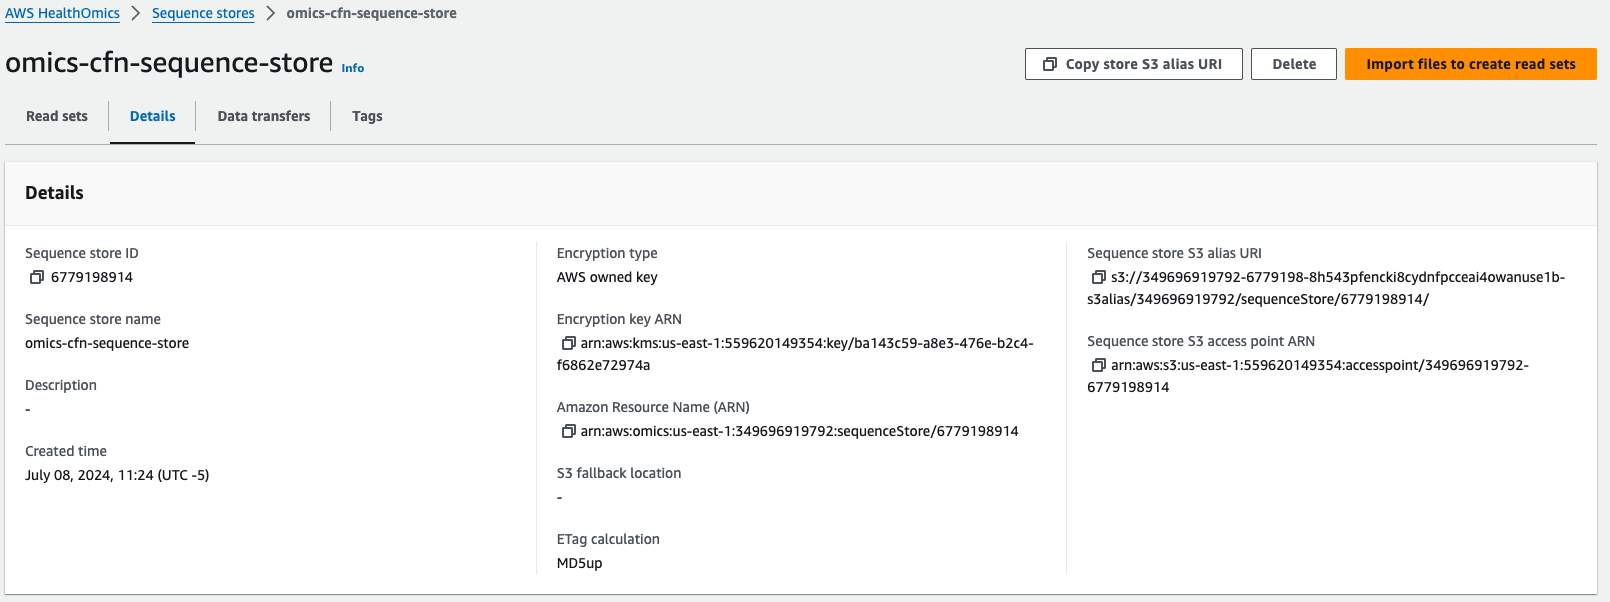
시퀀스 스토어
가져오기 시간은 데이터 소스에 따라 다릅니다. 위의 FASTQ 소스에 대한 가져오기는 완료하는 데 약 3~5분이 소요됩니다. BAM 및 CRAM 소스는 가져오기 중에 서비스에서 데이터에 유효성 검사 단계를 적용하므로 시간이 더 오래 걸립니다. FASTQ는 처리가 덜 필요하므로 가져오는 데 시간이 덜 걸립니다.
2024년 4월 15일부로 시퀀스에 등록한 시퀀스에 접근하기 위해서 S3:// alias URI로 접근할 수 있습니다. 이 덕분에 도메인별 메타데이터, 비용 절감, 확장성의 이점을 누리면서 HealthOmics 데이터 저장소를 생물정보학 에코시스템에 보다 쉽게 통합할 수 있습니다. Mountpoint for S3 와 같은 서비스를 활용할 수도 있습니다.
예) s3://349696919792-6779198-8h543pfencki8cydnfpcceai4owanuse1b-s3alias/349696919792/sequenceStore/6779198914/
참고
- https://catalog.workshops.aws/amazon-omics-end-to-end/en-US/010-xp-console/100-omics-storage/reference-stores
AWS HealthOmics에서 Annotation 작업 수행하기
AWS HealthOmics의 Analytics 기능을 활용하여 annotation작업을 수행할 수 있습니다.
준비물
- 입력 샘플 VCF
- Annotation할 정보 소스 VCF (예: ClinVar)
s3://omics-eventbridge-solutio-healthomicsckaoutput6642-xbtuwqnxt8uw/outputs/9881593/out/output_vcf/NA12878.hg38.g.vcf.gz
Variant stores
변이 스토어 생성
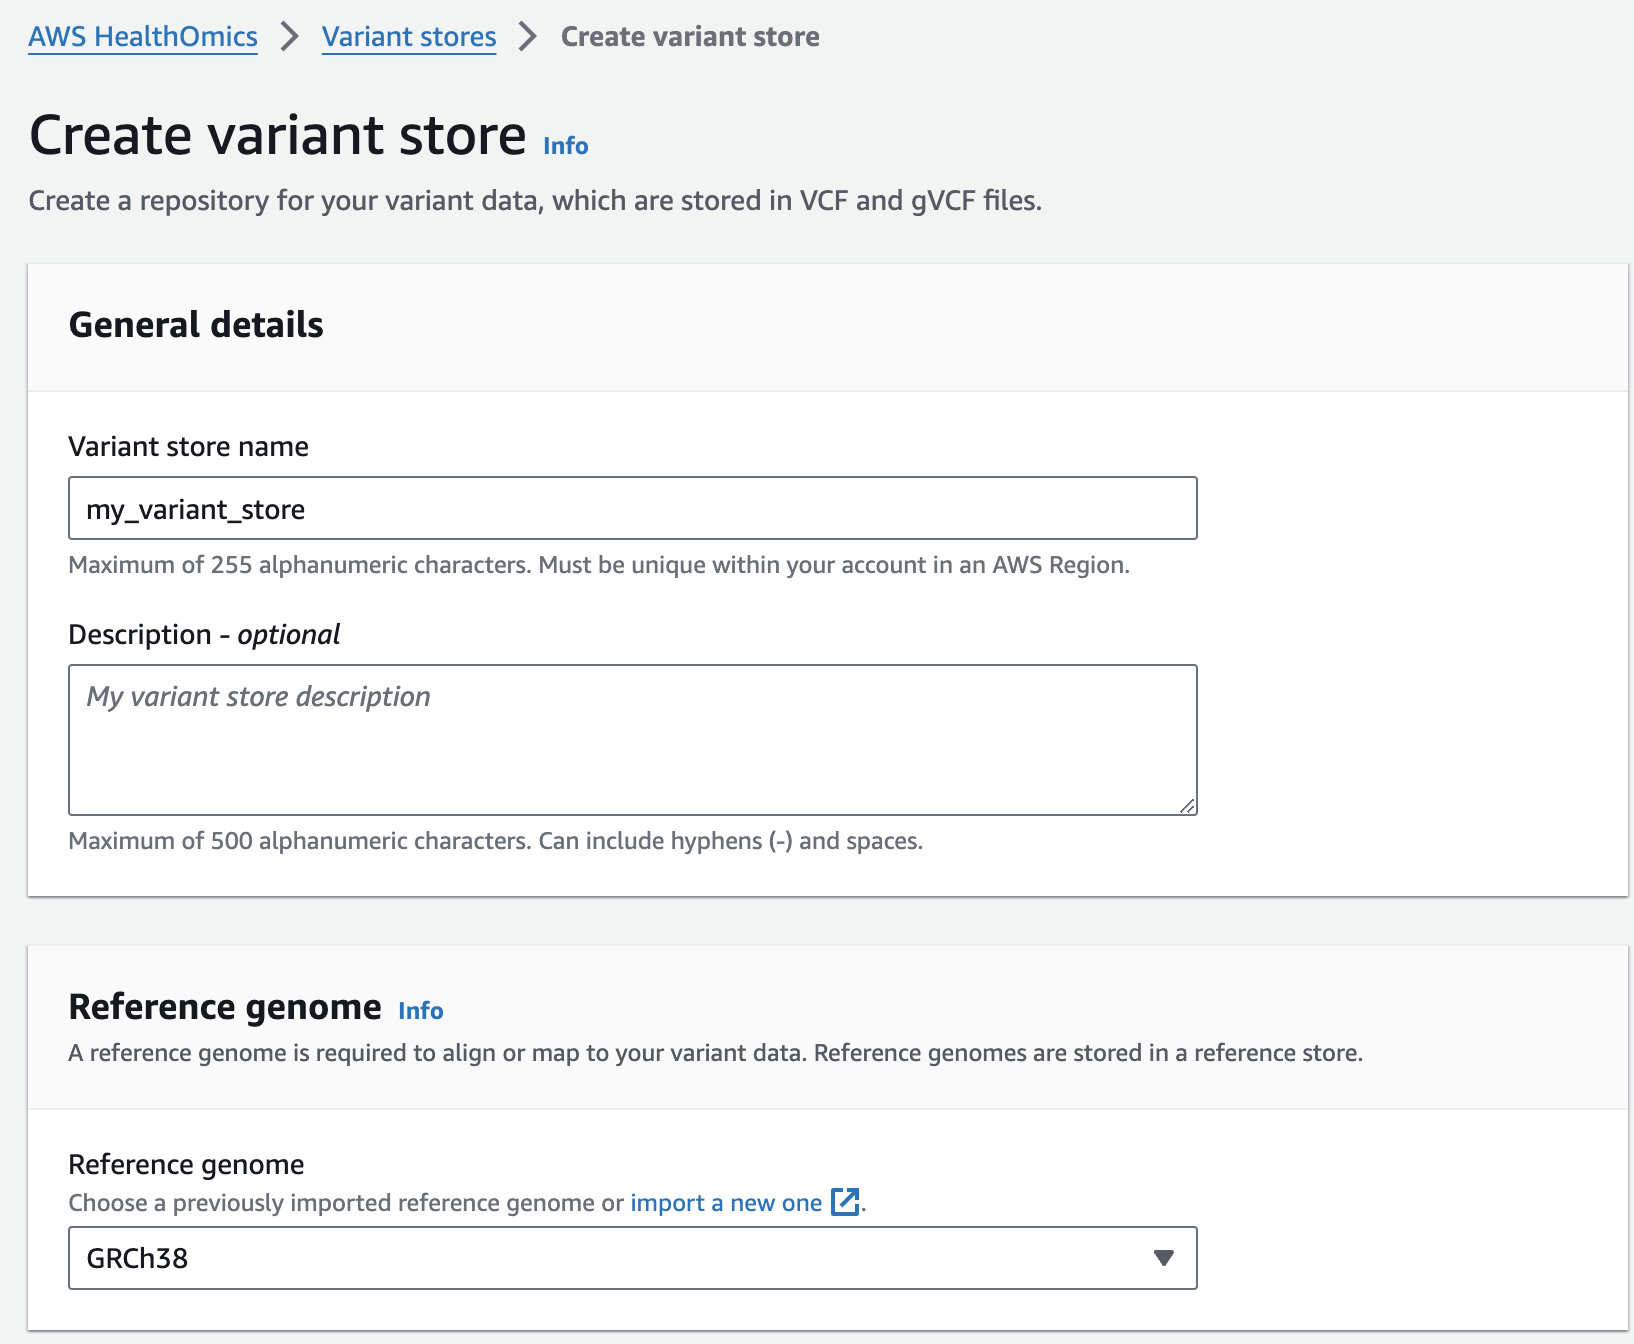
- From the AWS HealthOmics Console, navigate to Analytics > Variant stores
- Select Create variant store
- For Variant store name provide "my_variant_store".
- For Reference genome select "GRCh38" (this is a pre-provisioned reference, but you can alternatively select the reference you imported in the Reference Store part of the workshop)
- Finish with Create variant store
변이스토어에 샘플 VCF 파일 가져오기
Next, you are going to start a VCF import job. To do this:
- From the AWS HealthOmics Console, navigate to Analytics > Variant stores
- Select the Name Variant store named omicsvariantstore1 (or the one you created above as appropriate)
- Select Import variant data. If this option isn't available select Actions > Import.
- Select Create and use a new service role
- For Select variant data from S3 provide the following S3 URI:
아래 s3 경로는 입력 VCF 파일의 S3 URI을 의미합니다.
s3://omics-eventbridge-solutio-healthomicsckaoutput6642-xbtuwqnxt8uw/outputs/9881593/out/output_vcf/NA12878.hg38.g.vcf.gz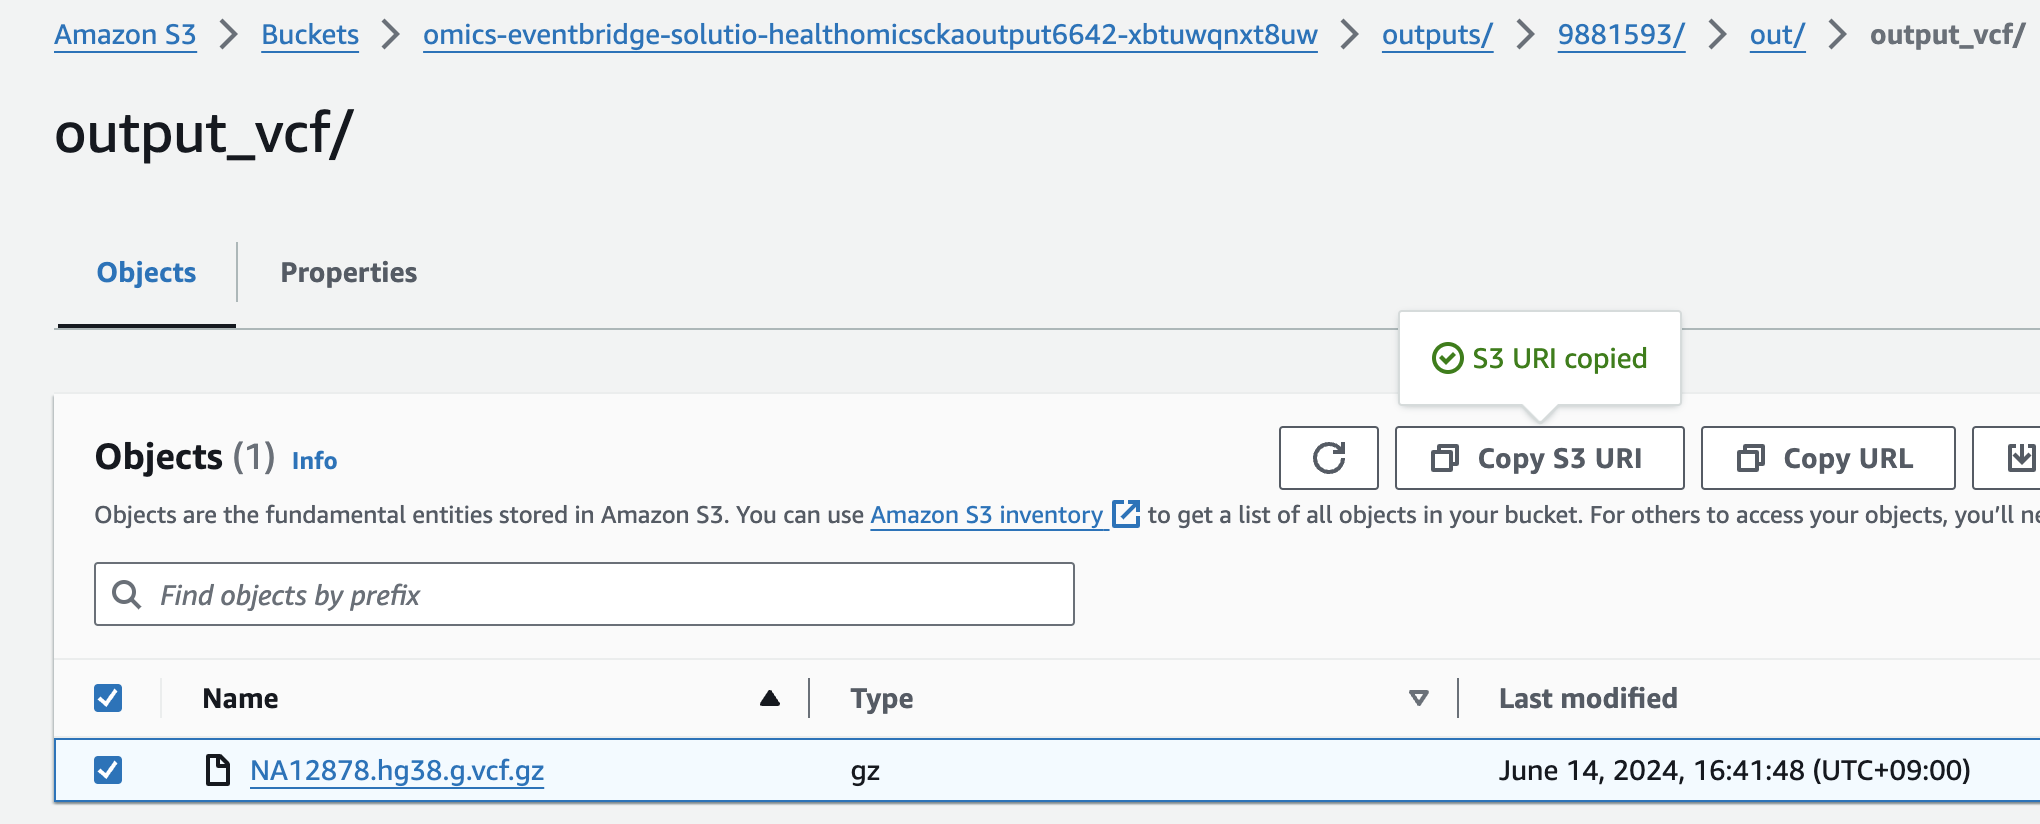
NOTE: The region will differ based on deployment region.
- Start the import with Create import job
You should now see something like this:
- 적당한 Service role 이 없을 경우 새로 생성하여 사용하는 옵션을 선택할 수 있습니다.
- 앞에서 설명한대로 입력하고자하는 VCF 파일의 S3 경로를 작성합니다.
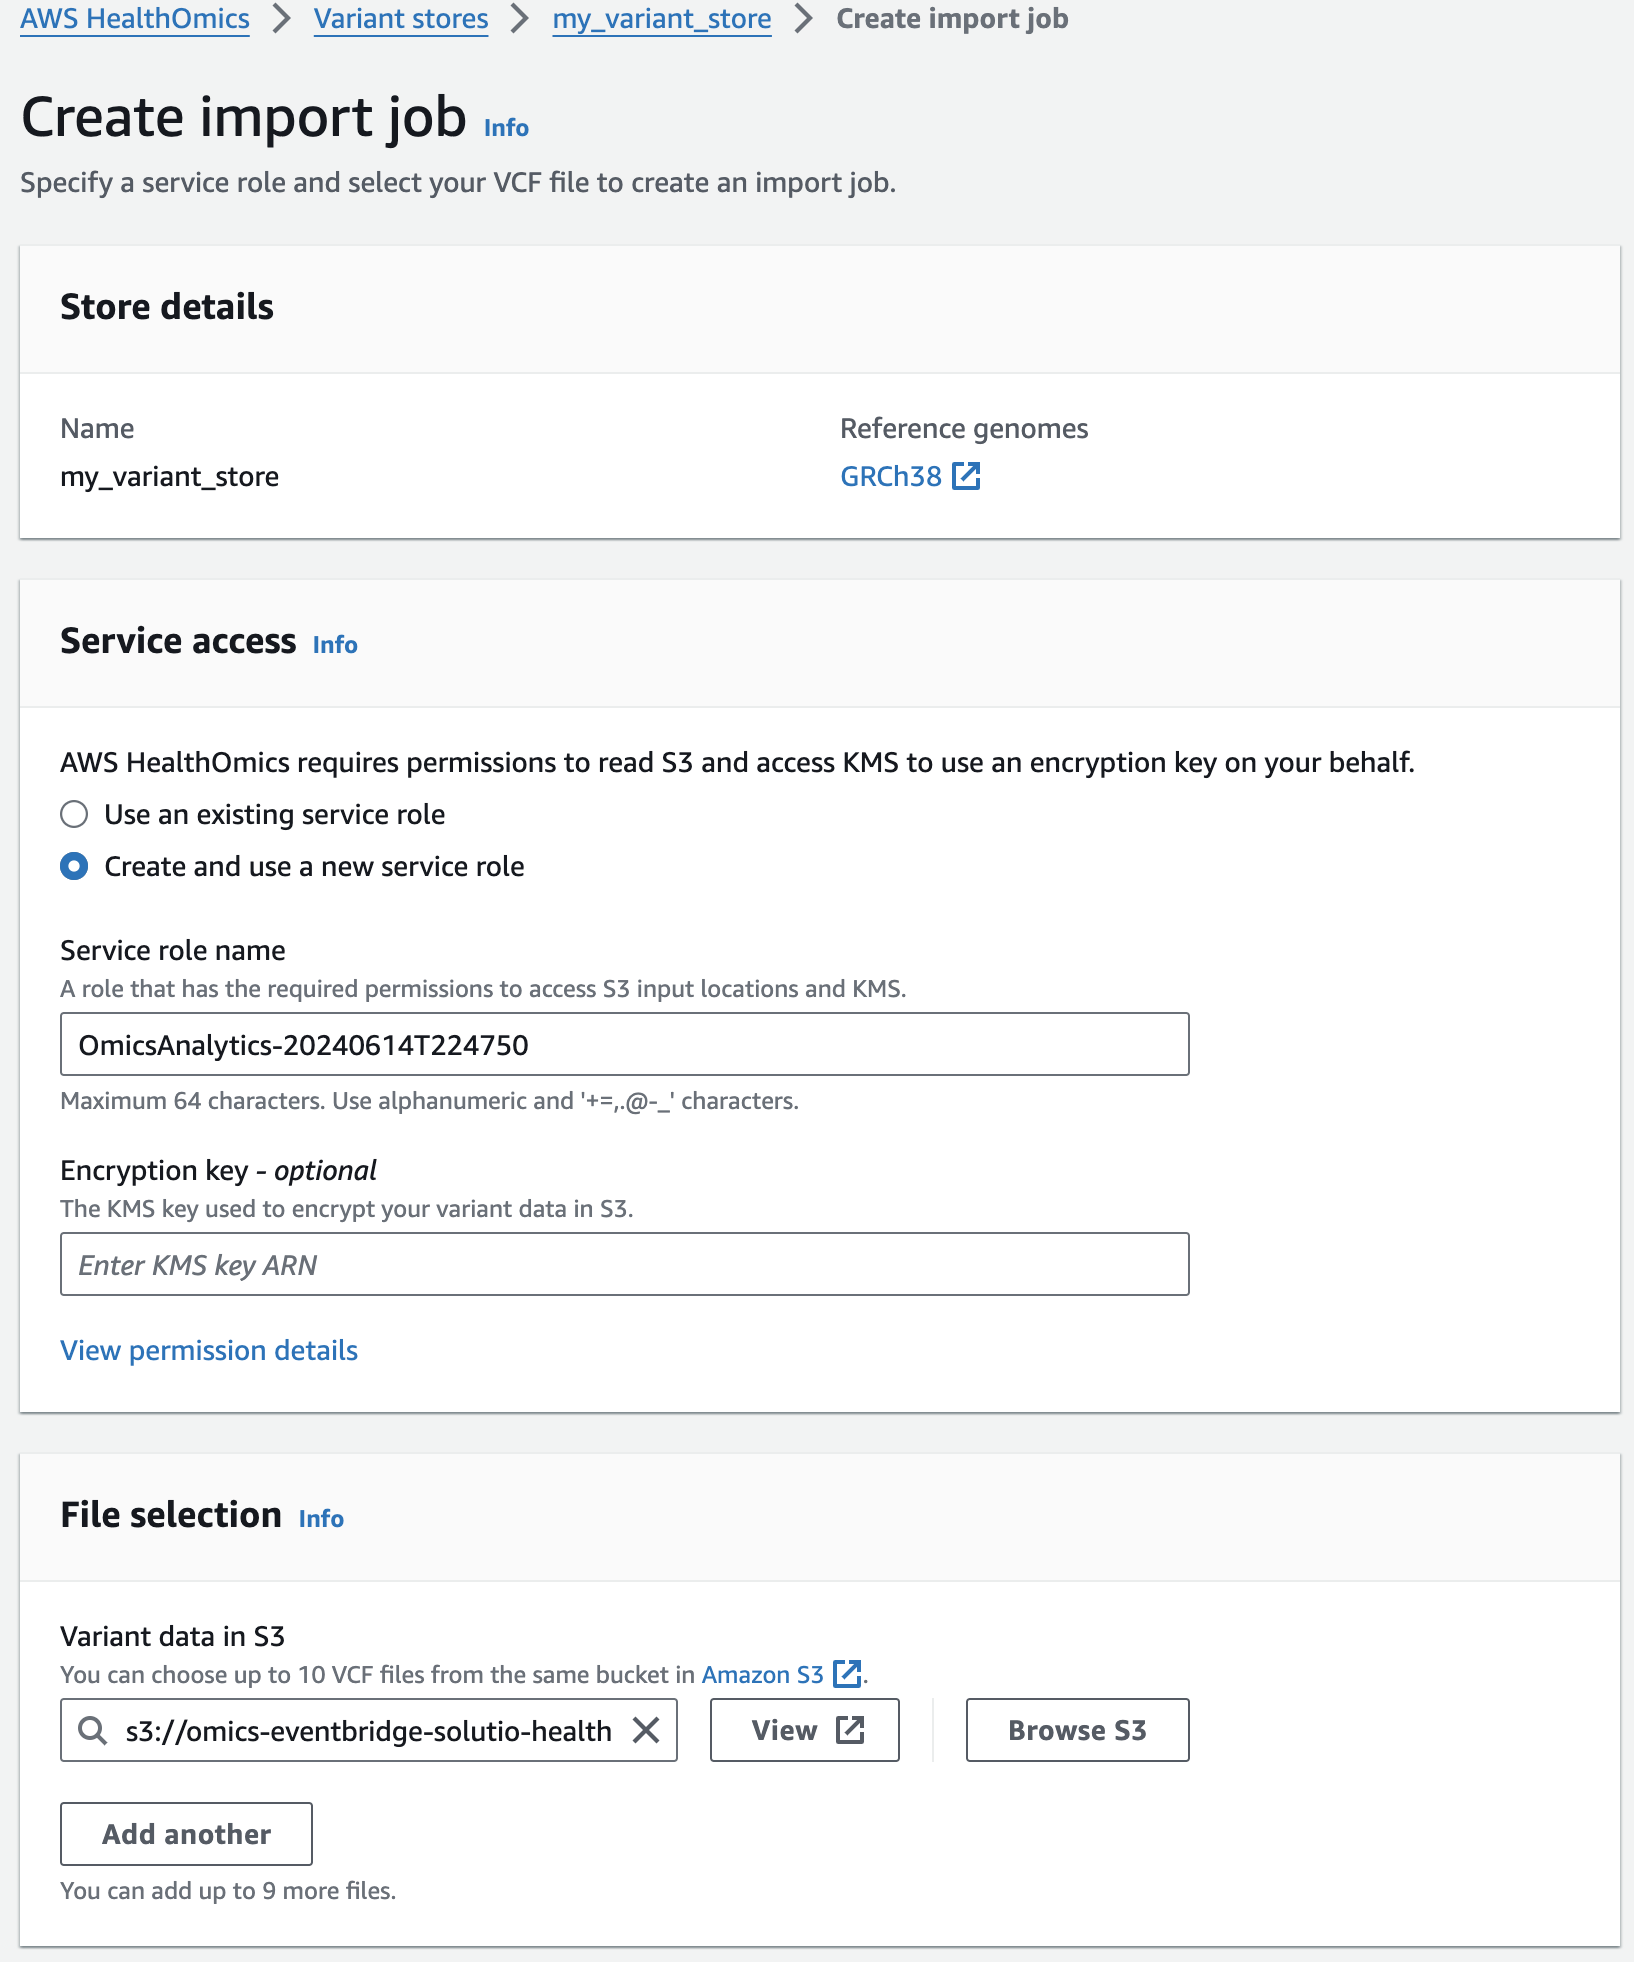
콘솔에서 VCF Import작업시 제출되었음을 확인할 수 있습니다.

Annotation stores
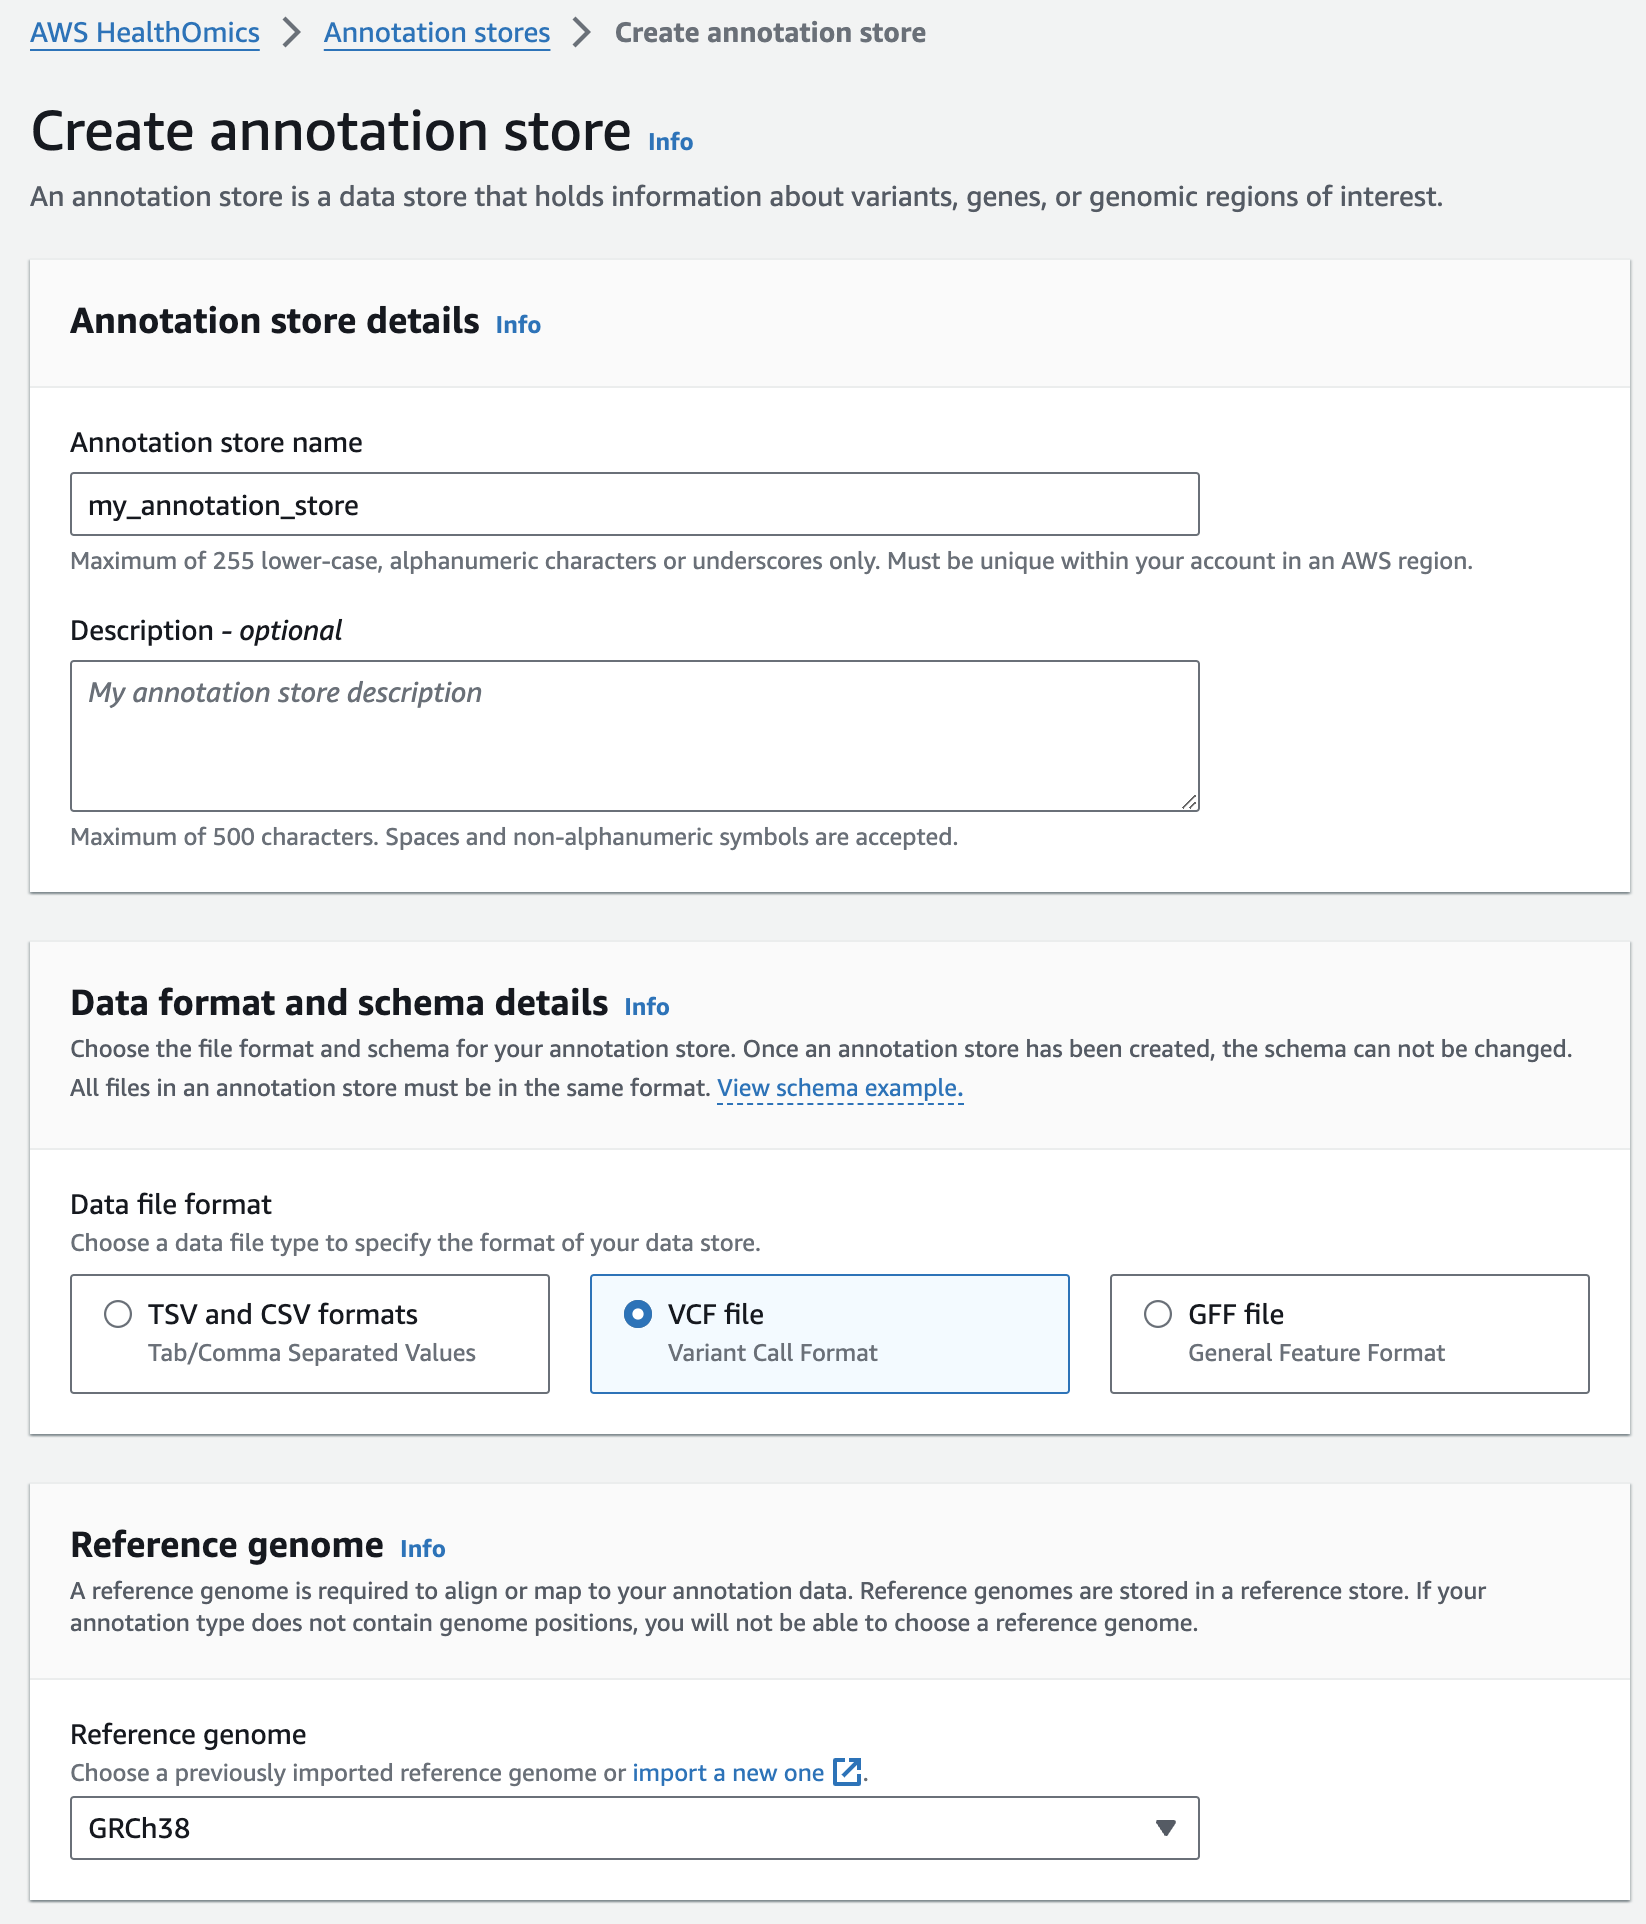
주석 스토어 생성
- From the AWS HealthOmics Console, navigate to Analytics > Annotation stores
- Select Create annotation store
- For Variant store name provide "my_annotation_store".
- For Data file format select VCF file
- For Reference genome select "GRCh38" (this is a pre-provisioned reference, but you can alternatively select the reference you imported in the Reference Store part of the workshop)
- Finish with Create annotation store
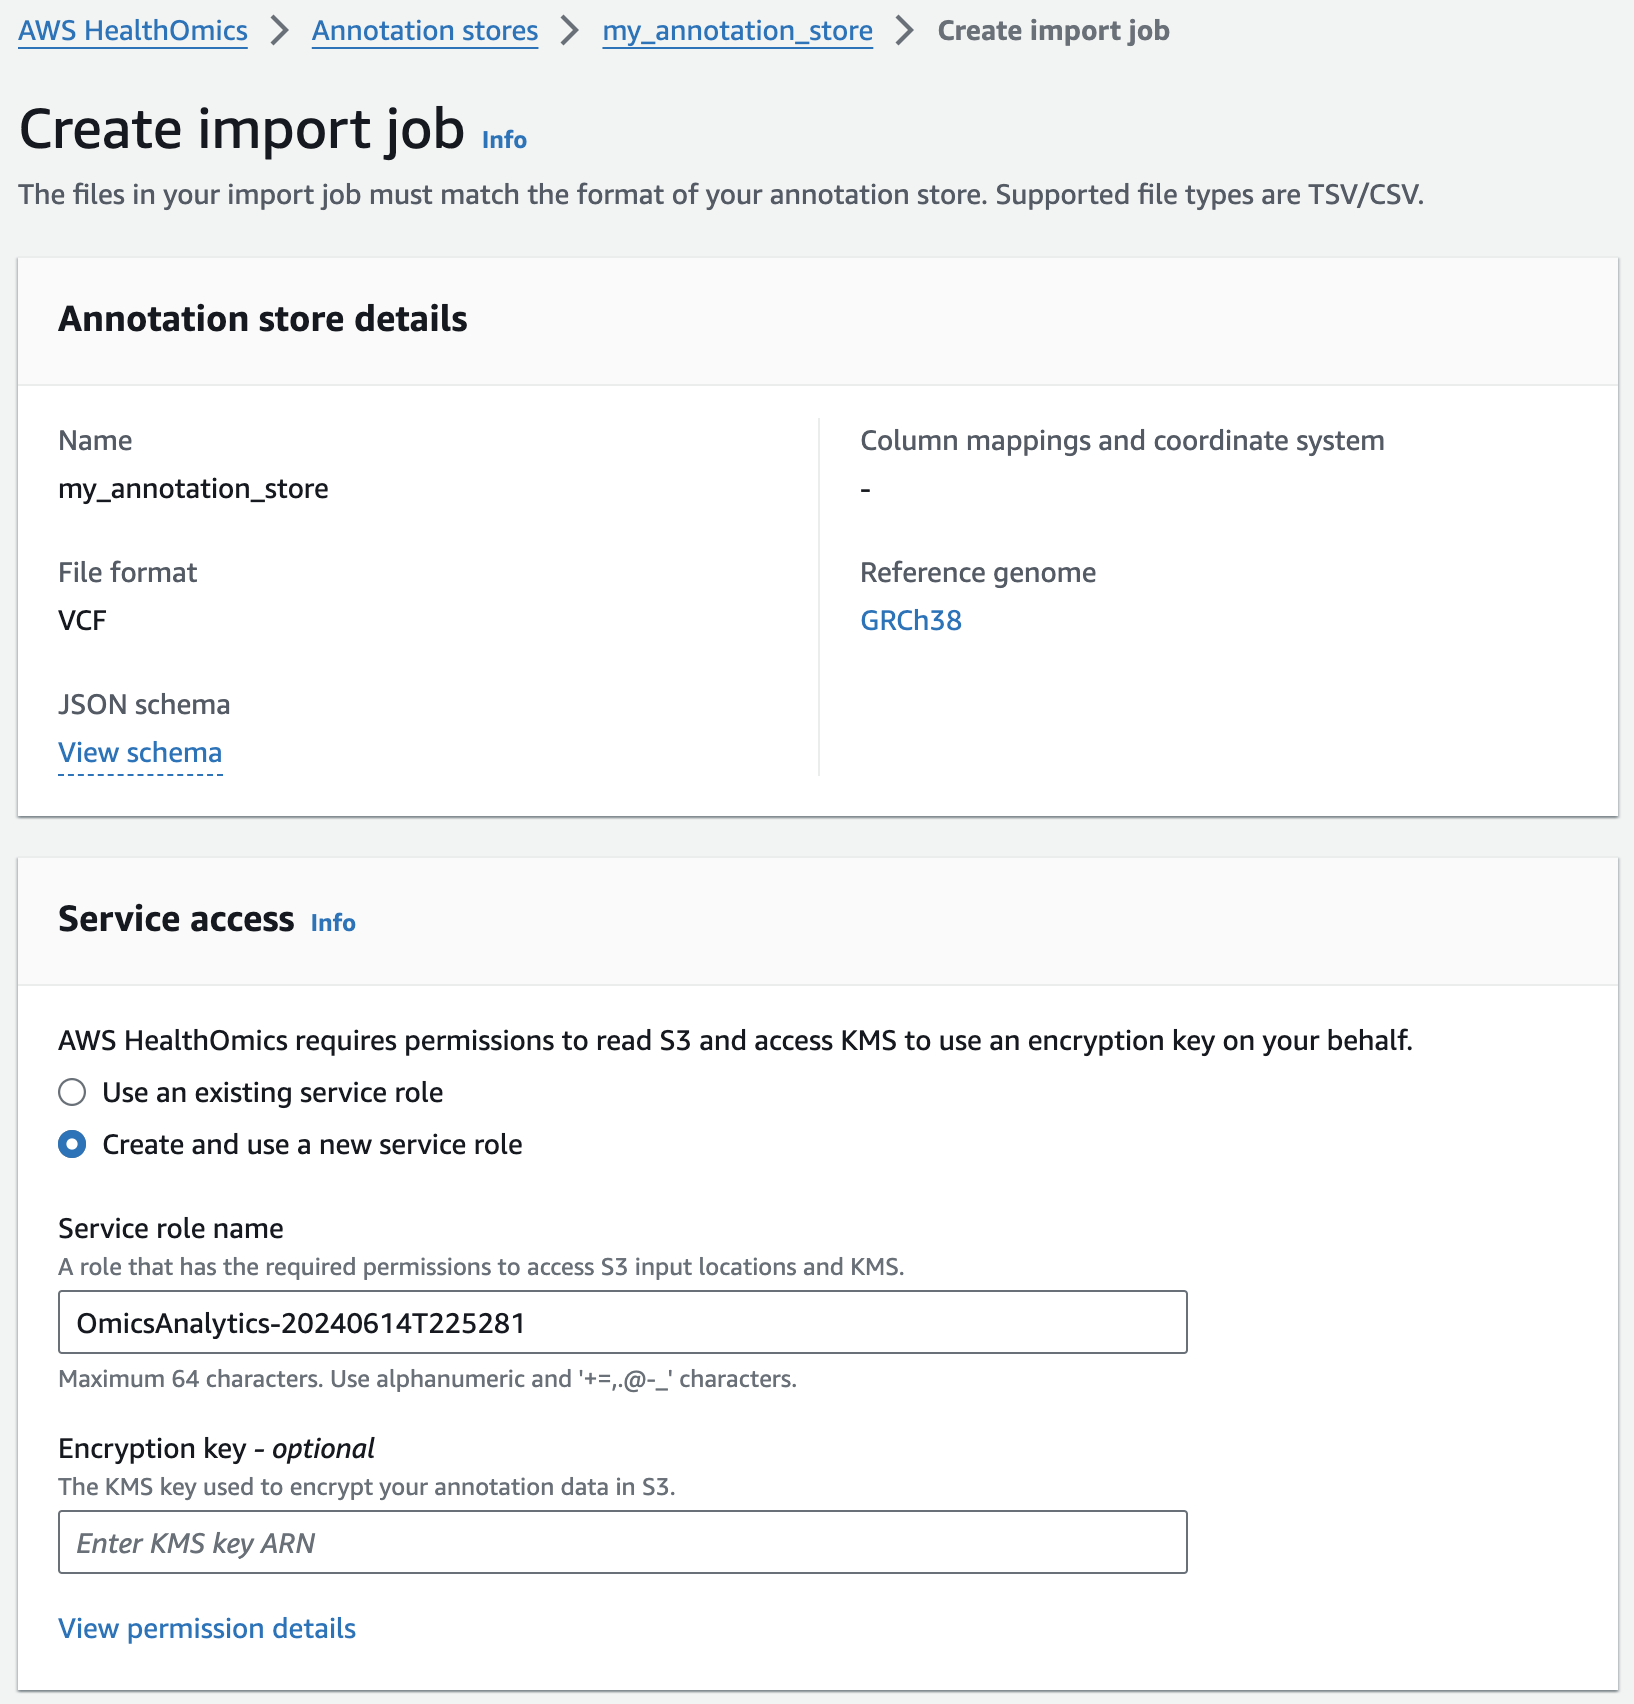
주석 스토어에 VCF 파일 가져오기
Next, you are going to start an annotation import job to import ClinVar annotations in VCF format into the pre-provisioned store.
- From the AWS HealthOmics Console, navigate to Analytics > Annotation stores
- Click on the name of the Annotation store named omicsannotationstore1 (or the one you created above as appropriate)
- Under Store versions click on the name of the only version listed (there should only be one at this time).
- Select Import VCF data. If this option isn't available select Actions > Import.
- Select Create and use a new service role
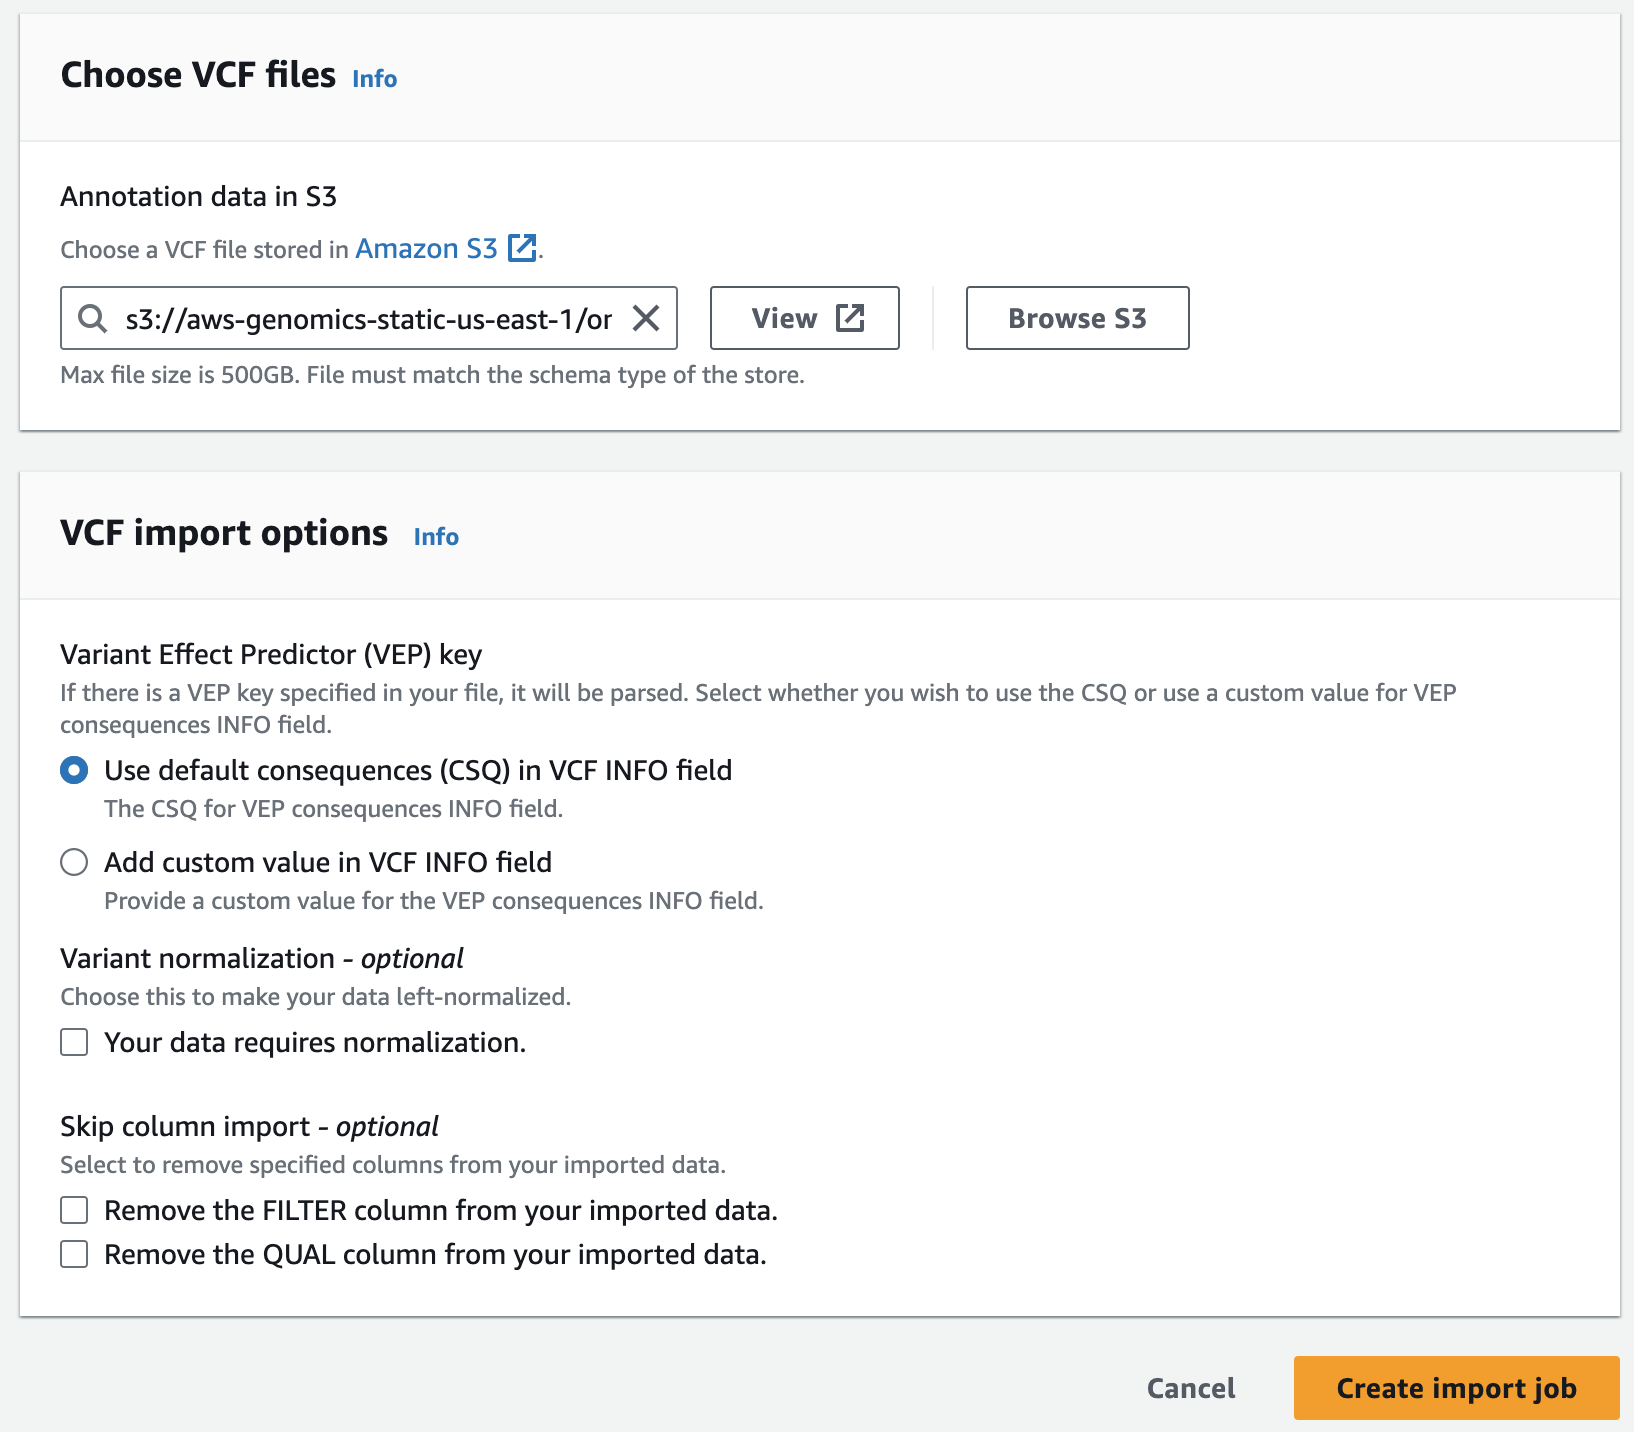
- For Choose annotation data from S3 provide the following S3 URI, including the appropriate AWS region:
아래는 미리준비된 예제 clinvar 입니다.
s3://aws-genomics-static-<aws-region>/omics-workshop/data/annotations/clinvar.vcf.gz실제 clinvar 데이터는 여기서 다운로드 할 수 있습니다.
예: https://ftp.ncbi.nlm.nih.gov/pub/clinvar/vcf_GRCh38/
Querying variants and annotations
이전 섹션에서 가져온 variant 및 annotation 데이터는 확장 가능한 쿼리가 가능한 열 형식의 저장소(Apache Parquet)로 변환됩니다. 데이터는 AWS 레이크 형성에서 공유 데이터베이스 및 테이블로 사용할 수 있습니다. 데이터를 쿼리하기 전에 Lake Formation 리소스 링크를 통해 액세스 권한을 제공하고 Athena 작업 그룹을 만드는 등 몇 가지 설정 단계를 수행해야 합니다.
- AWS Lake Formation을 사용하여 데이터 레이크 관리자 및 리소스 링크 생성하기
- Amazon Athena에서 작업 그룹을 생성하고 쿼리 편집기를 사용하여 변형 및 어노테이션 저장소에 대한 간단한 쿼리 실행하기
- AWS SDK for Pandas (aka AWS Wrangler)를 사용해 SageMaker 노트북에서 변형 및 어노테이션 저장소에 대해 쿼리 실행하기
AWS Lake Formation 서비스 셋업
Lake Formation Data Lake administrators are users and roles with permissions to create resource links (covered in the section below). In a real-world scenario, you would only need to setup data lake administrators once per account per region, or you would have IT support staff that serve this role.
For this workshop, you will need to verify that your current user role is a data lake administrator.
2. If you see the following screen, select Get started:
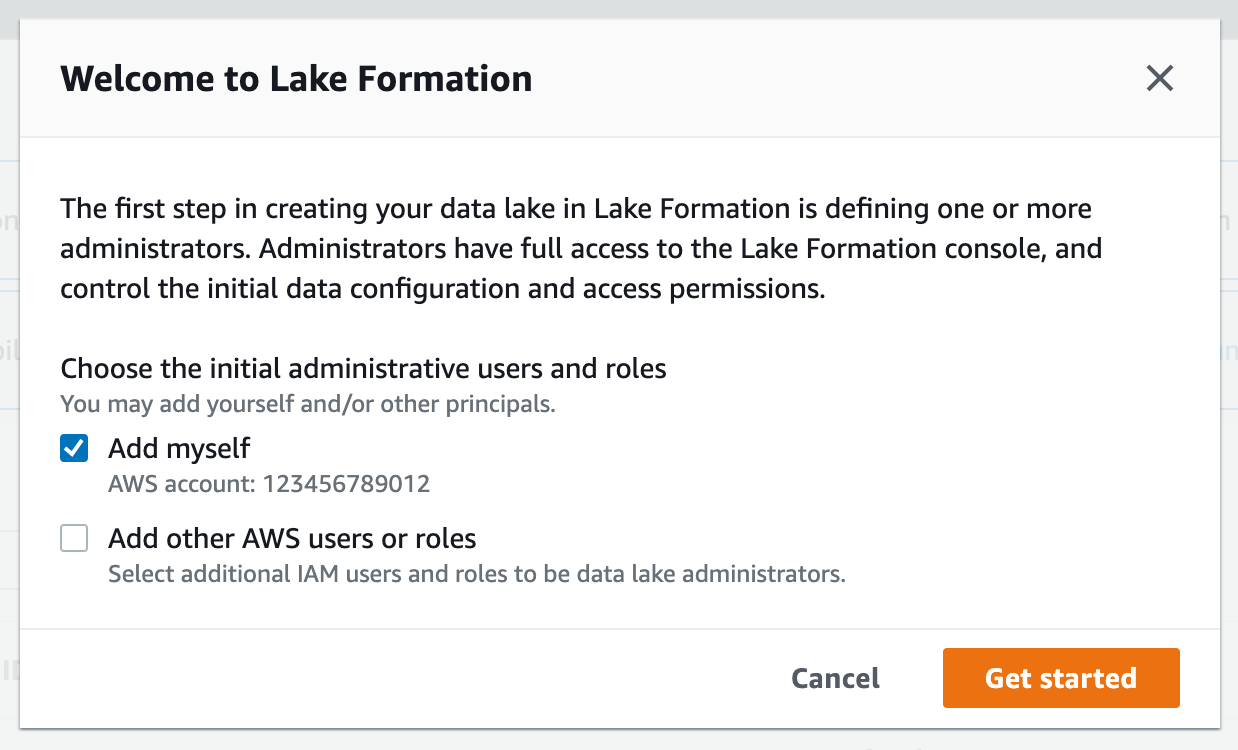

4. If WSParticipantRole is not listed as a data lake administrator, select Choose administrators and then choose WSParticipantRole under IAM uesrs and roles. Then select Save to add the role as a Data lake administrator.
데이터베이스 생성
Let's create a database that we'll use as a virtual container for our variants and annotations.
1. AWS Lake Formation 콘솔에서 Databases 로 들어갑니다.
2. Select Create Database.
3. For Name provide omicsdb. 
4. Accept all other defaults and finish with Create database.
리소스 링크 생성
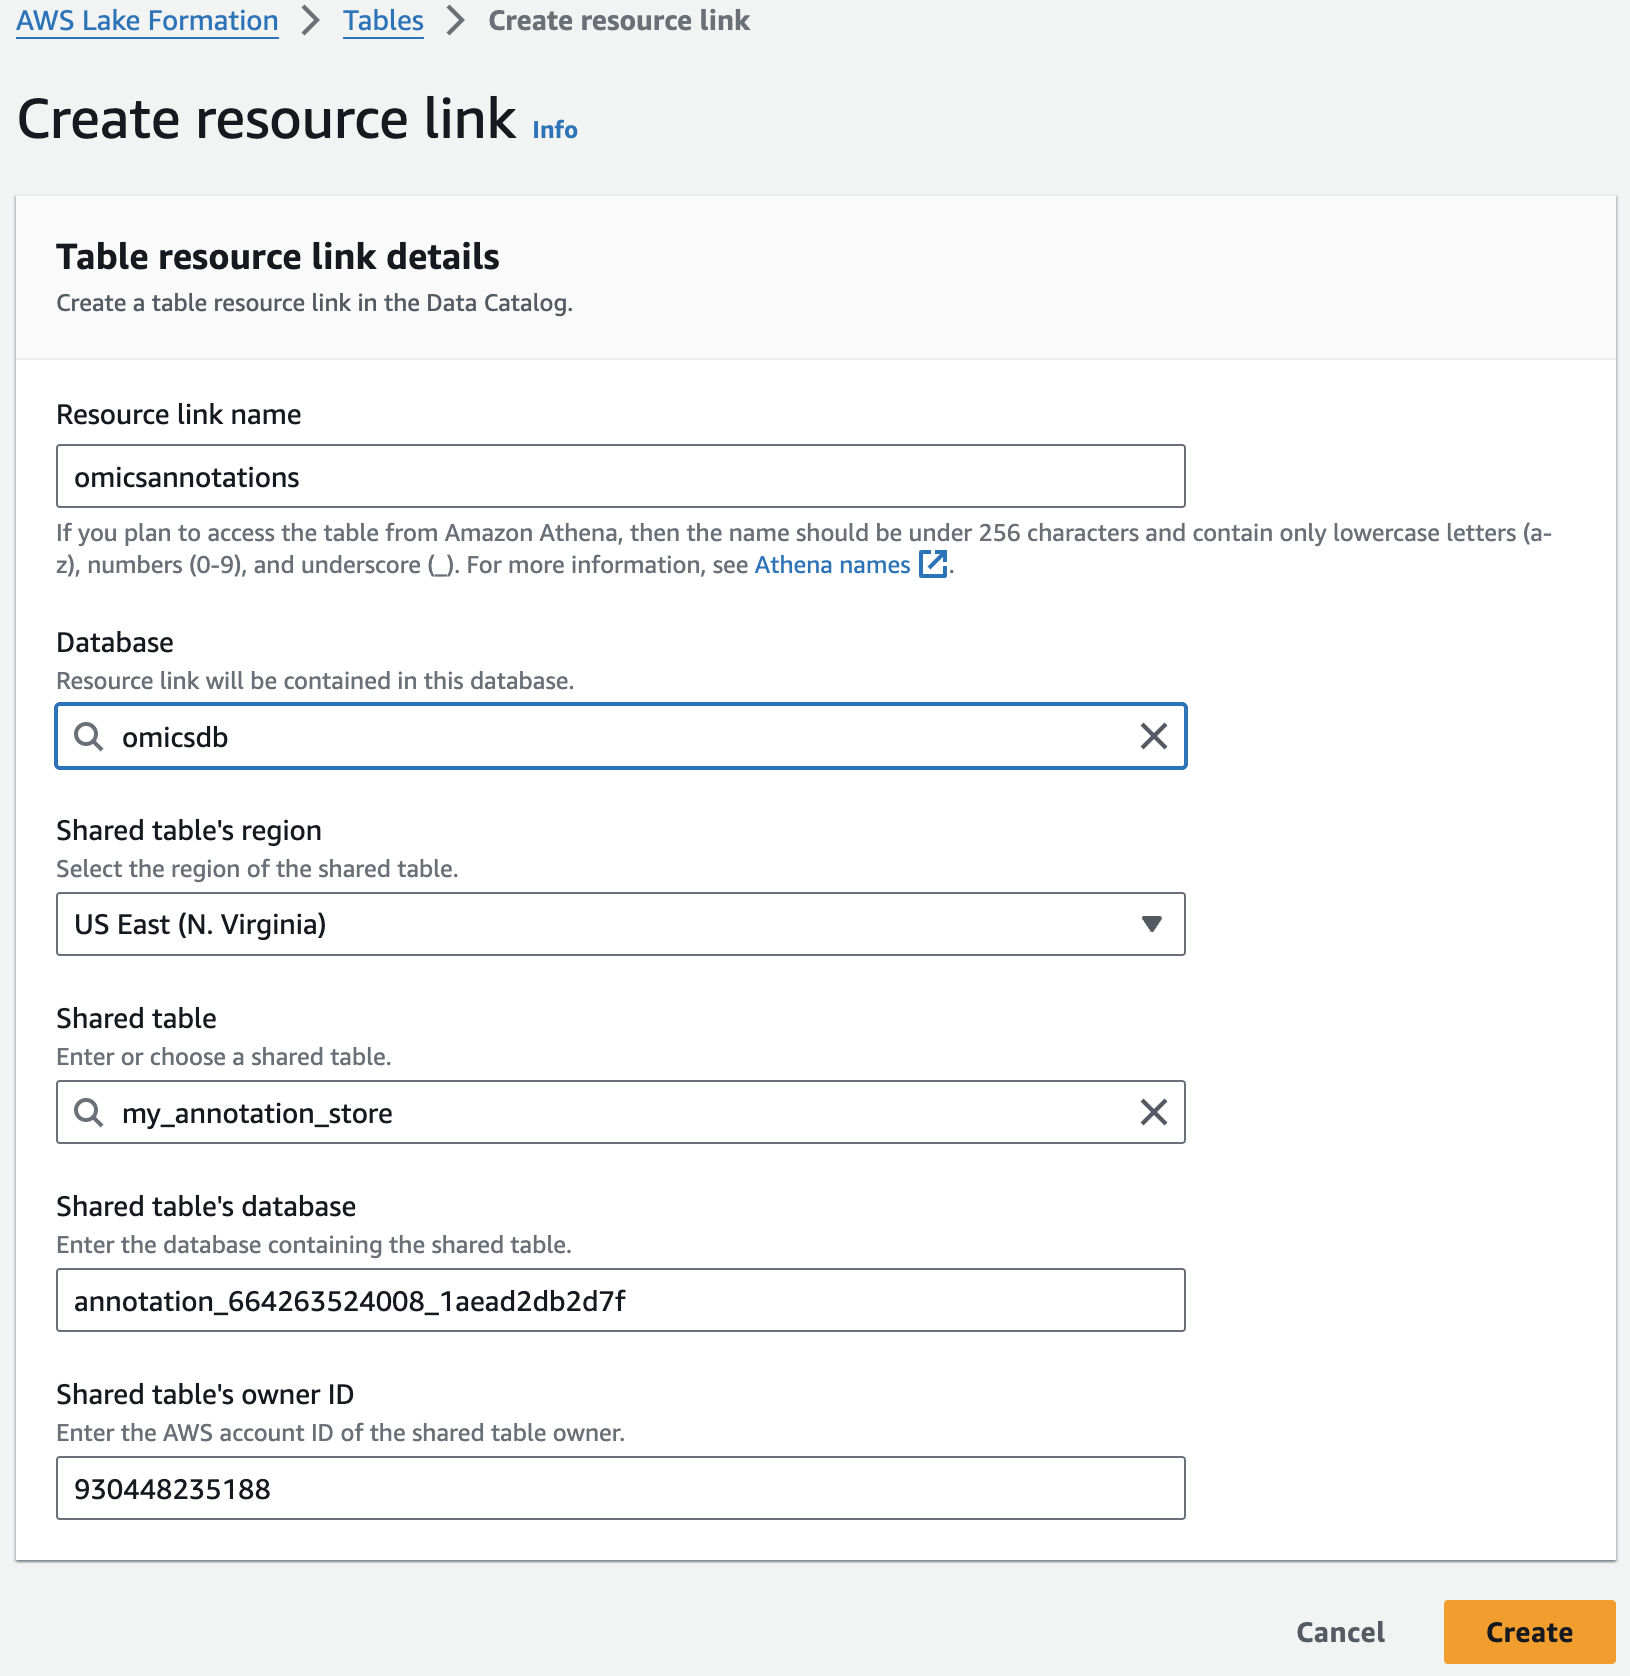
Resource links connect resources shared by HealthOmics Analytics to new or existing databases in your AWS Glue Data Catalog. For this workshop, we'll create resource links within the omicsdb you created above that point to the Variant and Annotaiton stores you created in previous sections.
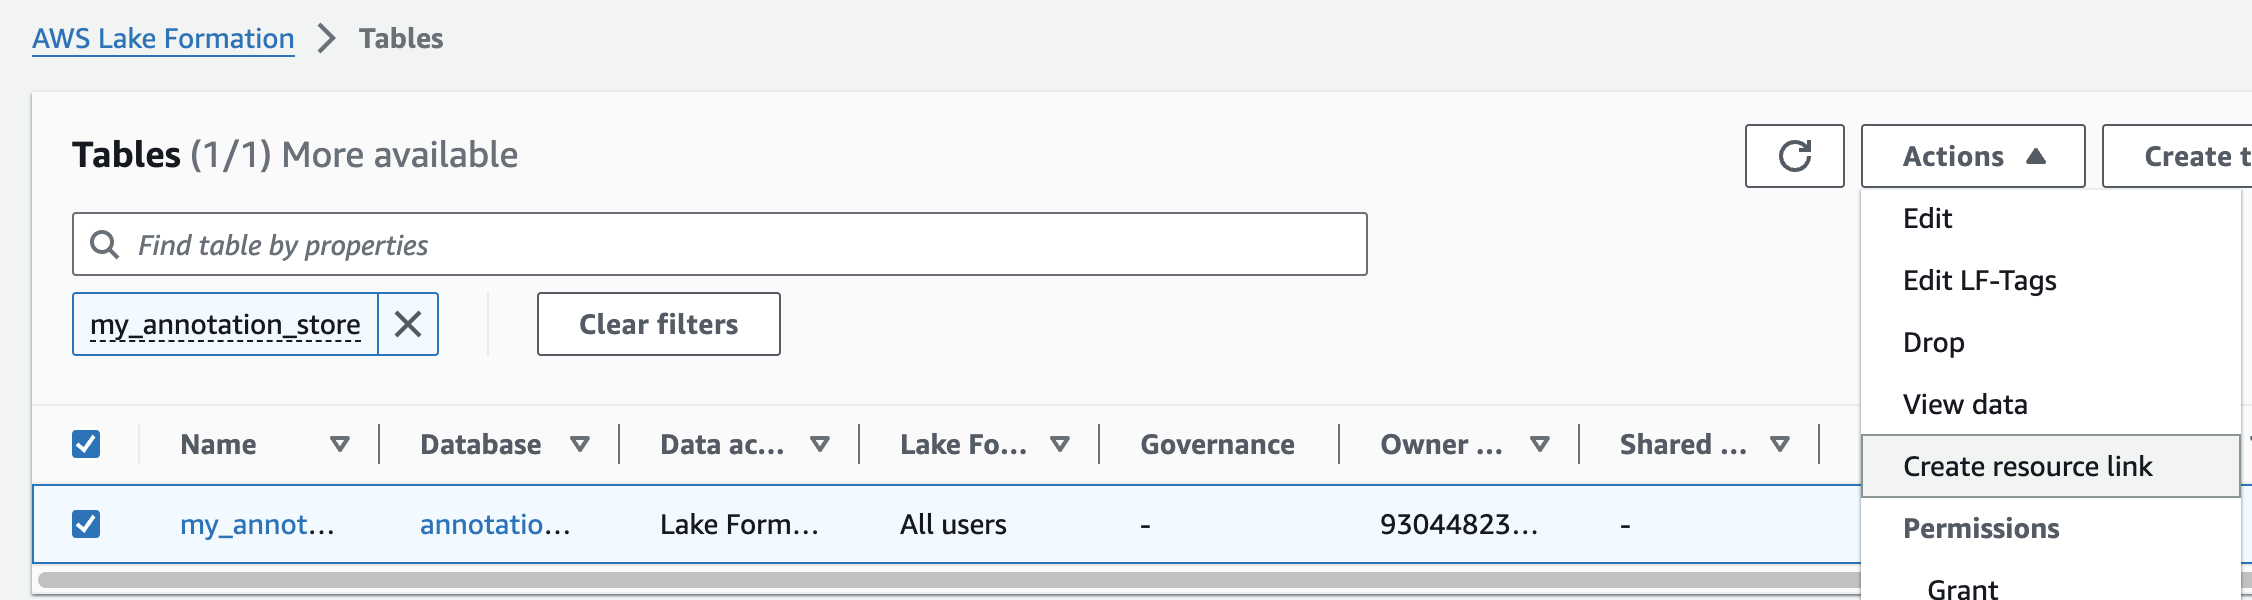
1. AWS Lake Formation 콘솔에서 Tables 메뉴로 진입합니다.
2. 앞에서 만들었던 변이 스토어 이름을 검색한 뒤 선택하고 새로운 리소스 링크를 만듭니다.
여기 예는 my_variant_store 입니다.
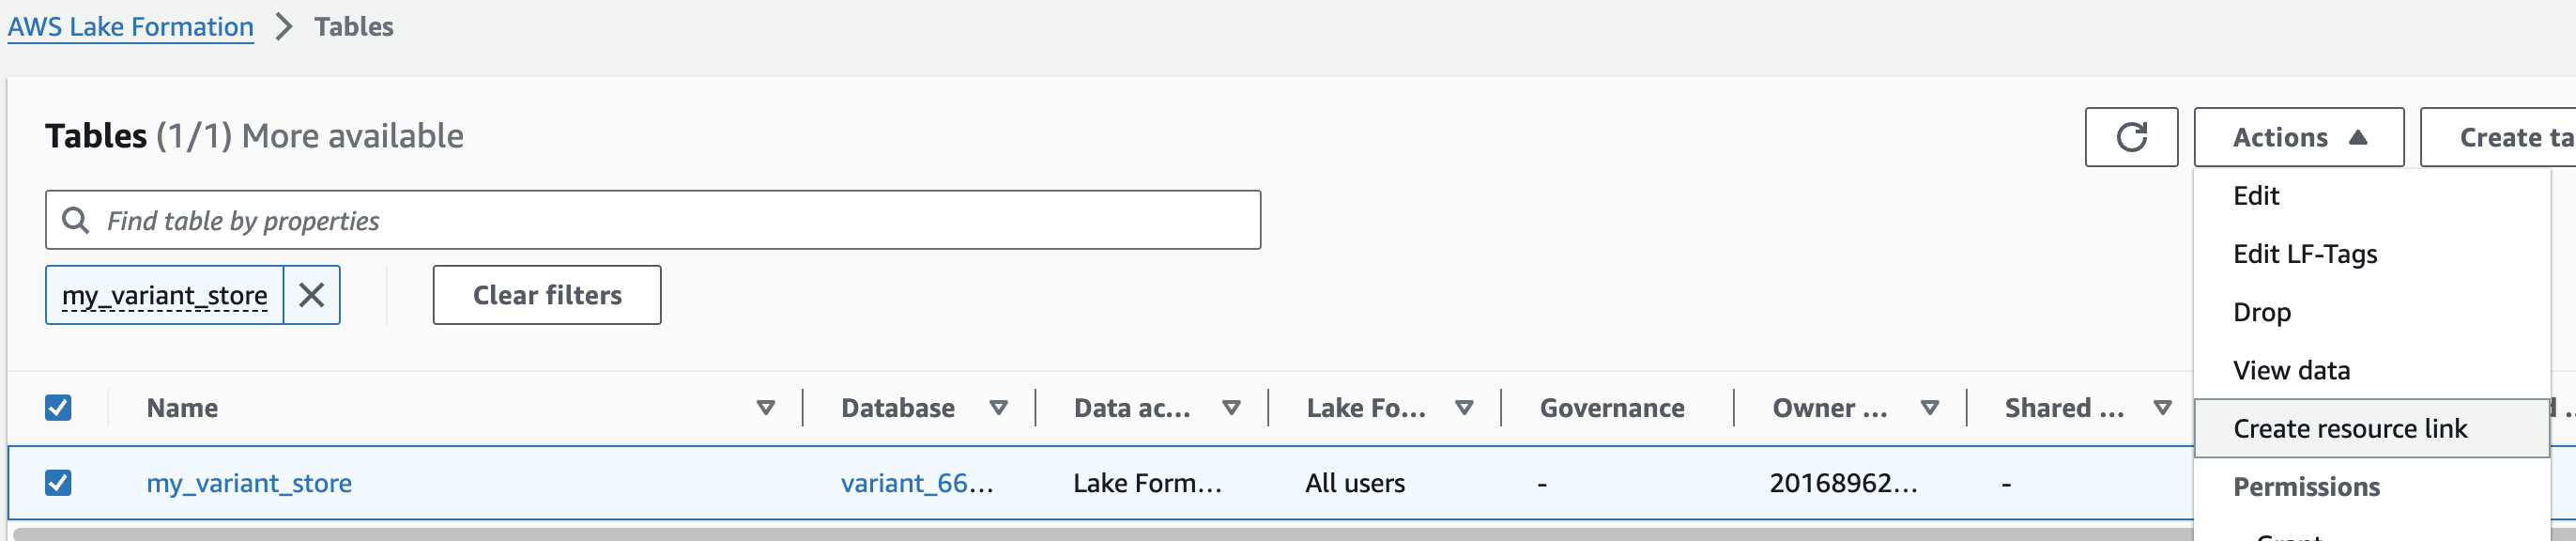
For Resource link name, provide omicsvariants.
For Database, provide omicsdb.
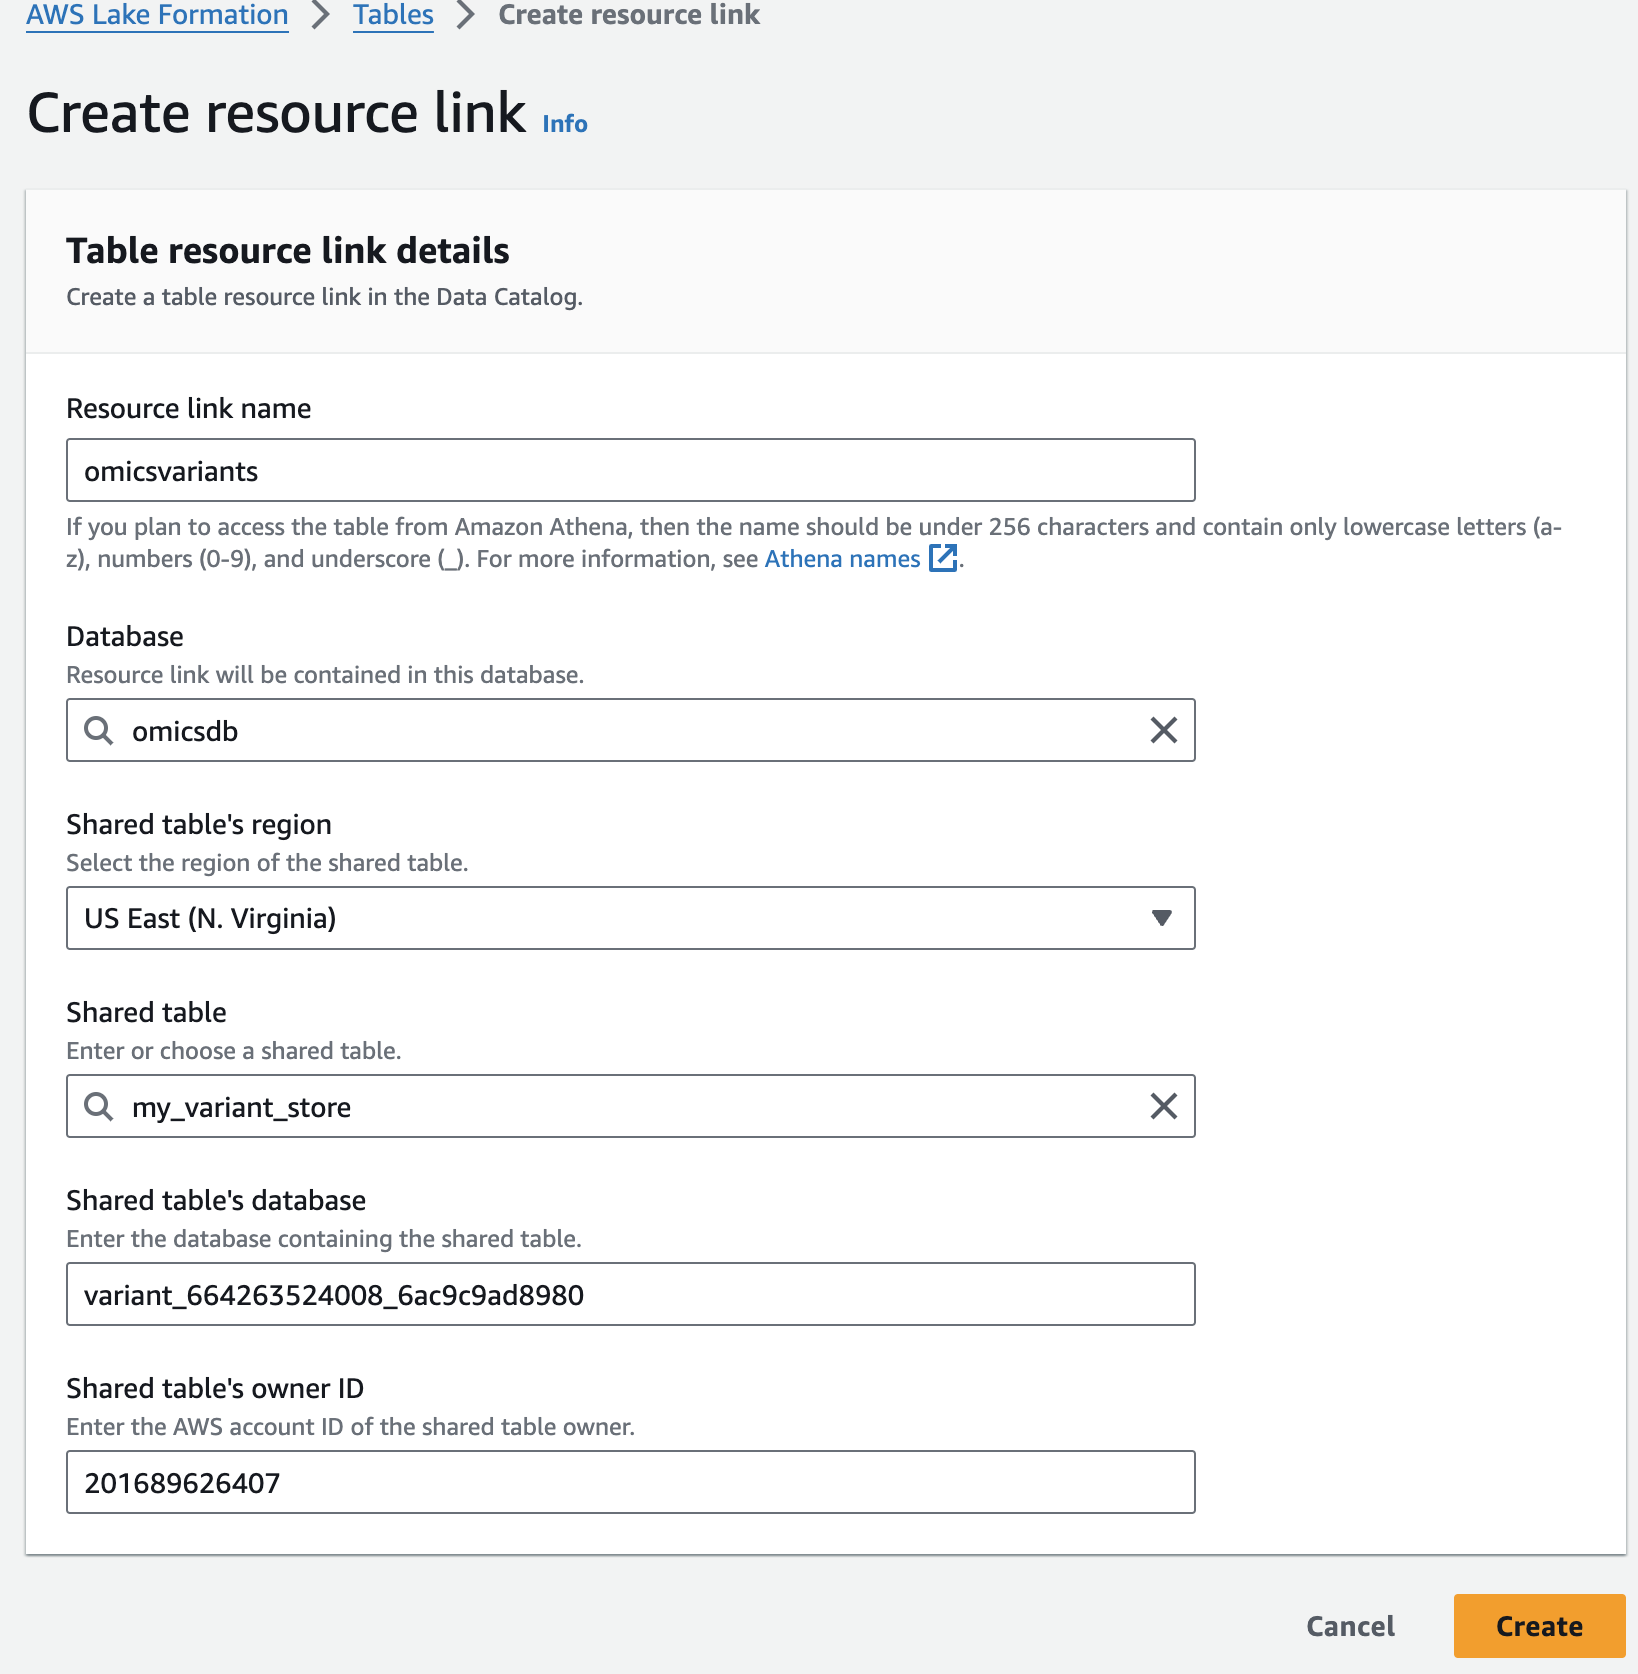
주석 테이블에 대해 위의 단계를 반복하여 omicsdb 데이터베이스에 omicsannotations라는 리소스 링크를 만듭니다.
Amazon Athena 셋업
쿼리 결과 디렉토리 지정
- Open the Amazon Athena console .
- From the navigation, choose Query editor.
- In the Query editor, choose the Settings tab and then choose Manage.
- Click on Browse S3, select the bucket named omics-output-{REGION}-{ACCOUNT-ID}, and click Choose. This will fill the Location of query result with the S3 URI of the workshop output bucket. Append to this URI "/athena/" and select Save.

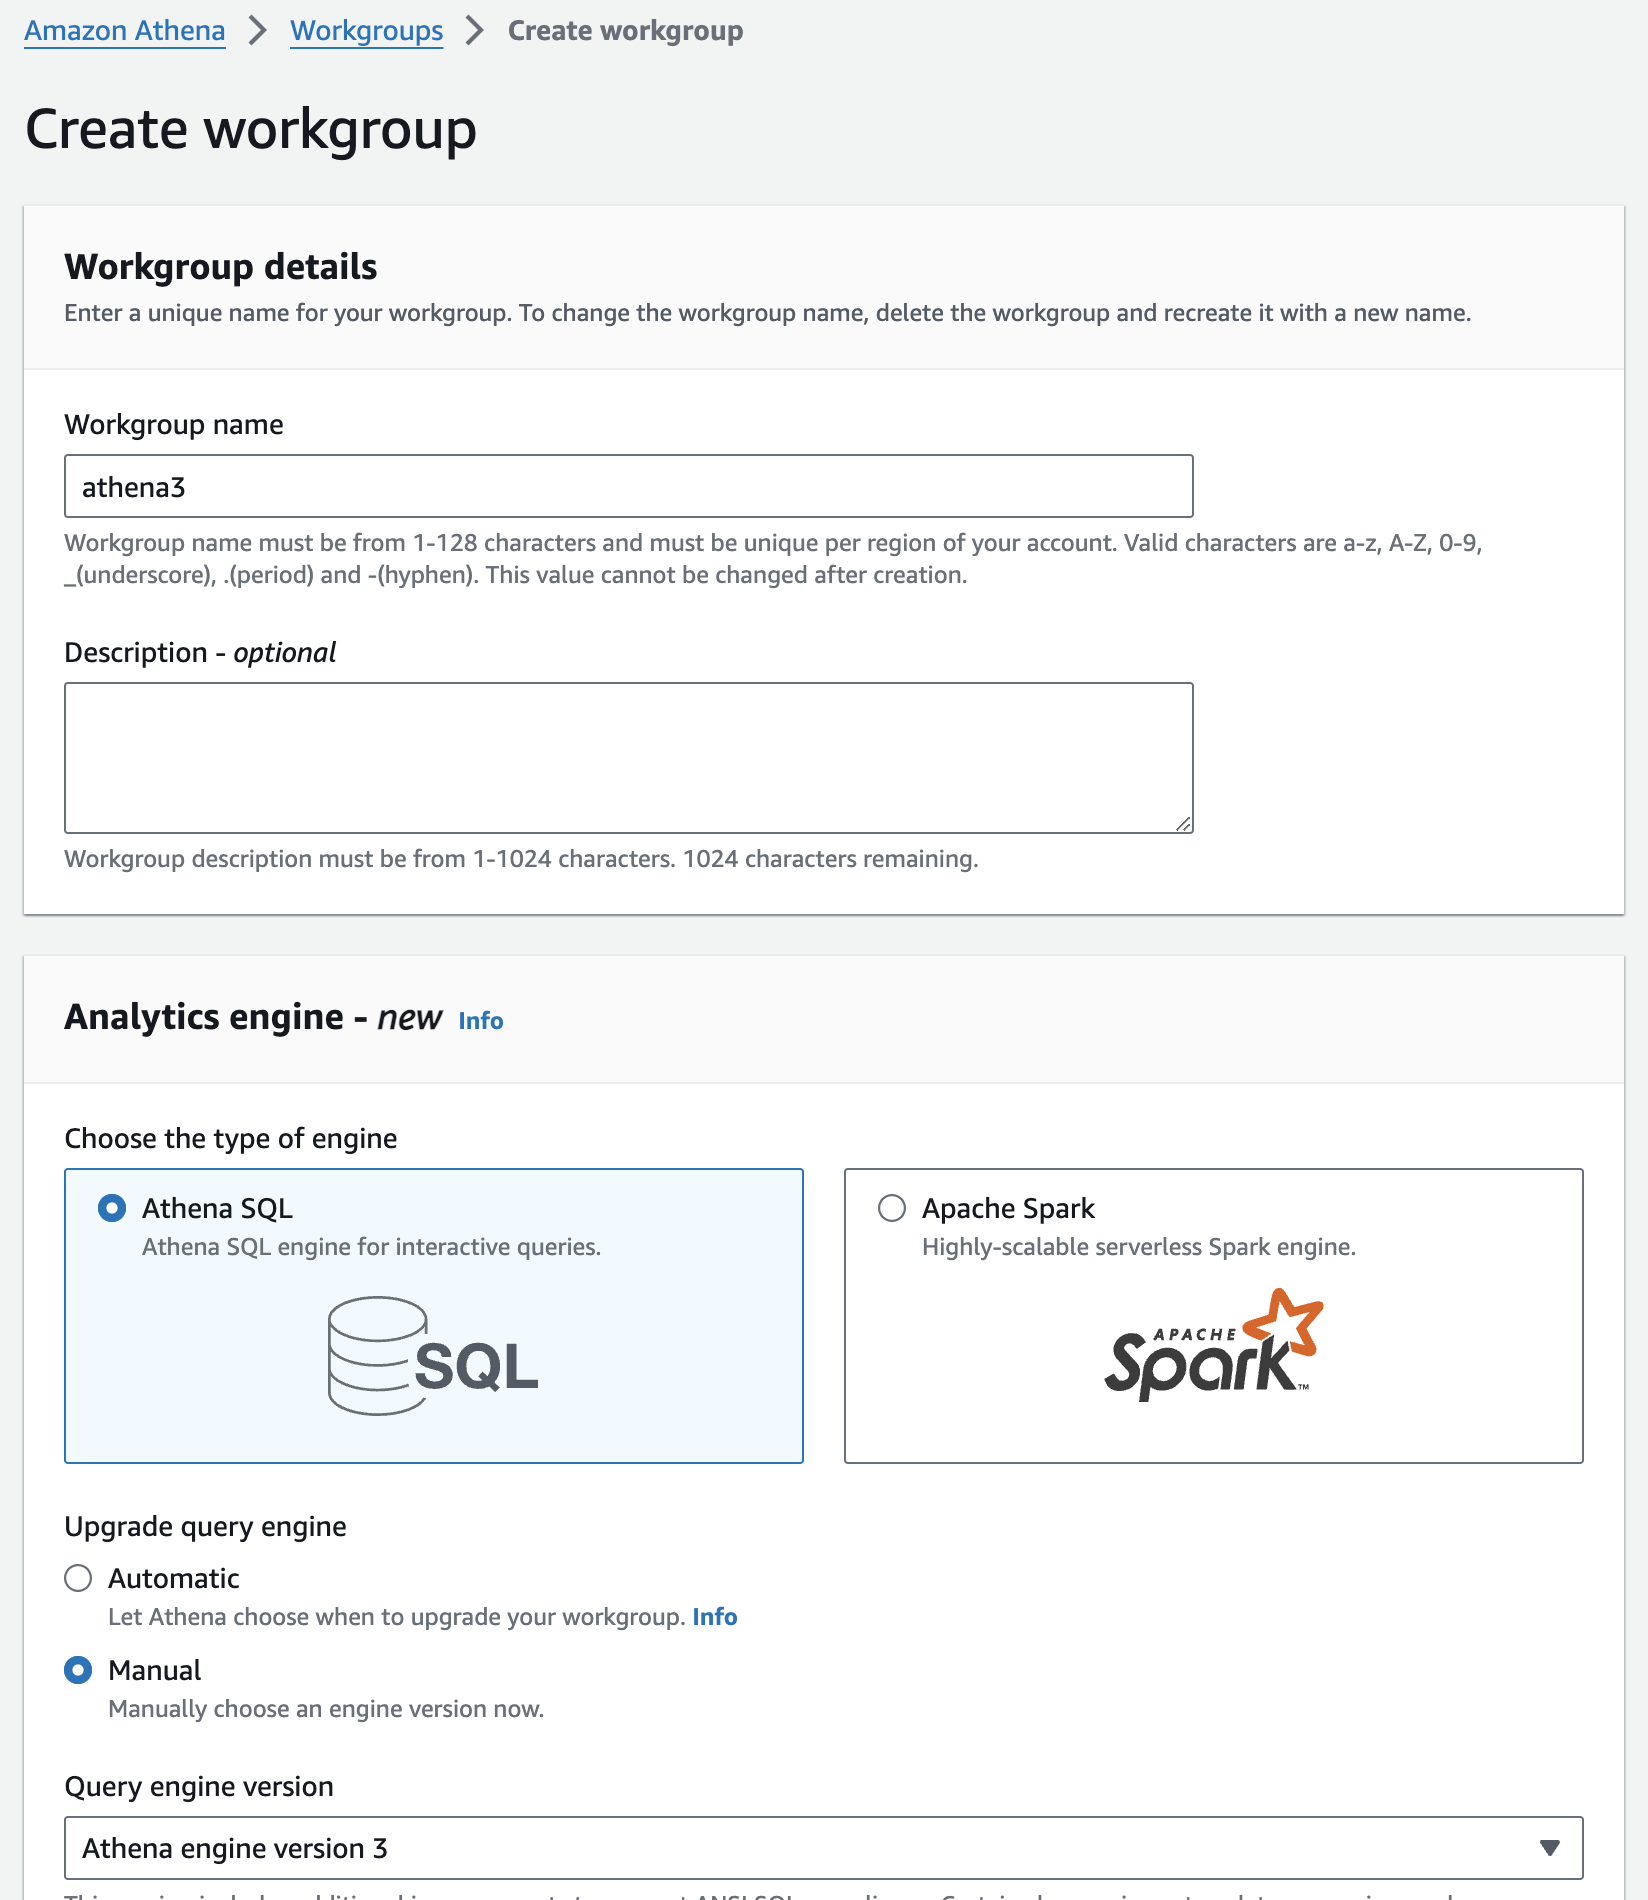
워킹 그룹 생성
- Open the Amazon Athena console .
- From the navigation, choose Workgroups, and then Create Workgroup.
- For Workgroup name provide athena3.
- Select Athena SQL for the type of engine.
- Under Upgrade query engine select Manual.
- Under Query Engine Version select Athena version 3.
- Finish with Create workgroup

Running queries - Amazon Athena
Now that we have Athena configured, let's run some queries.
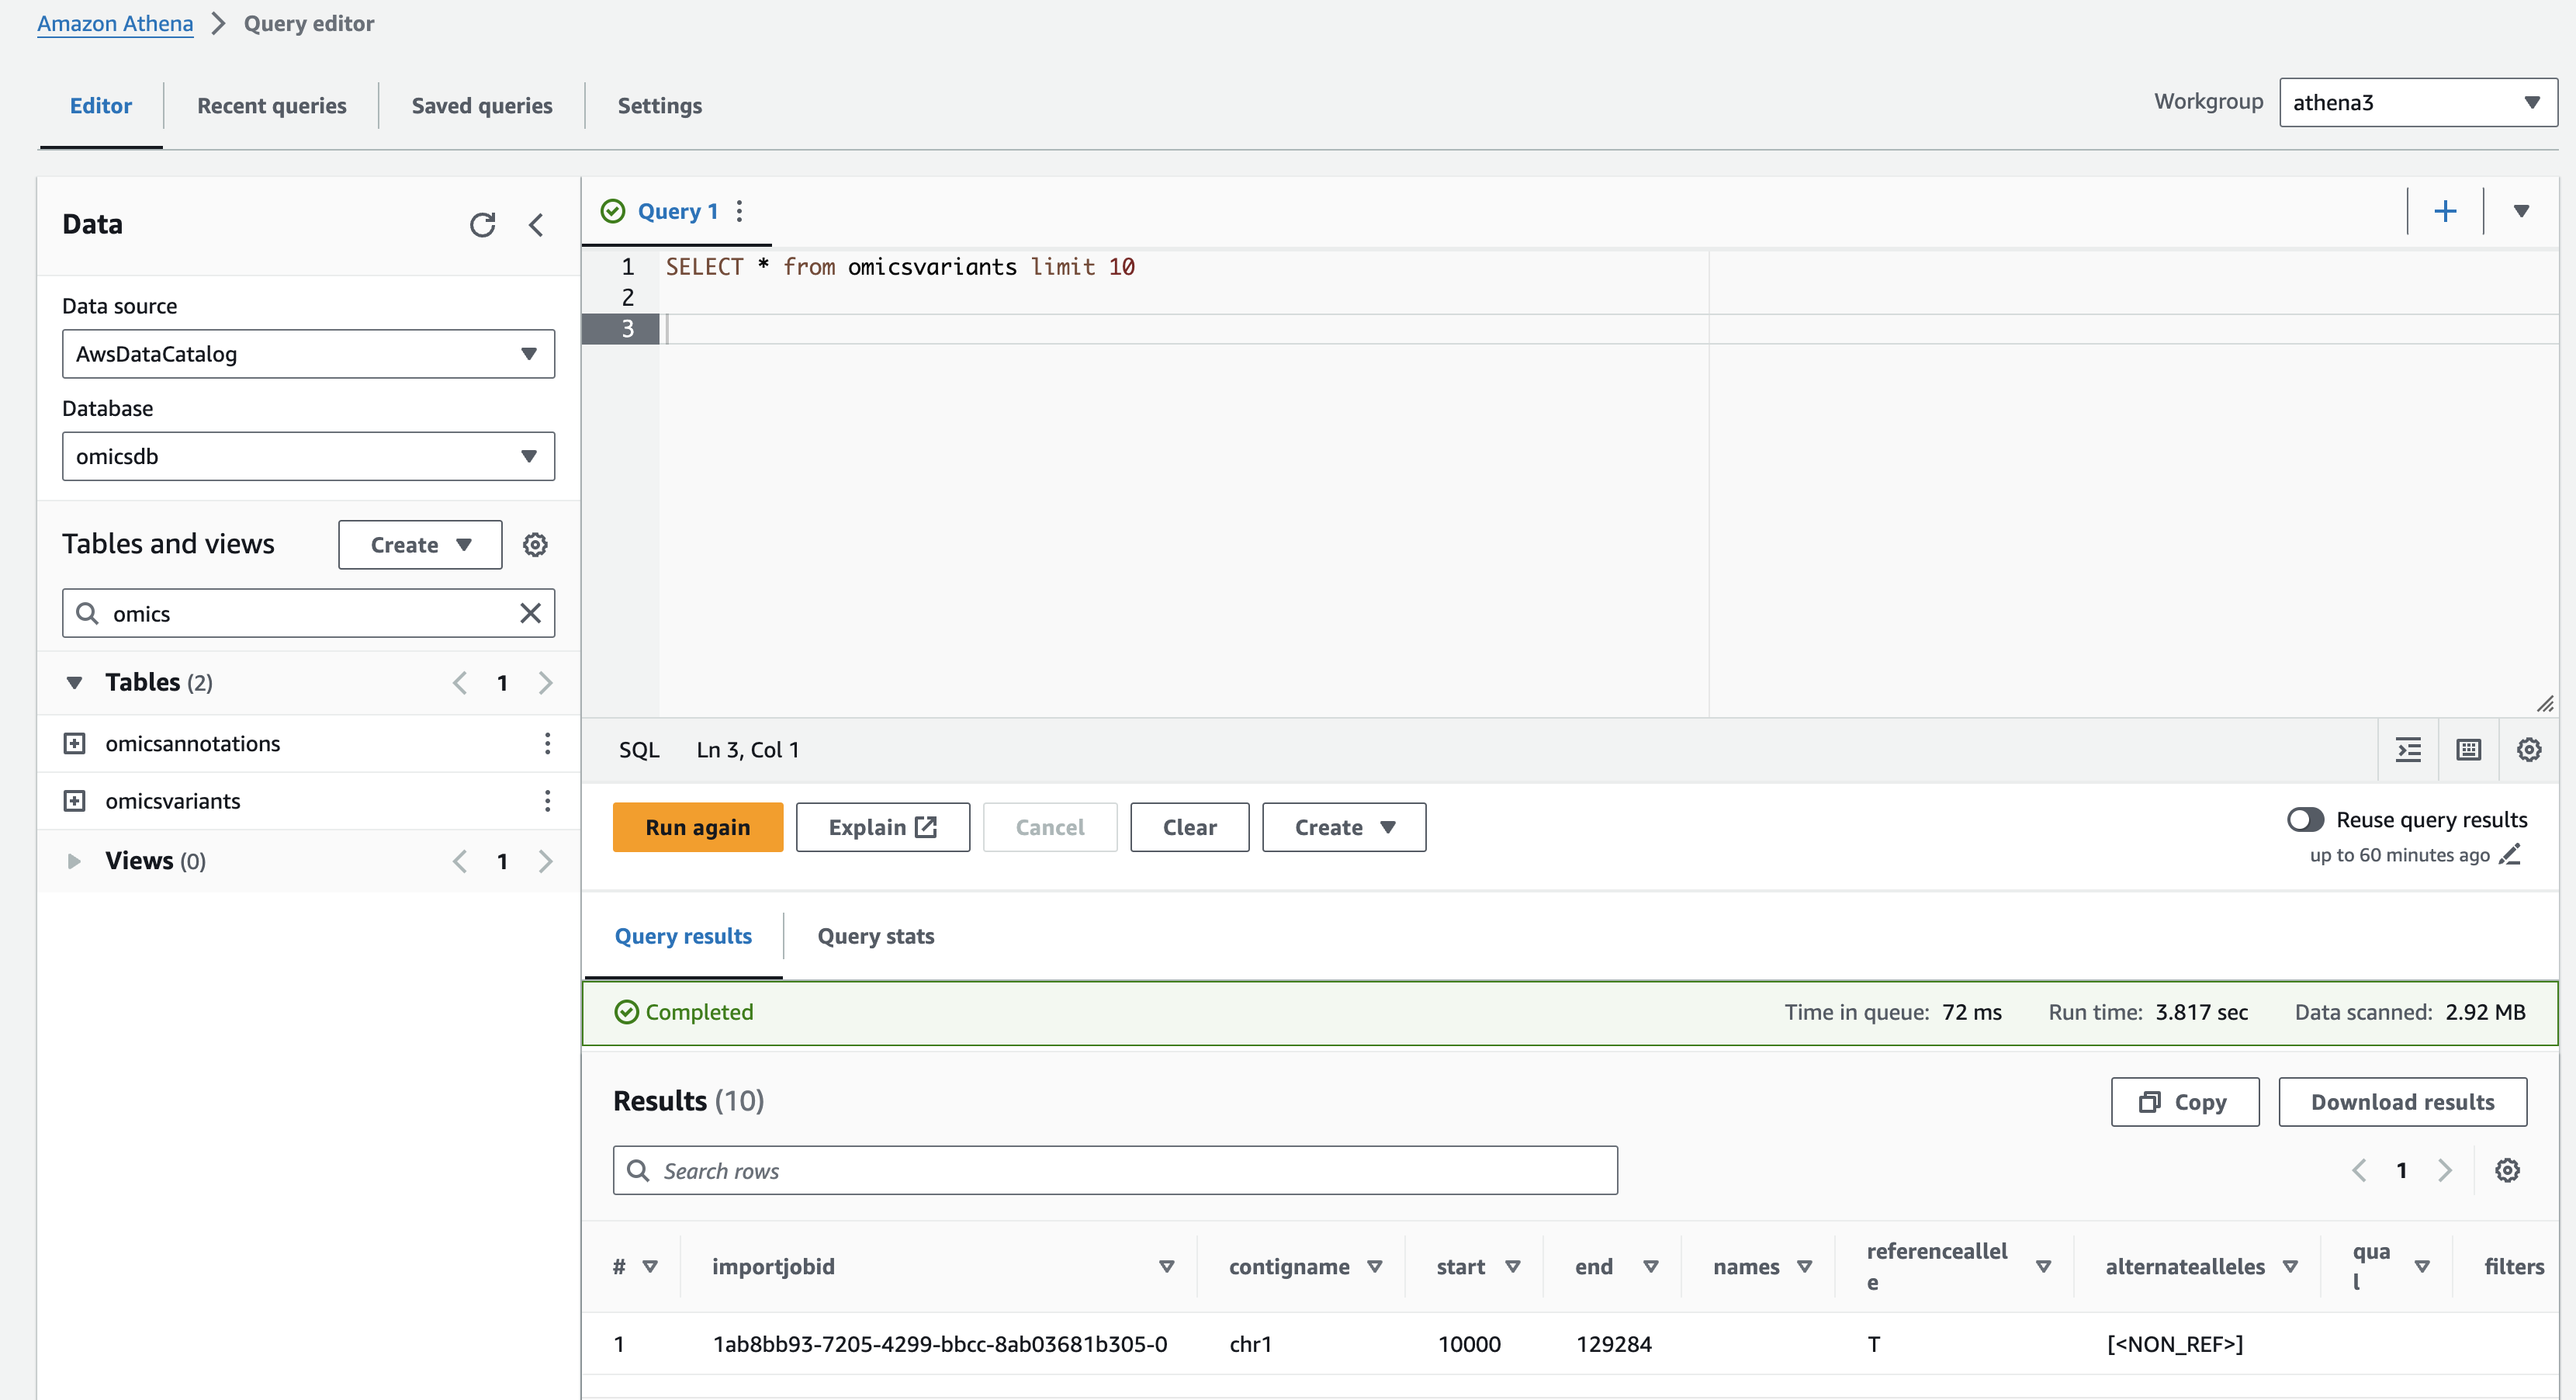
- Open the Amazon Athena Query editor .
- Under Workgroup select "athena3" (which you created above).
- Make sure the Data Source is AwsDataCatalog and the Database is omicsdb (which you created previously). Both the omicsvariants and omicsannotations tables should be listed.
간단한 쿼리
Preview the omicsvariants table, by running the following query:
SELECT * from omicsvariants limit 10- Copy the above query and paste it into the Query Editor under the Query 1 tab.
- Select Run to execute the query.
Results should return in a few seconds and look like:
복잡한 쿼리
For a more complex query, you can run the following which displays variants with a 'Likely_pathogenic' clinical significance by joining ClinVar annotations to variants.
- Select the + on the top right to create a new query tab called Query 2.
- Copy and paste the SQL below and select Run.
SELECT variants.sampleid,
variants.contigname,
variants.start,
variants.referenceallele,
variants.alternatealleles,
variants.attributes AS variant_attributes,
clinvar.referenceallele,
clinvar.alternatealleles,
clinvar.attributes AS clinvar_attributes
FROM omicsvariants as variants
INNER JOIN omicsannotations as clinvar ON
variants.contigname=CONCAT('chr',clinvar.contigname)
AND variants.start=clinvar.start
AND variants."end"=clinvar."end"
WHERE clinvar.attributes['CLNSIG']='Benign'

또다른 예 (본인의 상황에 맞게 수정해야할 것입니다.)
SELECT variants.sampleid,
variants.contigname,
variants.start,
variants.referenceallele,
variants.alternatealleles,
variants.attributes AS variant_attributes,
clinvar.attributes AS clinvar_attributes
FROM omicsvariants as variants
INNER JOIN omicsannotations as clinvar ON
variants.contigname=CONCAT('chr',clinvar.contigname)
AND variants.start=clinvar.start
AND variants."end"=clinvar."end"
AND variants.referenceallele=clinvar.referenceallele
AND variants.alternatealleles=clinvar.alternatealleles
WHERE clinvar.attributes['CLNSIG']='Likely_pathogenic'
참고
- https://catalog.workshops.aws/amazon-omics-end-to-end/en-US/010-xp-console/300-omics-analytics
- https://github.com/aws-samples/amazon-omics-tutorials/blob/main/notebooks/200-omics_analytics.ipynb
- https://github.com/vcflib/vcflib/tree/master
- https://github.com/Ensembl/ensembl-vep
- echtvar
- https://github.com/brentp/vcfanno
AWS HealthOmics - Troubleshooting
공식문서
https://docs.aws.amazon.com/omics/latest/dev/troubleshooting.html
ECR_PERMISSION_ERROR
{account_id}.dkr.ecr.us-east-1.amazonaws.com/quay/biocontainers/python:3.9--1
{account_id}.dkr.ecr.us-east-1.amazonaws.com/quay/nf-core/seurat:4.3.0
{account_id}.dkr.ecr.us-east-1.amazonaws.com/quay/biocontainers/fastqc:0.12.1--hdfd78af_0
위와 같은 다른 이미지 주소와 달리 bioconductor-dropletutils는 주소가 다르게 ecr에 등록되어 있음을 확인.
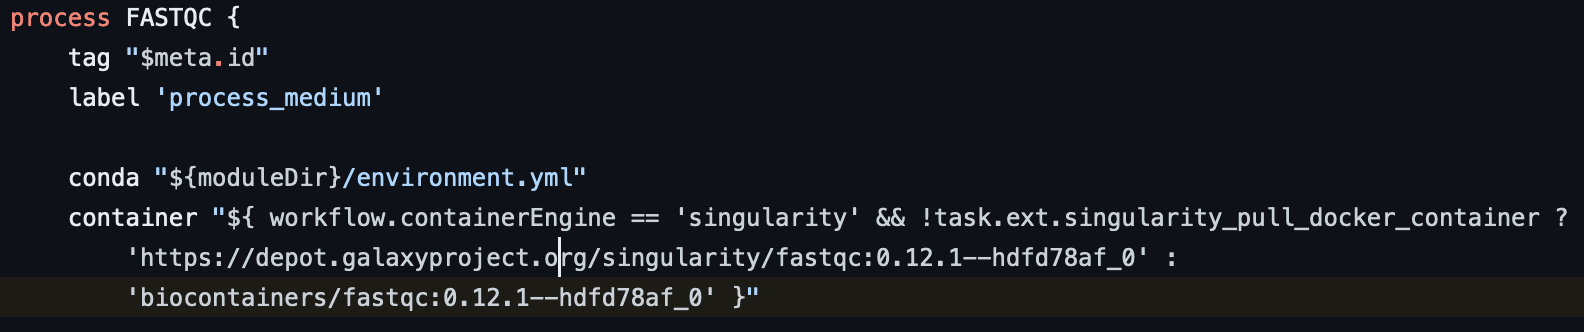
{account_id}.dkr.ecr.us-east-1.amazonaws.com/quay/quay.io/biocontainers/bioconductor-dropletutils:1.18.0--r42hf17093f_1
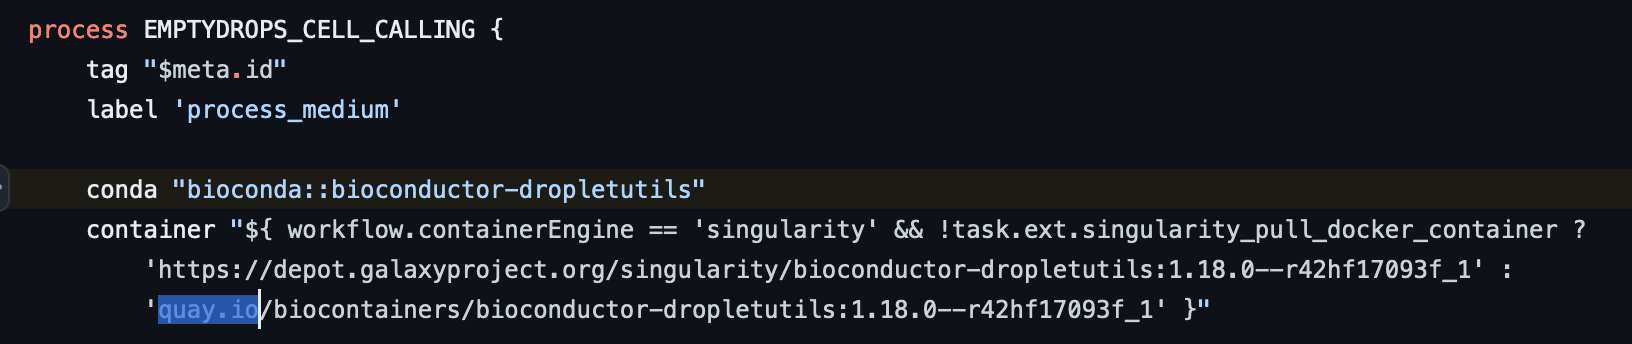
따라서 scrnaseq/conf/omics.config 파일을 수정을 필요로함.

to

몇 가지 기능과 알아둘 것들
서비스 Quota와 리전
AWS의 거의 모든 서비스가 그러하듯 HealthOmics에서도 Quota가 존재합니다. 또한 사용 가능한 리전이 현재 제한적입니다. (서울 리전은 사용 불가능)
- 리전 정보: https://docs.aws.amazon.com/general/latest/gr/healthomics-quotas.html
- Quota: https://docs.aws.amazon.com/omics/latest/dev/quotas.html
HealthOmics Etag 및 데이터 출처
HealthOmics의 Etag 란 시퀀스 저장소에 있는 데이터의 Hash를 말합니다. 이렇게 하면 데이터의 컨텐츠 무결성을 유지하면서 데이터 검색 및 처리를 간소화 합니다.
Etag는 메타데이터가 아니라 객체의 시맨틱 컨텐츠에 대한 변경 사항을 반영합니다. 설명하면 파일에는 bitwise identity와 semantic identity가 있는데, 비트는 파일의 비트가 동일하다는 의미이고 시맨틱은 파일의 내용이 동일함을 의미합니다. 시맨틱은 그래서 파일의 컨텐츠 무결성을 캡처하므로 메타 데이터 변경이나 압축 변경을 해도 된다는 바뀌지 않는 다는 의미입니다.
HealthOmics의 시퀀스 저장소의 Read sets은 객체 수명 주기 전반에 걸쳐 압축/압축 해제 주기와 데이터 출처 추적을 거칩니다. 어 처리과정에서 파일의 비트는 변경될 수 있지만 시맨틱은 그대로 유지됩니다.
더 자세한 설명은 아래 링크를 참고하세요.
https://docs.aws.amazon.com/omics/latest/dev/etags-and-provenance.html
시퀀스 스토리지로 바로 업로드하기
HealthOmics Transfer Manager를 사용해서 직접 업로드할 수도 있습니다. 이때 멀티파트 업로드를 사용할 수도 있습니다.
https://docs.aws.amazon.com/omics/latest/dev/synchronous-uploads.html
시퀀스 스토리지에 있는 데이터를 다른 3rd party에서 바로 접근하기
- Integrative Genomics Viewer (IGV)나 UCSC Genome Browser
- CWL, WDL 및 Nextflow 와 같은 워크플로우에서 Amazon S3 확장을 사용할 때
- 인증을 구현해서 액세스 포인트 Amazon S3 URIs 또는 presigned Amazon S3 URIs를 읽을 때
- Mountpoint나 CloudFront와 같은 Amazon S3 의 유틸리티 기능이 필요할 때
https://docs.aws.amazon.com/omics/latest/dev/s3-access.html
자동 주기 변환
HealthOmics 스토리지를 사용하여 유전체학 데이터를 저렴한 비용으로 효율적으로 저장, 검색, 구성 및 공유할 수 있습니다.
ACTIVE 상태로 저장된 데이터는 즉시 검색할 수 있습니다.30일 이상 액세스하지 않은 데이터는 ARCHIVE 상태로 저장됩니다.
만일 파일을 ACTIVE로 전환 하려면 아래 링크를 참고하세요. ReadSet 크기에 따라 다시 활성화하는 데 몇 분에서 몇 시간이 걸릴 수 있습니다. (마치 Amazon S3 Glacier Instant Retrieval Storage Class 에서 데이터 검색 요청하는 것과 유사함)
예를들어 2023년 10월 기준으로 1Gbase파일은 3분이내에 활성화되고 110Gbase 파일이 2시간 45분 만에 활성화됩니다.
https://docs.aws.amazon.com/omics/latest/dev/activating-read-sets.html
변이 스토어 다루기
AWS Lake Formation과 Amazon Athena 나 AMaozn EMR을 사용해 변이 스토어에 대한 쿼리를 수행할 수 있습니다.
2024년 9월 26일 이후 생성된 변이 스토어에 대해 HealthOmics는 샘플 아이디를 기준으로 스토어를 분할합니다. 이러한 파티셔닝은 HealthOmics가 샘플 ID를 사용하여 변형 정보를 저장하는 최적화를 의미합니다. 샘플 정보를 필터로 사용할 경우 쿼리에서 스캔하는 데이터 양이 적기 때문에 결과를 더 빨리 반환합니다.
데이터를 수집하기 전에 샘플 ID에 PHI 데이터가 포함되어 있는지 확인하세요. 만일 포함되었다면 샘플 아이디를 변경해야 합니다. (HIPAA 규정준수 참고)
워크플로우 실행 전 검사 하기
워크플로를 만든 후 첫 실행을 시작하기 전에 워크플로에서 린터를 실행하는 것이 좋습니다. 린터는 실행 실패의 원인이 될 수 있는 오류를 탐지합니다.
WDL의 경우 HealthOmics는 워크플로를 생성할 때 자동으로 린터를 실행합니다. 린터 출력은 get-Workflow 응답의 StatusMessage 필드에서 사용할 수 있습니다.다음 CLI 명령을 사용하여 상태 출력을 검색합니다 (생성한 WDL 워크플로의 워크플로 ID 사용).
-
WDL – A public Amazon ECR image to run a WDL linter.
-
Nextflow – A public Amazon ECR image to run Linter rules for Nextflow. You can access the source code for this linter from GitHub.
-
CWL – not available
https://docs.aws.amazon.com/omics/latest/dev/workflows-linter.html
워크플로우의 콜 캐싱 기능
HealthOmics는 비공개 워크플로에 대한 콜 캐싱을 지원합니다. 콜 캐싱은 실행 완료 후 완료된 워크플로 작업의 출력을 저장합니다. 후속 실행에서는 작업 출력을 다시 계산하는 대신 캐시의 작업 출력을 사용할 수 있습니다. 호출 캐싱은 컴퓨팅 리소스 사용량을 줄여 실행 기간을 단축하고 컴퓨팅 비용을 절감합니다.
실행이 완료된 후 캐시된 작업 출력 파일에 액세스할 수 있습니다. 개발 중에 고급 디버깅 및 문제 해결을 수행하기 위해 중간 작업 파일을 캐시하려는 경우 워크플로 정의에서 이러한 파일을 작업 출력으로 선언하십시오.
프로덕션 워크플로의 경우 호출 캐싱을 사용하여 실행 실패로 인한 완료된 작업 결과를 저장하십시오.다음 실행은 완료된 작업을 다시 계산하는 대신 성공적으로 완료된 마지막 작업부터 시작합니다.
HealthOmics에서 작업과 일치하는 캐시 항목을 찾지 못하더라도 실행은 실패하지 않습니다. HealthOmics는 작업과 종속 작업을 다시 계산합니다.
https://docs.aws.amazon.com/omics/latest/dev/workflows-call-caching.html
HealthOmics의 공유 기능
- HealthOmics variant stores, HealthOmics annotation stores, Private workflows