# Hail on AWS
본 문서에서는 AWS에서 오픈소스 [Hail](https://hail.is/) 도구를 실행하는 방법을 안내합니다. 아래와 같은 여러 방법들로 Hail을 실행할 수 있습니다.
- Amazon EMR on EC2
- AWS Glue
- Amazon EMR Serverless
- Amazon EC2
# Amazon EMR on EC2
### VPC 생성
1\. VPC를 생성합니다.
[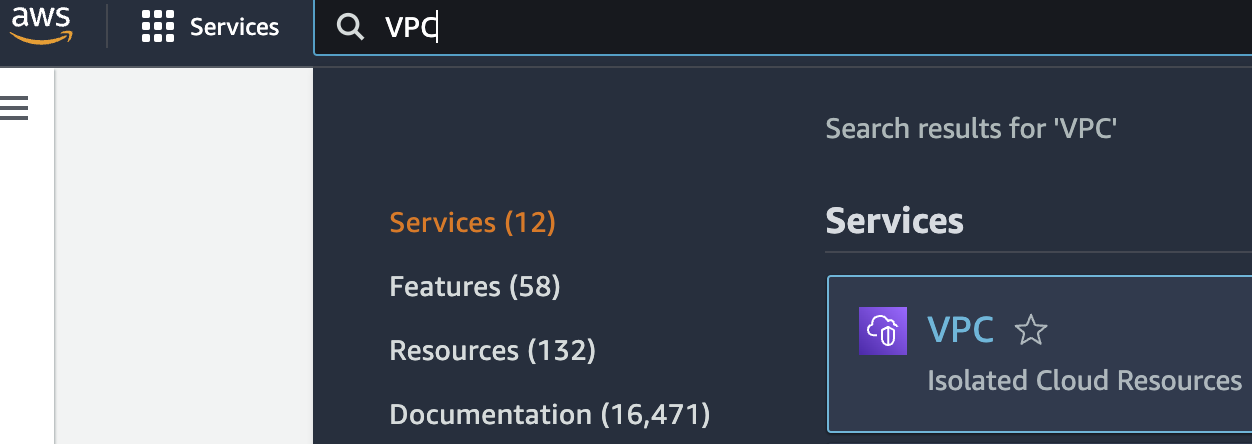 ](https://www.aws-ps-tech.kr/uploads/images/gallery/2024-04/screenshot-2024-04-18-at-11-32-14-pm.png)[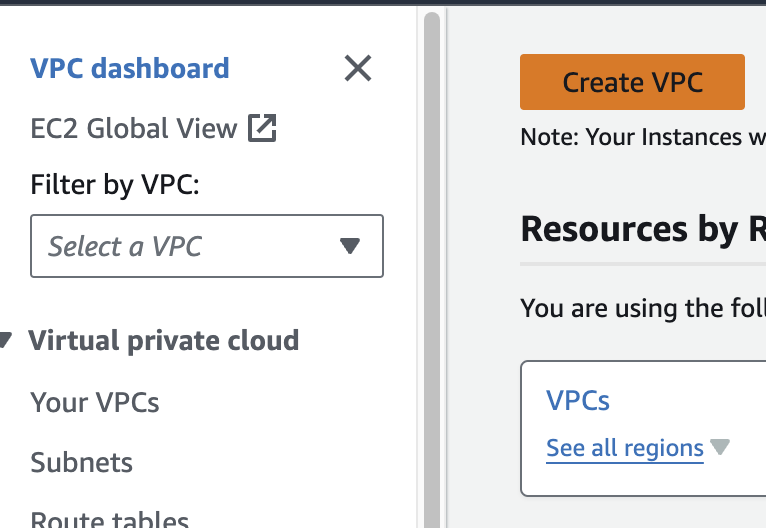](https://www.aws-ps-tech.kr/uploads/images/gallery/2024-04/screenshot-2024-04-18-at-11-35-04-pm.png)
다른 모든 사항은 기본값으로 하여 Name만 지정해주었습니다.
[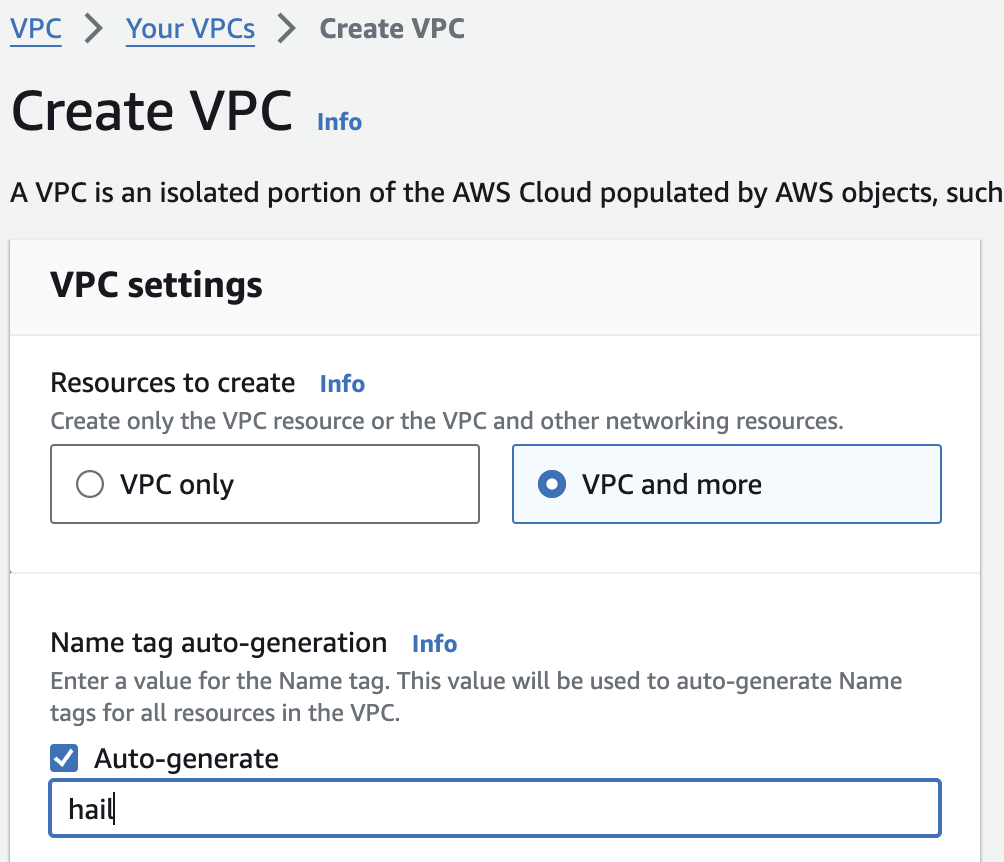](https://www.aws-ps-tech.kr/uploads/images/gallery/2024-04/screenshot-2024-04-18-at-11-36-34-pm.png)
### VPC 생성 확인
만들어진 `hail-vpc` 이름의 VPC ID 를 확인합니다.
[](https://www.aws-ps-tech.kr/uploads/images/gallery/2024-04/screenshot-2024-04-18-at-11-38-25-pm.png)
2\. 보안 그룹을 2개 생성합니다. 이때 앞에서 만든 VPC를 선택해야 합니다.
여기서는 `emr-primary-sg` 와 `emr-core-sg` 로 이름을 지정했습니다.
[](https://www.aws-ps-tech.kr/uploads/images/gallery/2024-04/screenshot-2024-04-18-at-11-37-33-pm.png)[ ](https://www.aws-ps-tech.kr/uploads/images/gallery/2024-04/screenshot-2024-04-18-at-11-39-07-pm.png)[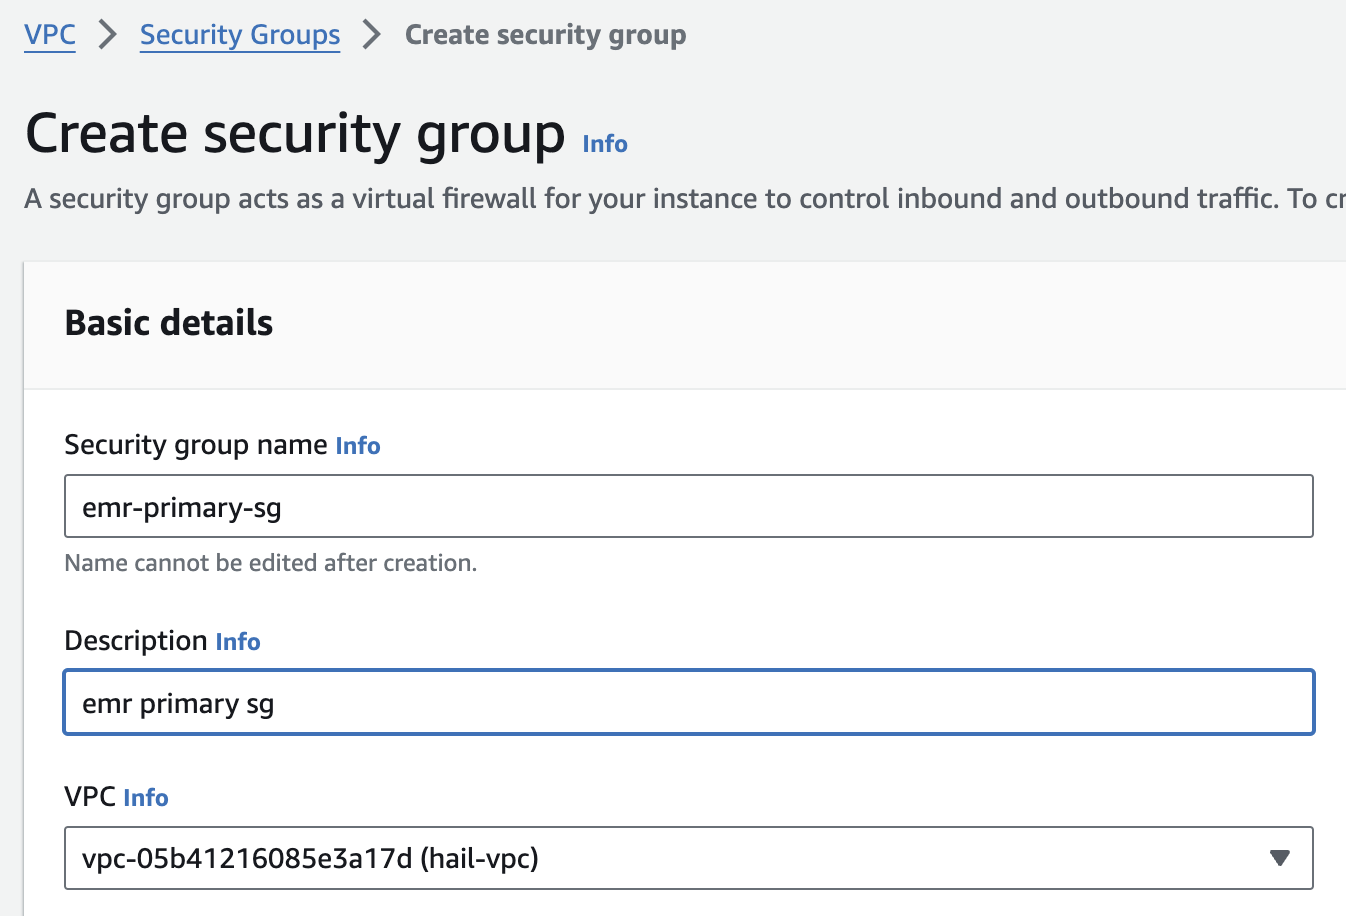](https://www.aws-ps-tech.kr/uploads/images/gallery/2024-04/screenshot-2024-04-18-at-11-40-01-pm.png)
AWS CloudFormation 을 사용하는 방법도 있습니다. [여기를 참고](https://catalog.us-east-1.prod.workshops.aws/workshops/c86bd131-f6bf-4e8f-b798-58fd450d3c44/en-US/setup/selfpaced/prerequisites)하세요.
[Stack 실행하기](https://us-east-1.console.aws.amazon.com/cloudformation/home?region=us-east-1#/stacks/quickcreate?stackName=emr-workshop&templateURL=https://ws-assets-prod-iad-r-iad-ed304a55c2ca1aee.s3.us-east-1.amazonaws.com/c86bd131-f6bf-4e8f-b798-58fd450d3c44/emr-dev-exp-self-paced.template)
### EMR 클러스터 생성
1\. EMR 콘솔로 접속합니다.
[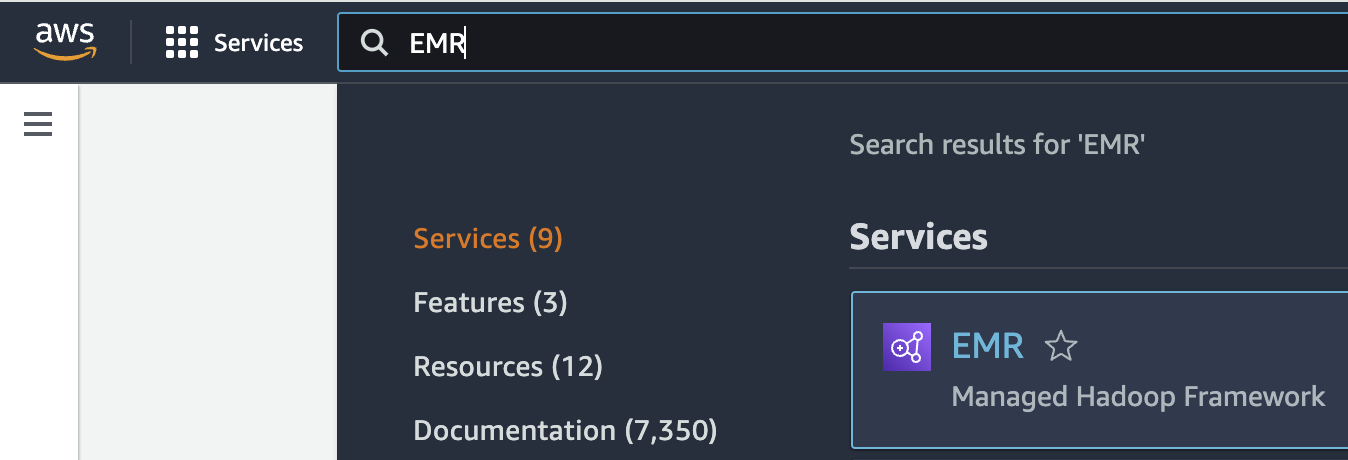](https://www.aws-ps-tech.kr/uploads/images/gallery/2024-04/screenshot-2024-04-18-at-11-40-57-pm.png)
2\. EMR on EC2 > Clusters 메뉴를 선택하고 클러스터를 새로 생성합니다.
#### Name and applications
Application bundle은 `Custom` 을 선택합니다.
| Option | Configuration |
|---|
| Release | emr-7.1.0 |
| Software | \*Hadoop, Hive, Spark, Livy and JupyterHub, JupyterEnterpriseGateway |
| Multi-master support | Leave as deafult |
| AWS Glue Data Catalog Settings | Select 1. Use for Hive table metadata, 2. Use for Spark table metadata |
| Amazon Linux Release | Leave as deafult |
[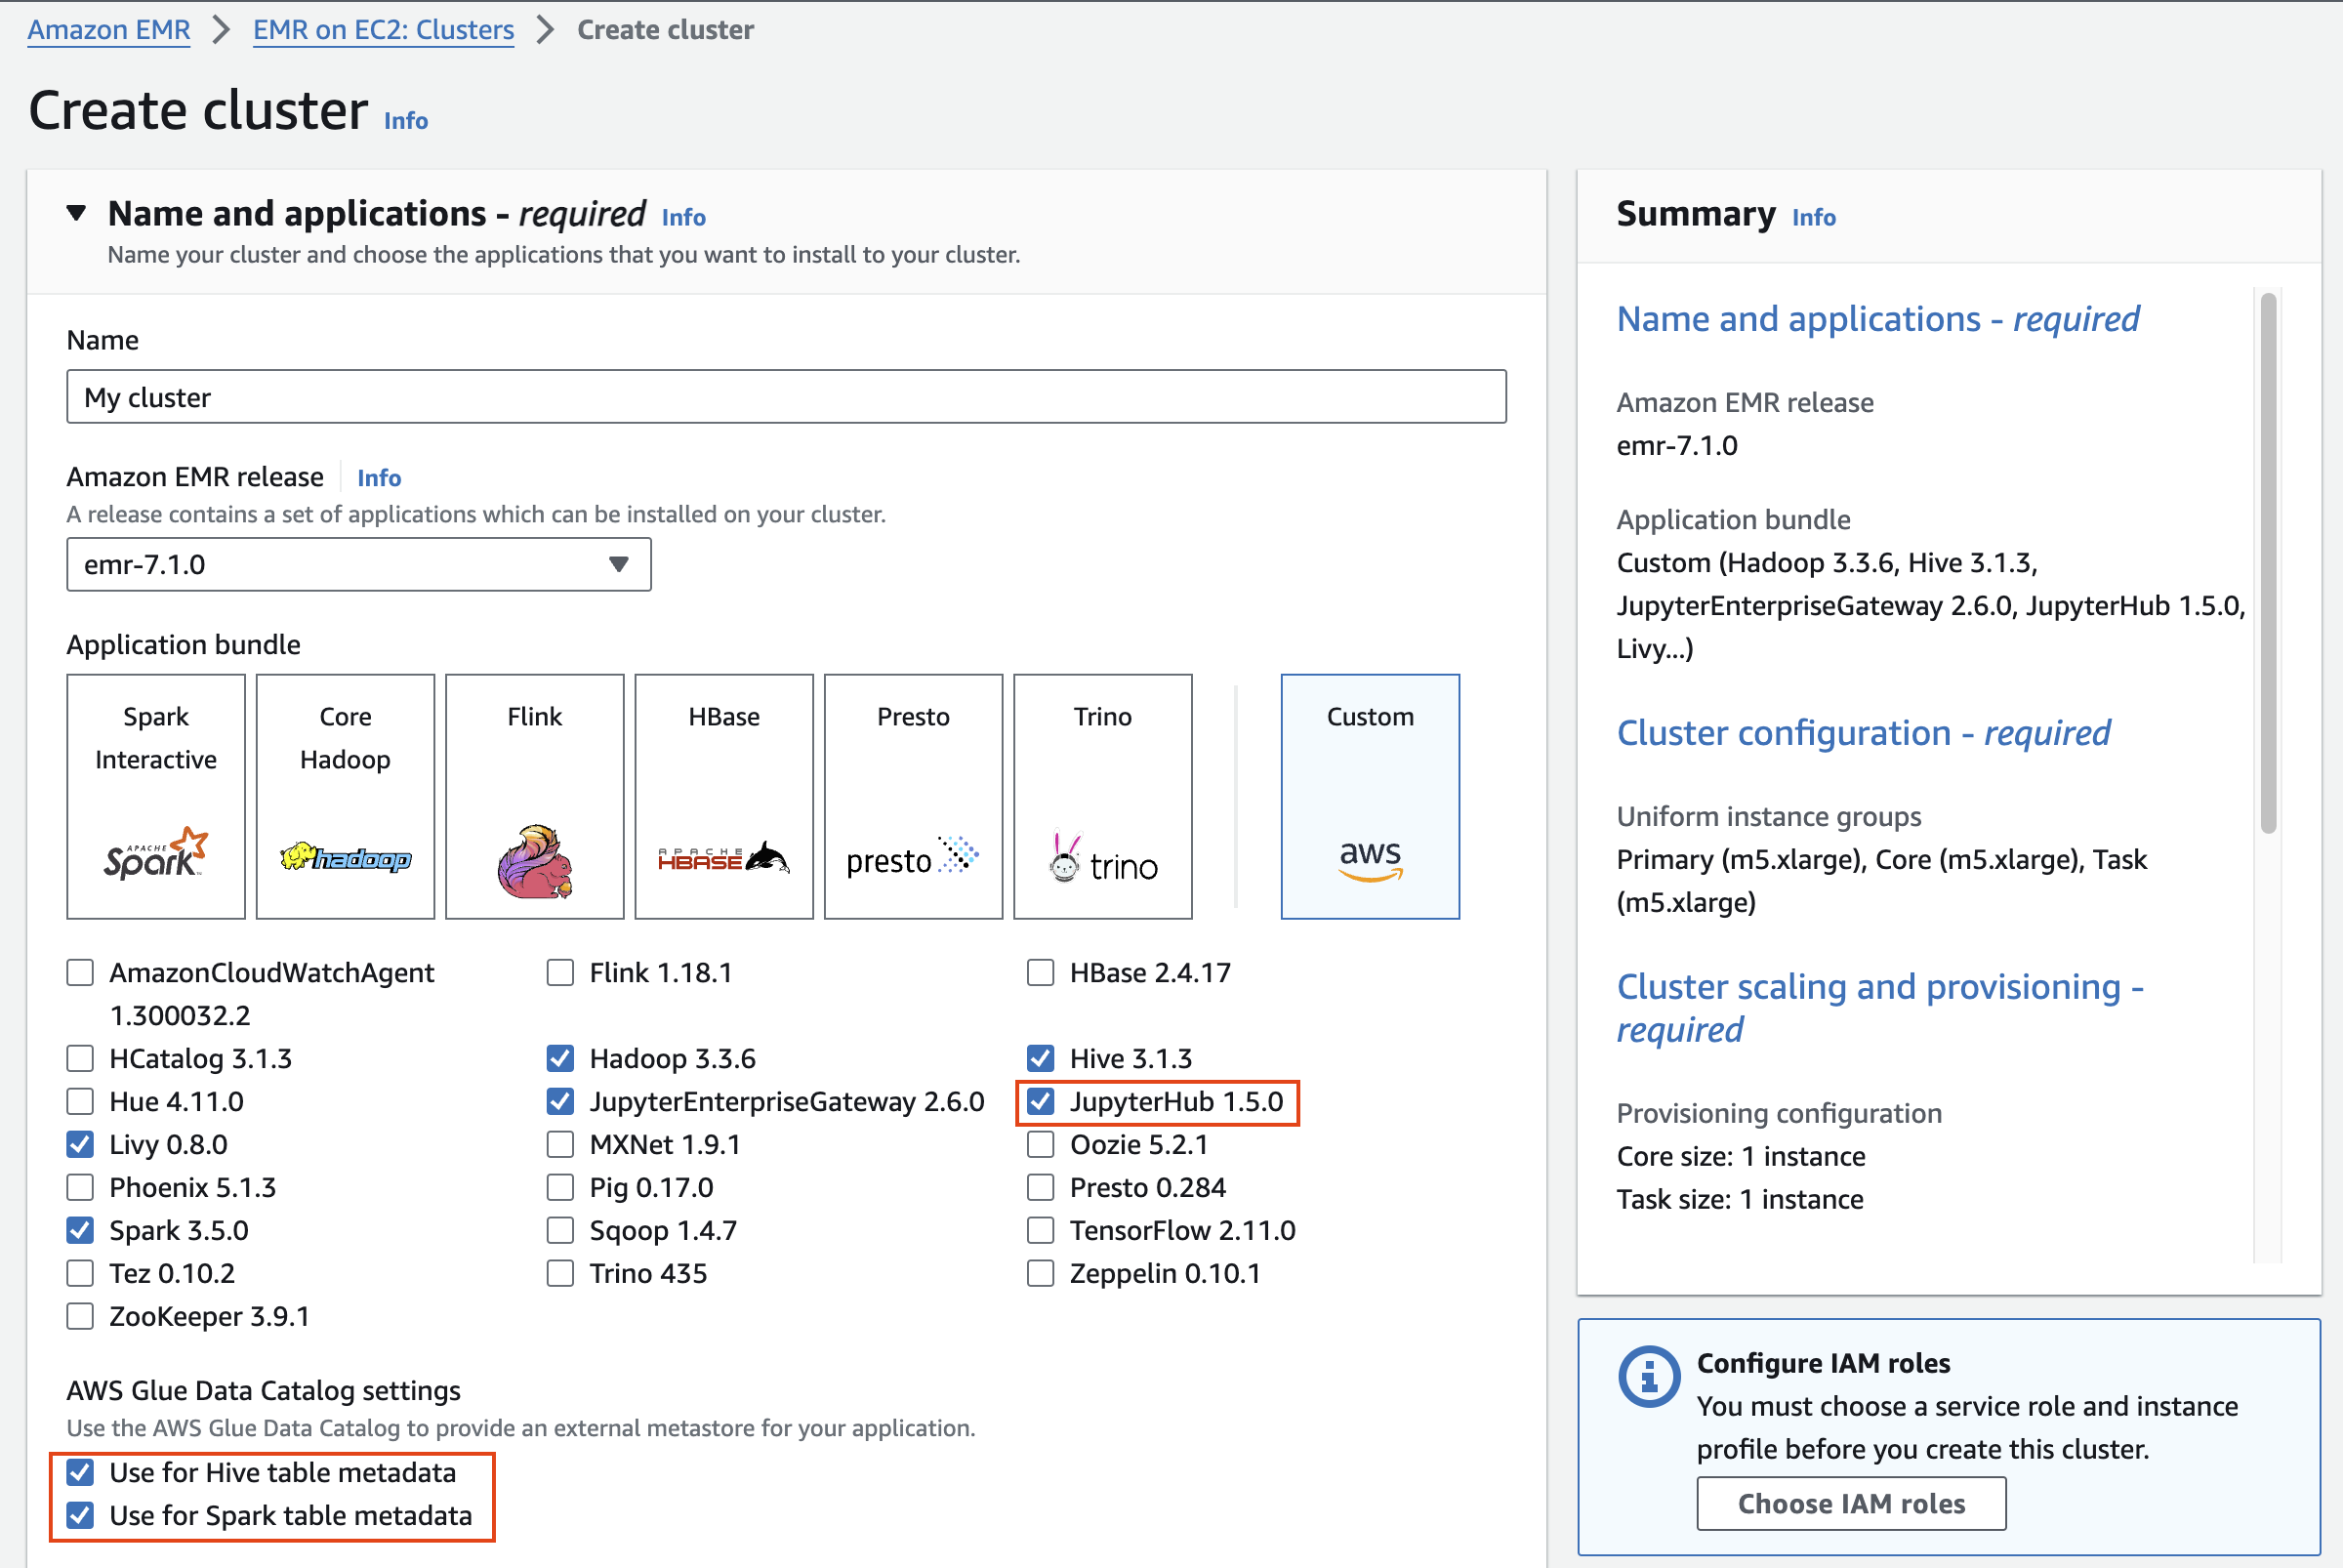](https://www.aws-ps-tech.kr/uploads/images/gallery/2024-04/screenshot-2024-04-18-at-11-42-51-pm.png)
#### Cluster configuration
Cluster configuration 에서 Task 노드는 삭제합니다.
[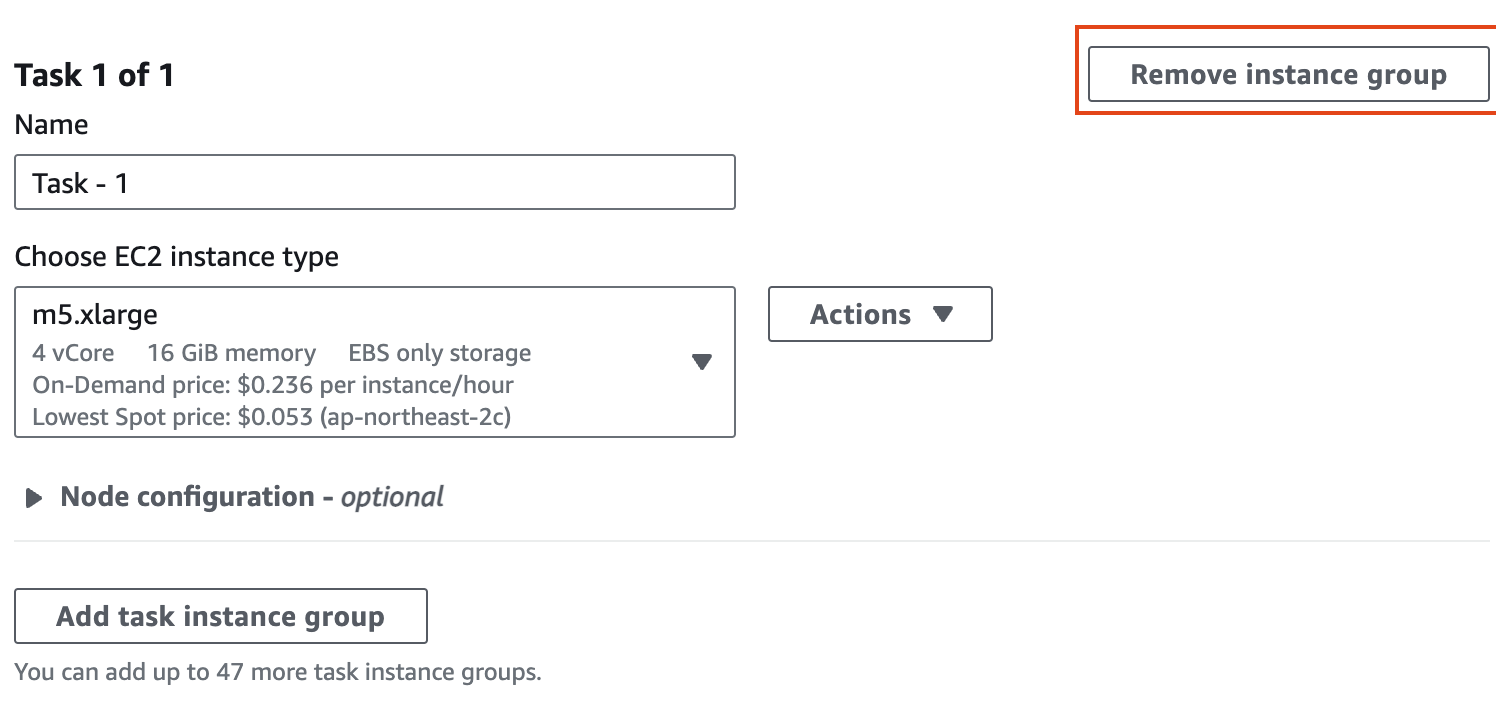](https://www.aws-ps-tech.kr/uploads/images/gallery/2024-04/screenshot-2024-04-18-at-11-45-17-pm.png)
인스턴스 그룹에서 기본의 경우 m5d.4xlarge(스토리지 추가)를 선택하고, 코어의 경우 m5.4xlarge를 선택한 후 작업 노드를 제거합니다(작업 노드는 작업 실행에만 사용되며 HDFS에 데이터를 저장하지 않습니다).
[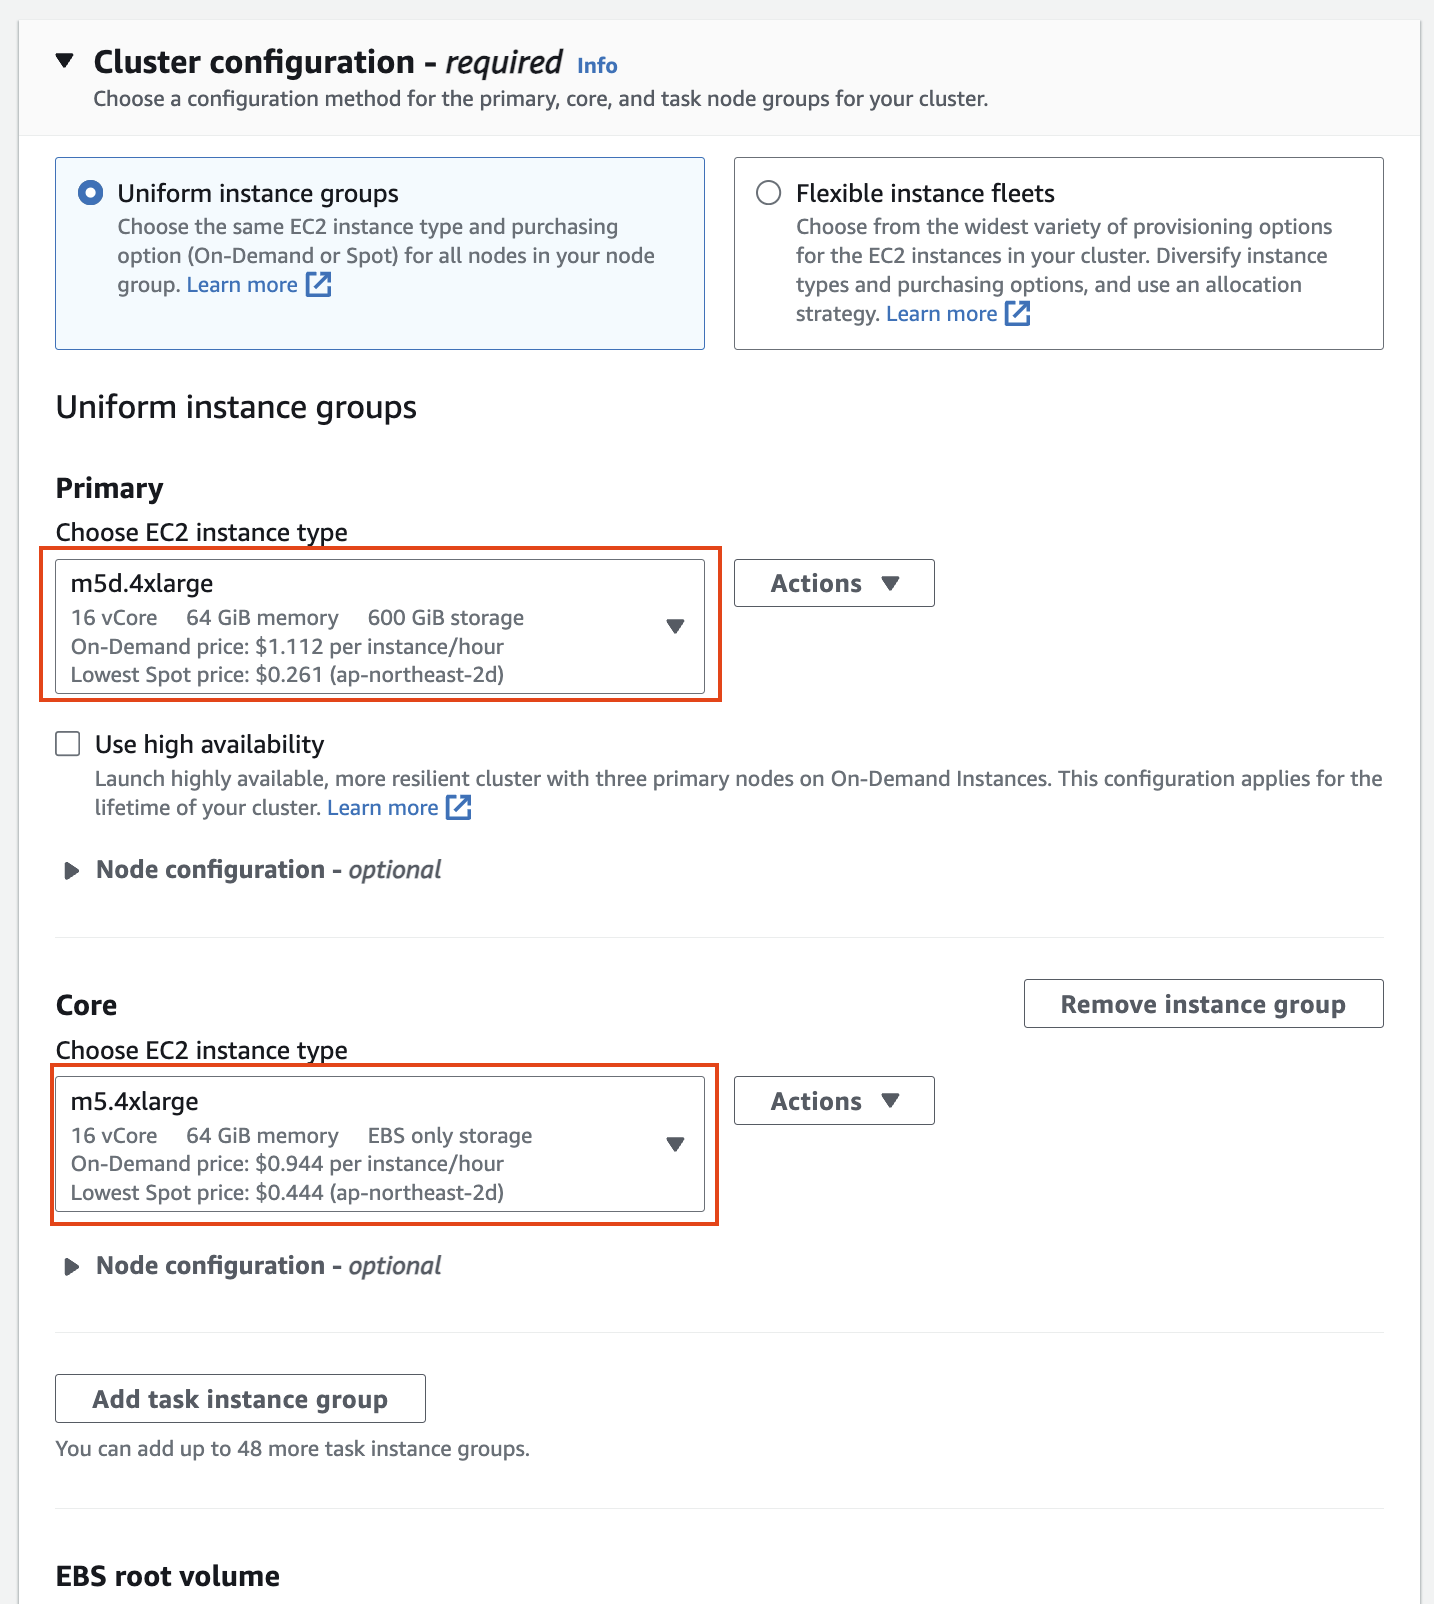](https://www.aws-ps-tech.kr/uploads/images/gallery/2024-04/screenshot-2024-04-18-at-11-46-31-pm.png)
#### Networking
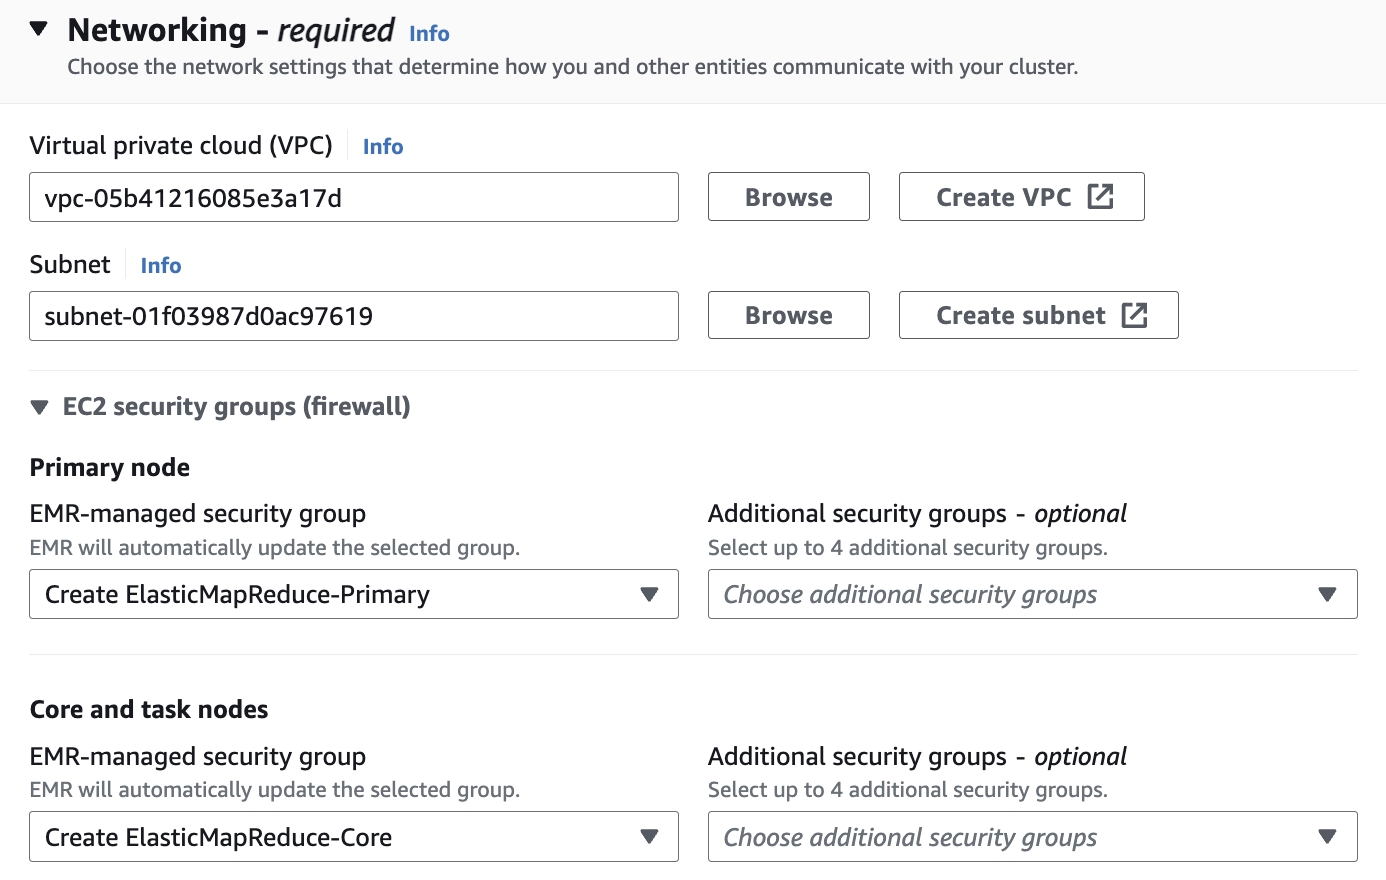
Networking 설정에서 vpc는 앞에서 만들었던 hail-vpc에 해당하는 VPC ID 를 선택합니다.
Stack을 이용해 Networking을 구성했다면 EMR-Dev-Exp-VPC 라는 이름의 VPC를 선택해야 할 수도 있습니다.
[](https://www.aws-ps-tech.kr/uploads/images/gallery/2024-04/screenshot-2024-04-18-at-11-47-46-pm.png)
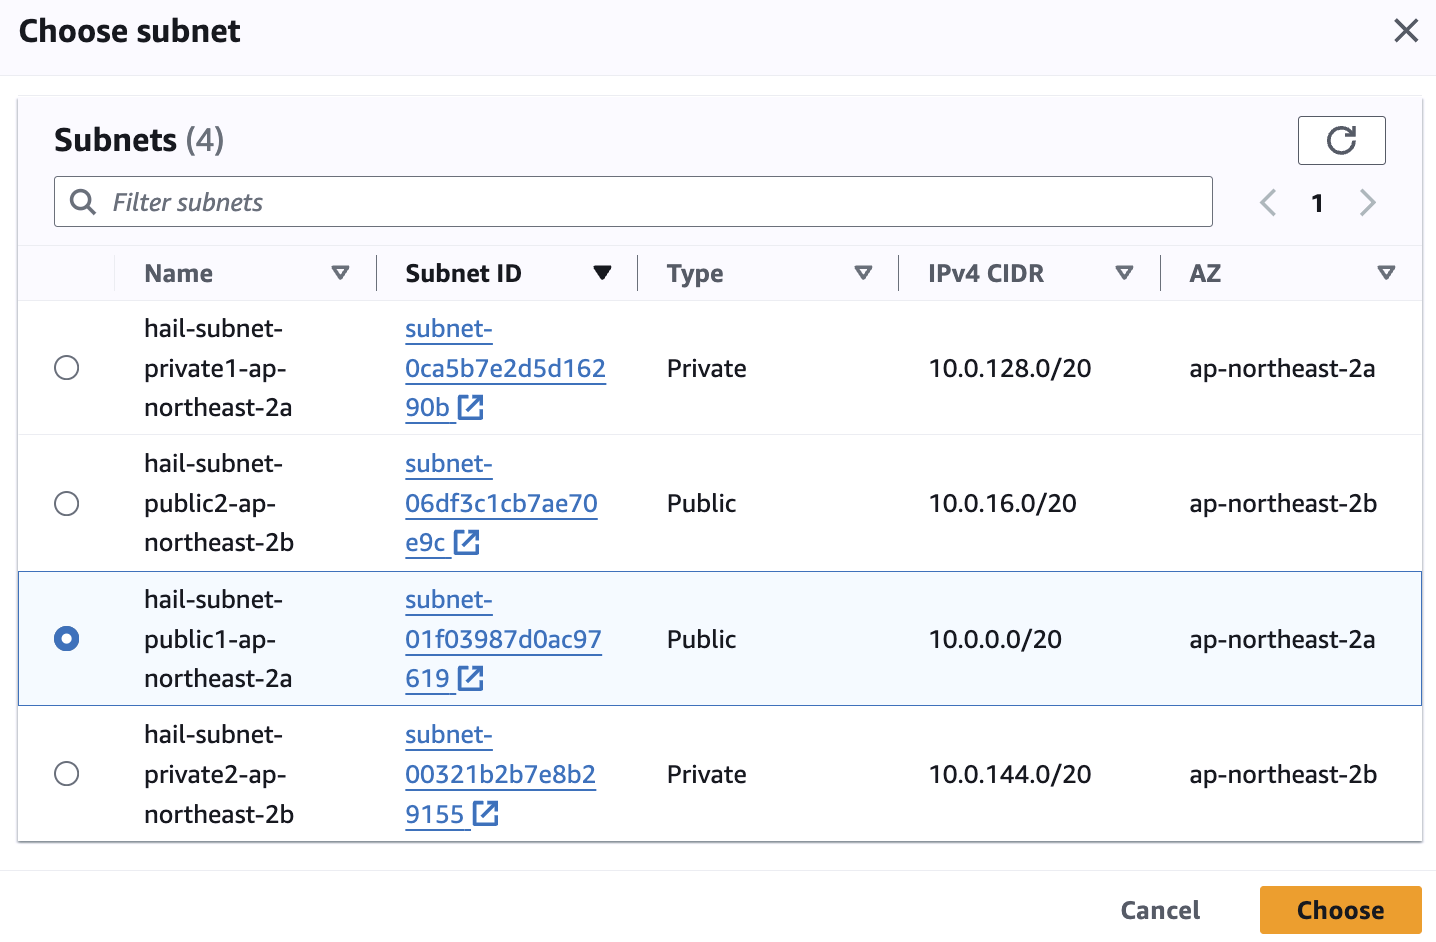
Subnet은 public 중에 선택합니다.
[](https://www.aws-ps-tech.kr/uploads/images/gallery/2024-04/screenshot-2024-04-18-at-11-49-02-pm.png)
[](https://www.aws-ps-tech.kr/uploads/images/gallery/2024-04/screenshot-2024-04-18-at-11-50-55-pm.png)
[](https://www.aws-ps-tech.kr/uploads/images/gallery/2024-04/Nn0screenshot-2024-04-19-at-9-32-13-am.png)
#### Cluster termination and node replacement
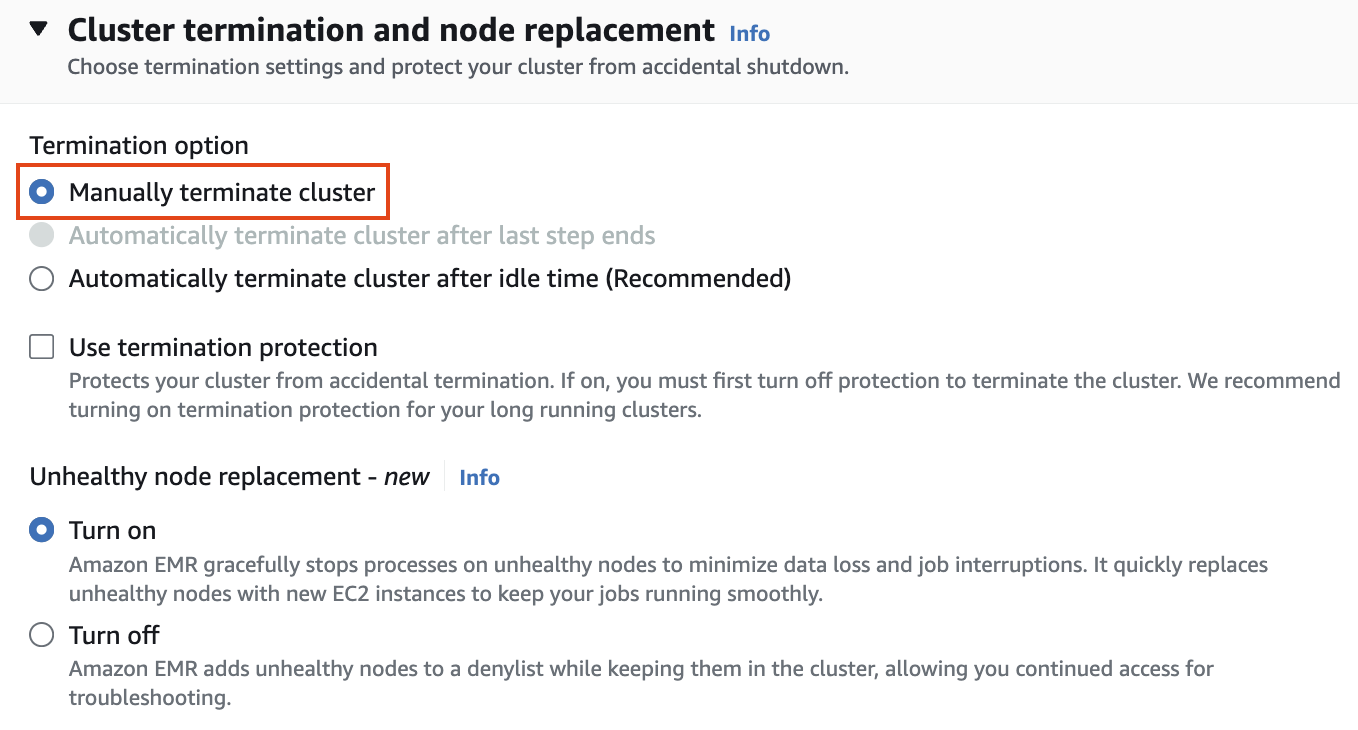
Cluster termination and node replacement > Termination option에서 `Manually terminate cluster` 를 선택합니다.
[](https://www.aws-ps-tech.kr/uploads/images/gallery/2024-04/screenshot-2024-04-18-at-11-51-22-pm.png)
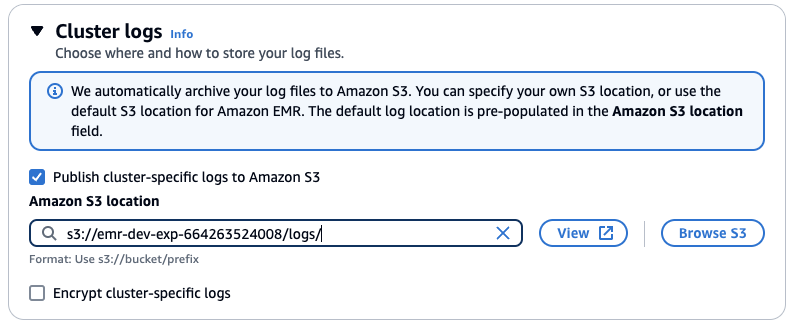
#### Cluster logs
클러스터 로그 설정에서 클러스터별 로그를 Amazon S3에 게시를 선택한 다음 S3 찾아보기를 클릭합니다. "emr-dev-exp-xxxxx"가 있는 버킷을 선택하고 /logs/ 접미사를 추가합니다.
[](https://www.aws-ps-tech.kr/uploads/images/gallery/2024-05/screenshot-2024-05-10-at-11-24-41-am.png)
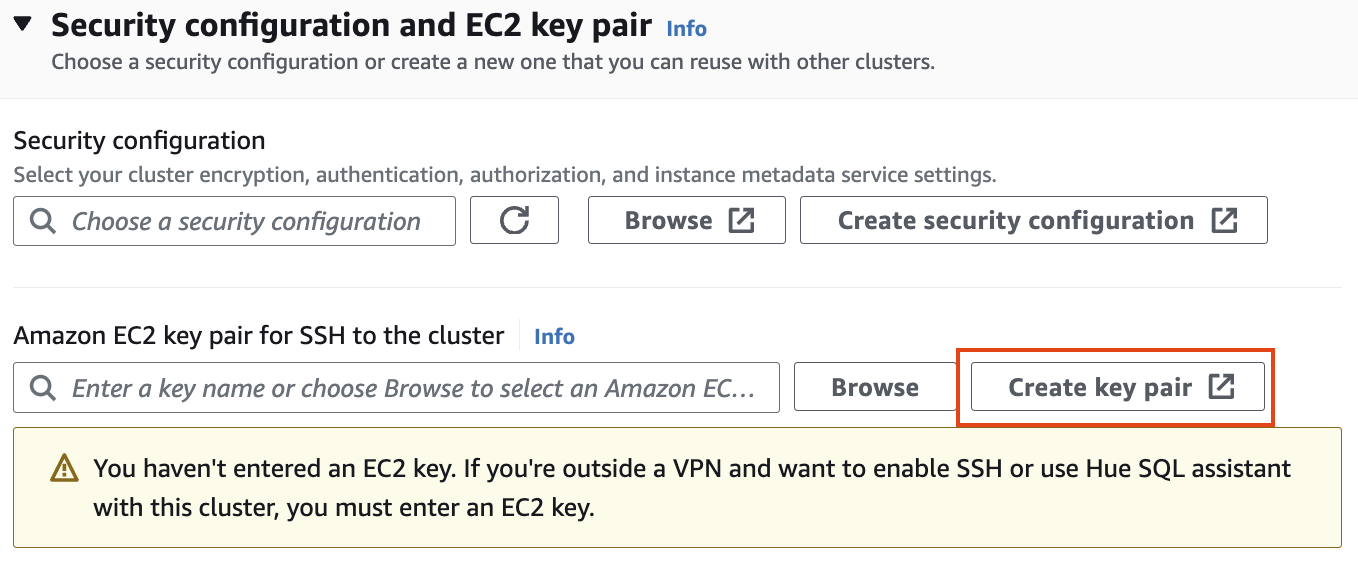
#### Security configuration and EC2 key pair
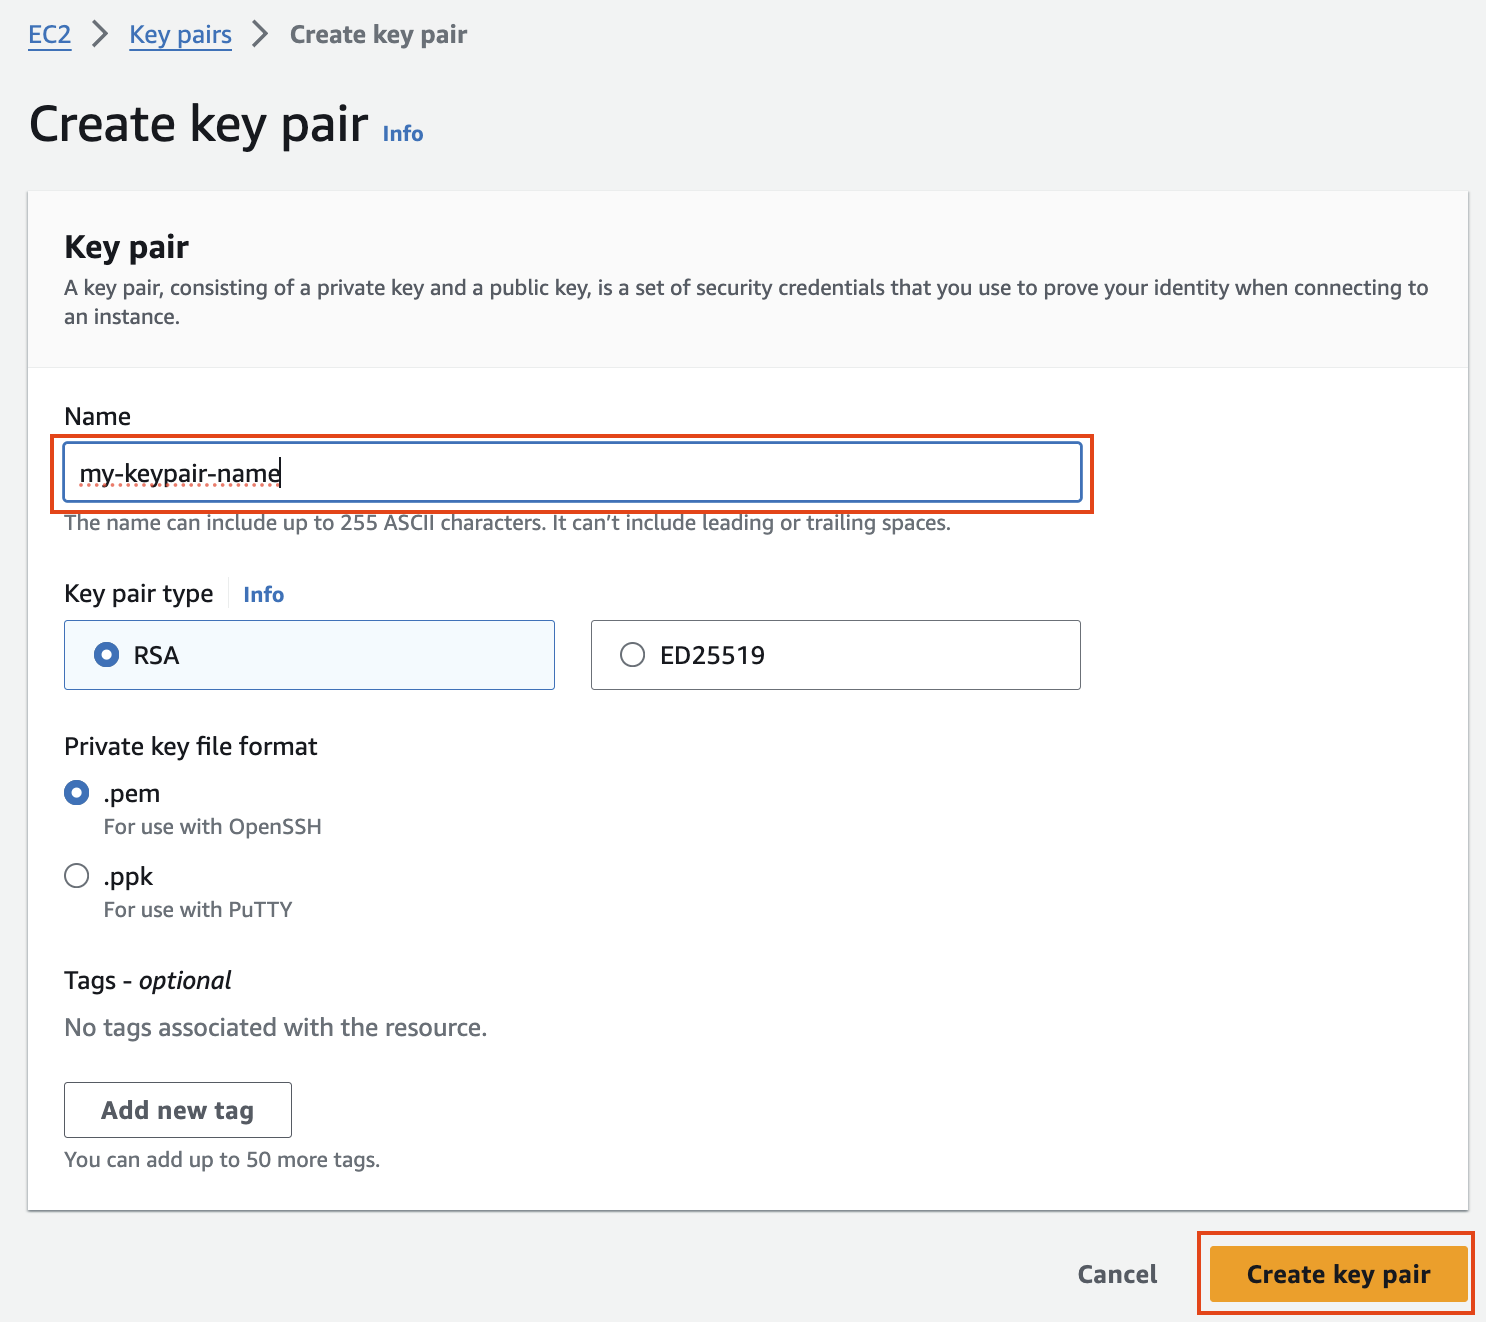
보안 구성 및 EC2 키 쌍에서 키 쌍을 만들고 ssh용 .pem 키 파일을 저장합니다.
[](https://www.aws-ps-tech.kr/uploads/images/gallery/2024-04/screenshot-2024-04-18-at-11-52-53-pm.png)
[](https://www.aws-ps-tech.kr/uploads/images/gallery/2024-04/screenshot-2024-04-18-at-11-53-19-pm.png)
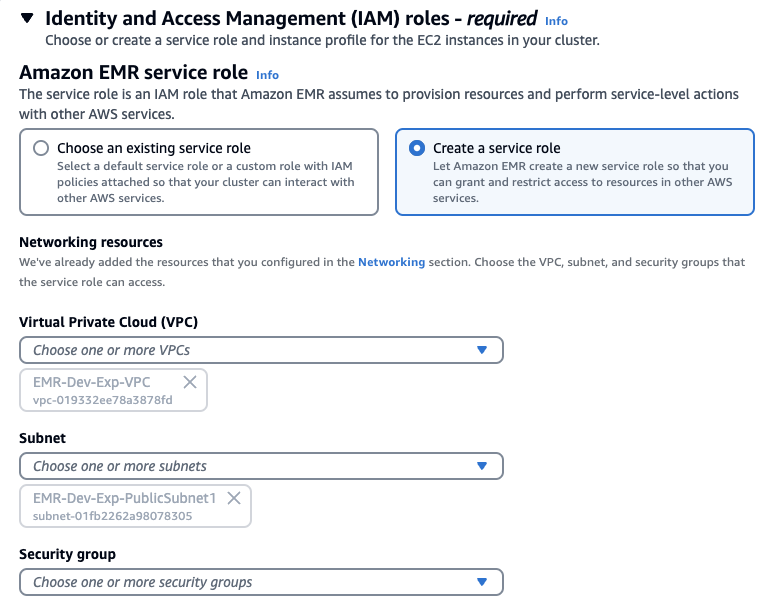
#### Identity and Access Management (IAM) roles
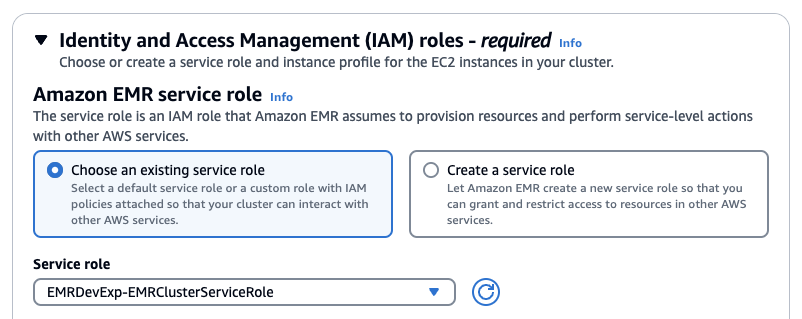
ID 및 액세스 관리 역할에서 서비스 역할 및 인스턴스 프로필 만들기를 선택할 수도 있습니다.
[](https://www.aws-ps-tech.kr/uploads/images/gallery/2024-05/screenshot-2024-05-10-at-11-26-08-am.png)
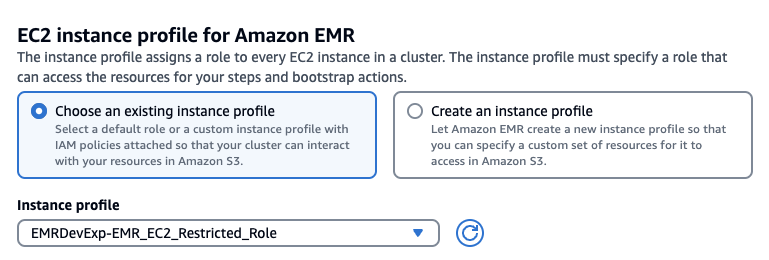
Stack을 사용햇다면 아래처럼 기존에 존재하는 Role을 선택하고 EMRDevExp-EMRClusterServiceRole을 선택합니다. 마찬가지로 EC2 instance profile에 대해서도 스택에 의해 만들어져있는 EMRDevExp-EMR\_EC2\_Restricted\_Role을 선택합니다.
[](https://www.aws-ps-tech.kr/uploads/images/gallery/2024-05/screenshot-2024-05-10-at-11-25-22-am.png)
[](https://www.aws-ps-tech.kr/uploads/images/gallery/2024-05/screenshot-2024-05-10-at-11-26-48-am.png)
### 클러스터 생성 확인
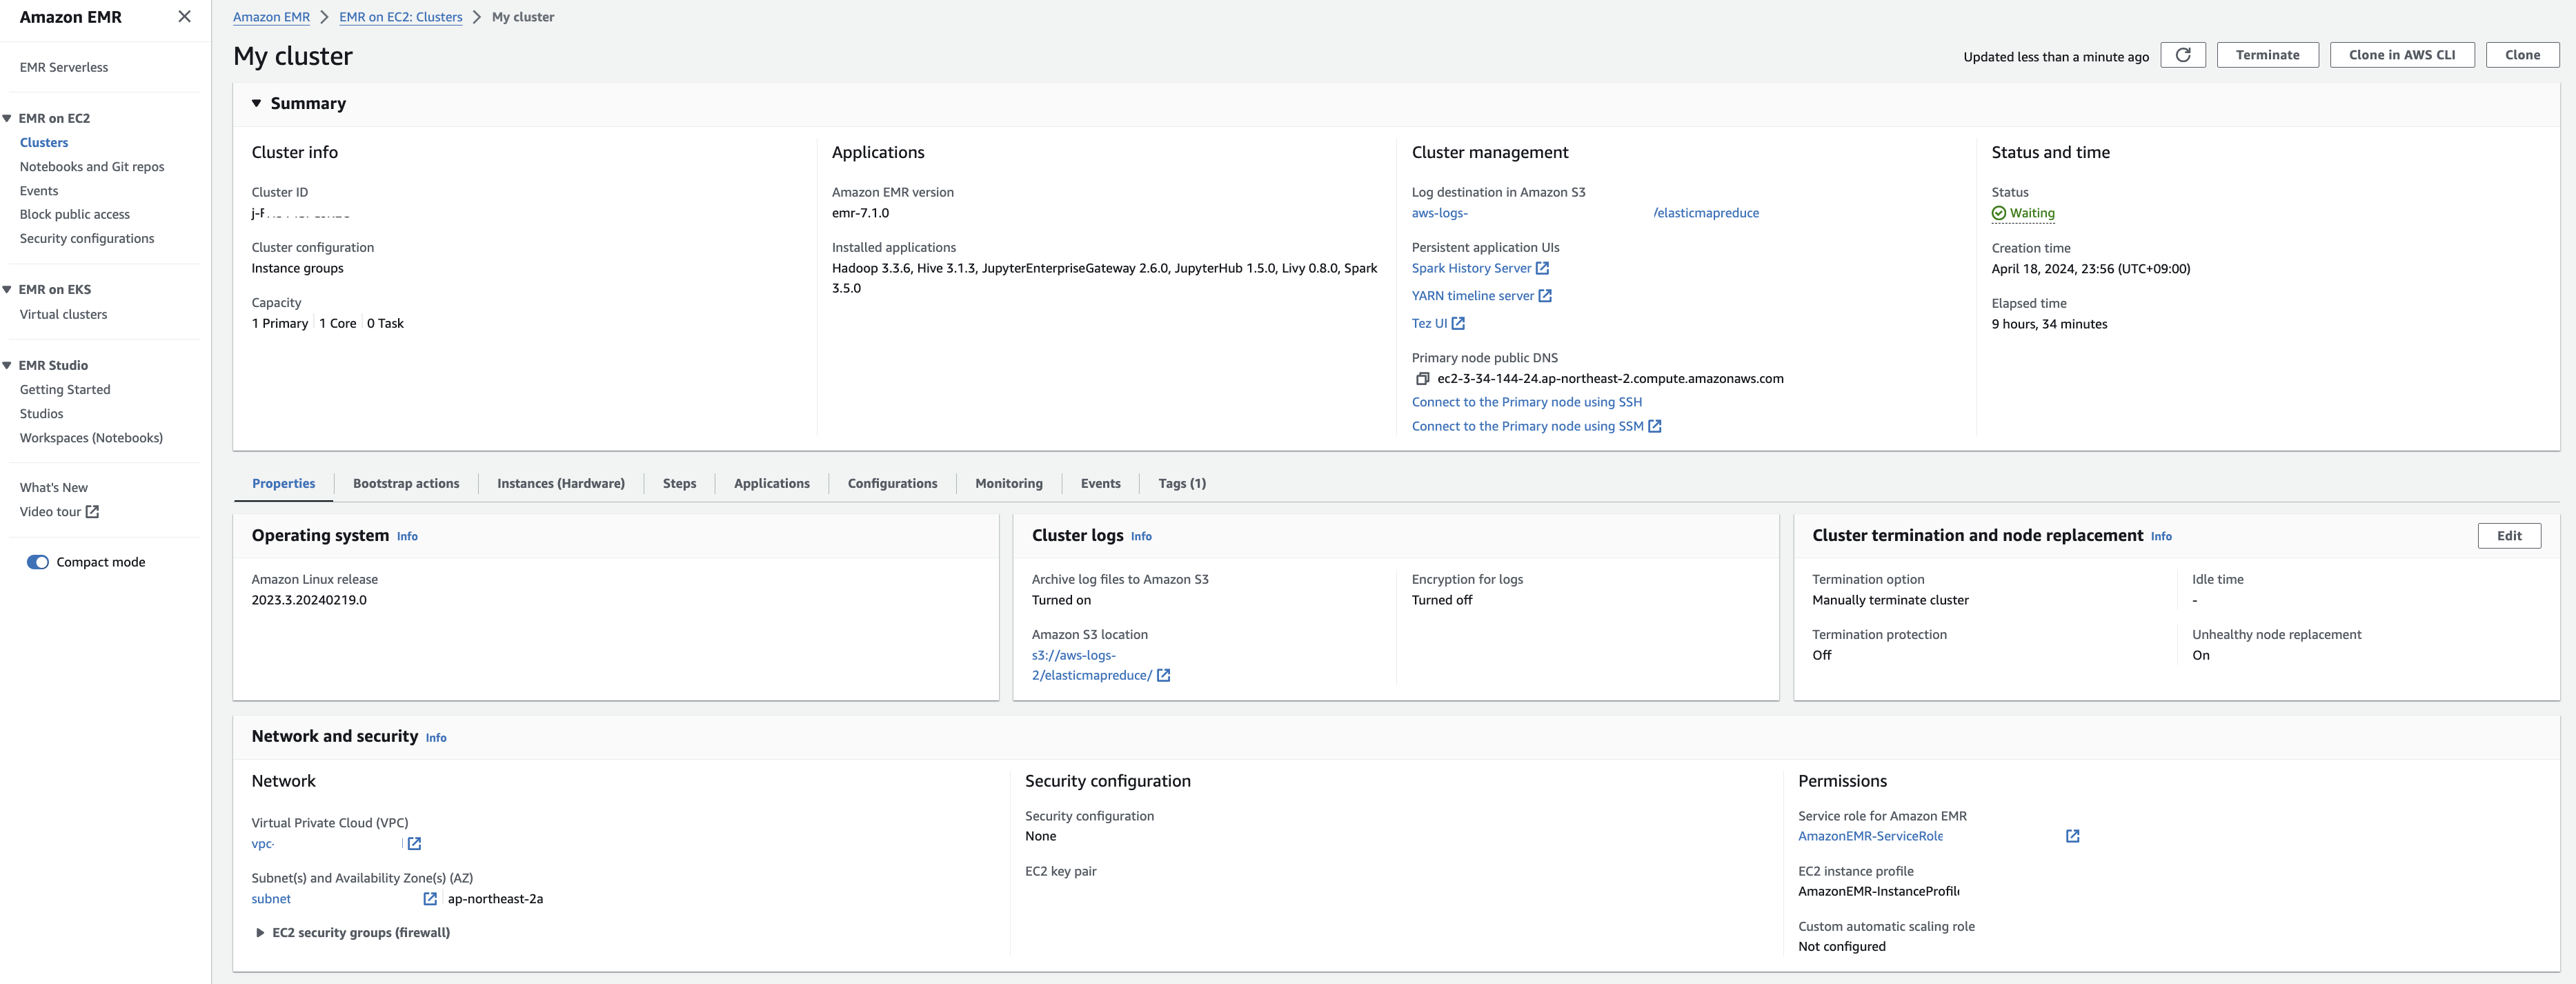
다음과 같이 EMR 클러스터 생성을 확인합니다.
[](https://www.aws-ps-tech.kr/uploads/images/gallery/2024-04/BhMscreenshot-2024-04-19-at-9-31-02-am.png)
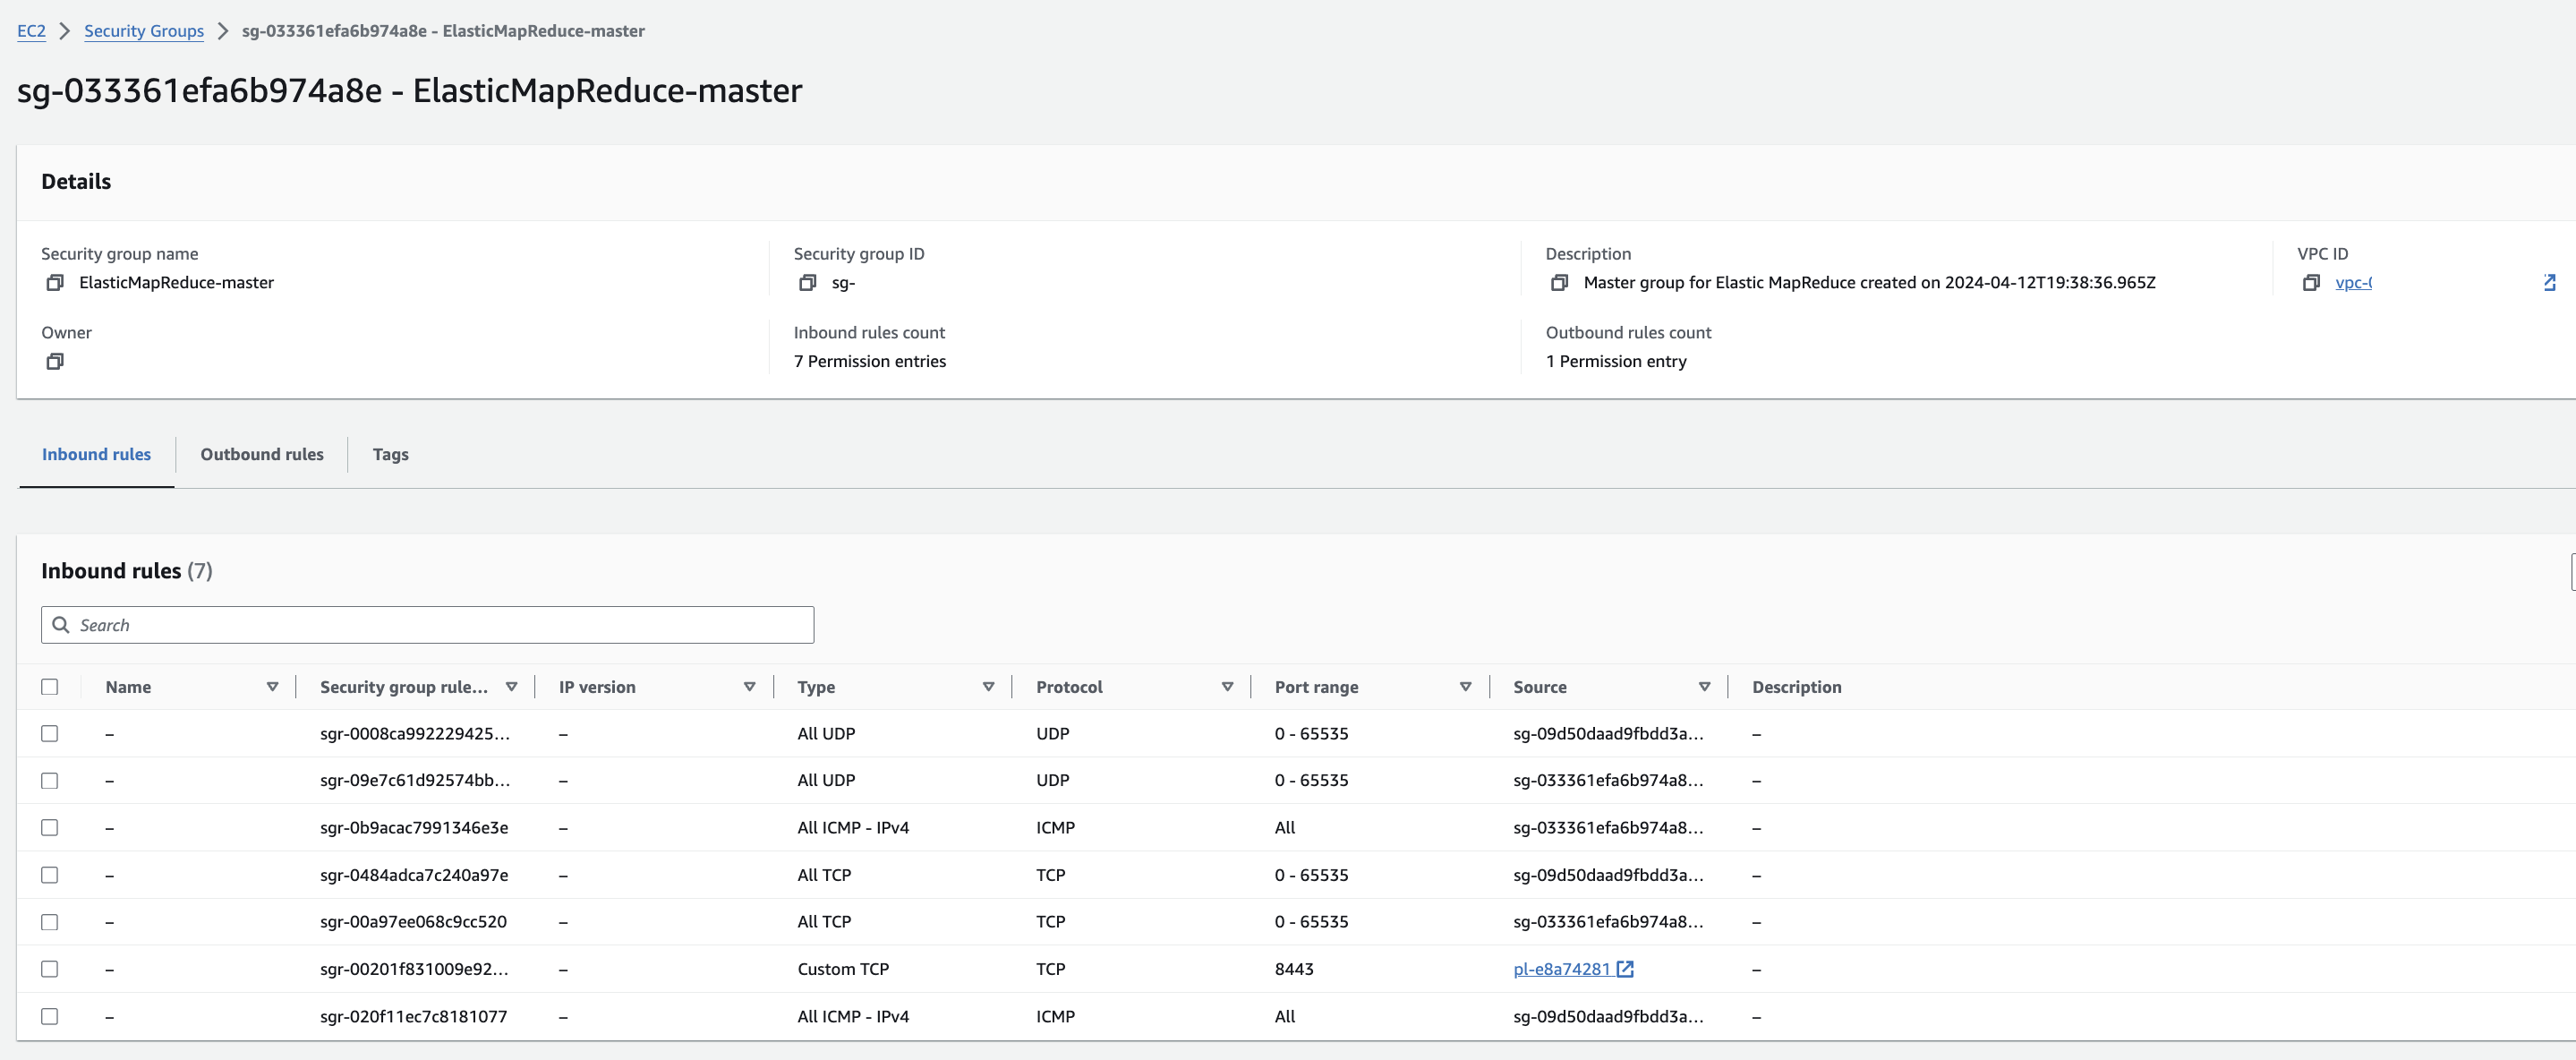
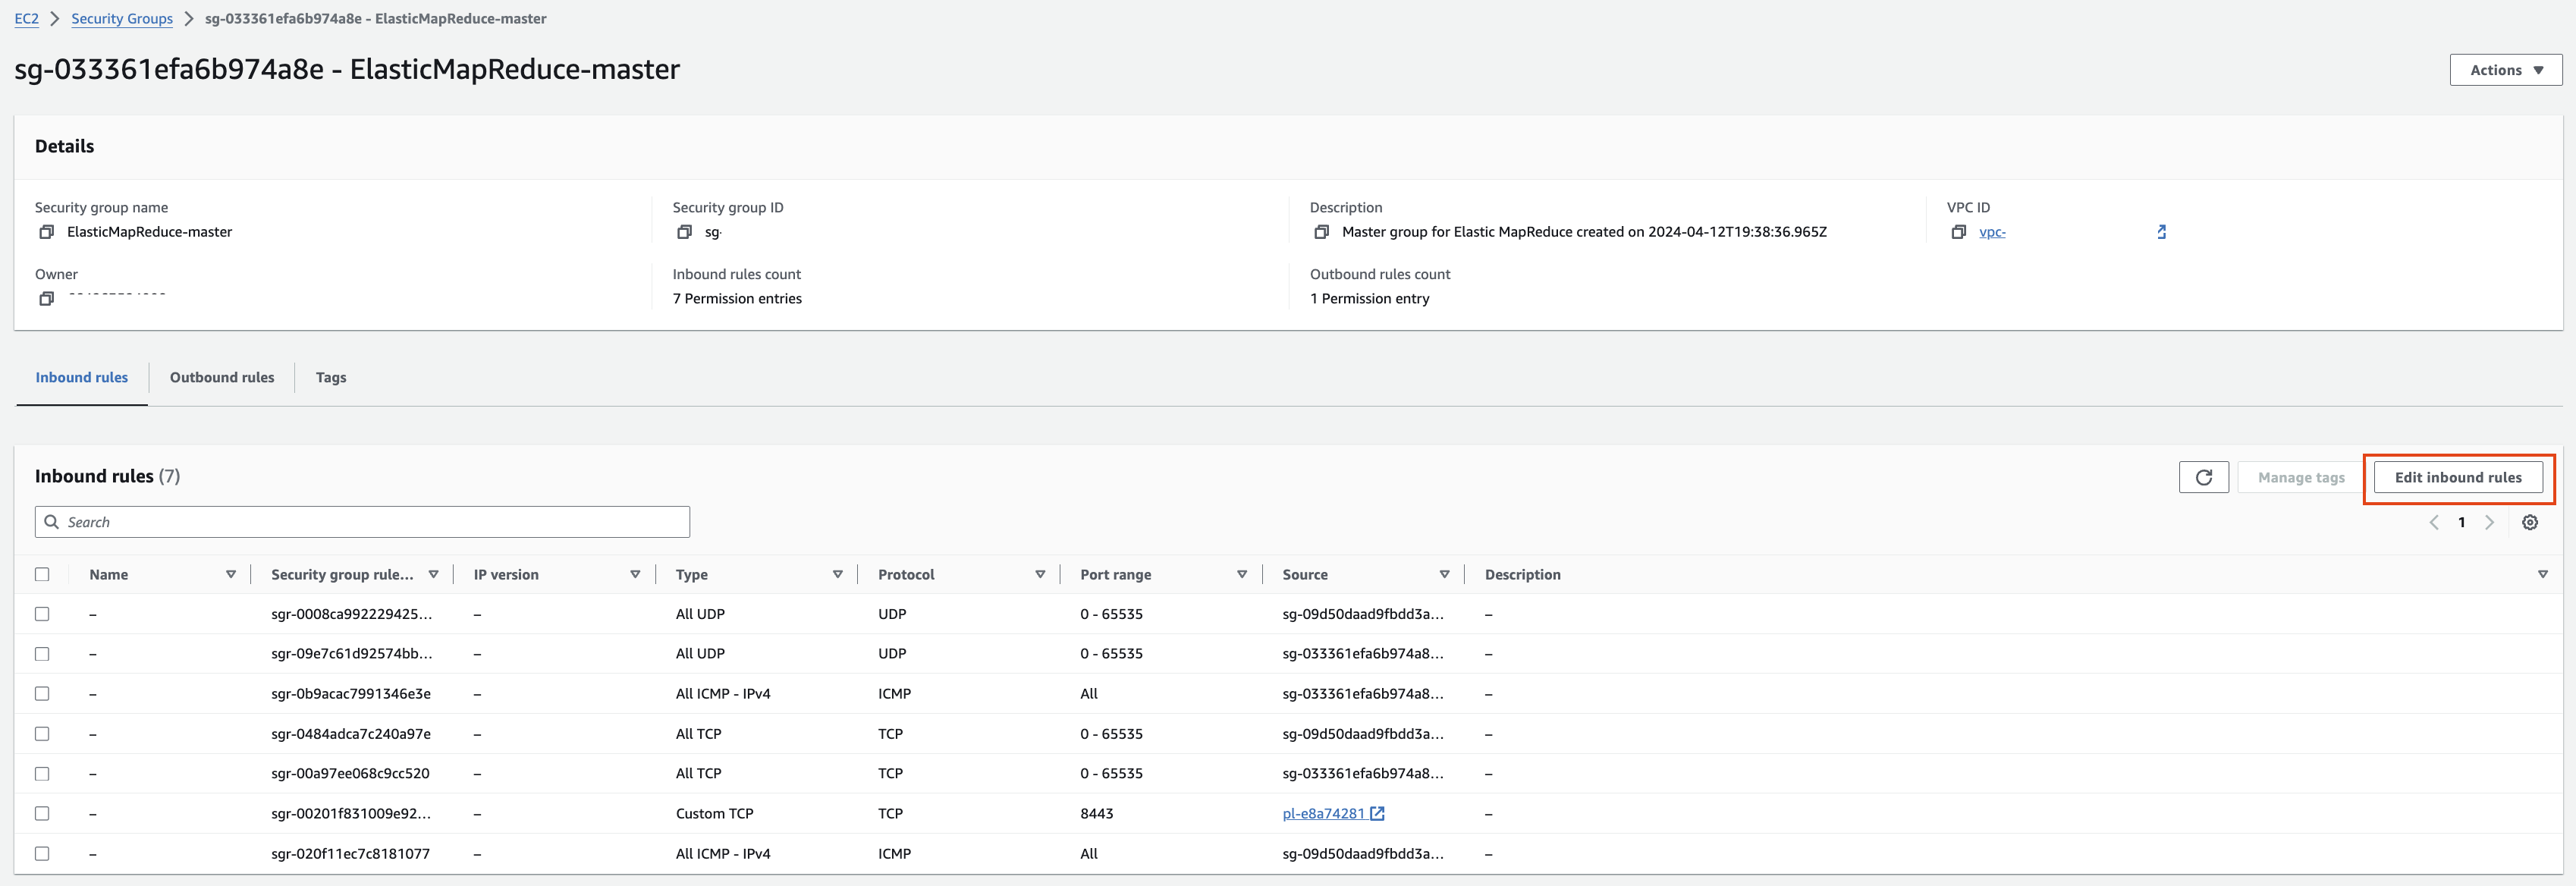
EMR-master 에 대한 Security group 확인을 해봅니다. Edit inbound rules를 눌러 ssh 로 접속할 수 있도록 룰을 추가합니다.
[](https://www.aws-ps-tech.kr/uploads/images/gallery/2024-04/8c8screenshot-2024-04-19-at-9-47-48-am.png)
EMR-slave에 대한 Security group 확인
[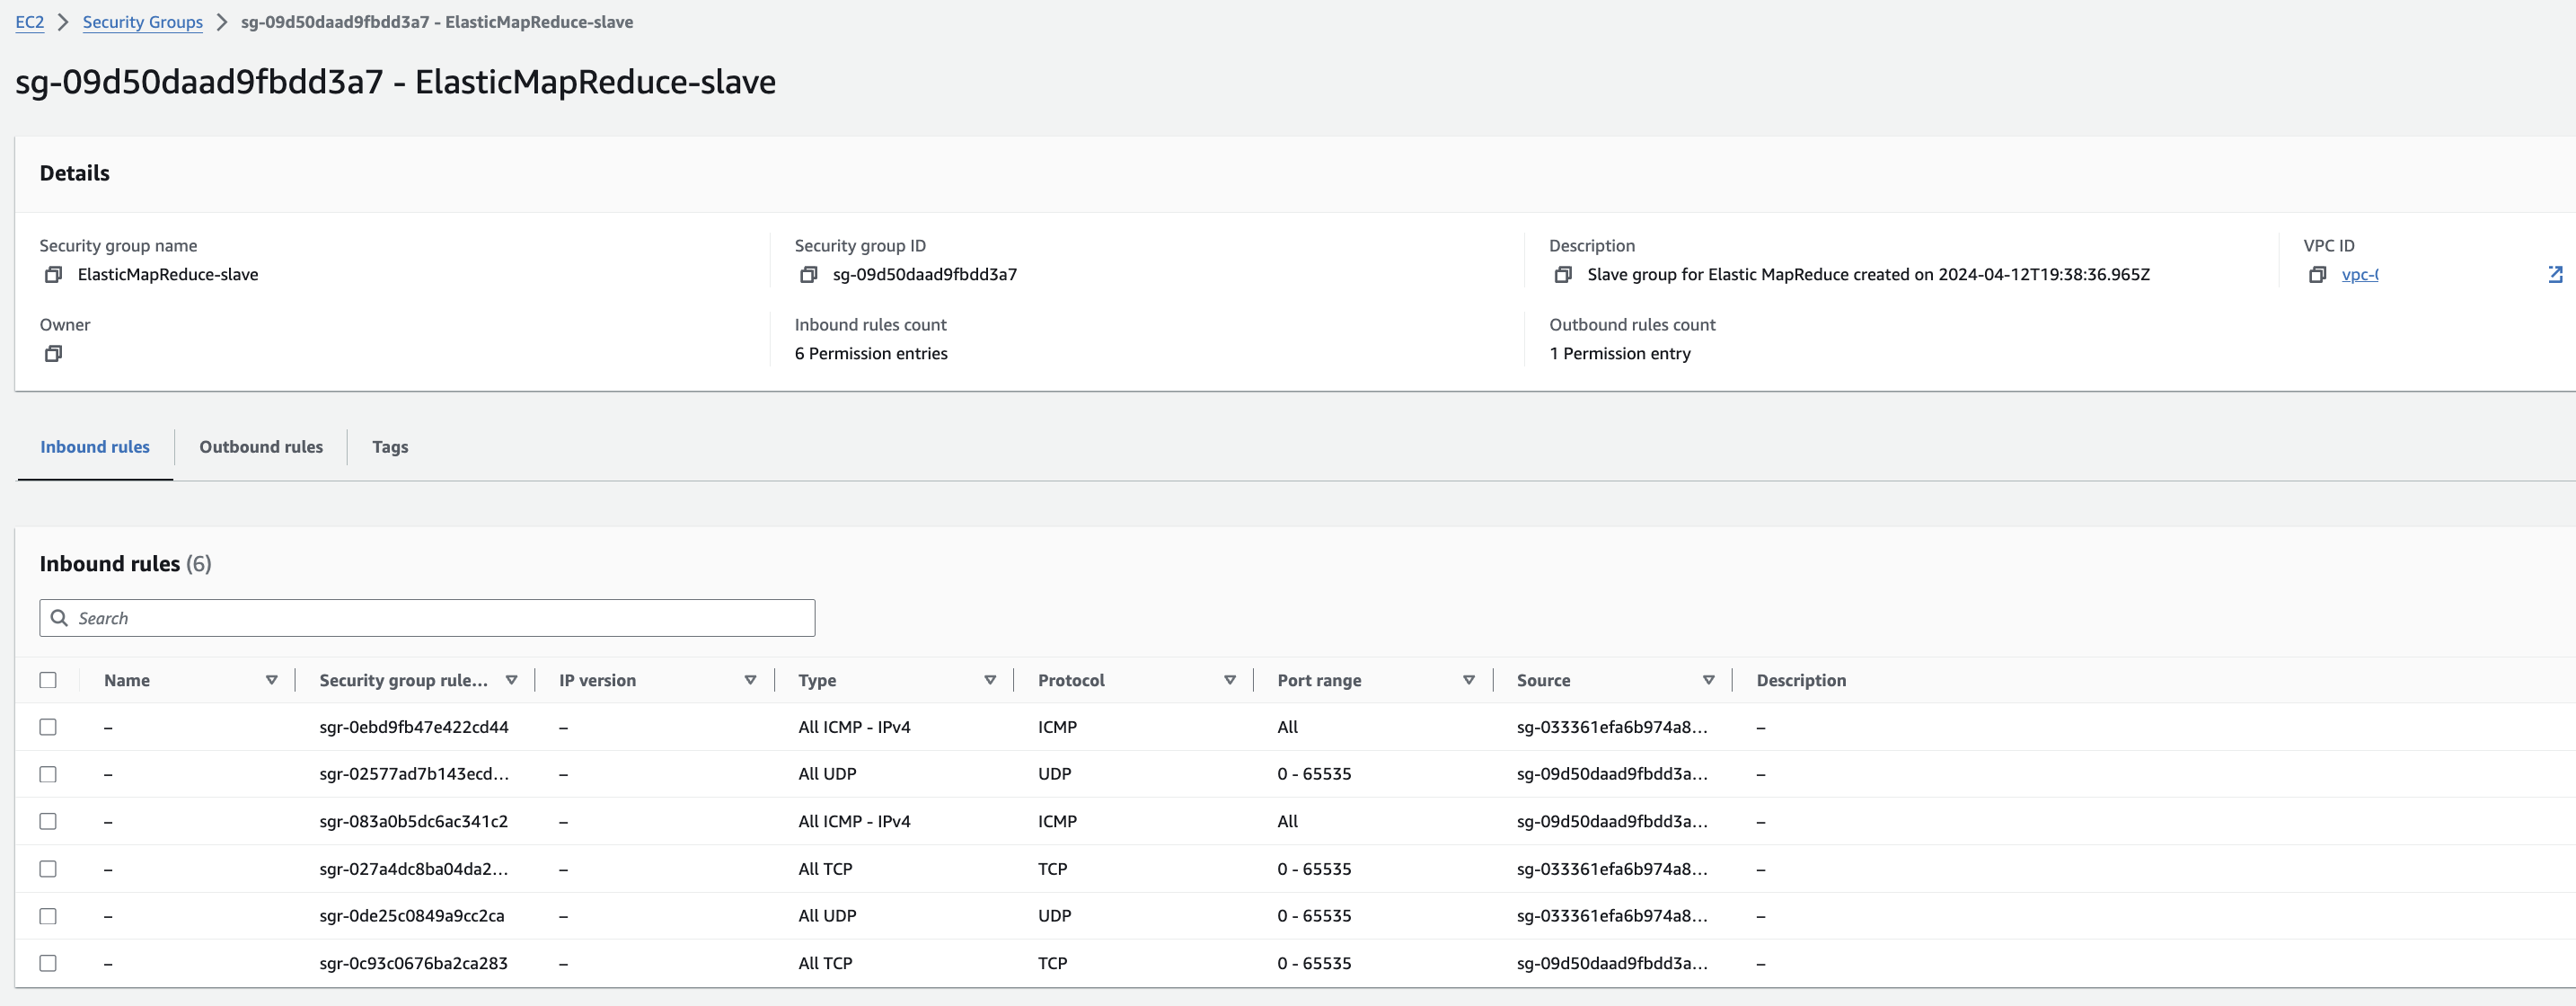](https://www.aws-ps-tech.kr/uploads/images/gallery/2024-04/dI2screenshot-2024-04-19-at-9-33-11-am.png)
#### Installing & Running Hail on Primary Node
cluster 접속
```
aws emr ssh --cluster-id --key-pair-file
```
hail 설치 (참고)
```
sudo yum install git lz4 lz4-devel openblas-devel lapack-devel
git clone https://github.com/hail-is/hail.git
cd hail/hail
export JAVA_HOME=/usr/lib/jvm/java-1.8.0-amazon-corretto
export PATH=$PATH:/home/hadoop/.local/bin
make install-on-cluster HAIL_COMPILE_NATIVES=1 SCALA_VERSION=2.12.18 SPARK_VERSION=3.5.0
```
hail test ([참고](https://hail.is/docs/0.2/install/try.html#next-steps))
```
import hail
mt = hail.balding_nichols_model(n_populations=3,
n_samples=10,
n_variants=100)
mt.show()
```
**Running with Spark (중요)**
```
from pyspark.sql import SparkSession
import hail as hail
hail_dir = "/home/hadoop/.local/lib/python3.9/site-packages/hail" # Edit the path accordingly.
spark = SparkSession.builder \
.config("spark.jars", f"{hail_dir}/backend/hail-all-spark.jar") \
.config("spark.driver.extraClassPath", f"{hail_dir}/backend/hail-all-spark.jar") \
.config("spark.executor.extraClassPath", "./hail-all-spark.jar") \
.config("spark.kryo.registrator", "is.hail.kryo.HailKryoRegistrator") \
.config("spark.serializer", "org.apache.spark.serializer.KryoSerializer") \
.getOrCreate()
hail.init(spark.sparkContext)
#hail.stop() #if previous session is still open
```
#### 참고 링크
- [Git repository](https://github.com/ryerobinson/quickstart-hail)
- [EMR COntainers Best Practices Guides](https://aws.github.io/aws-emr-containers-best-practices/troubleshooting/docs/change-log-level/)
#### 트러블 슈팅
py4j.protocol.Py4JJavaError: An error occurred while calling z:is.hail.backend.spark.SparkBackend.apply.
: is.hail.utils.HailException: This Hail JAR was compiled for Spark 3.3.0, cannot run with Spark 3.5.0-amzn-1.
The major and minor versions must agree, though the patch version can differ.
**export JAVA\_HOME**
[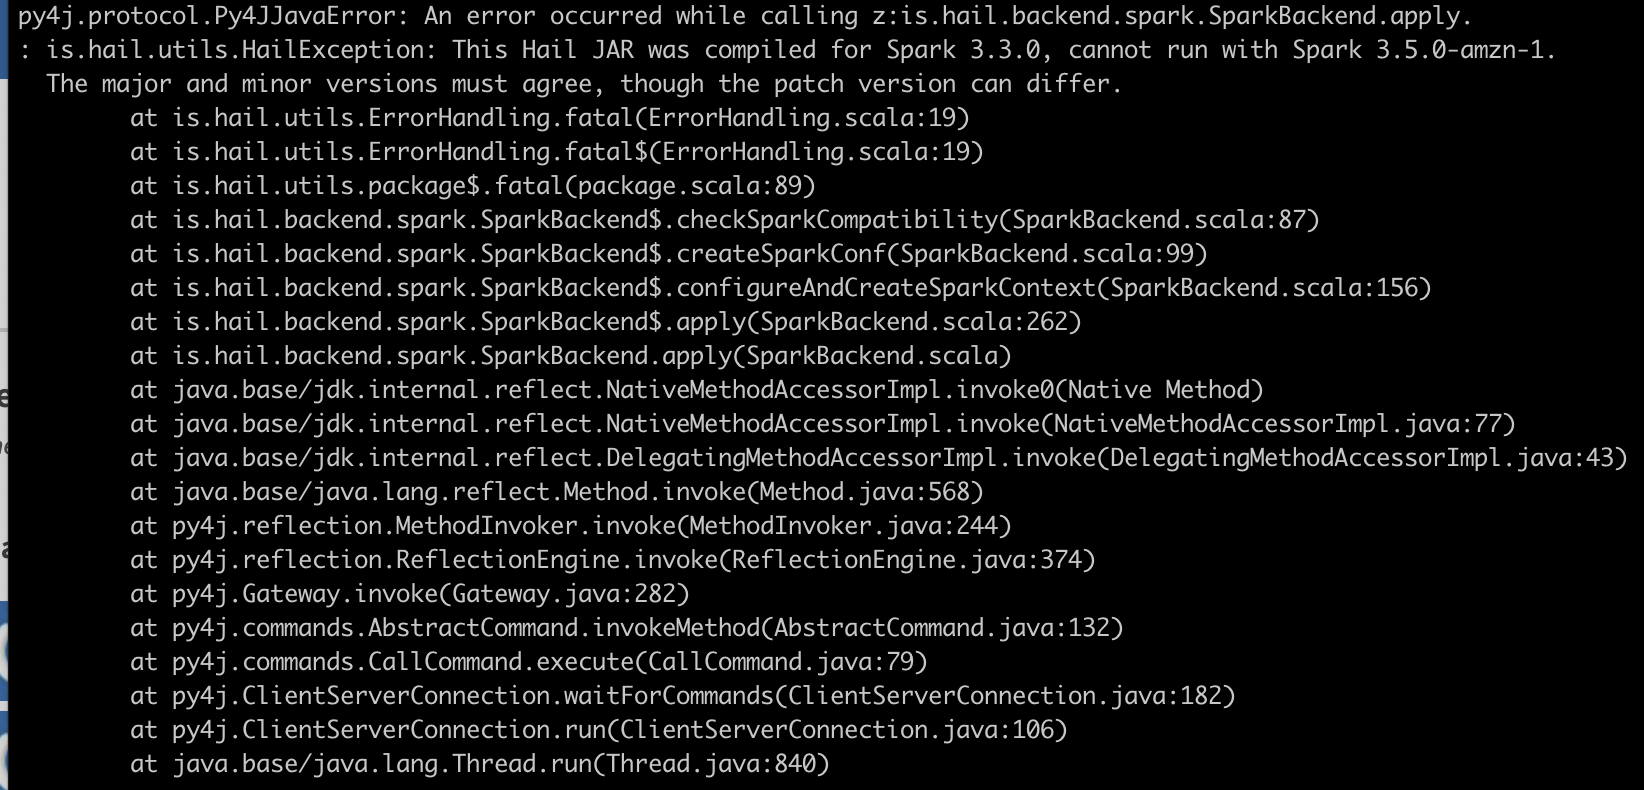](https://www.aws-ps-tech.kr/uploads/images/gallery/2024-04/screenshot-2024-04-19-at-9-53-10-am.png)
export PATH=$PATH:/home/hadoop/.local/bin
[](https://www.aws-ps-tech.kr/uploads/images/gallery/2024-04/screenshot-2024-04-19-at-10-36-37-am.png)
# AWS Glue
여기서는 Hail을 VCF to Parquet 목적으로 사용하는 법을 설명합니다.
스크린샷이 첨부된 버전은 [여기](https://www.notion.so/awsimd/VCF-to-Parquet-12b6fbb36ef1445da0f14ae9b75cf8d3?pvs=4)서 확인할 수 있습니다.
## 사전 준비
1. [hail-all-spark.jar](https://hyunmink.awsapps.com/workdocs/index.html#/share/document/572930260ca4d28c62f10d95068e0d3991cf400e5bc91e3fc035ab0305767315) 파일을 다운로드 받습니다.
2. Amazon S3 서비스로 접속해서 앞에서 다운로드 받은 `hail-all-spark.jar` 파일을 본인에 알맞은 버킷에 업로드합니다.
3. 업로드한 `hail-all-spark.jar` 파일을 선택하고 `Copy S3 URL`을 눌러 주소를 복사합니다.
이 복사한 주소는 다음 섹션에서 다룰 AWS Glue의 노트북 작업 코드에 필요합니다.
## AWS IAM
IAM 서비스로 진입하여 정의된 Role 을 수정합니다. `GenomicsAnalysis-Genomics-JobRole-*` 으로 검색하여 나오는 Role에 대해서 2가지 Policy를 추가할 것입니다.
### GetRole, PassRole
1. Create inline policy 를 클릭합니다.
2. 다음과 같이 Policy를 JSON을 선택해서 작성합니다. 이때 반드시 `{account-id}`는 본인의 AWS 계정아이디와 `{GenomicsAnalysis-Genomics-JobRole-*}`은 해당되는 것으로 변경해서 작성합니다.
```bash
{
"Version": "2012-10-17",
"Statement": [
{
"Sid": "Statement1",
"Effect": "Allow",
"Action": [
"iam:GetRole",
"iam:PassRole"
],
"Resource": [
"arn:aws:iam::**{account-id}**:role/**{GenomicsAnalysis-Genomics-JobRole-*}**"
]
}
]
}
```
3. 작성한 커스텀 정책의 이름을 입력하고 `Create policy`를 클릭합니다.
4. 아래와 같이 방금 만든 정책이 해당 Role에 추가된 것을 확인할 수 있습니다. (여기서는 `MyGluePolicy`)
### S3 Read
1. 이번에는 사전 정의된 정책을 첨부하여 추가해보겠습니다. `Add permissions` > `Attach policies`
2. `AmazonS3ReadOnlyAccess` 정책을 검색하여 선택합니다.
3. 최종적으로 아래와 같이 2개의 Policy가 2개더 추가된 것을 확인할 수 있습니다. (여기서는 `MyGluePolicy` , `AmazonS3ReadOnlyAccess`)
## AWS Glue
1. 콘솔을 통해 AWS Glue 서비스에 접속합니다.
2. ETL jobs > Notebook 을 클릭해서 새로운 노트북을 생성합니다.
이때 IAM role 은 사전에 생성되어 있는 `GenomicsAnalysis-Genomics-JobRole-*` 를 선택합니다.
3. Glue notebook 창으로 돌아와 아래 코드를 모두 붙여 넣습니다. hail-all-spark.jar의S3 URI 새로운 셀을 추가하려면 원하는 위치에서 `+`를 눌러 추가할 수 있습니다.
```bash
%idle_timeout 2880
%glue_version 4.0
%worker_type G.1X
%number_of_workers 5
%additional_python_modules hail
%extra_jars "**{본인의 버킷에 업로드한 hail-all-spark.jar의 S3 URI}**"
%%configure
{
"--conf": "spark.serializer=org.apache.spark.serializer.KryoSerializer --conf spark.kryo.registrator=is.hail.kryo.HailKryoRegistrator"
}
```
```bash
import sys
from pyspark.context import SparkContext
from awsglue.context import GlueContext
from awsglue.job import Job
import hail as hl
sc = SparkContext.getOrCreate()
hl.init(sc=sc)
```
```bash
glueContext = GlueContext(sc)
spark = glueContext.spark_session
job = Job(glueContext)
job.init("JobNameEx")
vds = hl.import_vcf("s3://**{본인의 버킷명}**/genomics-tertiary-analysis-and-data-lakes-using-aws-glue-and-amazon-athena/latest/variants/vcf/variants.vcf.gz", force_bgz=True, reference_genome='GRCh38')
vds.make_table().to_spark().write.mode('overwrite').parquet("s3://**{본인의 버킷명}**/genomics-tertiary-analysis-and-data-lakes-using-aws-glue-and-amazon-athena/latest/variants/vcf_to_parquet")
job.commit()
```
4. 이제 S3 콘솔로 접속하여 결과 Parquet이 잘 만들어졌는지 확인합니다.
## Optional 단계
- 해당 데이터를 S3의 Query with S3 Select 기능을 사용해 쿼리해봅니다.
- 해당 데이터를 AWS Glue 크롤러를 만들어 카탈로깅해봅니다. 그리고 Athena 에서 쿼리해 볼 수 있습니다.
# Hail with Amazon EMR notebook
### 노트북 셋업
1. EMR 스튜디오에서 동일한 VPC에 새 스튜디오를 만듭니다.
2. 생성한 스튜디오에 대한 새 작업 공간(노트북)을 생성하면 완료되면 jupyterHub에 대한 새 탭이 자동으로 열립니다.
3. python3 커널을 사용하여 새 노트북을 시작합니다.
### EMR 노트북에 Hail 설치
```
pip install hail
```
**추후 S3a 프로토콜 사용을 위한 내용** ([Hadoop-AWS module](https://hadoop.apache.org/docs/stable/hadoop-aws/tools/hadoop-aws/index.html))
1. Ssh into primary node (**as sudo user**)
2. Go to the jars directory: `cd /home/emr-notebook/.local/lib/python3.9/site-packages/pyspark/jars`
3. Download the 2 jar files with the following command in the directory:
1. sudo curl -sSL https://search.maven.org/remotecontent?filepath=org/apache/hadoop/hadoop-aws/3.3.2/hadoop-aws-3.3.2.jar > ./hadoop-aws-3.3.2.jar
2. sudo curl -sSL https://search.maven.org/remotecontent?filepath=com/amazonaws/aws-java-sdk-bundle/1.12.99/aws-java-sdk-bundle-1.12.99.jar > ./aws-java-sdk-bundle-1.12.99.jar
의존성 설치
[https://repo1.maven.org/maven2/org/apache/hadoop/hadoop-aws/3.3.6/](https://repo1.maven.org/maven2/org/apache/hadoop/hadoop-aws/3.3.6/)
[https://repo1.maven.org/maven2/com/amazonaws/aws-java-sdk-bundle/](https://repo1.maven.org/maven2/com/amazonaws/aws-java-sdk-bundle/)
| HAIL\_VERSION | 0.2.105 |
|---|
| HTSLIB\_VERSION | 1.20 |
| SAMTOOLS\_VERSION | 1.20 |
- 만일 hail-vep (VEP와 함께 설치) 옵션으로 빌드할 경우라면..
| HAIL\_VERSION | 0.2.105 |
|---|
| HTSLIB\_VERSION | 1.20 |
| SAMTOOLS\_VERSION | 1.20 |
| VEP\_VERSION | |
| RODA\_BUCKET | <VEP 다운로드 받은 버킷명> |
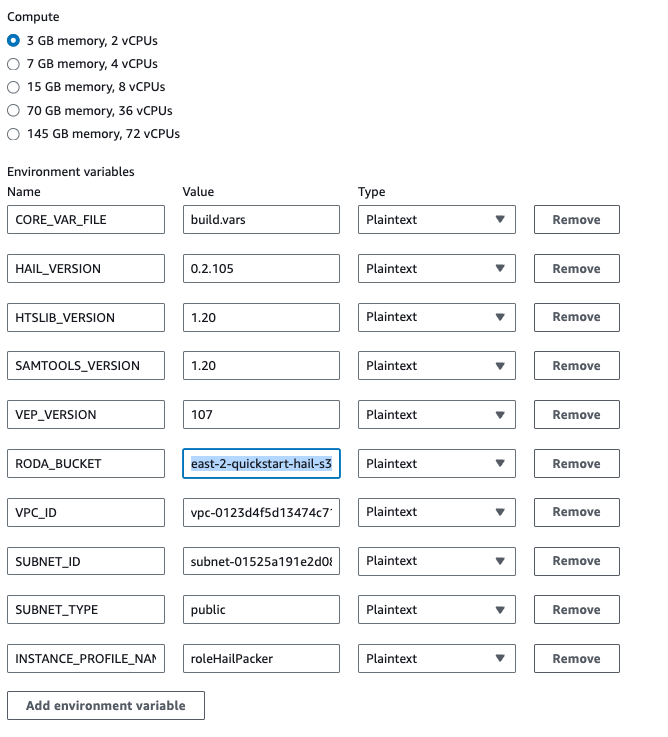
VEP 버전의 hail빌드시 약 1시간 38분 소요
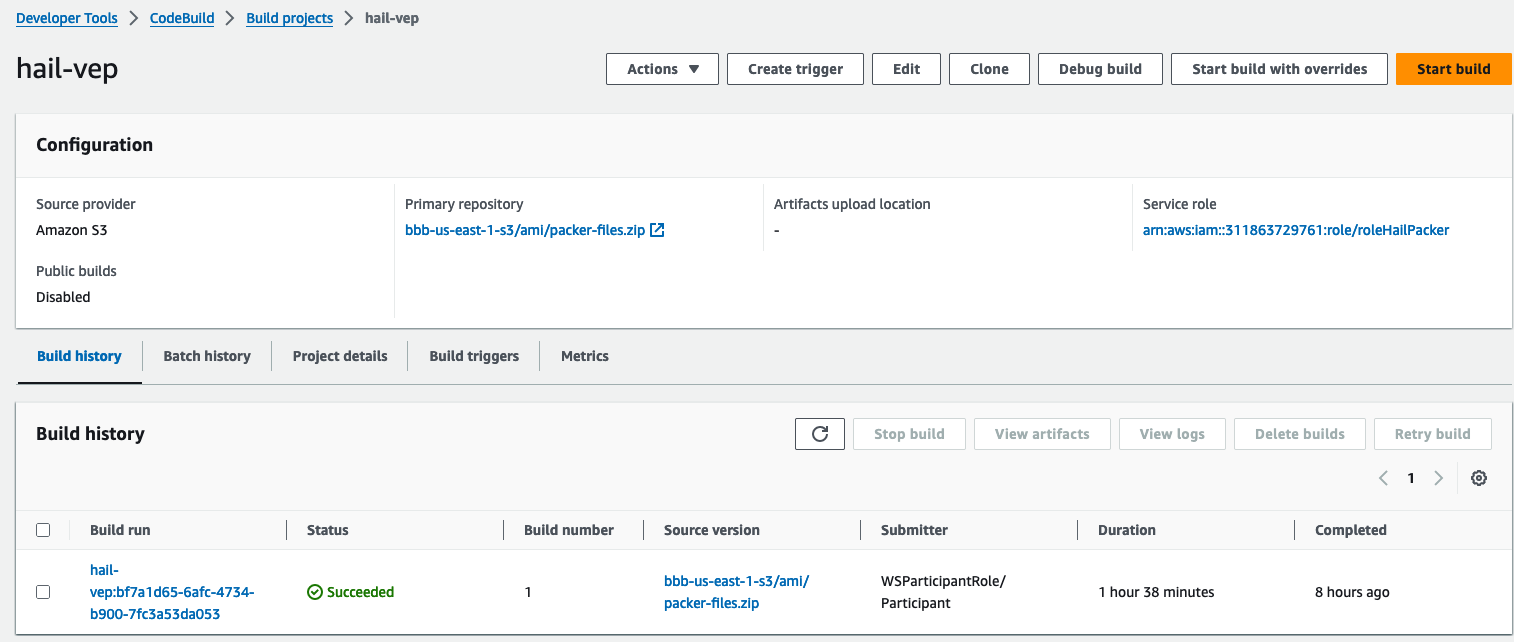
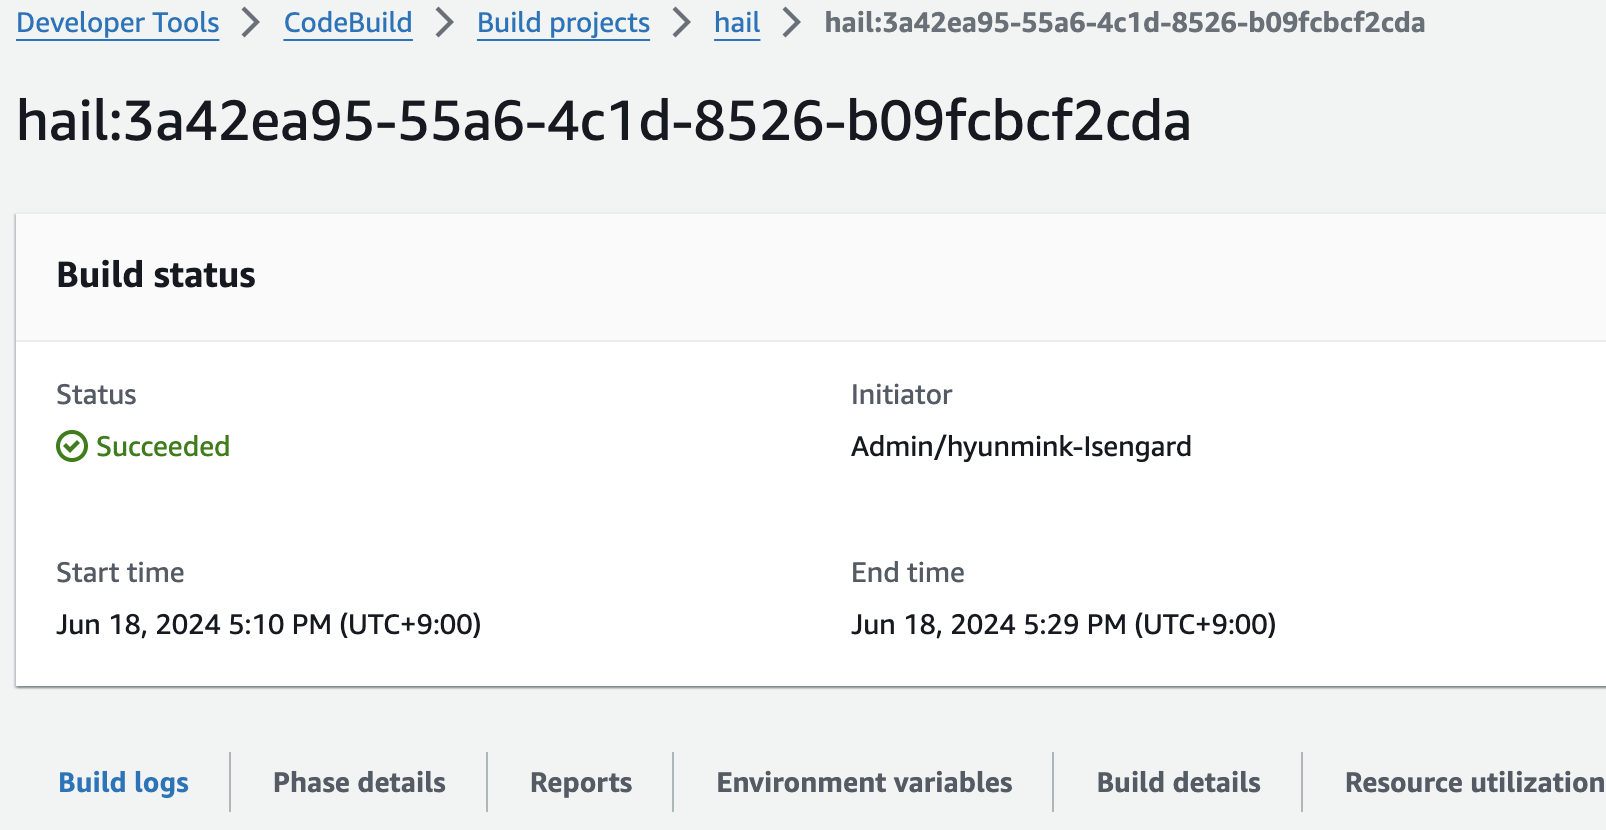
빌드 후 약 20분이 지나면 hail 이미지 빌드가 완료된 것을 확인할 수 있었습니다.

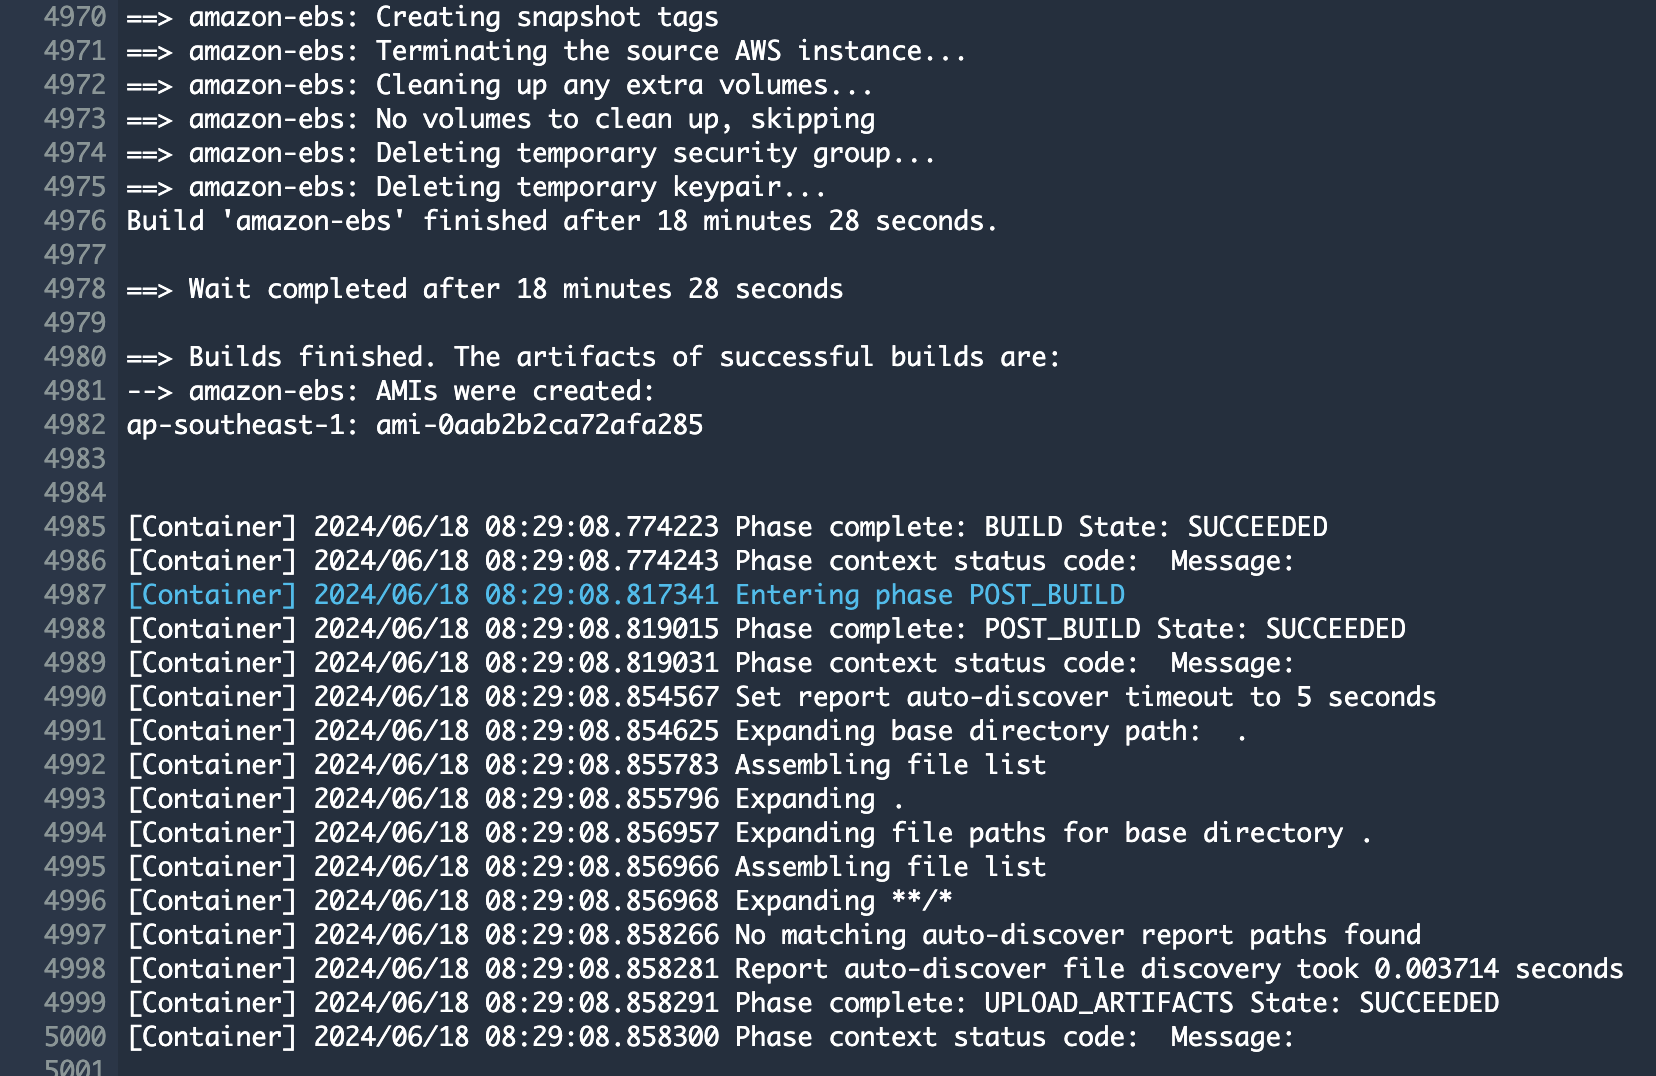
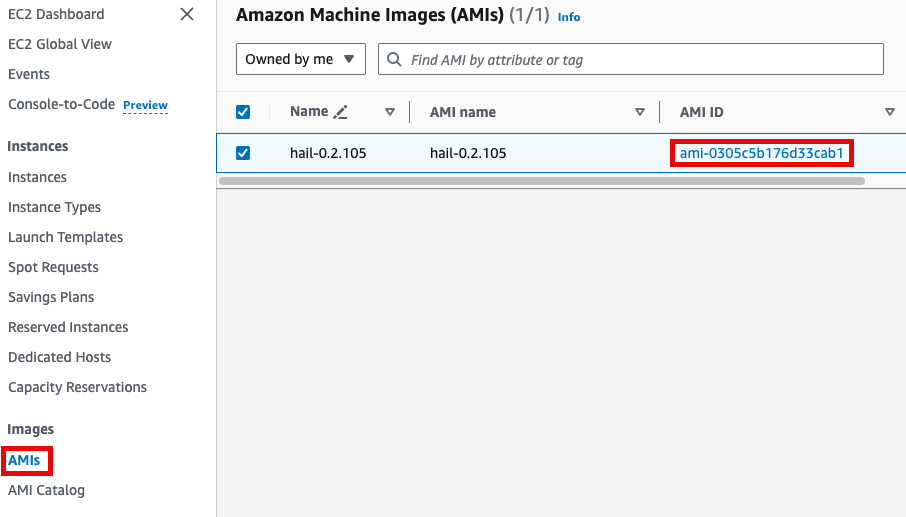
**또한 AMI 결과는** [AMI 메뉴](https://us-east-1.console.aws.amazon.com/ec2/home?region=us-east-1#Images:) 또는 CodeBuild 로그에서 확인 가능합니다.

또는
# **EMR 클러스터 실행 및 Jupyter 환경 세팅**
## EMR 클러스터 실행
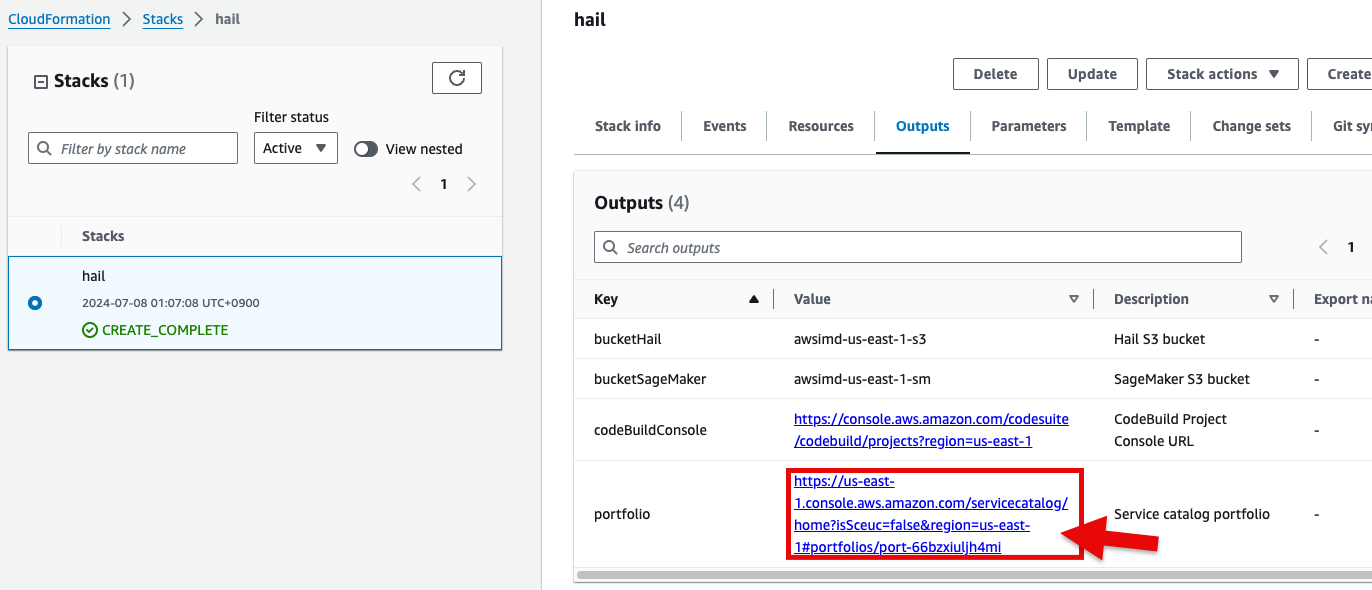
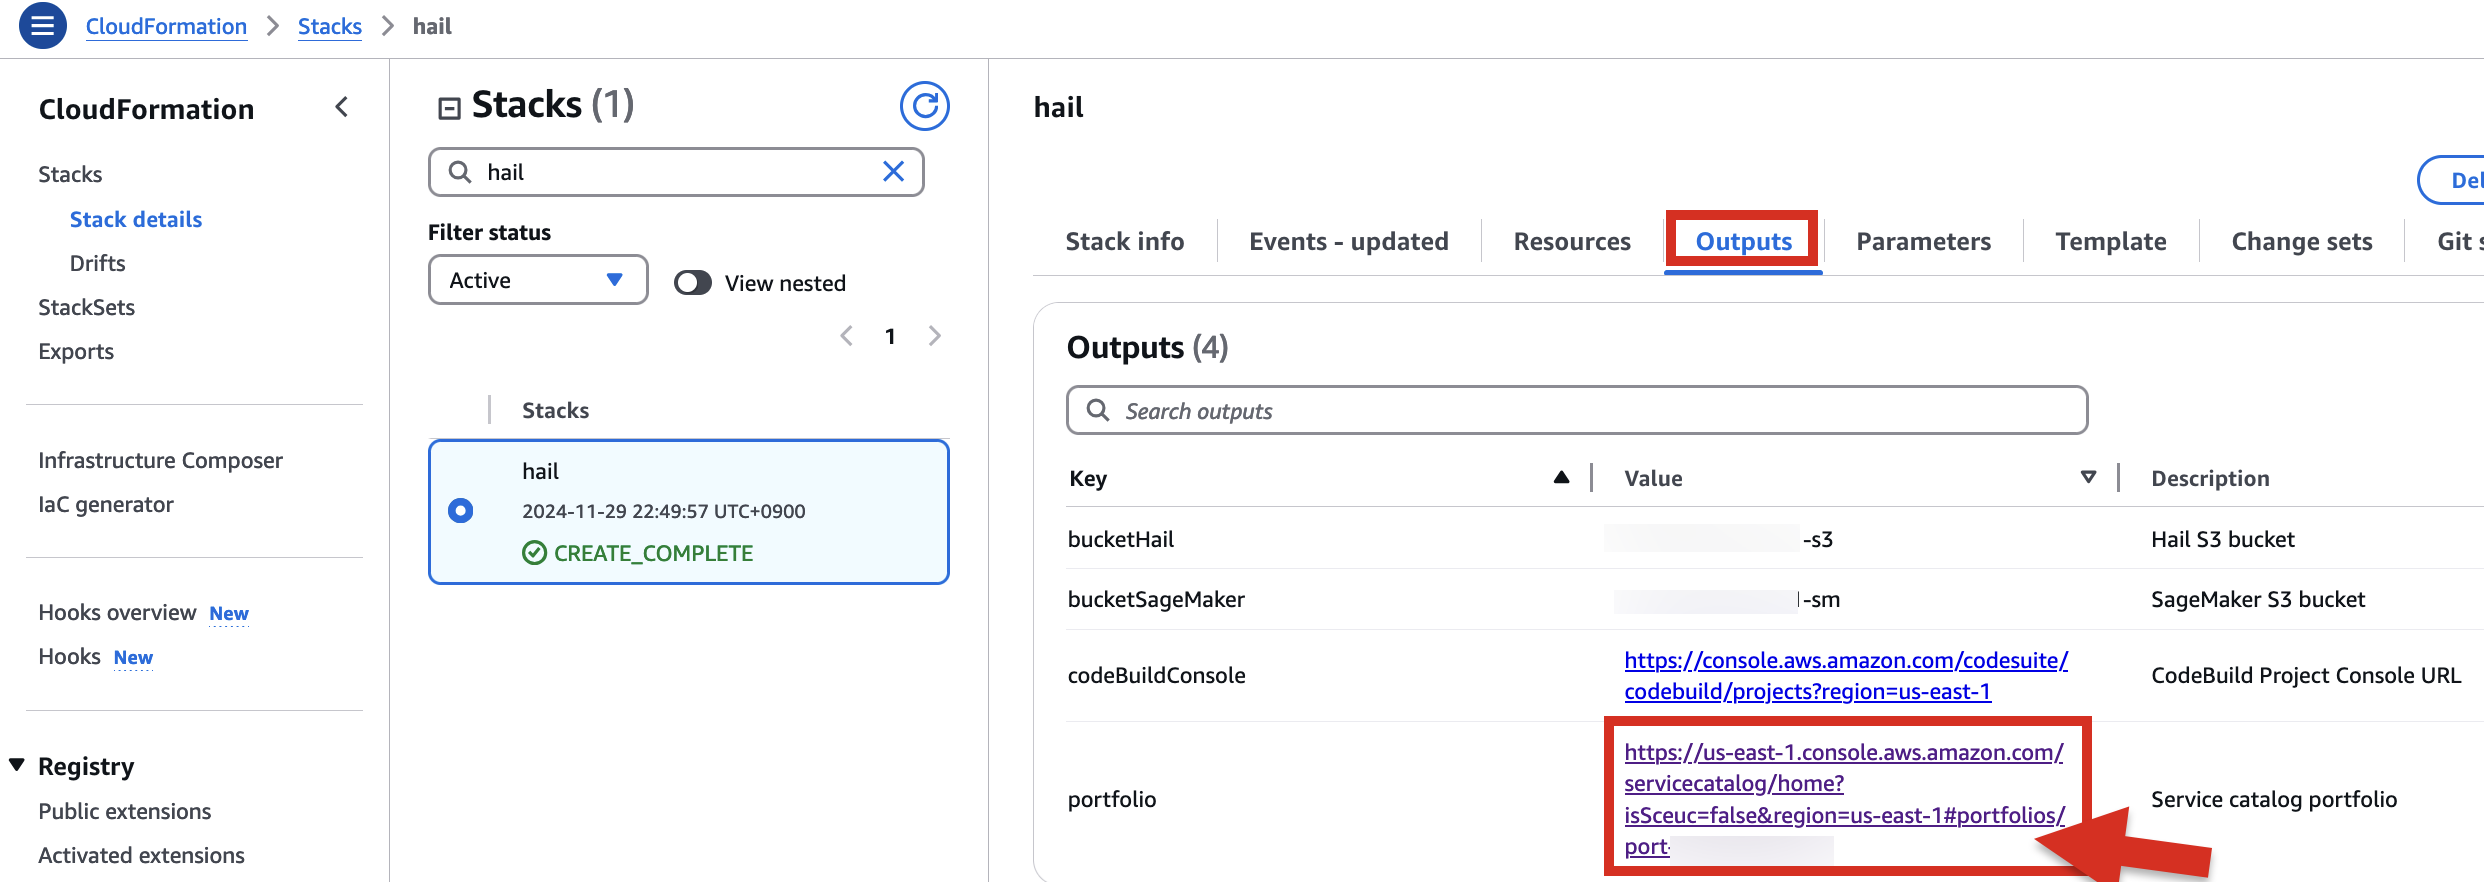
1. CloudFormation 서비스 콘솔에서 스택 Outputs 탭의 portfolio 에 있는 링크를 클릭합니다.
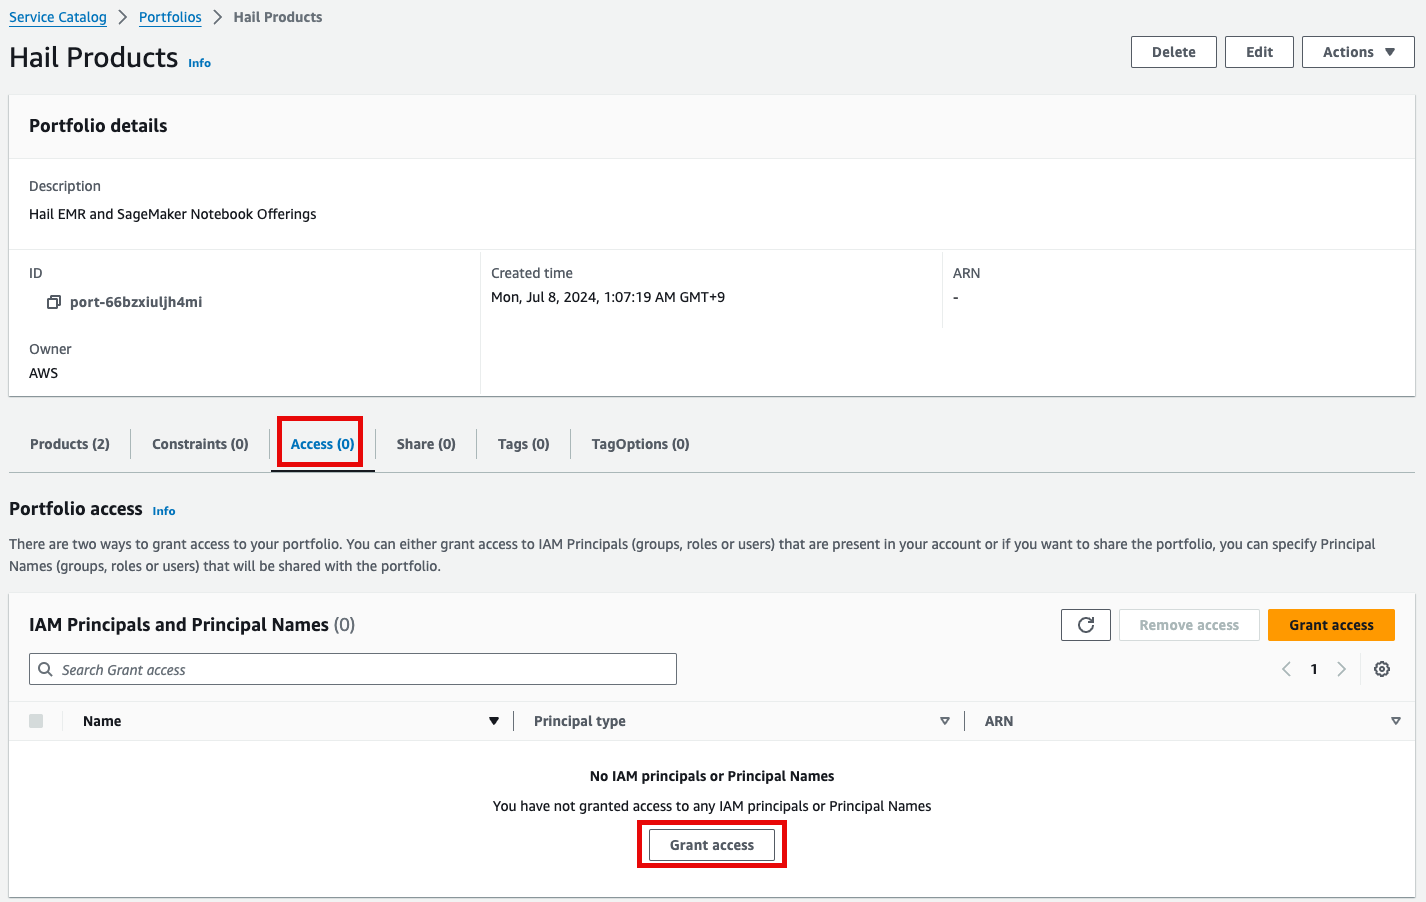
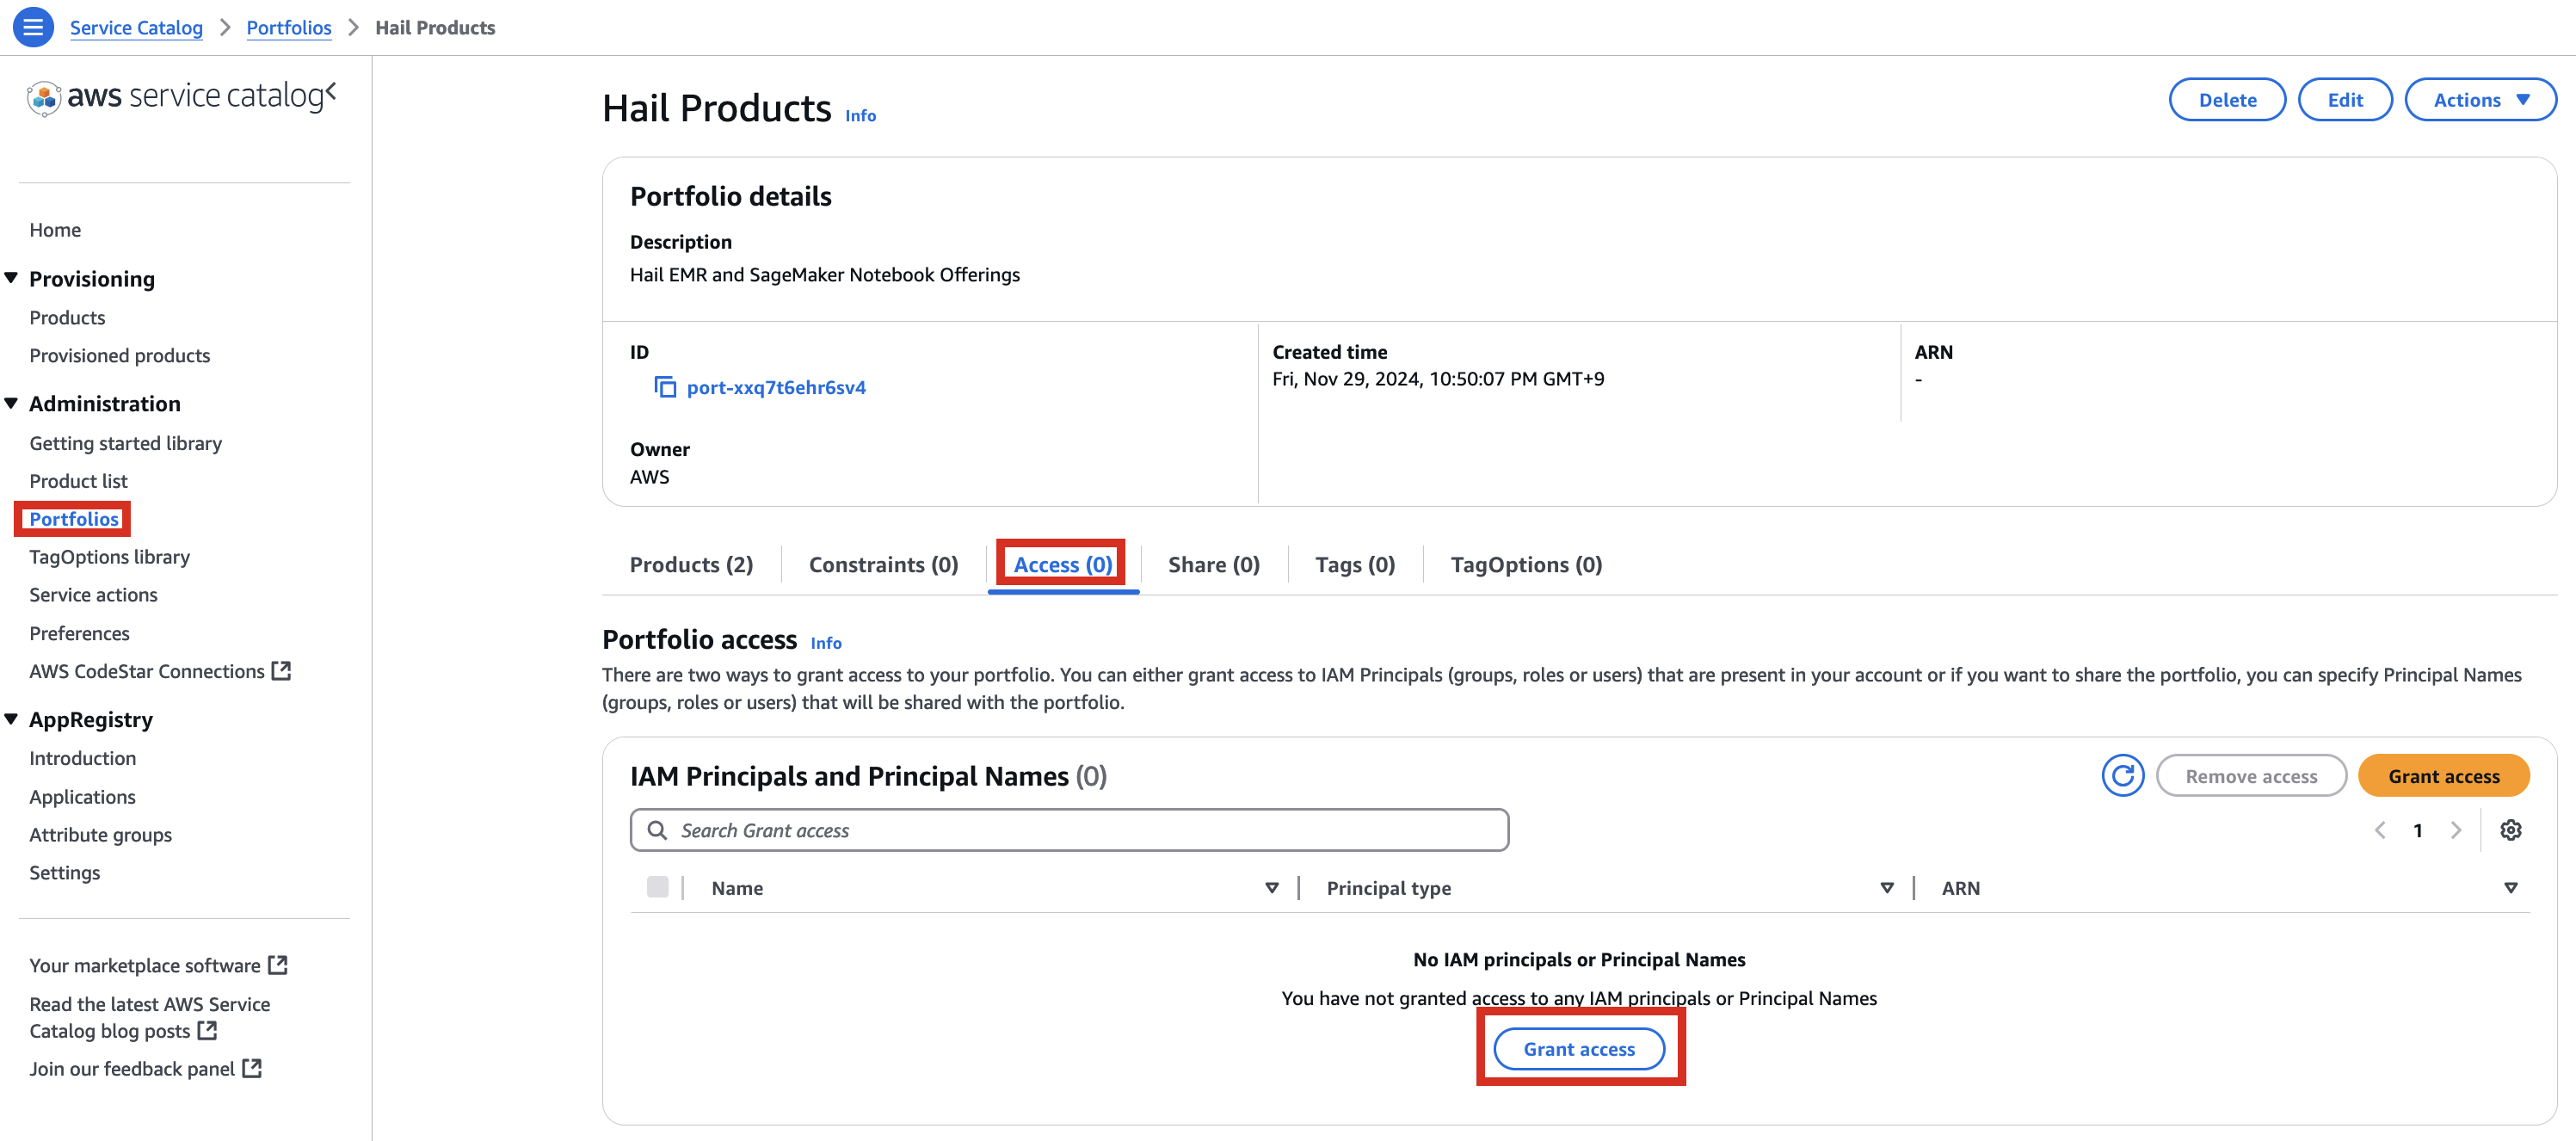
2. 포트폴리오내 해당 Product에 대한 Access 탭을 클릭한 뒤 Grant access 를 클릭합니다.
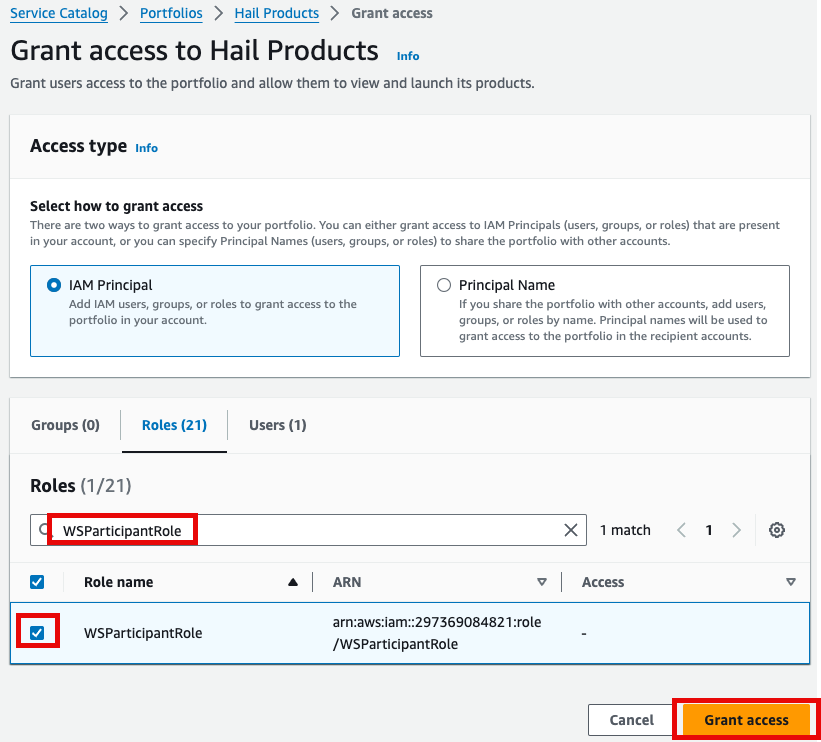
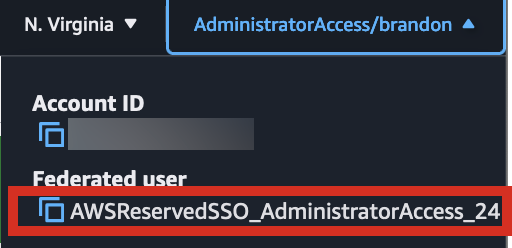
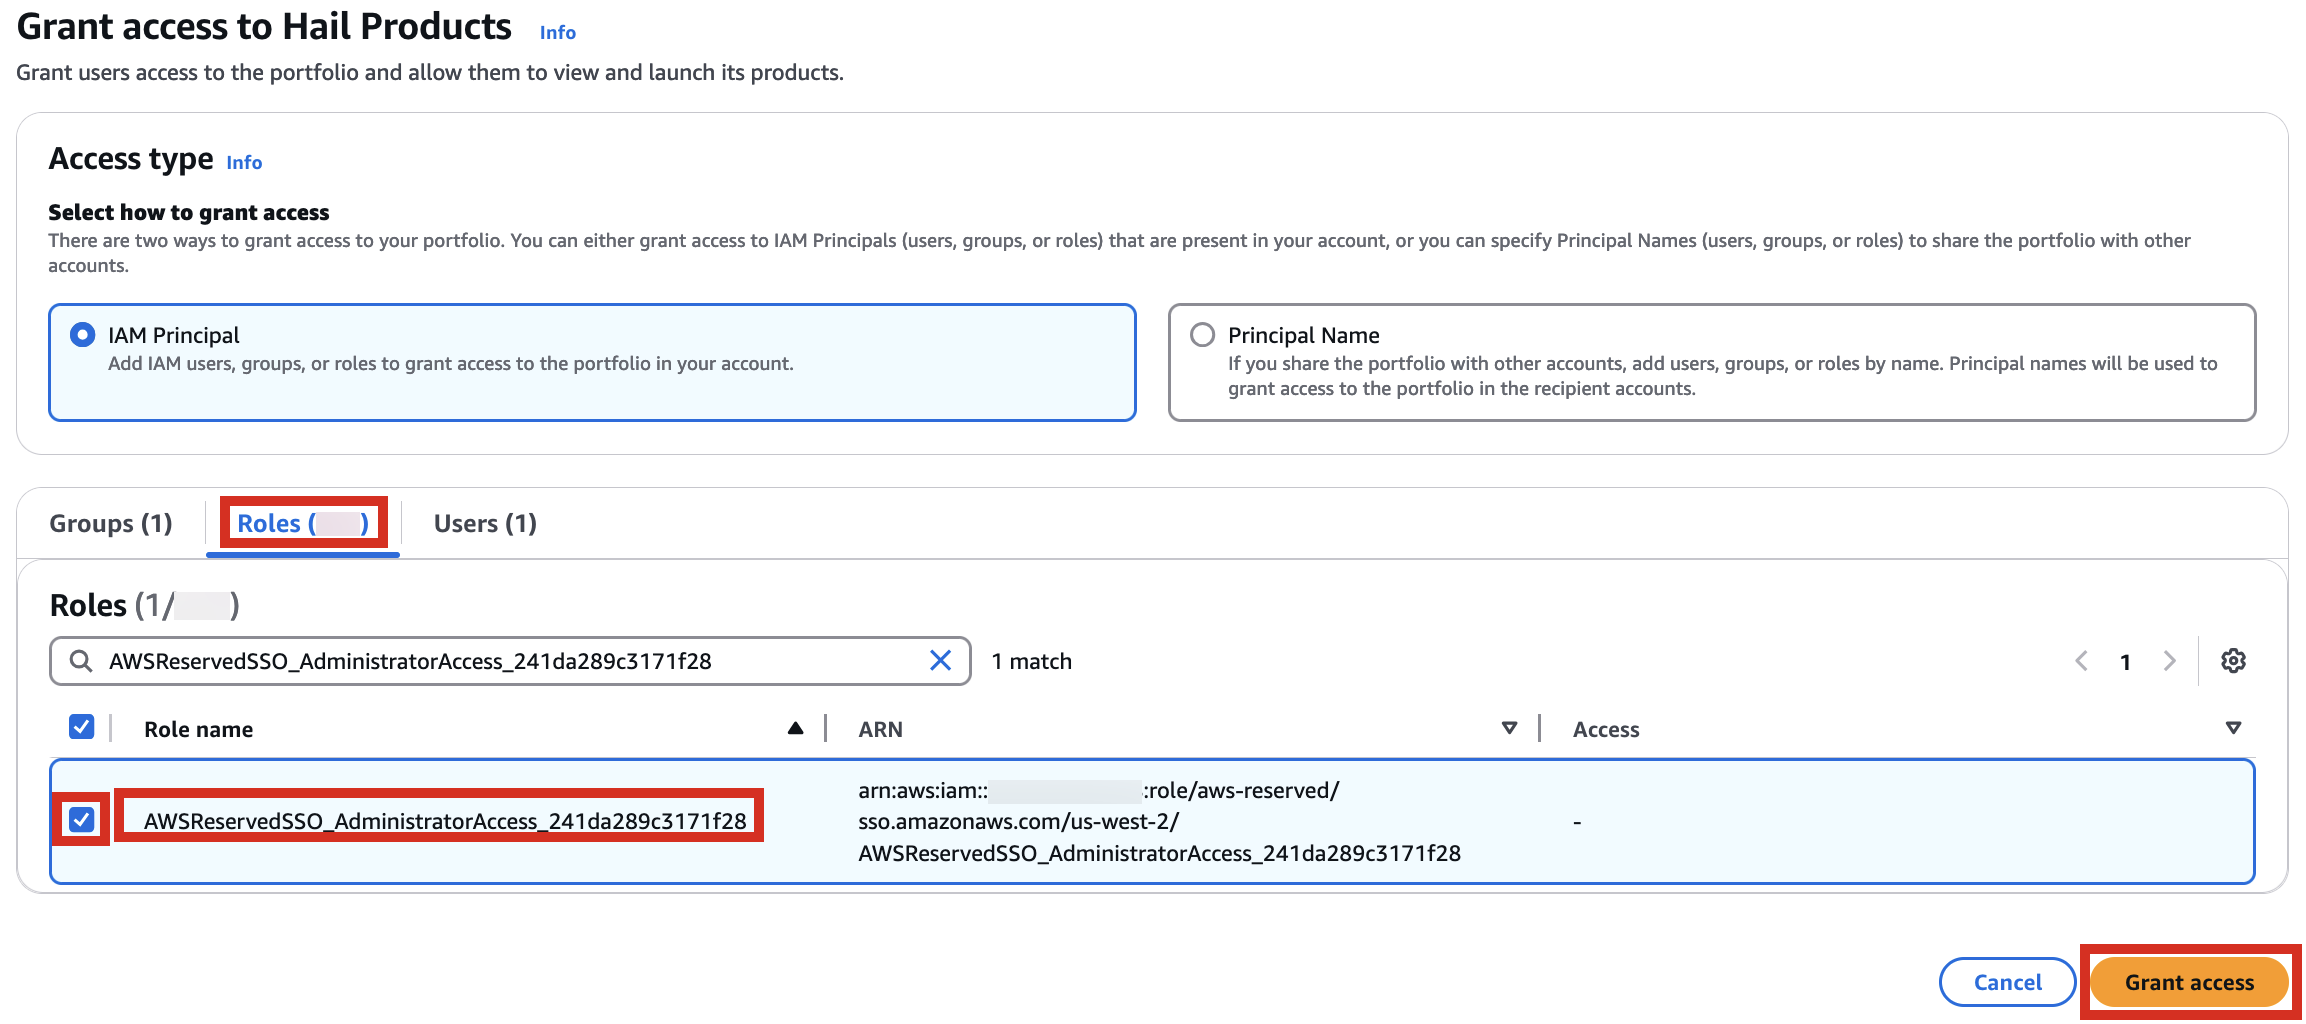
3. 권한 추가를 합니다. 여기서는 실습 계정 역할 이름이 `WSParticipantRole` 입니다. 검색후 체크하고 Grant access를 클릭합니다.
4. Access 권한이 있음을 확인한 뒤 Provisioning 메뉴의 Product를 클릭하여 진입합니다.

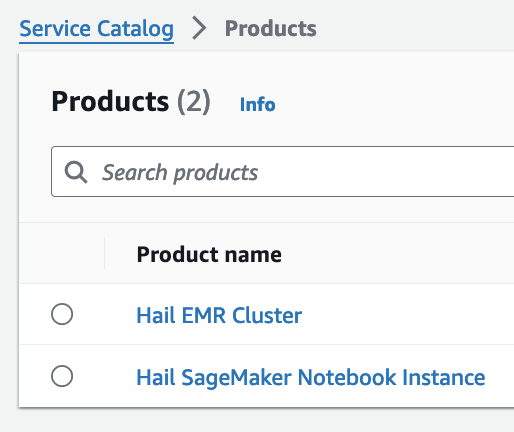
5. 이제 권한이 있으므로 Products 항목에서 2개의 Product들을 볼 수 있게 되었습니다.

6. Product에 있는 Hail EMR Cluster메뉴로 진입하여 원하는 product를 선택하고 Launch product를 클릭합니다.

7. Launch에 필요한 정보들을 기입합니다.
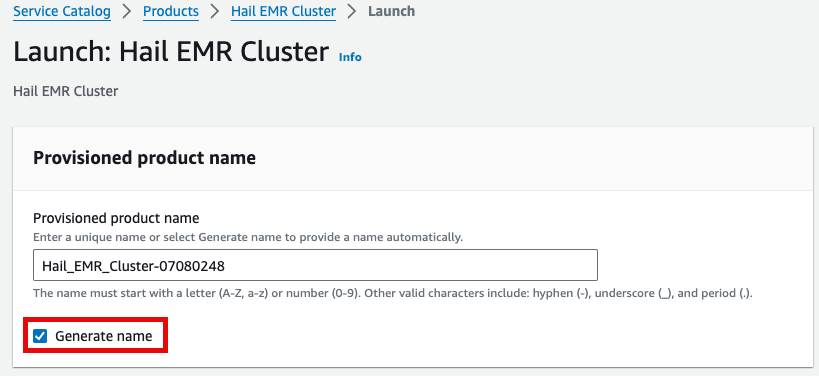
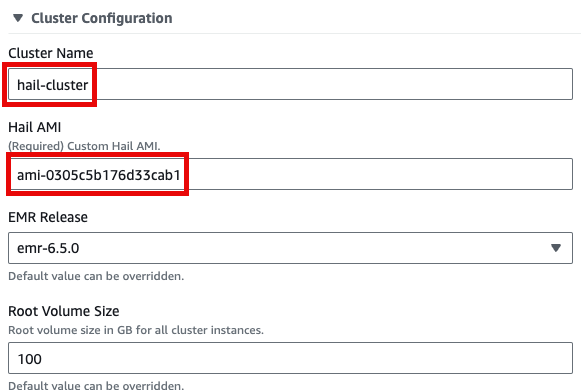
이름을 직접 입력하거나 Generate name을 클릭합니다.
앞에서 만든 Hail AMI를 입력합니다. 이때 AMI ID는 AMI 메뉴에서 EC2 서비스 하위의 AMIs 항목에서 찾을 수 있습니다. (앞에서도 설명했던)
Cluster name을 입력하고 Hail AMI에 AMI ID를 입력한 뒤 다른 것은 모두 기본값을 사용할 수 있습니다.
8. 맨 아래의 Launch product를 클릭합니다.

## SageMaker Notebook 실행
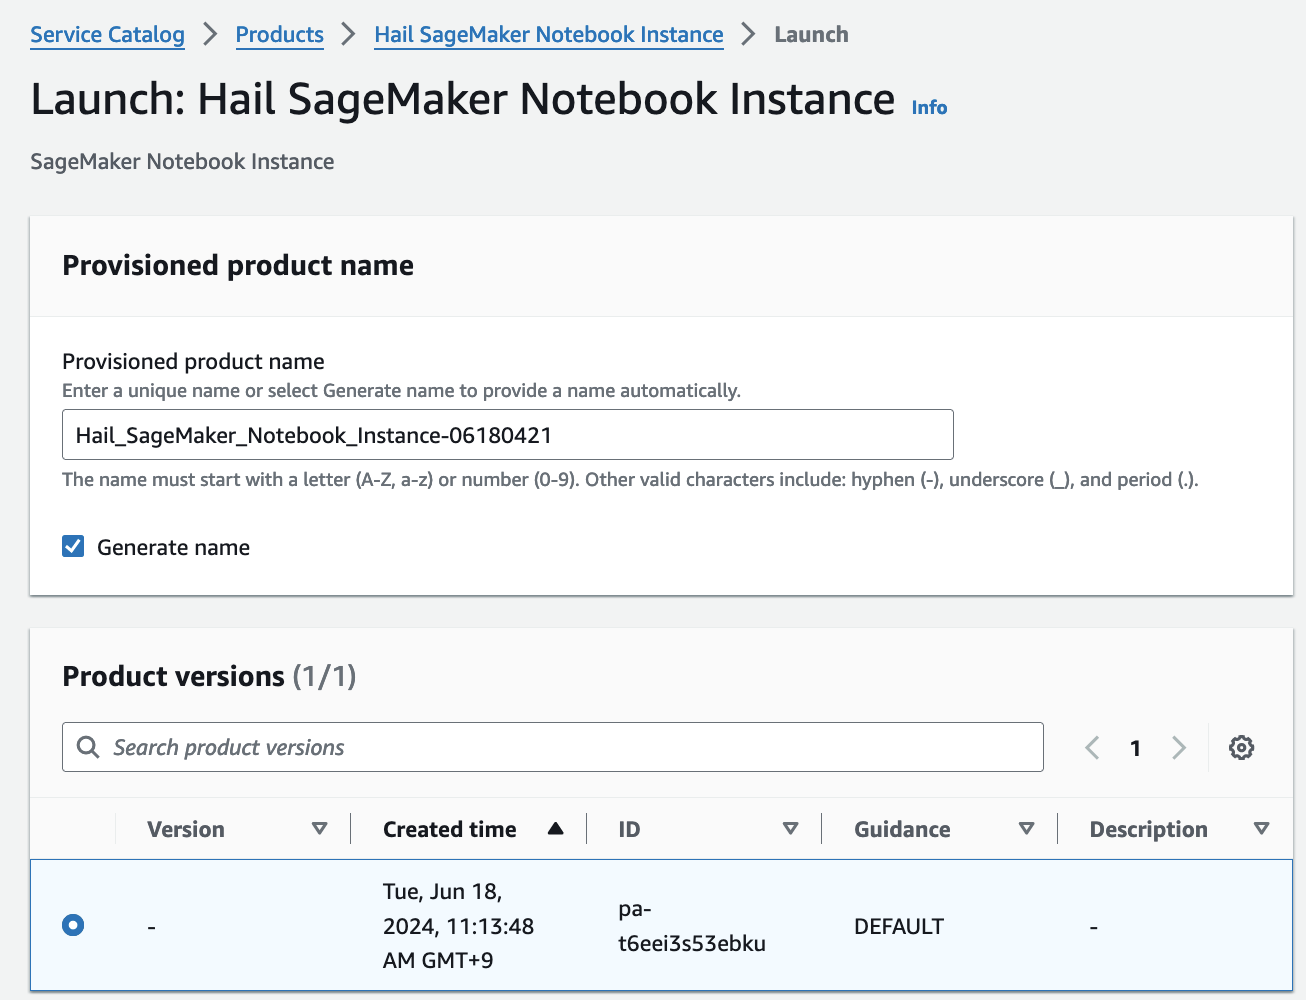
1. Product 메뉴에서 마찬가지로 Launch product를 클릭합니다.

2. Hail notebook을 위한 인스턴스의 이름을 입력하고 나머지는 모두 기본값입니다.

3. 맨 아래의 Launch product를 클릭합니다.

*참고로 제품(Product)의 실행 과정은 CloudFormation을 통해서도 확인할 수 있습니다.*
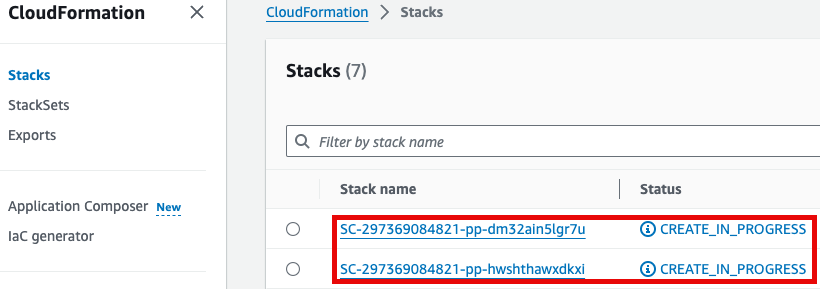
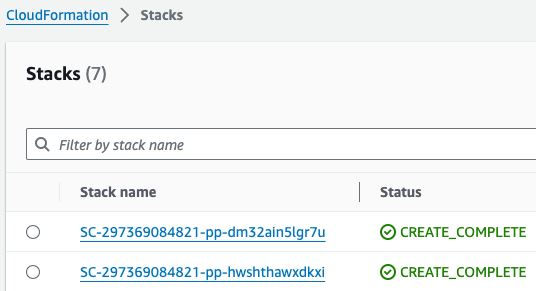
# GWAS 실습 (Hail)
1. 노트북을 실행합니다. 이 때 CloudFormation의 Outputs탭에서 url을 확인할 수 있습니다. 클릭하면 Amazon SageMaker의 해당 노트북 인스턴스로 자동 연결됩니다.
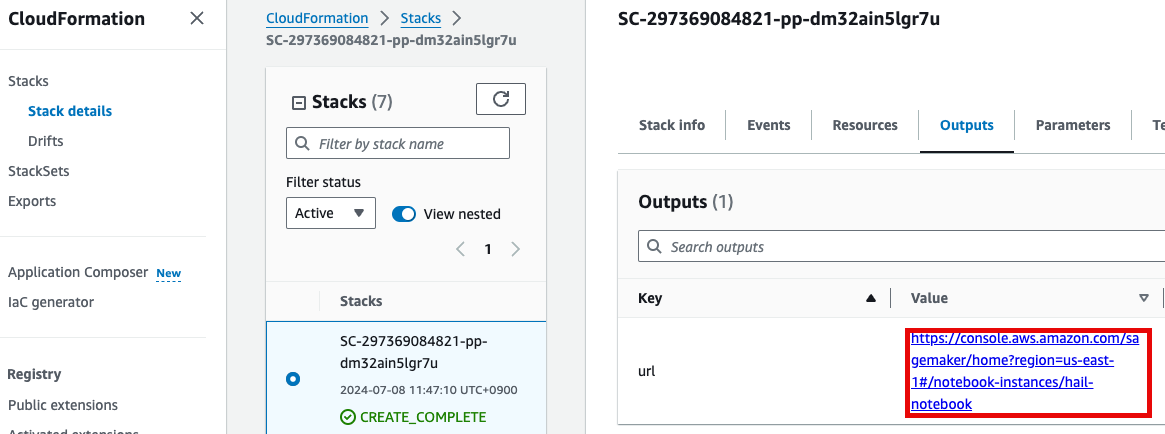
2. Open JupyterLab을 클릭하여 노트북을 실행합니다.

3. 이제 노트북에서 각각 2개의 노트북을 가지고 실습해봅니다.
- common-notebooks/plotting-tutorail.ipynb
- common-notebooks/GWAS-tutorial.ipynb
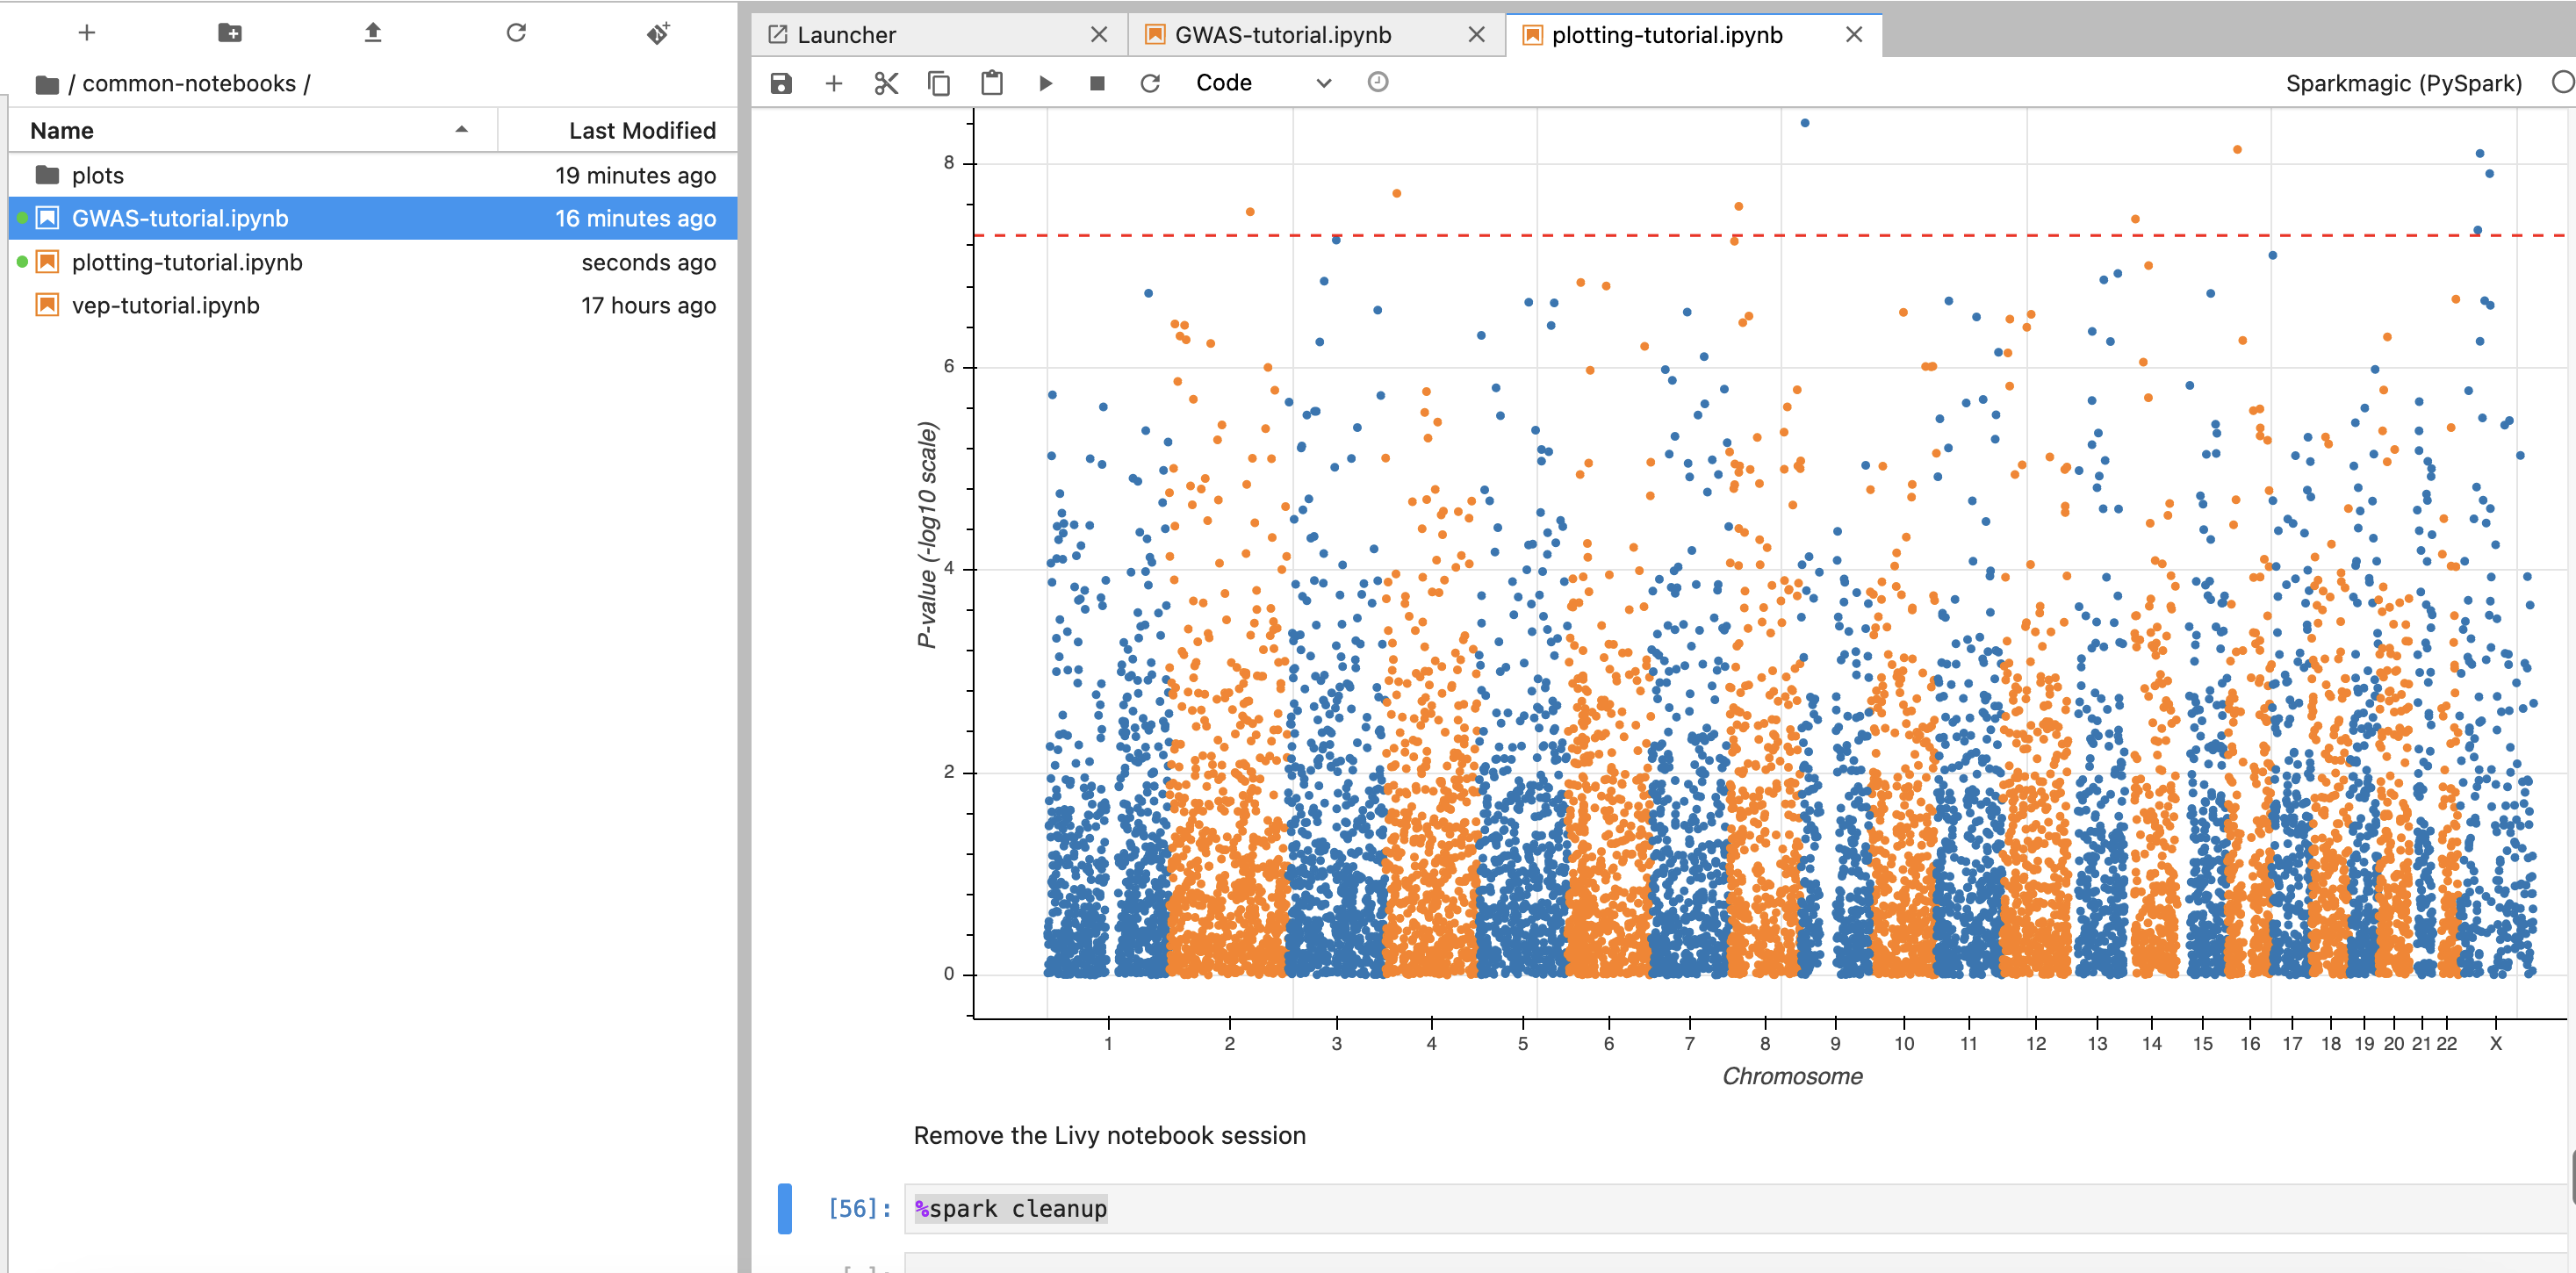
앞에서 만든 EMR 클러스터를 조회한 뒤 Cluster Name을 2번째 셀에서 수정해줍니다.
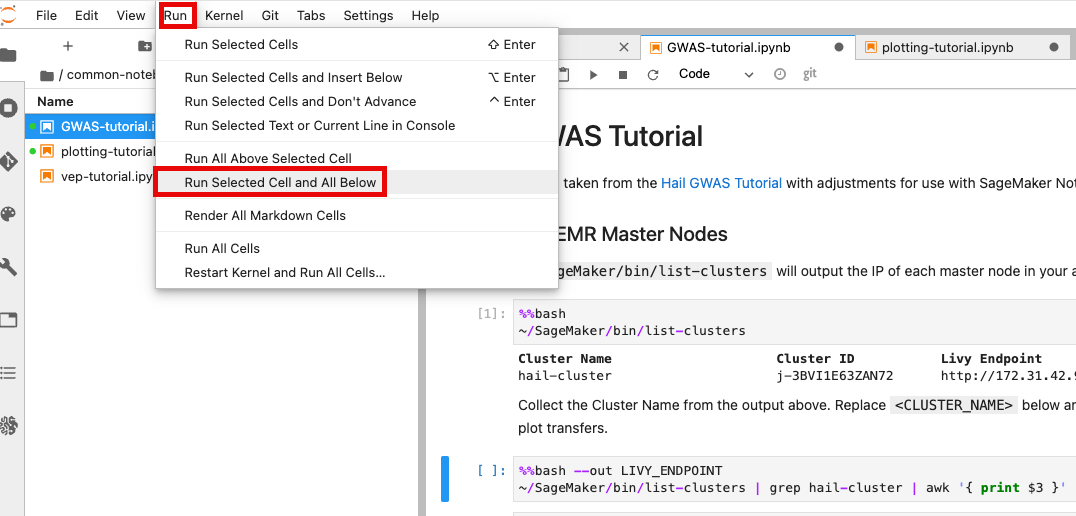
노트북 셀을 한번에 실행하기 위해서 시작하고자 하는 셀에 커서를 놓은 뒤 일괄 실행할 수 있습니다.
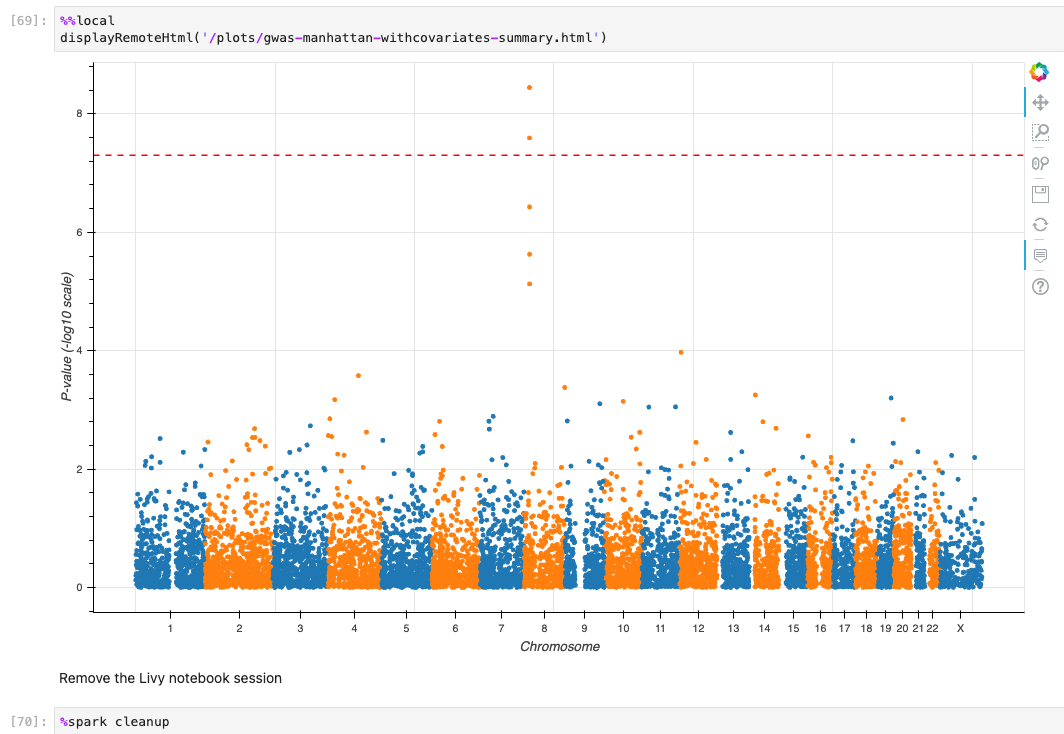
*최종적으로 튜토리얼로 주어진 코드가 정상적으로 실행할 수 있었다면 아래와 같은 결과들을 확인할 수 있습니다.*
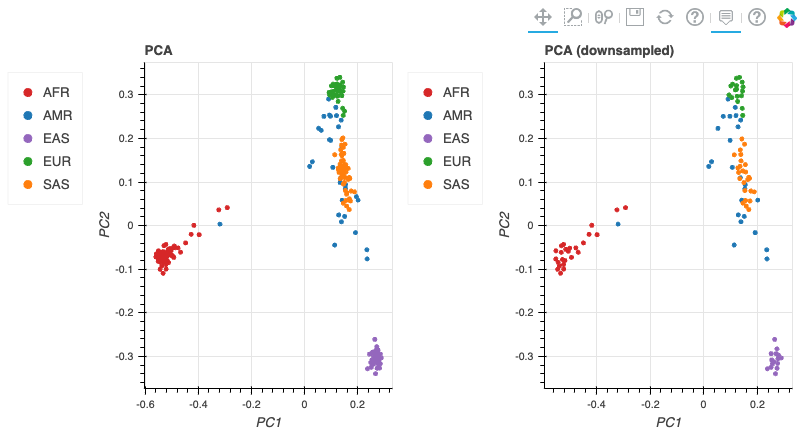
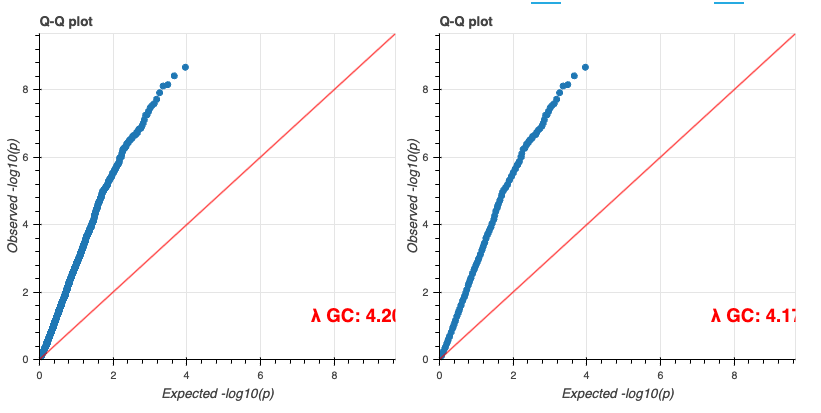
# 기타
## VEP configuration
S3 버킷에서 해당 json파일 객체를 선택하고 Copy S3 URI를 클릭합니다.
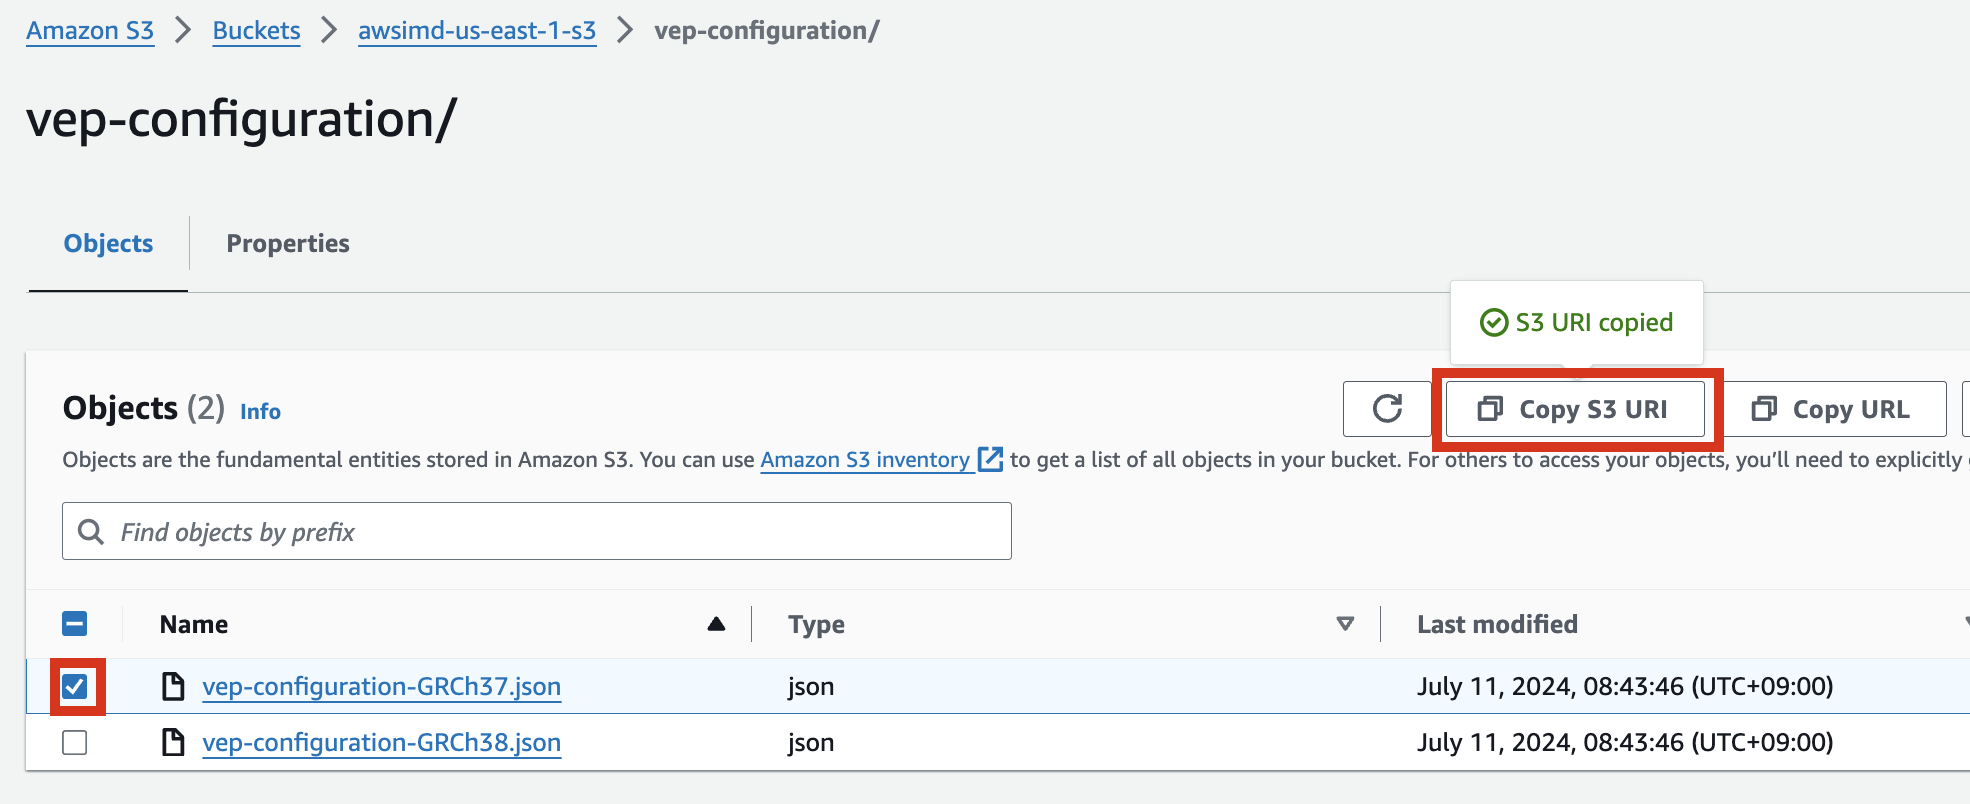
예시) vep-configuration-GRCh37.json
```bash
{
"command": [
"/opt/ensembl-vep/vep",
"--format", "vcf",
"--dir_plugins", "/opt/vep/plugins",
"--dir_cache", "/opt/vep/cache",
"--json",
"--everything",
"--allele_number",
"--no_stats",
"--cache", "--offline",
"--minimal",
"--assembly", "GRCh37",
"--plugin", "LoF,human_ancestor_fa:/opt/vep/loftee_data/human_ancestor.fa.gz,filter_position:0.05,min_intron_size:15,conservation_file:/opt/vep/loftee_data/phylocsf_gerp.sql,gerp_file:/opt/vep/loftee_data/GERP_scores.final.sorted.txt.gz",
"-o", "STDOUT"
],
"env": {
"PERL5LIB": "/opt/vep"
},
"vep_json_schema": "Struct{assembly_name:String,allele_string:String,ancestral:String,colocated_variants:Array[Struct{aa_allele:String,aa_maf:Float64,afr_allele:String,afr_maf:Float64,allele_string:String,amr_allele:String,amr_maf:Float64,clin_sig:Array[String],end:Int32,eas_allele:String,eas_maf:Float64,ea_allele:String,ea_maf:Float64,eur_allele:String,eur_maf:Float64,exac_adj_allele:String,exac_adj_maf:Float64,exac_allele:String,exac_afr_allele:String,exac_afr_maf:Float64,exac_amr_allele:String,exac_amr_maf:Float64,exac_eas_allele:String,exac_eas_maf:Float64,exac_fin_allele:String,exac_fin_maf:Float64,exac_maf:Float64,exac_nfe_allele:String,exac_nfe_maf:Float64,exac_oth_allele:String,exac_oth_maf:Float64,exac_sas_allele:String,exac_sas_maf:Float64,id:String,minor_allele:String,minor_allele_freq:Float64,phenotype_or_disease:Int32,pubmed:Array[Int32],sas_allele:String,sas_maf:Float64,somatic:Int32,start:Int32,strand:Int32}],context:String,end:Int32,id:String,input:String,intergenic_consequences:Array[Struct{allele_num:Int32,consequence_terms:Array[String],impact:String,minimised:Int32,variant_allele:String}],most_severe_consequence:String,motif_feature_consequences:Array[Struct{allele_num:Int32,consequence_terms:Array[String],high_inf_pos:String,impact:String,minimised:Int32,motif_feature_id:String,motif_name:String,motif_pos:Int32,motif_score_change:Float64,strand:Int32,variant_allele:String}],regulatory_feature_consequences:Array[Struct{allele_num:Int32,biotype:String,consequence_terms:Array[String],impact:String,minimised:Int32,regulatory_feature_id:String,variant_allele:String}],seq_region_name:String,start:Int32,strand:Int32,transcript_consequences:Array[Struct{allele_num:Int32,amino_acids:String,appris:String,biotype:String,canonical:Int32,ccds:String,cdna_start:Int32,cdna_end:Int32,cds_end:Int32,cds_start:Int32,codons:String,consequence_terms:Array[String],distance:Int32,domains:Array[Struct{db:String,name:String}],exon:String,gene_id:String,gene_pheno:Int32,gene_symbol:String,gene_symbol_source:String,hgnc_id:String,hgvsc:String,hgvsp:String,hgvs_offset:Int32,impact:String,intron:String,lof:String,lof_flags:String,lof_filter:String,lof_info:String,minimised:Int32,polyphen_prediction:String,polyphen_score:Float64,protein_end:Int32,protein_start:Int32,protein_id:String,sift_prediction:String,sift_score:Float64,strand:Int32,swissprot:String,transcript_id:String,trembl:String,tsl:Int32,uniparc:String,variant_allele:String}],variant_class:String}"
}
```
[vep-tutorial](https://github.com/hmkim/quickstart-hail/blob/main/sagemaker/common-notebooks/vep-tutorial.ipynb) 코드에서 아래 내용에서 위에서 복사한 S3 객체 URI로 수정하여 사용할 수 있습니다.

## VEP 플러그인 설치
만일 VEP의 플러그인 설치에 변경사항 (추가 등)이 있다면 AMI를 다시 만들어야 합니다. 이 때 AMI를 만들 데 사용되는 VEP 설치에 관한 코드는 [vep\_install.sh](https://github.com/hmkim/quickstart-hail/blob/main/packer-files/scripts/vep_install.sh) 입니다. 해당 코드를 수정 후 다시 AMI를 빌드합니다.
다음을 참고하여 커스텀하게 Hail, VEP 툴을 설치 및 AMI를 빌드할 수 있습니다.
- [Hail AMI Creation via AWS CodeBuild](https://github.com/hmkim/quickstart-hail/blob/main/docs/hail-ami.md)
- [vep-install.md](https://github.com/hmkim/quickstart-hail/blob/main/docs/vep-install.md)
- [Building a Custom Hail AMI](https://github.com/hmkim/quickstart-hail/blob/main/docs/ami-creation.md)
## EMR 클러스터 EBS (HDFS) 동적 볼륨 늘리기
\- 데이터가 클 경우 사전에 클러스터상에 구성된 볼륨의 용량이 부족할 수 있습니다. 아래 블로그 내용을 참고하여, EBS 볼륨의 부족분을 동적으로 늘릴 수 있습니다.
[https://aws.amazon.com/ko/blogs/big-data/dynamically-scale-up-storage-on-amazon-emr-clusters/](https://aws.amazon.com/ko/blogs/big-data/dynamically-scale-up-storage-on-amazon-emr-clusters/)
# Quickstart Hail (English)
Deploy an [EMR cluster on AWS](https://aws.amazon.com/emr/), with Spark, [Hail](https://hail.is/index.html), [Zeppelin](https://zeppelin.apache.org/) and [Ensembl VEP](https://ensembl.org/info/docs/tools/vep/index.html) using CloudFormation service.
This tool requires the following programs to be previously installed in your computer:
- Amazon's `Command Line Interface (CLI)` utility
- Git
To install the required software open a terminal and execute the following:
For Mac:
```
# Installs homebrew
ruby -e "$(curl -fsSL https://raw.githubusercontent.com/Homebrew/install/master/install)"
# Installs AWS CLI
brew install awscli
```
For Debian / Ubuntu (apt-get):
```
curl "https://awscli.amazonaws.com/awscli-exe-linux-x86_64.zip" -o "awscliv2.zip"
unzip awscliv2.zip
sudo ./aws/install
sudo apt-get install -y git
```
For Fedora (dnf/yum):
```
curl "https://awscli.amazonaws.com/awscli-exe-linux-x86_64.zip" -o "awscliv2.zip"
unzip awscliv2.zip
sudo ./aws/install
sudo dnf install git # or sudo yum install git
```
For Amazon Linux 2023:
```
sudo dnf install git
```
# CloudFormation stack preparation
1\. Prepare the AWS credentials and apply them in the terminal.
```bash
export AWS_DEFAULT_REGION="{AWS_REGION}"
export AWS_ACCESS_KEY_ID="{ACCESS_KEY}"
export AWS_SECRET_ACCESS_KEY="{SECRET_ACCESS_KEY}"
export AWS_SESSION_TOKEN="{SESSION_TOKEN}"
```
2\. Create an S3 bucket in the region where you want to launch this CloudFormation stack.
```
aws s3 mb s3://{bucket name} --region {region}
```
Download and unzip the content from this repository, then place the downloaded content into the S3 bucket you created earlier.
```bash
export AWS_BUCKET={bucket name}
git clone https://github.com/hmkim/quickstart-hail.git
cd quickstart-hail
aws s3 sync . s3://$AWS_BUCKET/quickstart-hail/ --exclude ".git/*"
```
3\. Connect to the Amazon S3 console and check the bucket and directory.
[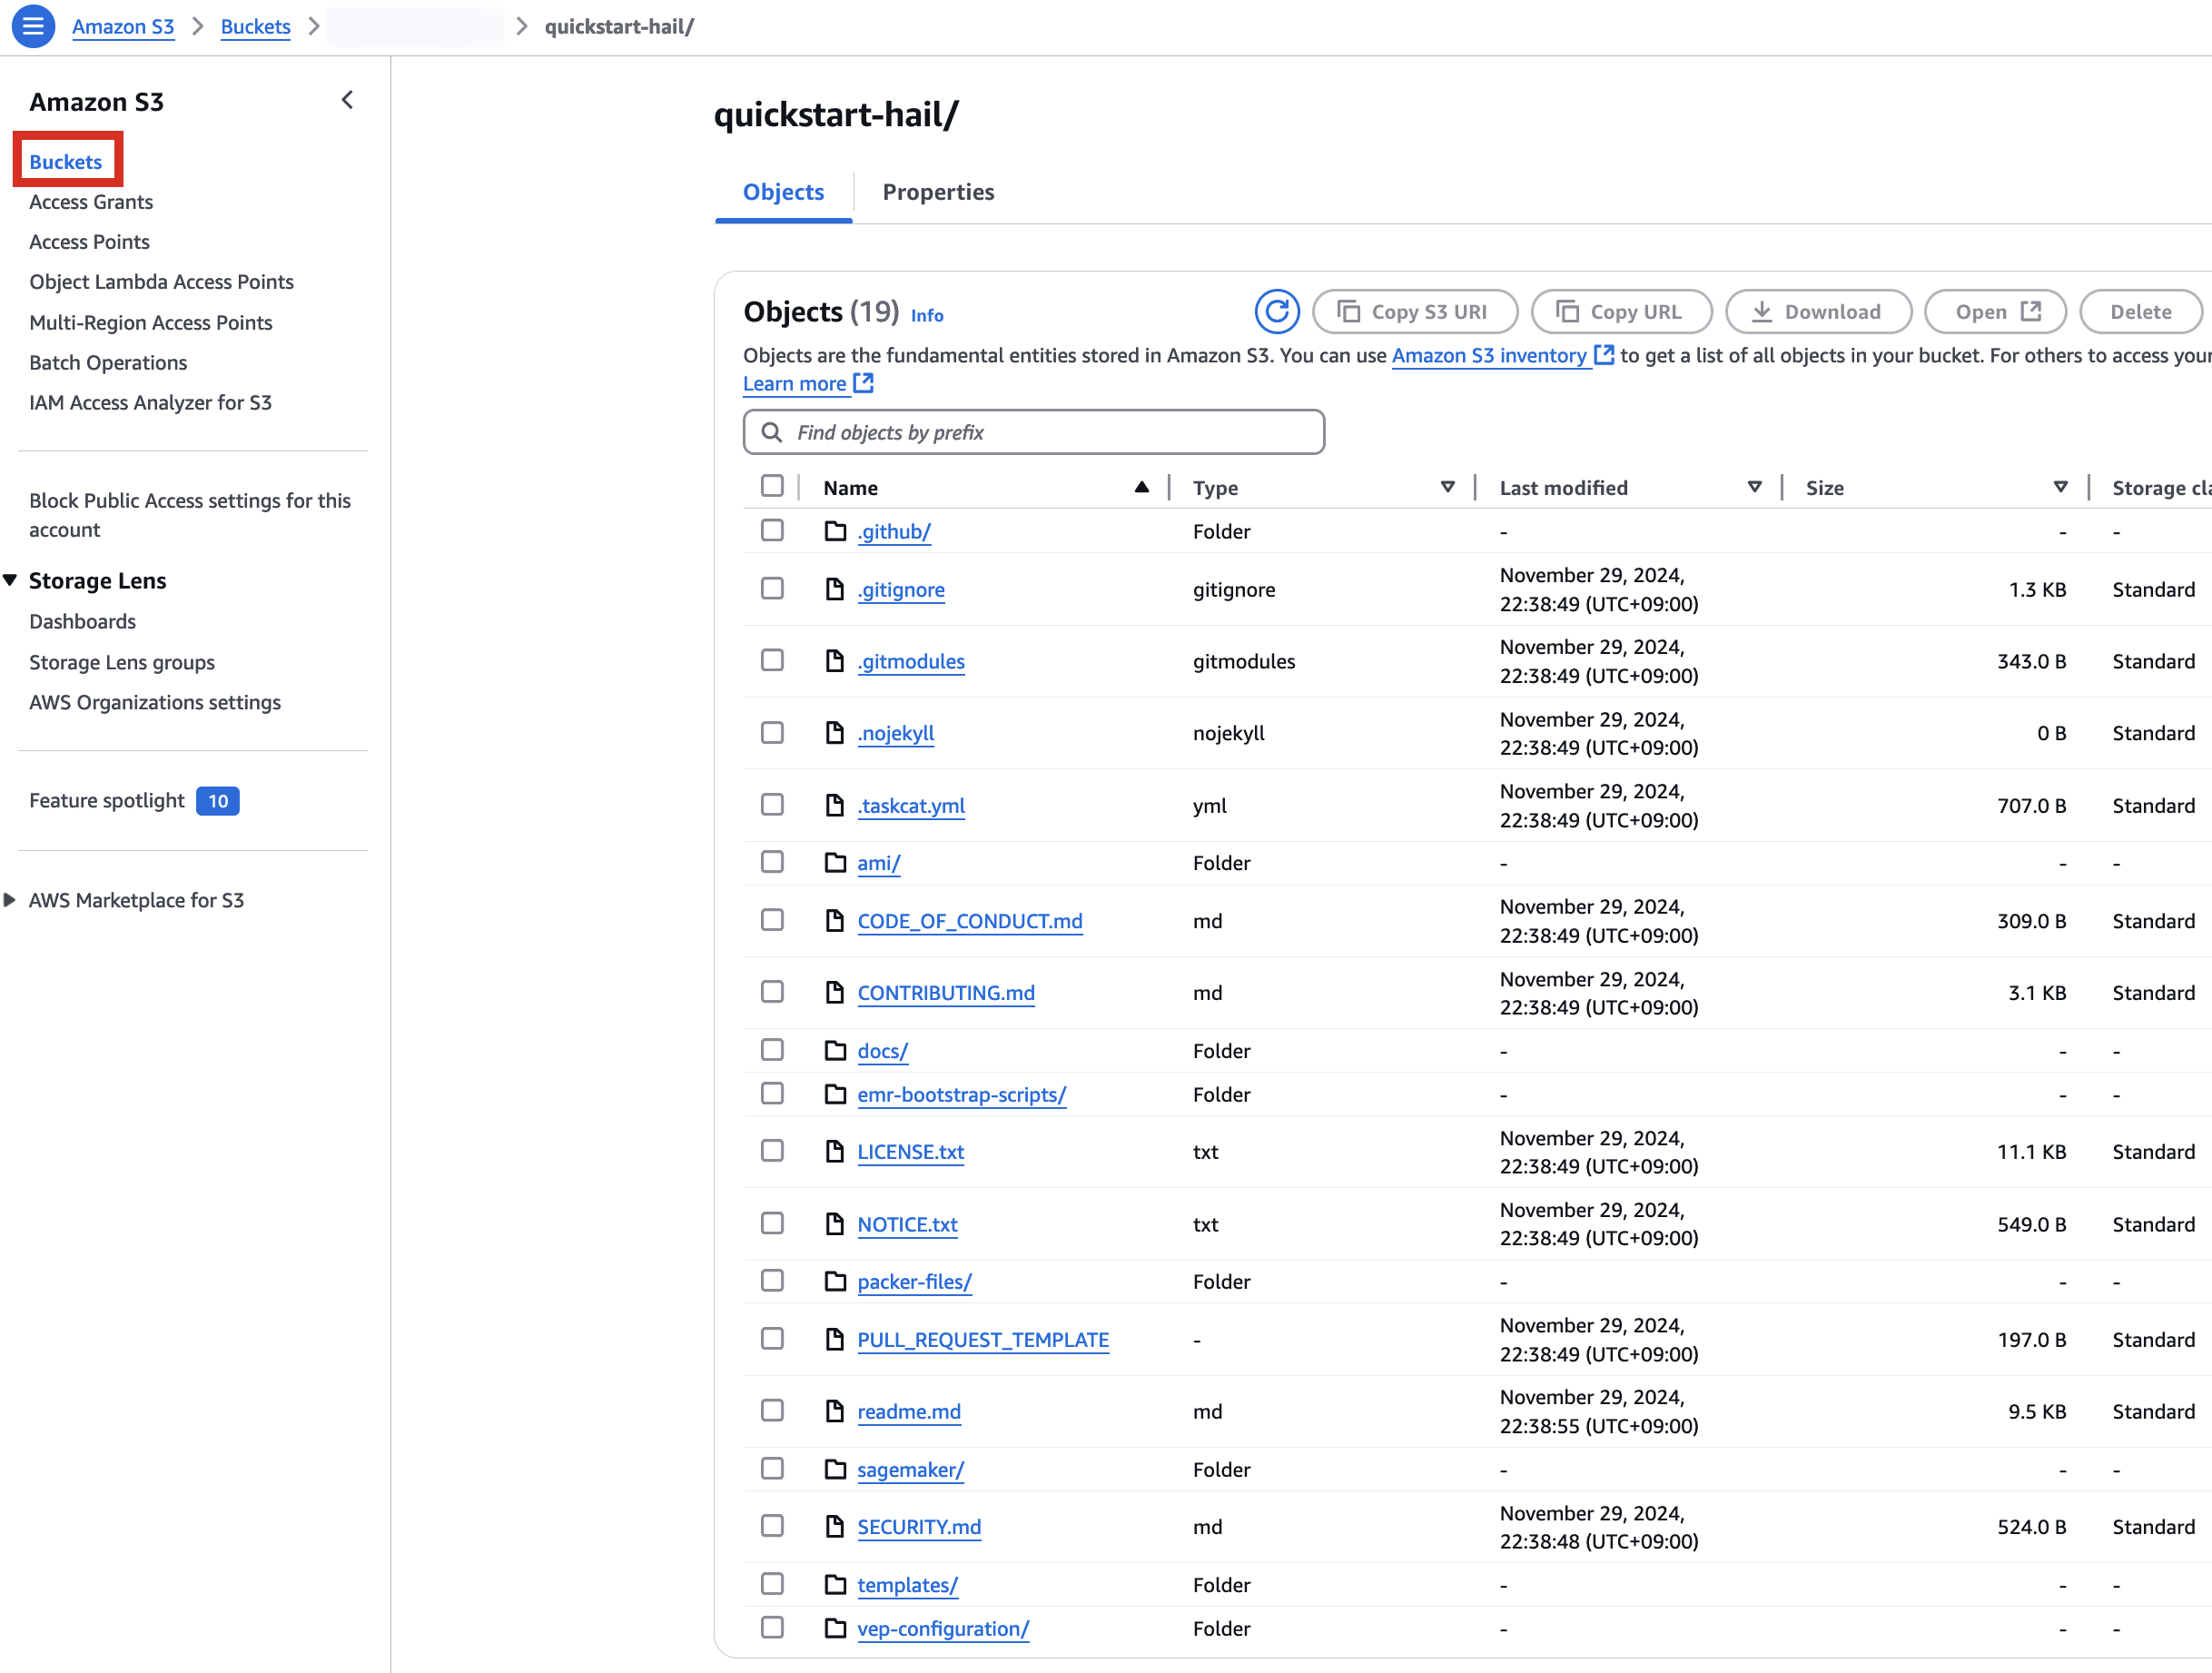](https://www.aws-ps-tech.kr/uploads/images/gallery/2024-12/uaCimage.png)
# Run the CloudFormation stack
1\. Go to the [CloudFormation](https://us-east-1.console.aws.amazon.com/cloudformation/home?region=us-east-1) console.

2\. Creates a new stack. At this time, select **`With new resources (standard)`**.

3\. Go to the Amazon S3 console, select `hail-launcher.template.yaml` in the template directory you uploaded earlier, and click `Copy URL`. The path is as follows:
**{bucket name} > quickstart-hail > templates > hail-launcher.template.yaml**
[](https://www.aws-ps-tech.kr/uploads/images/gallery/2024-12/image.png)
When creating a CloudFormation stack, enter this URL and create the stack.
[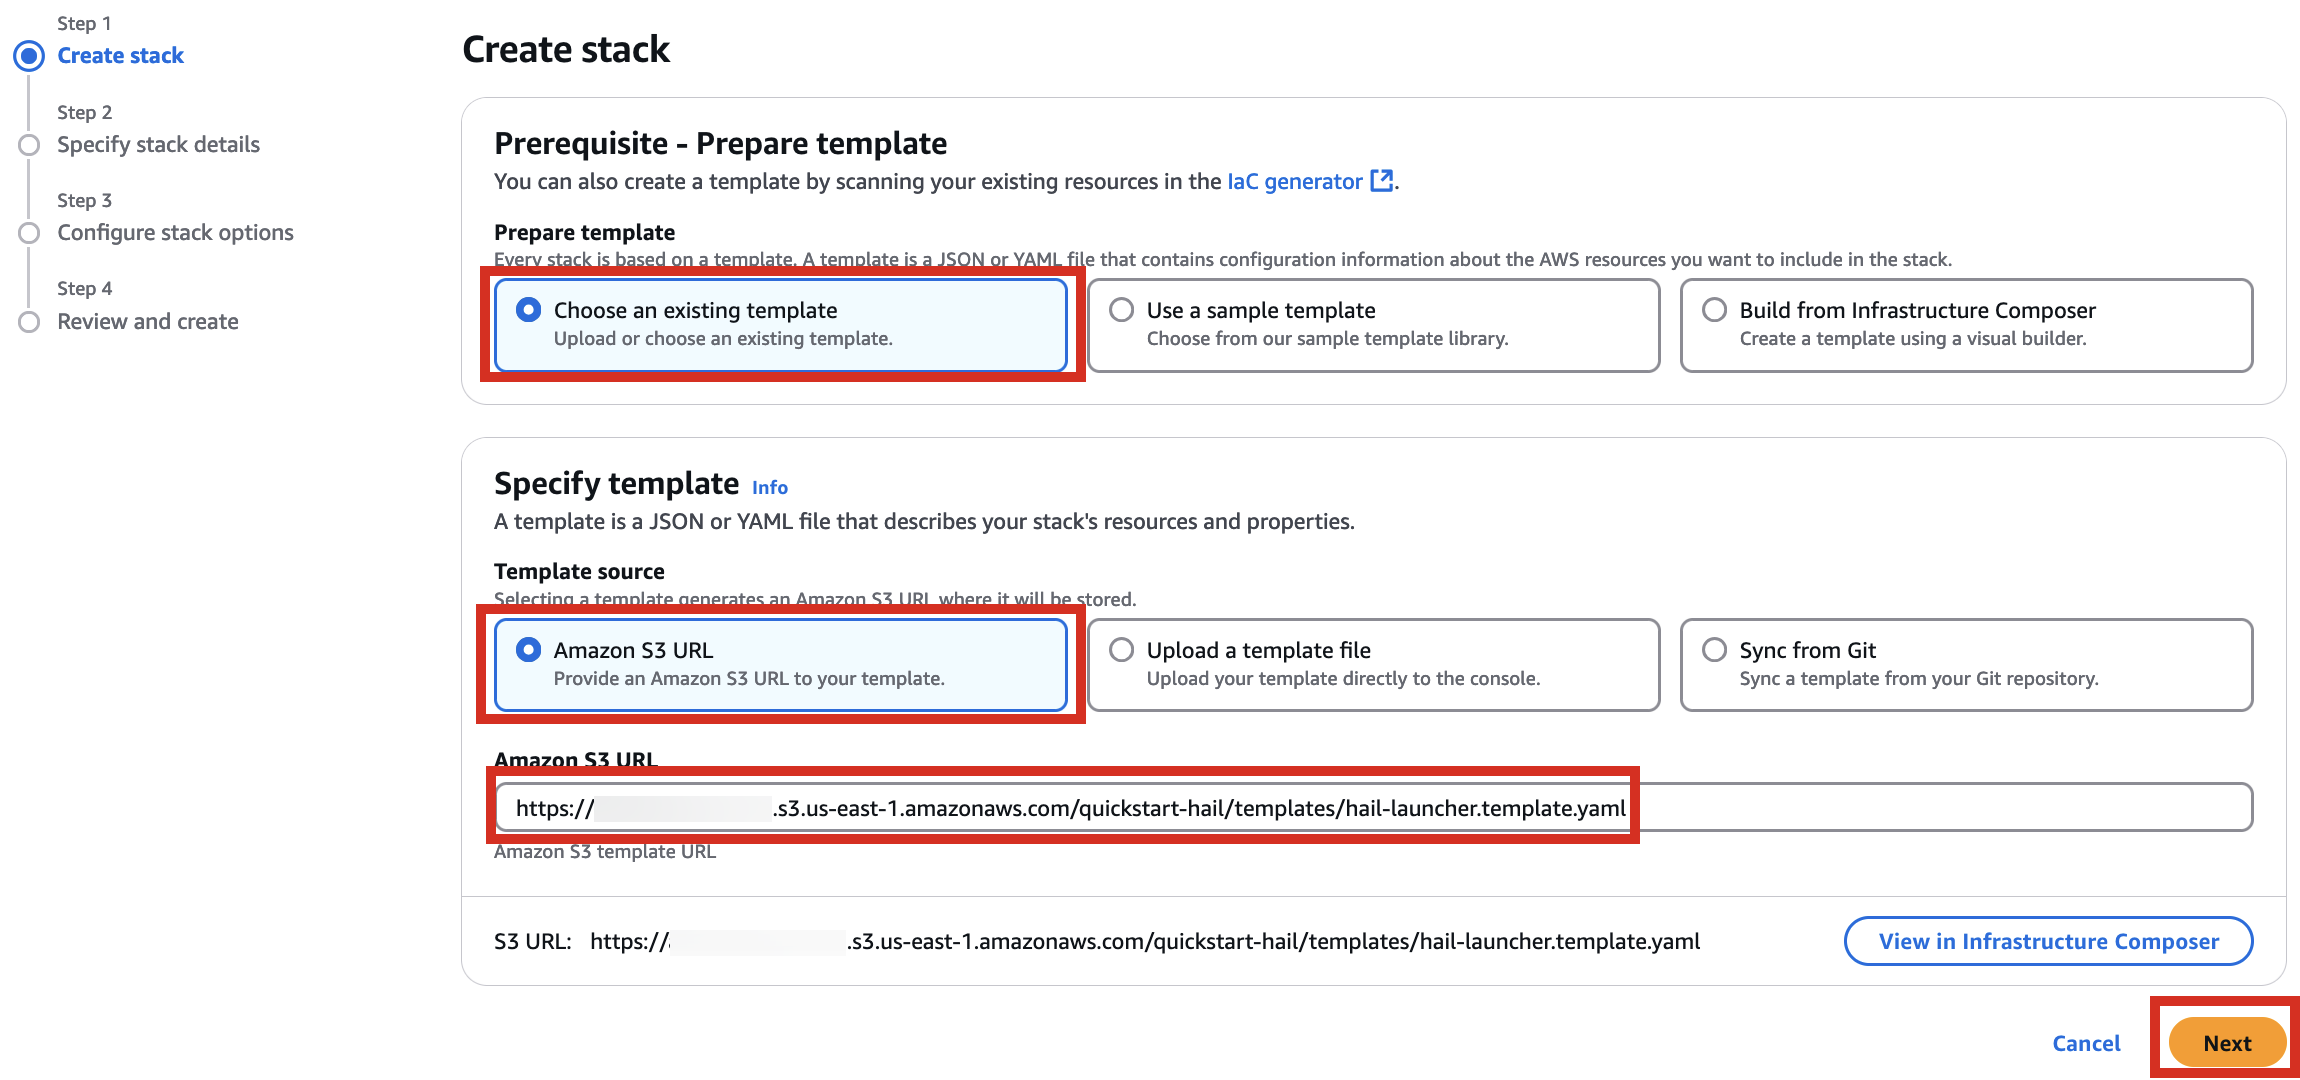](https://www.aws-ps-tech.kr/uploads/images/gallery/2024-12/Whlimage.png)
4\. Proceed with entering information to create a stack.
Type an name for the stack.
[](https://www.aws-ps-tech.kr/uploads/images/gallery/2024-12/JI3image.png)
Select a VPC. Select one subnet within the same VPC. For this exercise, select public.
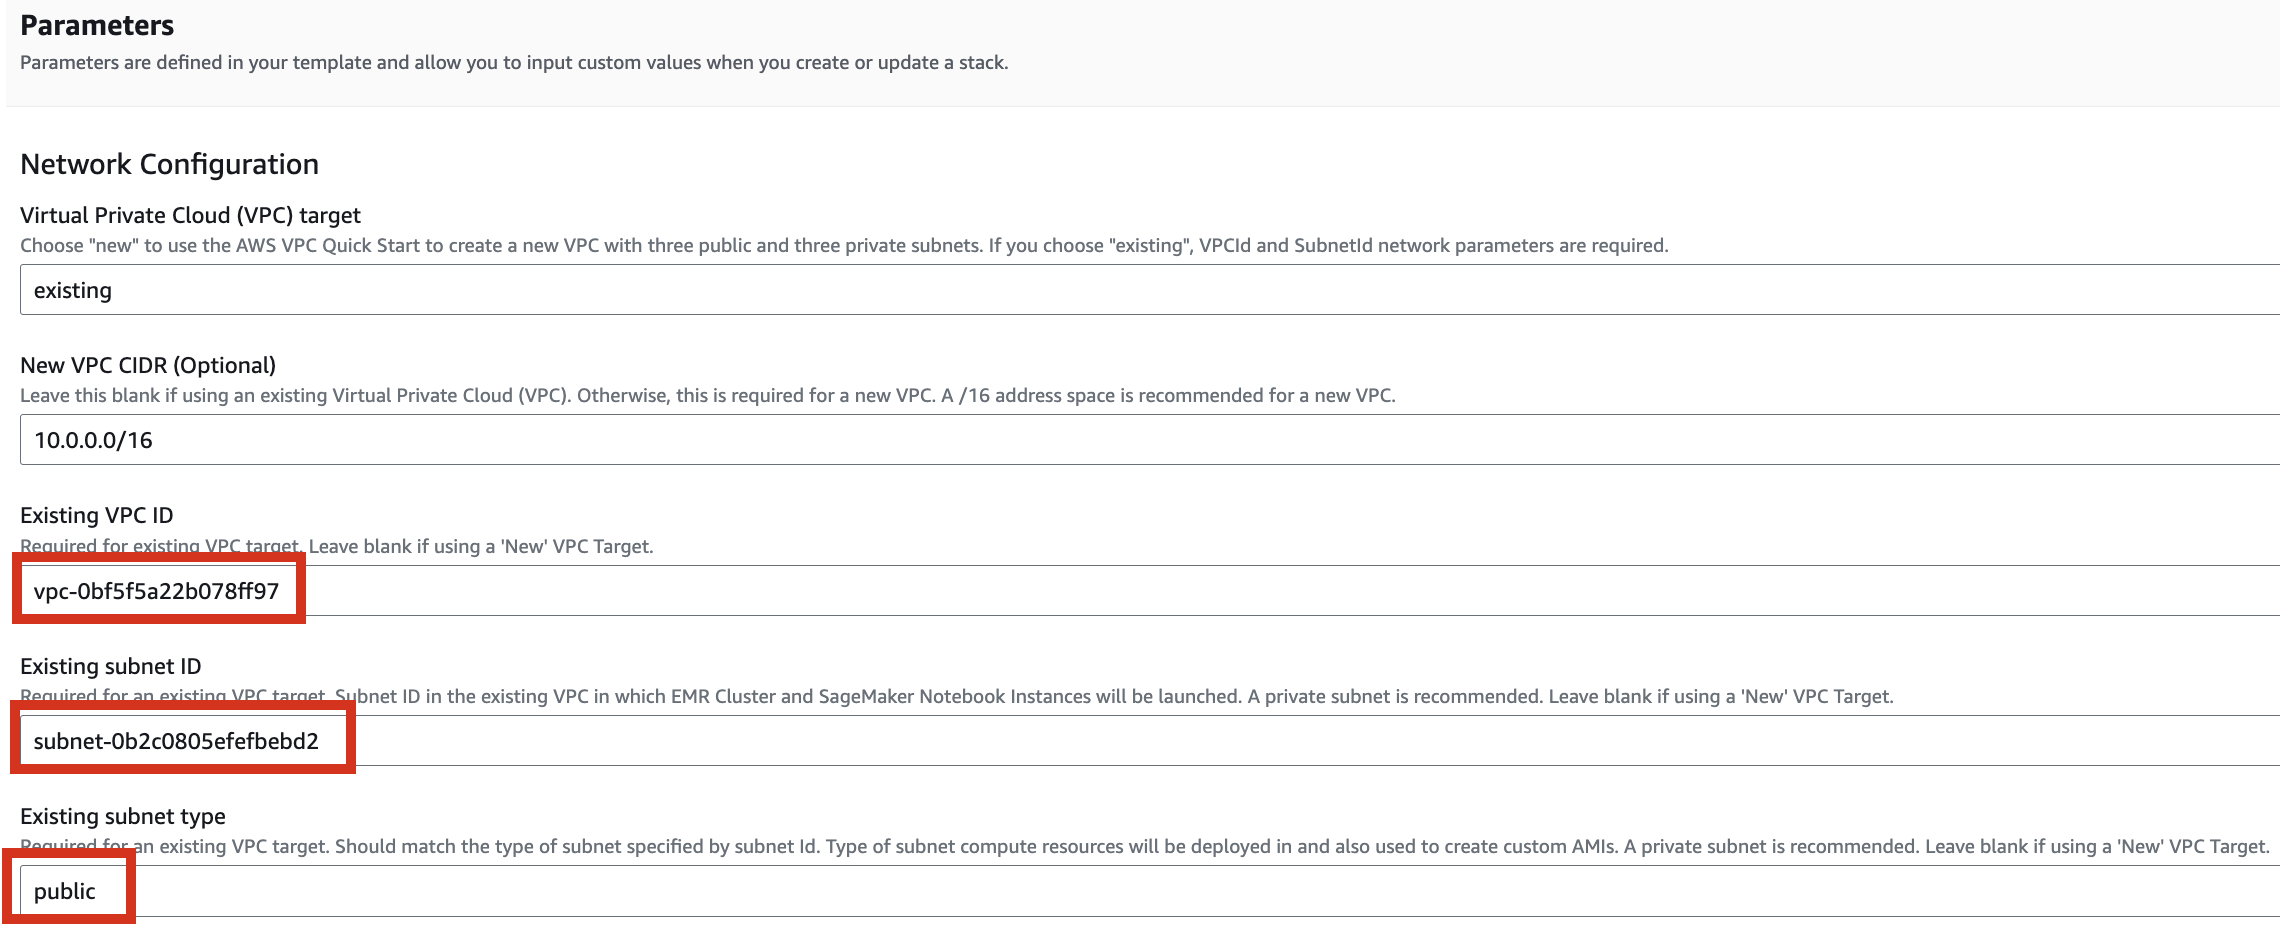
Let's set it up to create additional buckets as needed.
Enter the name of the existing bucket where the `quickstart-hail` folder was uploaded, and check the region.
Here, the bucket name `awsimd-us-east-1` was used, and the `Hail S3 bucket name` and `Sagemaker home directory S3 bucket name` were suffixed with `-s3` and `-sm`, respectively. Modify the bucket names as appropriate.
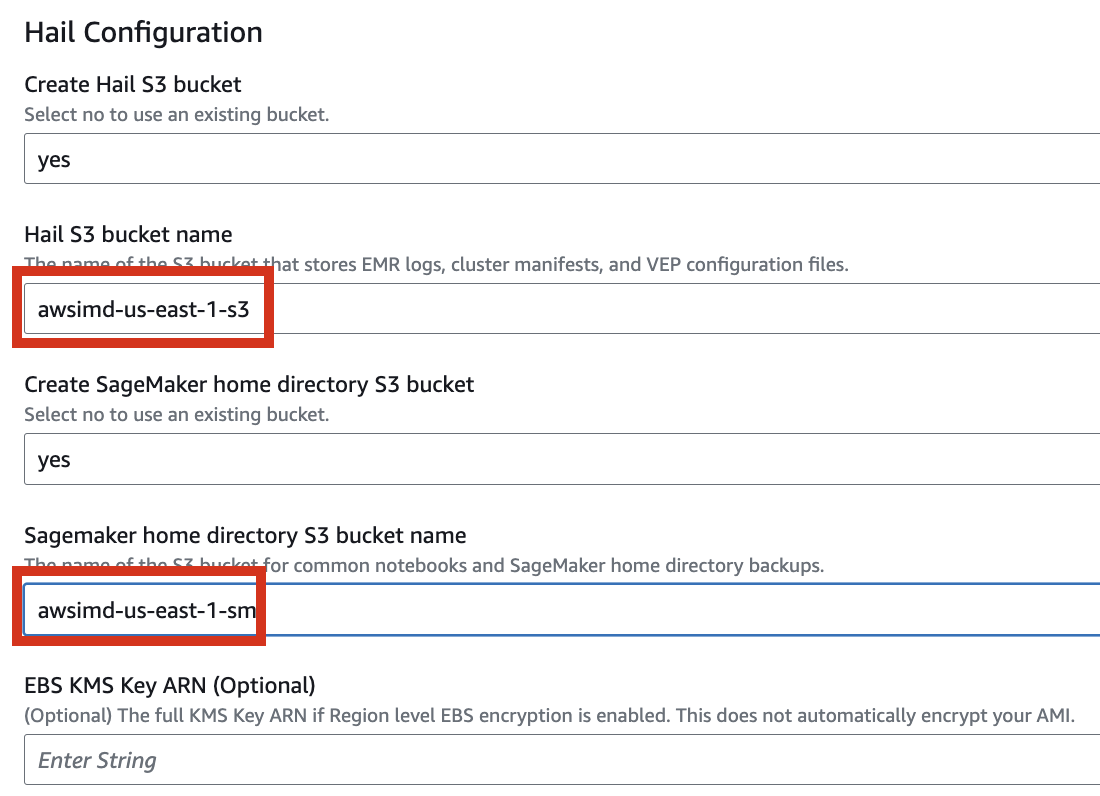

5\. Finally, press the **`Next`** button to create the stack.


6\. Check stack creation in CloudFormation.
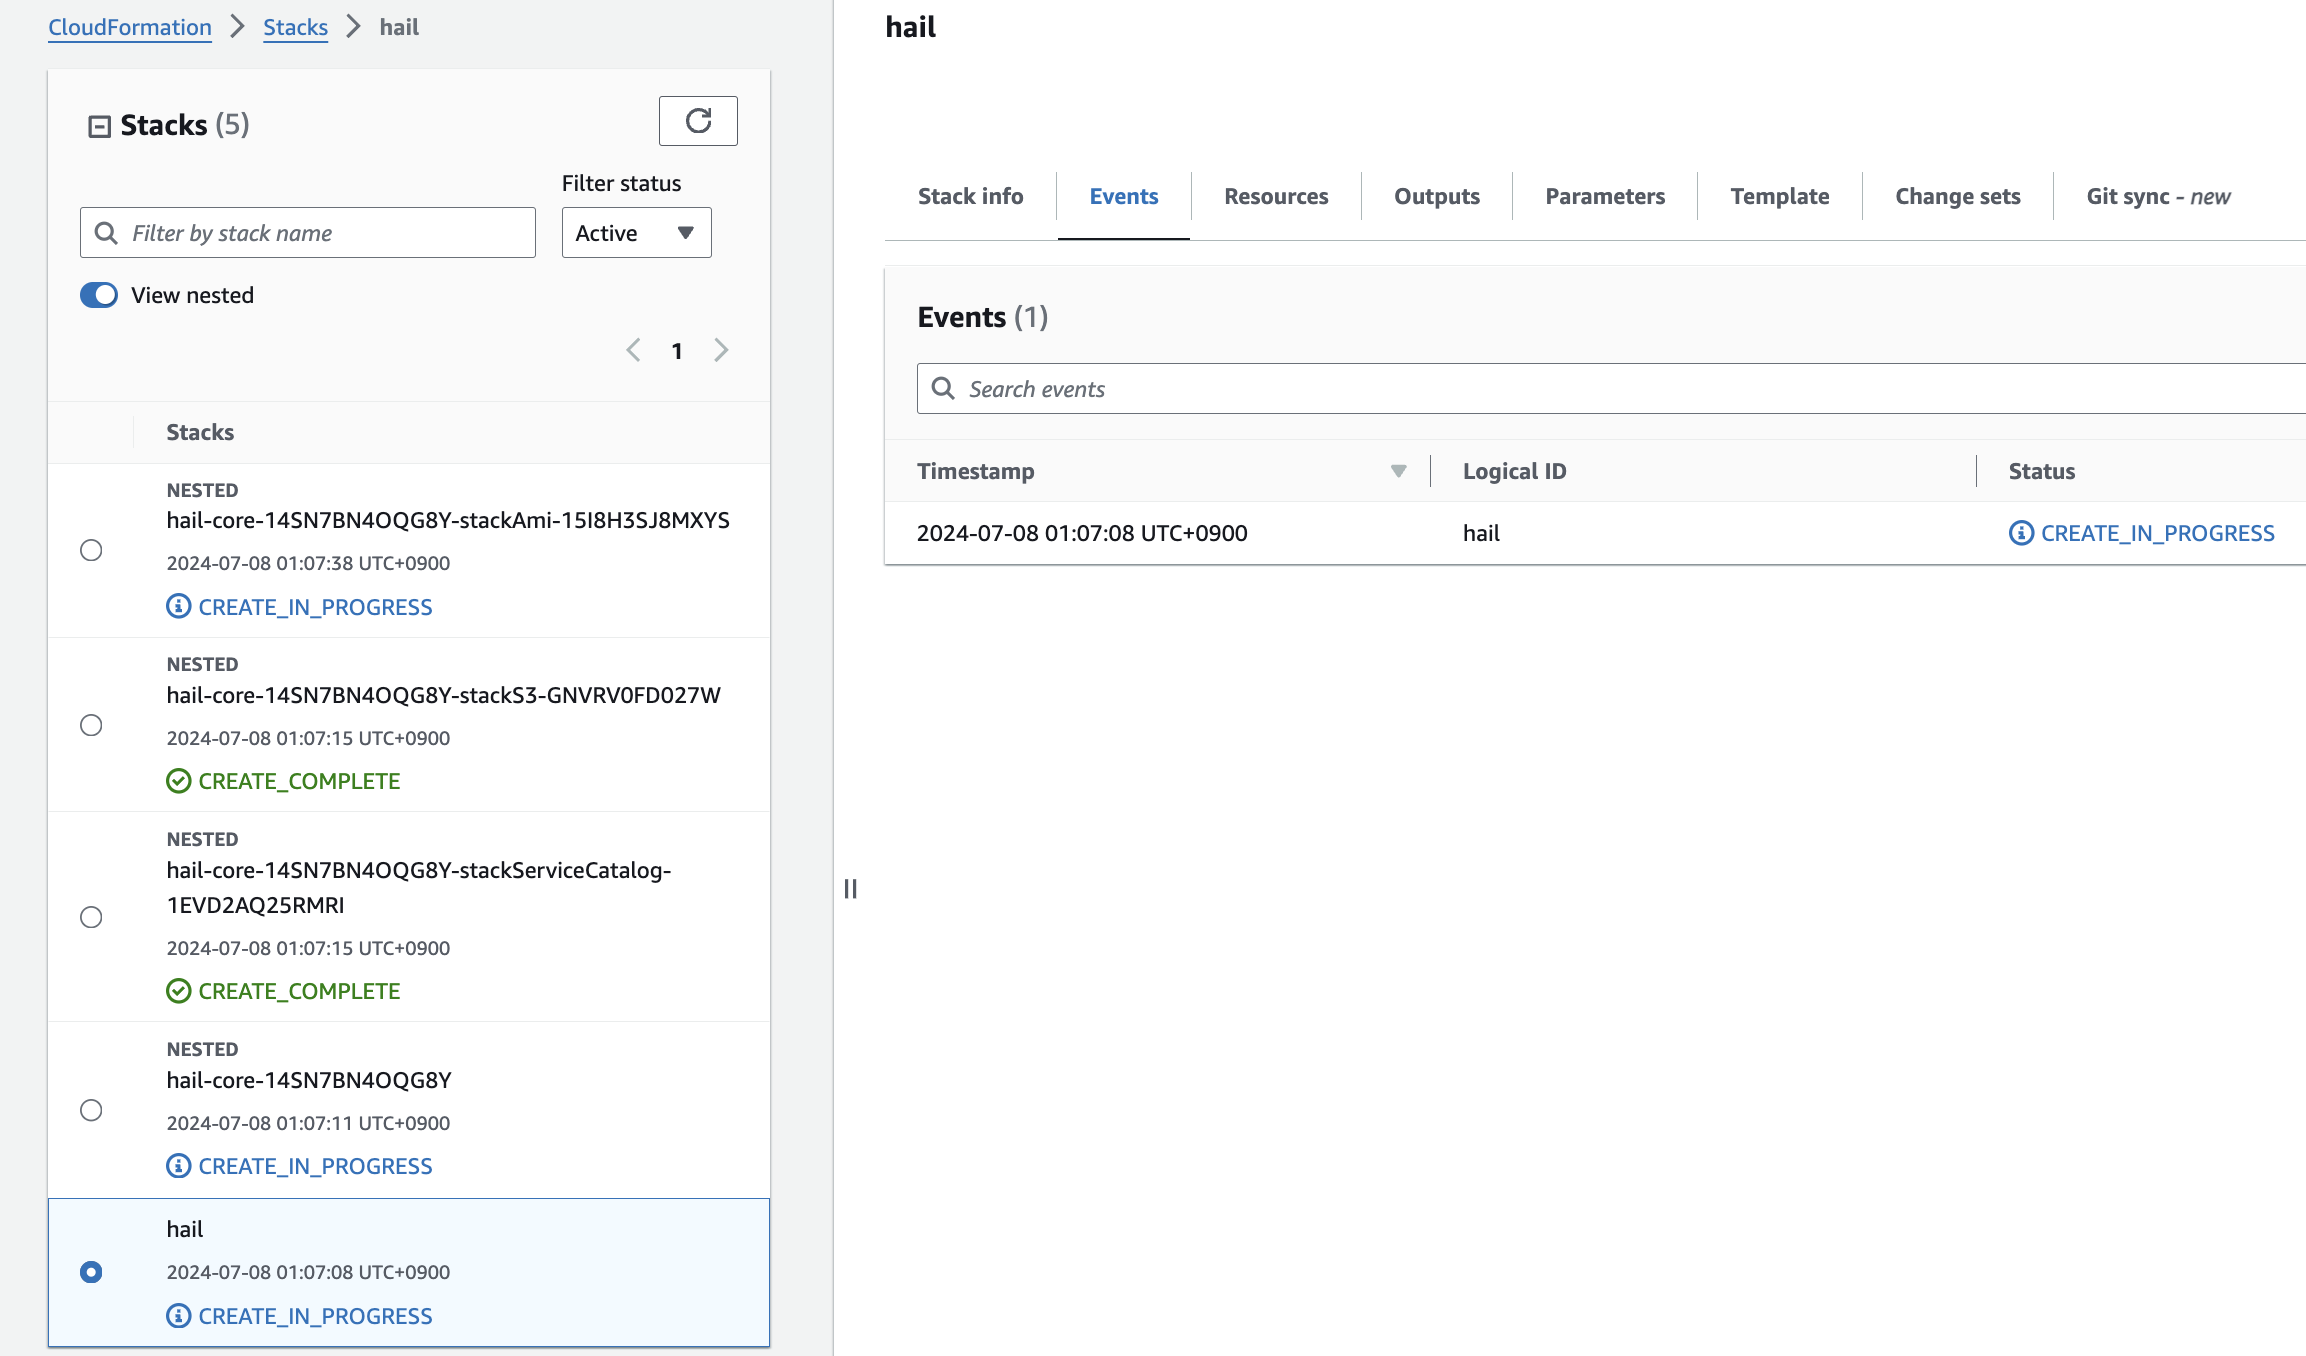
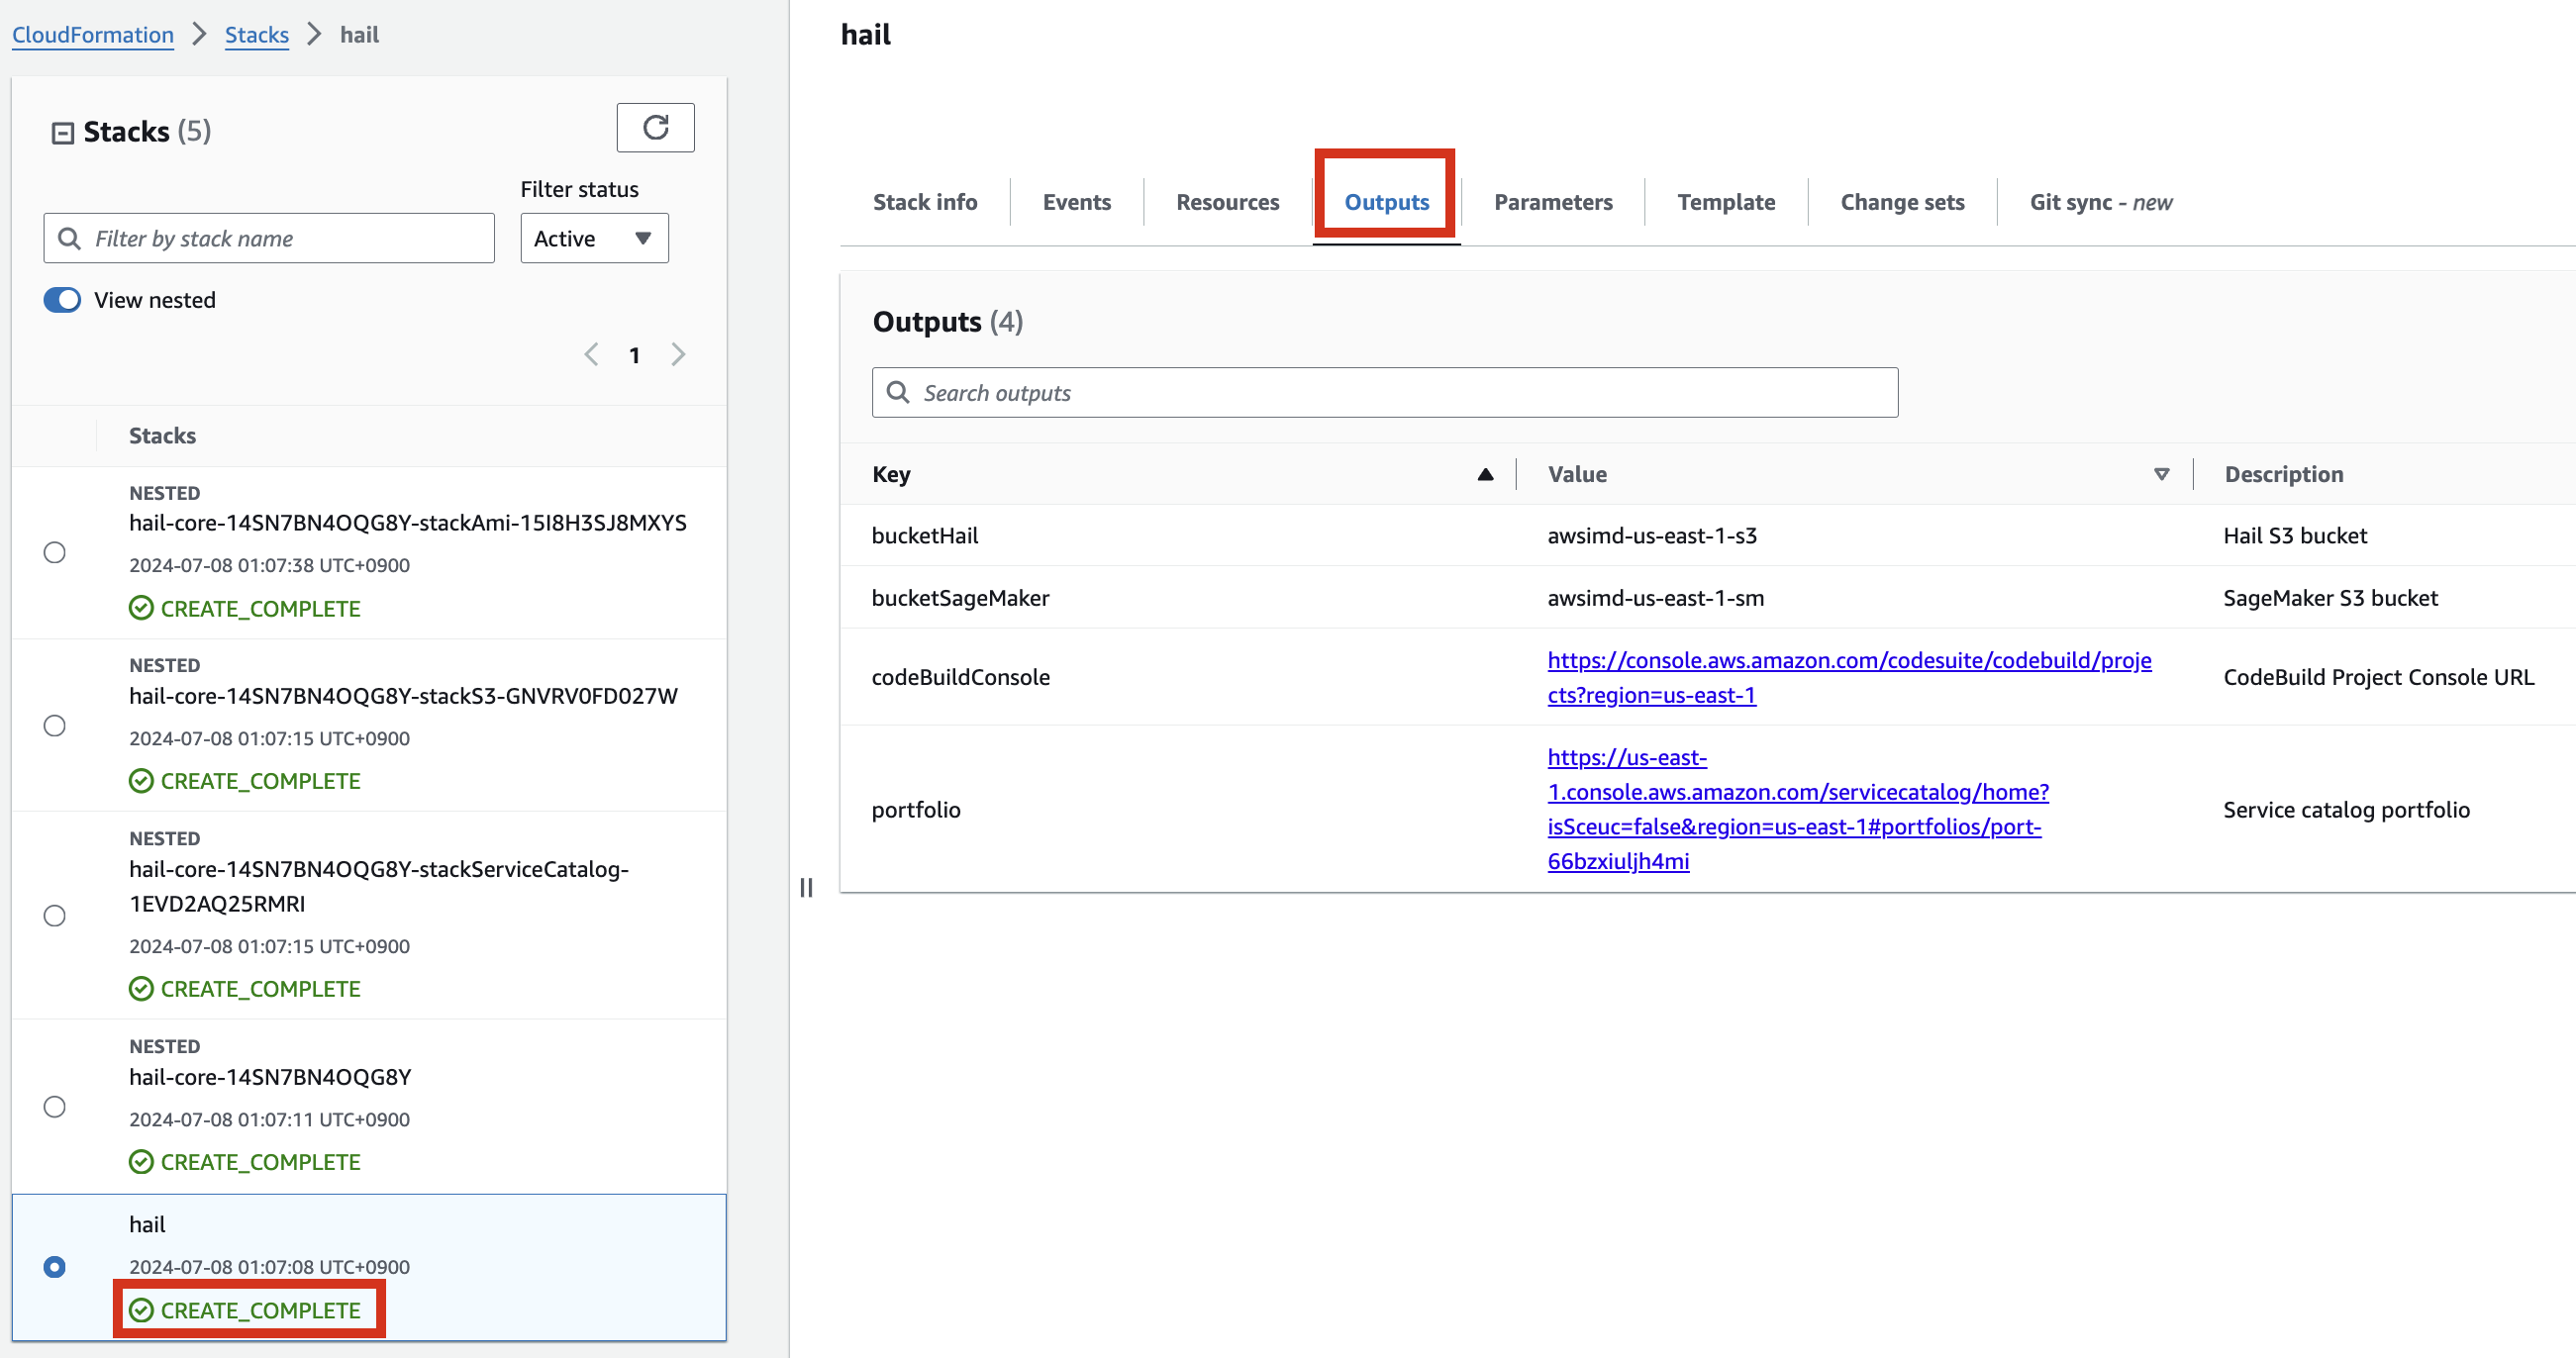
If the following portfolio appears in the output along with the **`CREATE_COMPLETE`** message in the top stack, you can confirm that it was executed correctly.
# Create an AMI for Hail and VEP
## Pre-downloading VEP Data and Storing in Bucket
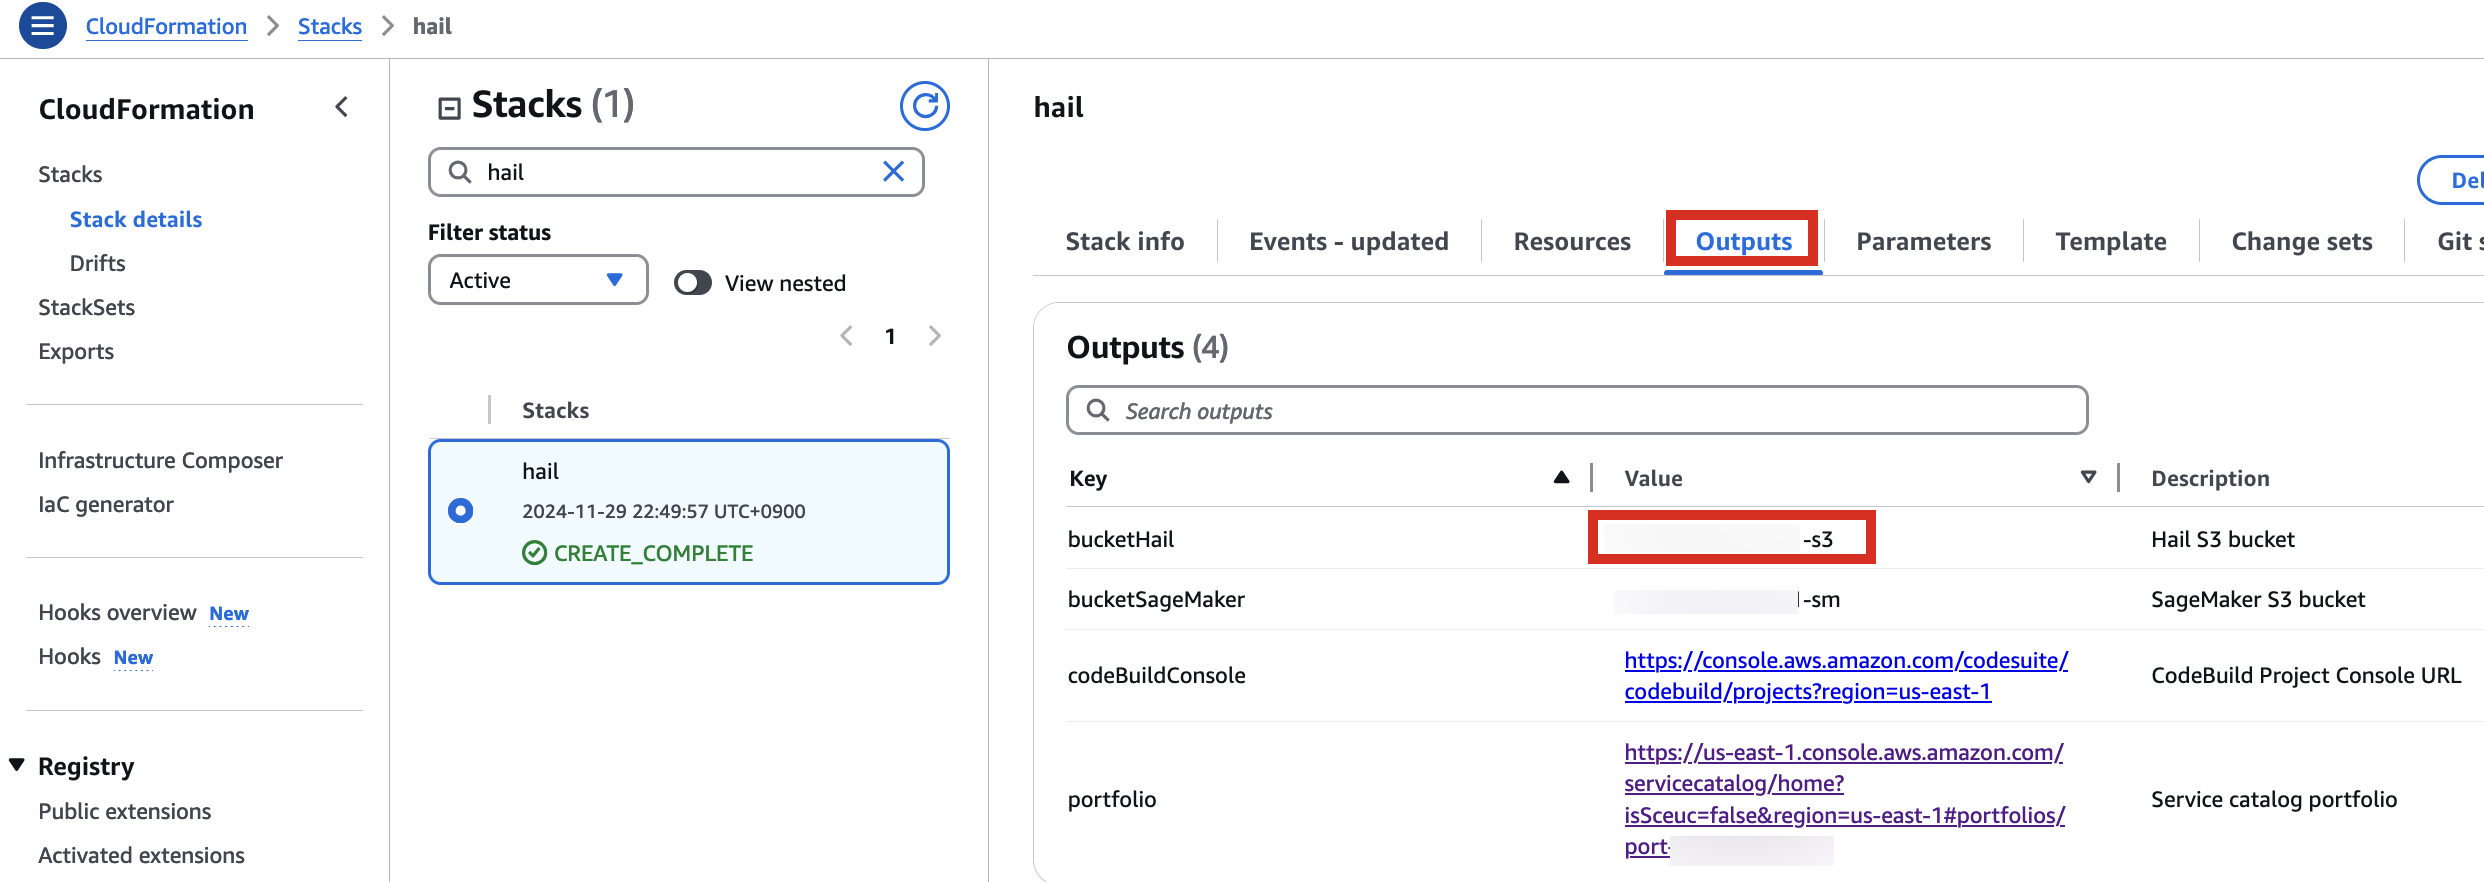
For VEP, you can pre-download the data and store it in the bucket created or specified through the stack (using the `bucketHail` value from CloudFormation's Outputs).
[](https://www.aws-ps-tech.kr/uploads/images/gallery/2024-12/jY3image.png)
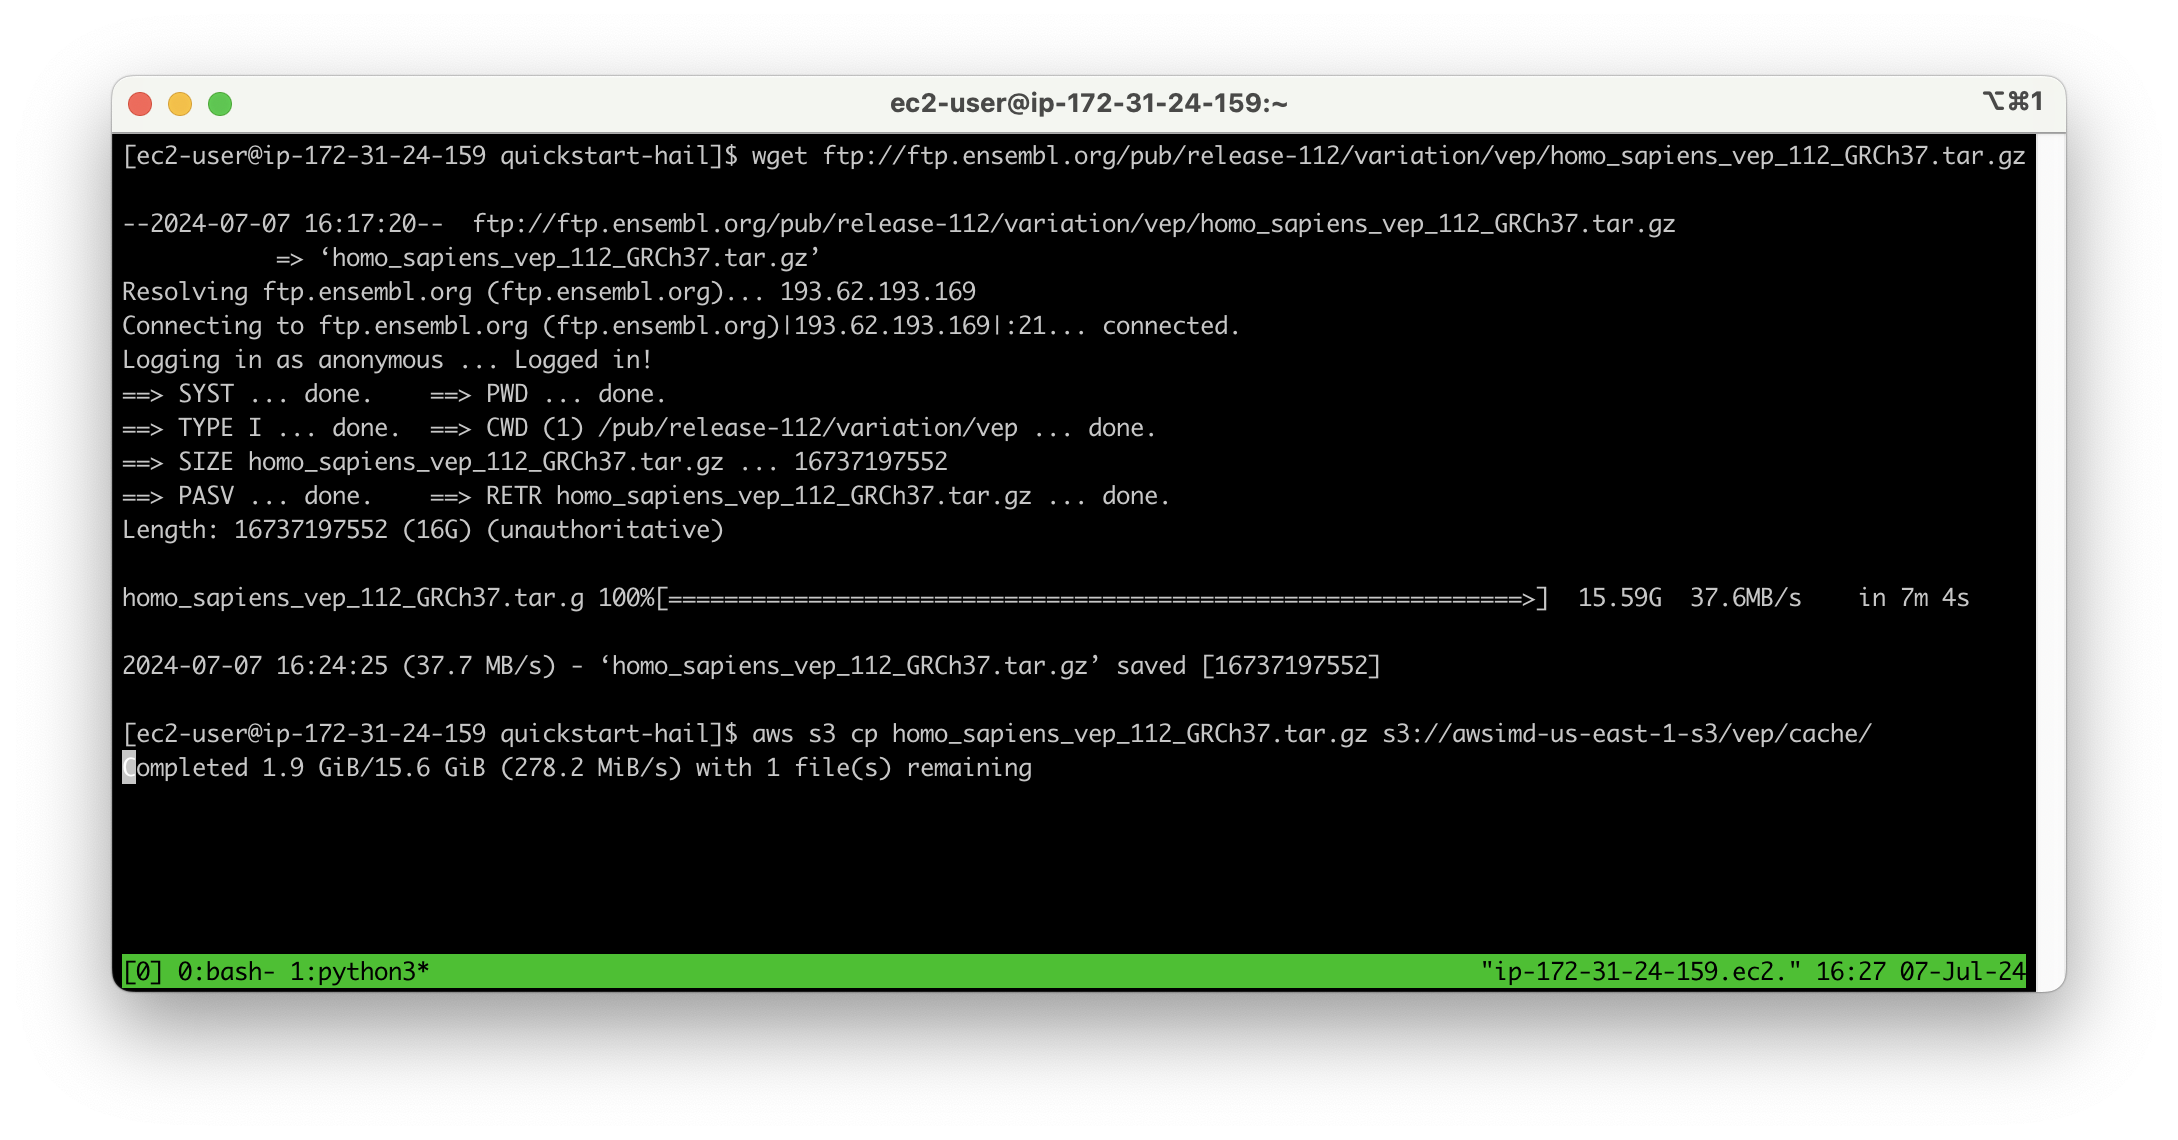
Download VEP data using the wget command:
```
wget ftp://ftp.ensembl.org/pub/release-112/variation/vep/homo_sapiens_vep_112_GRCh37.tar.gz
```
Upload the downloaded file to your bucket: (I emphasize that this is the value for the `BucketHail` key confirmed in CloudFormation Outputs)
```bash
aws s3 cp homo_sapiens_vep_112_GRCh37.tar.gz s3://{defined Hail S3 bucket}/vep/cache/
```
## AMI Build
1\. Access the [CodeBuild console ](https://us-east-1.console.aws.amazon.com/codesuite/codebuild/projects?region=us-east-1)and initiate the build process for each new AMI. Select Start build > Start with overrides.
[](https://www.aws-ps-tech.kr/uploads/images/gallery/2024-12/t6qimage.png)
[](https://www.aws-ps-tech.kr/uploads/images/gallery/2024-12/zwjimage.png)
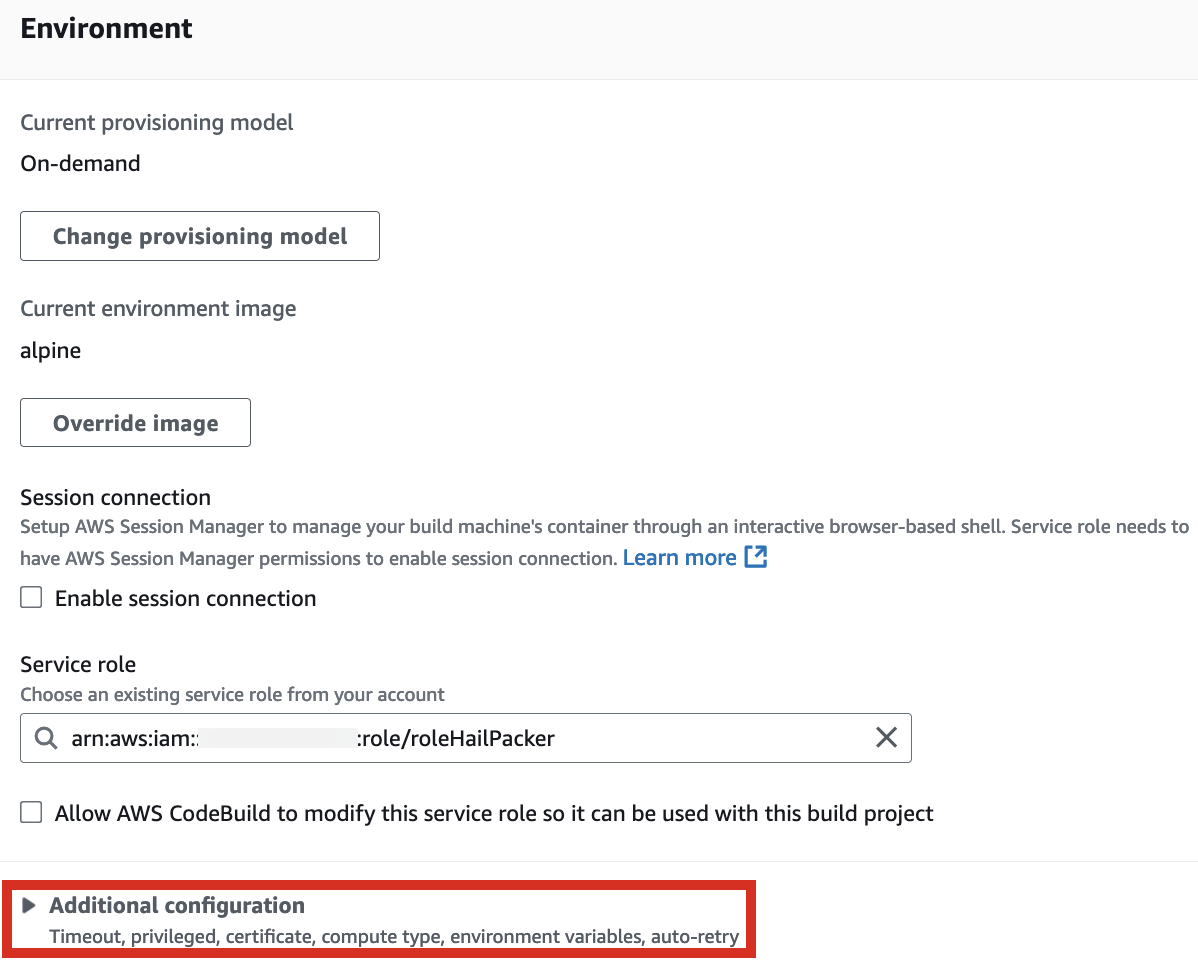
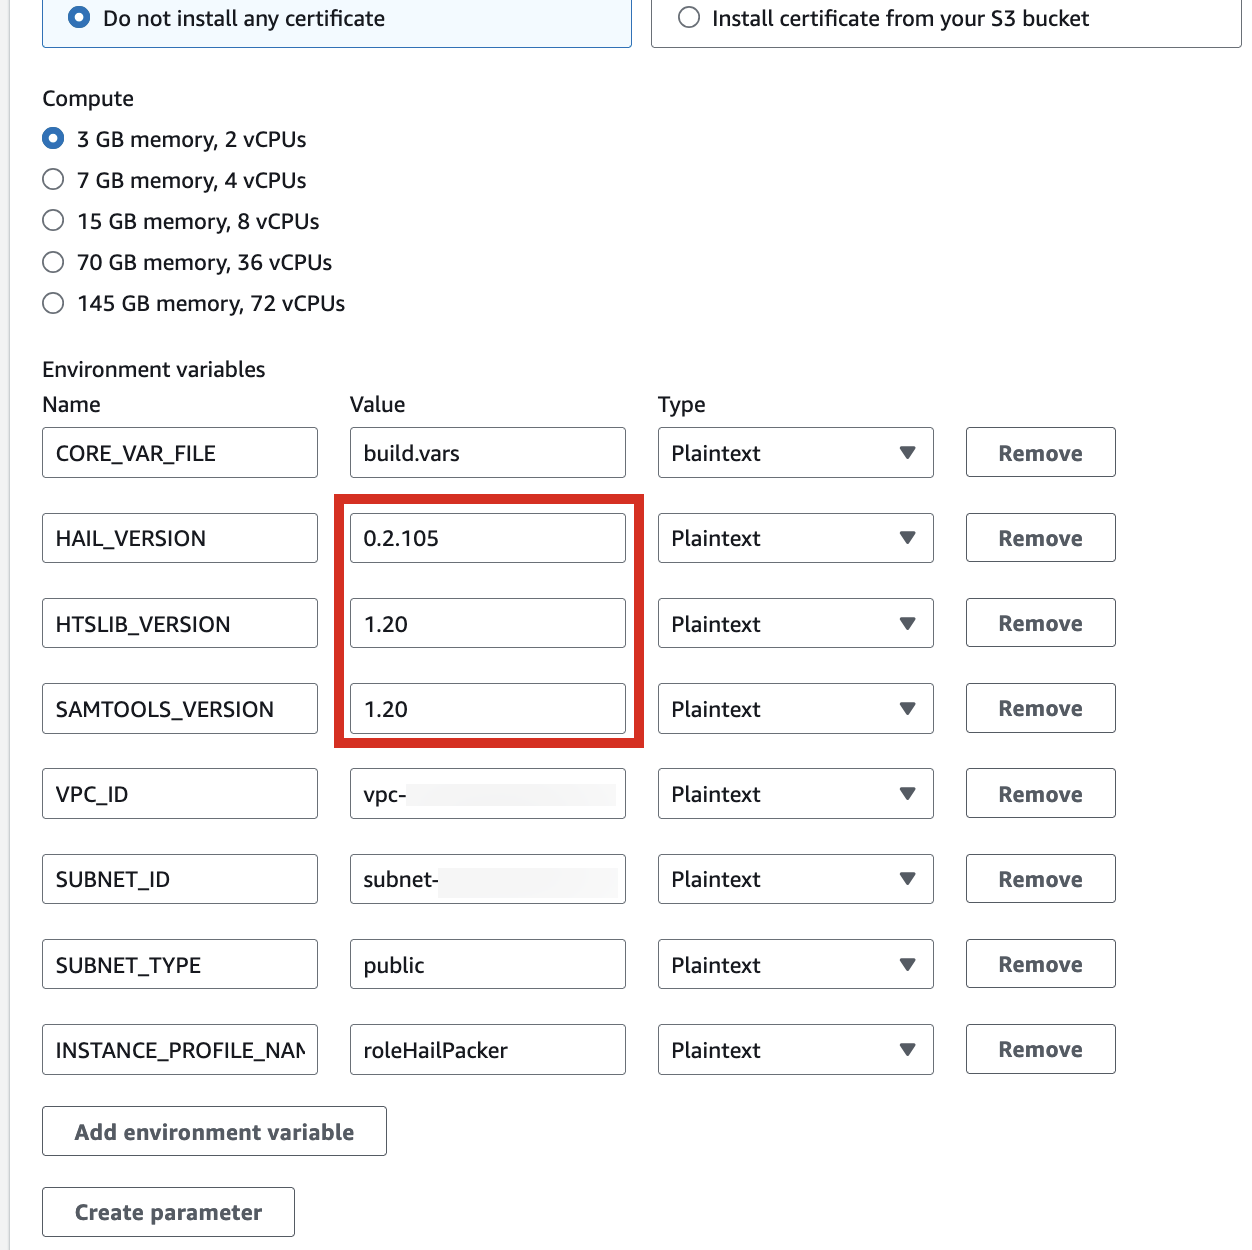
2\. In the Environment section, expand Additional configuration and input the required values.
[](https://www.aws-ps-tech.kr/uploads/images/gallery/2024-12/Nz5image.png)
[](https://www.aws-ps-tech.kr/uploads/images/gallery/2024-12/6rnimage.png)
| HAIL\_VERSION | 0.2.105 |
|---|
| HTSLIB\_VERSION | 1.20 |
| SAMTOOLS\_VERSION | 1.20 |
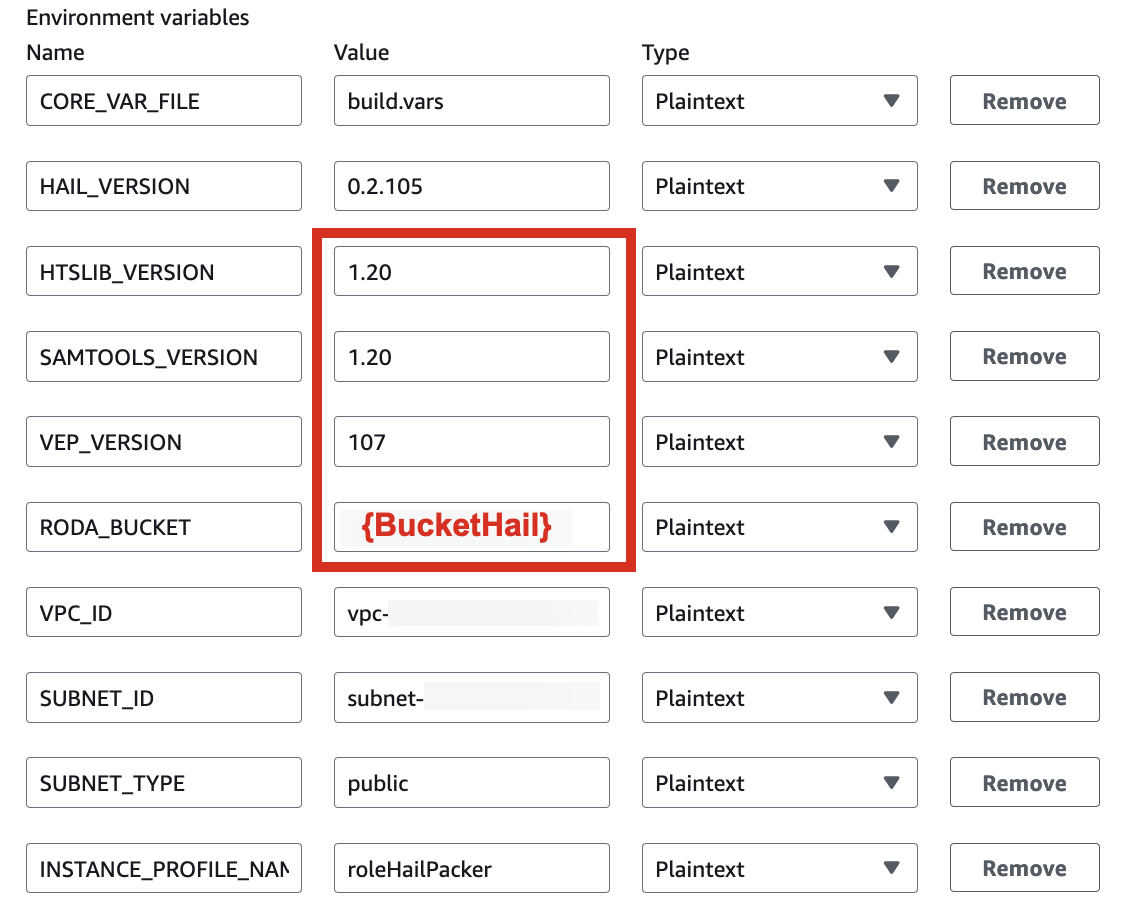
\* For building with hail-vep option (includes VEP installation):
| HAIL\_VERSION | 0.2.105 |
|---|
| HTSLIB\_VERSION | 1.20 |
| SAMTOOLS\_VERSION | 1.20 |
| VEP\_VERSION | 107 |
| **RODA\_BUCKET** | **value for the `BucketHail` key in CloudFormation Outputs** |
[](https://www.aws-ps-tech.kr/uploads/images/gallery/2024-12/rYGimage.png)
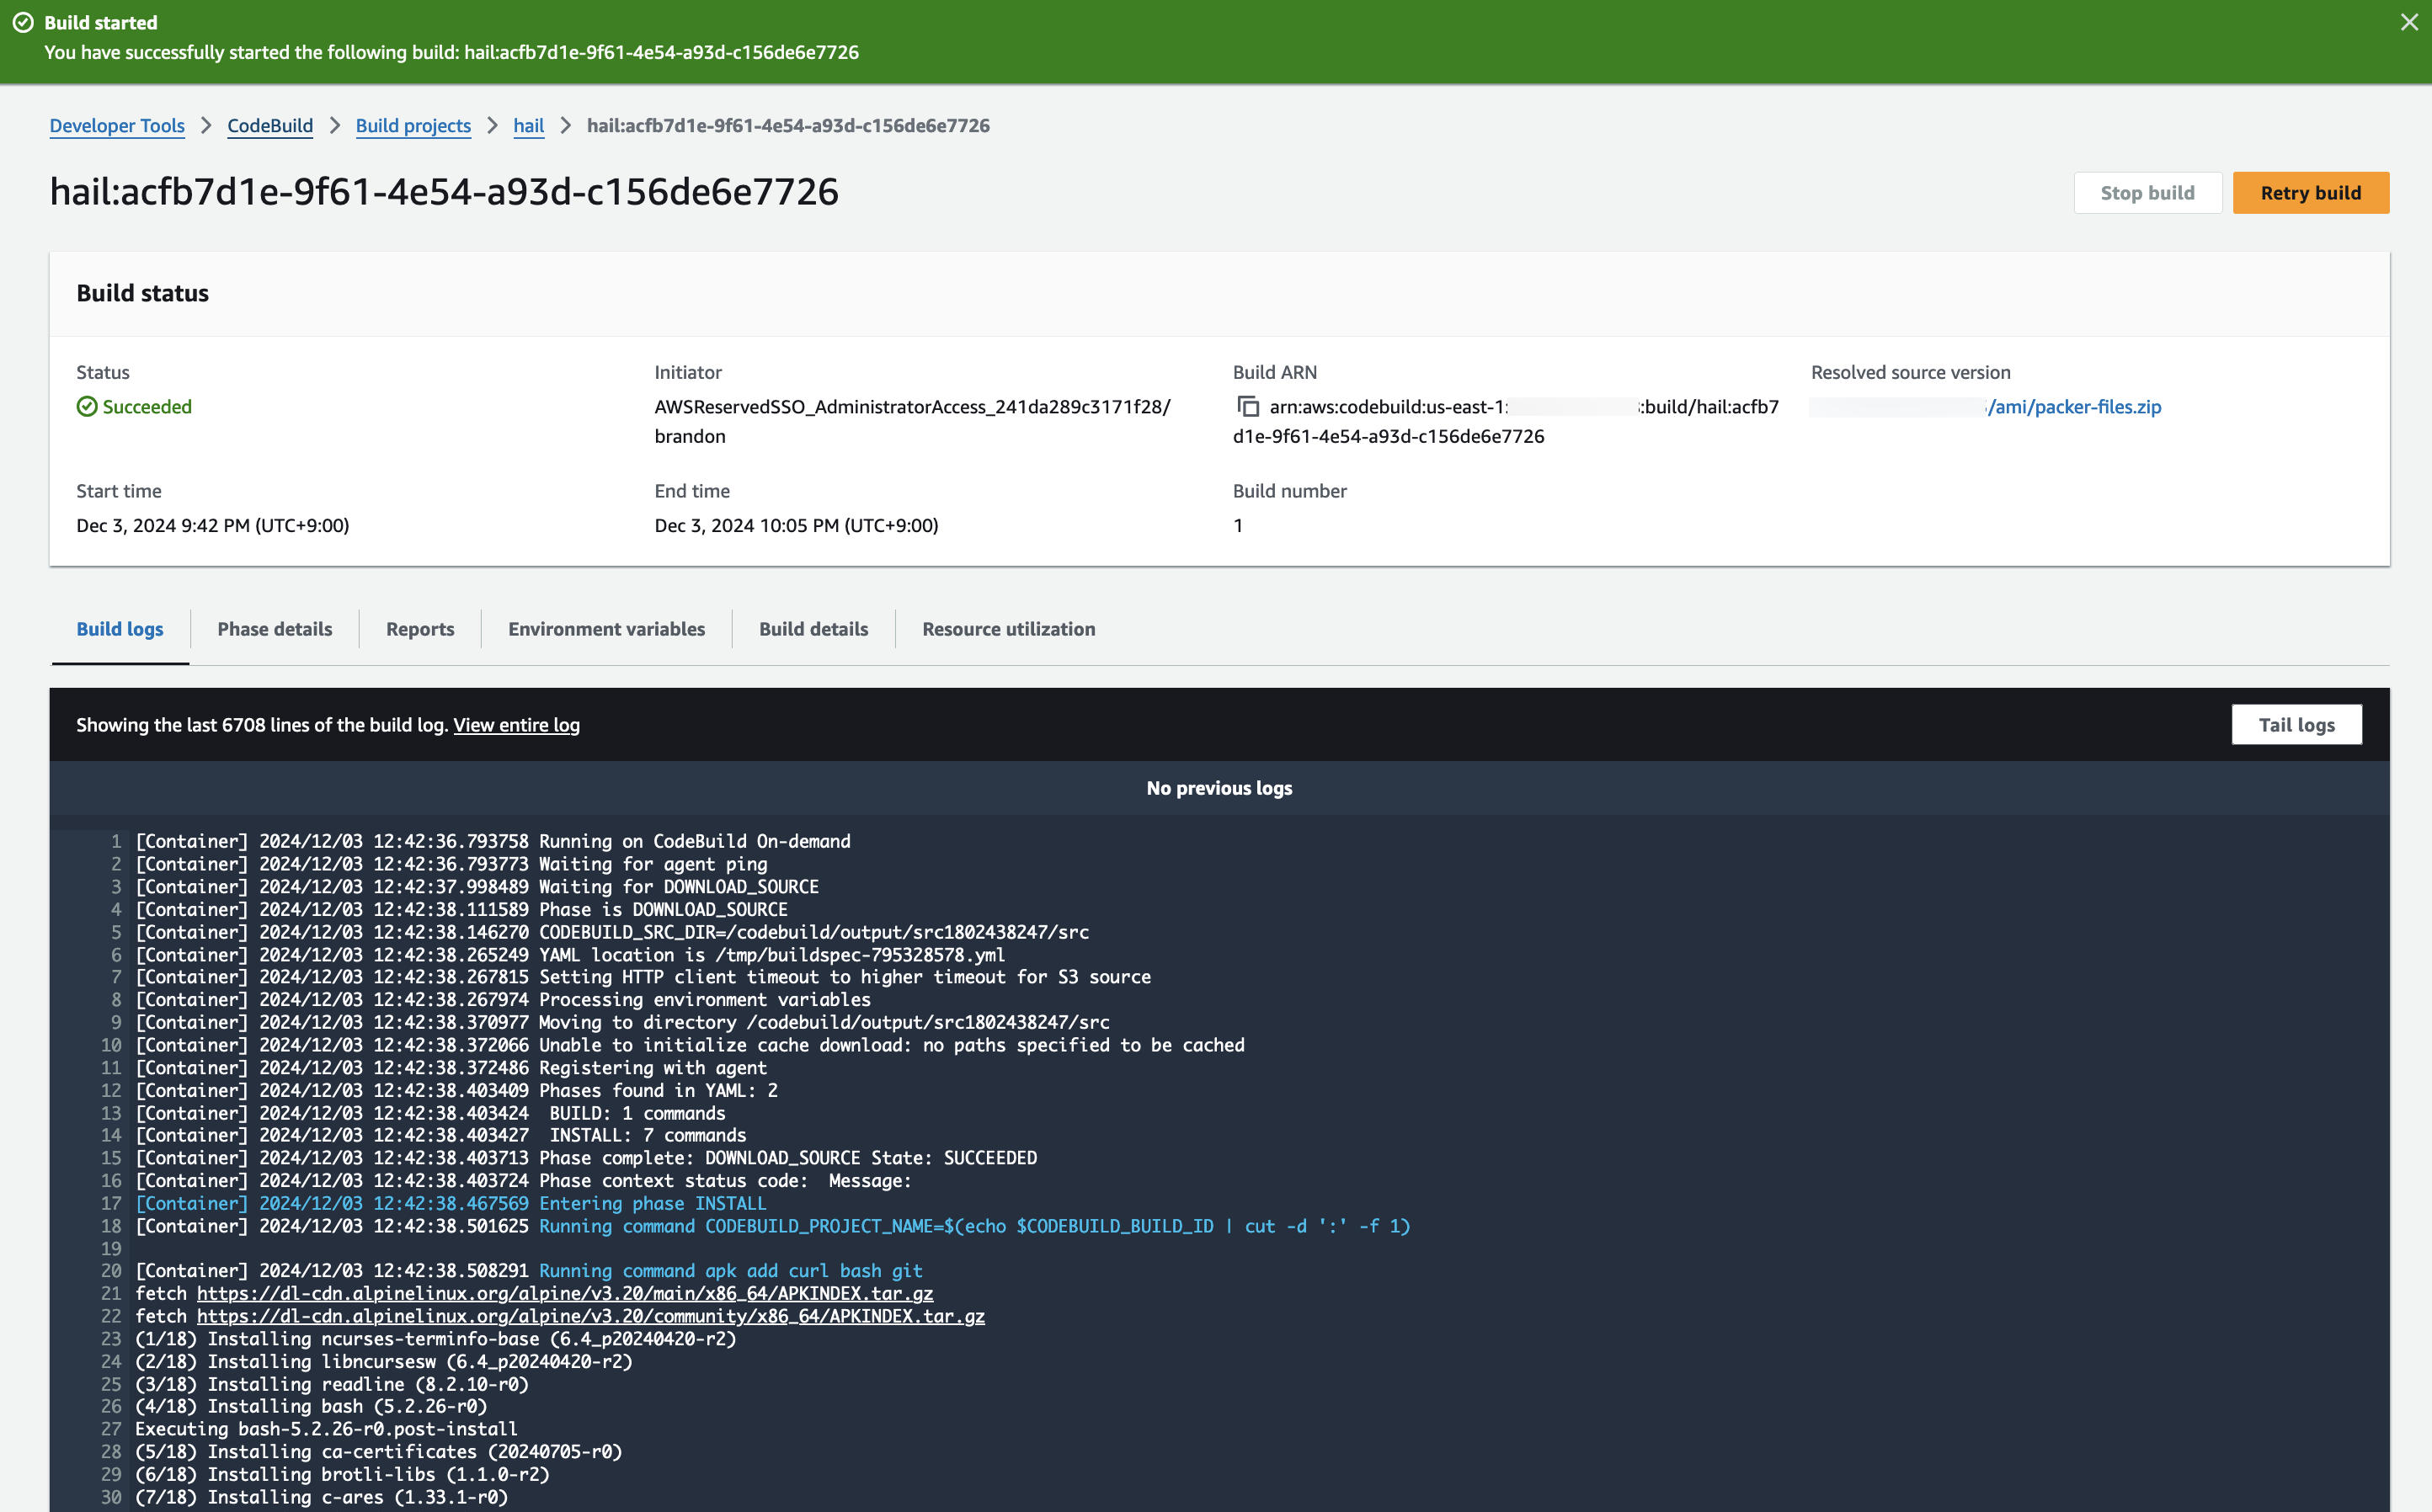
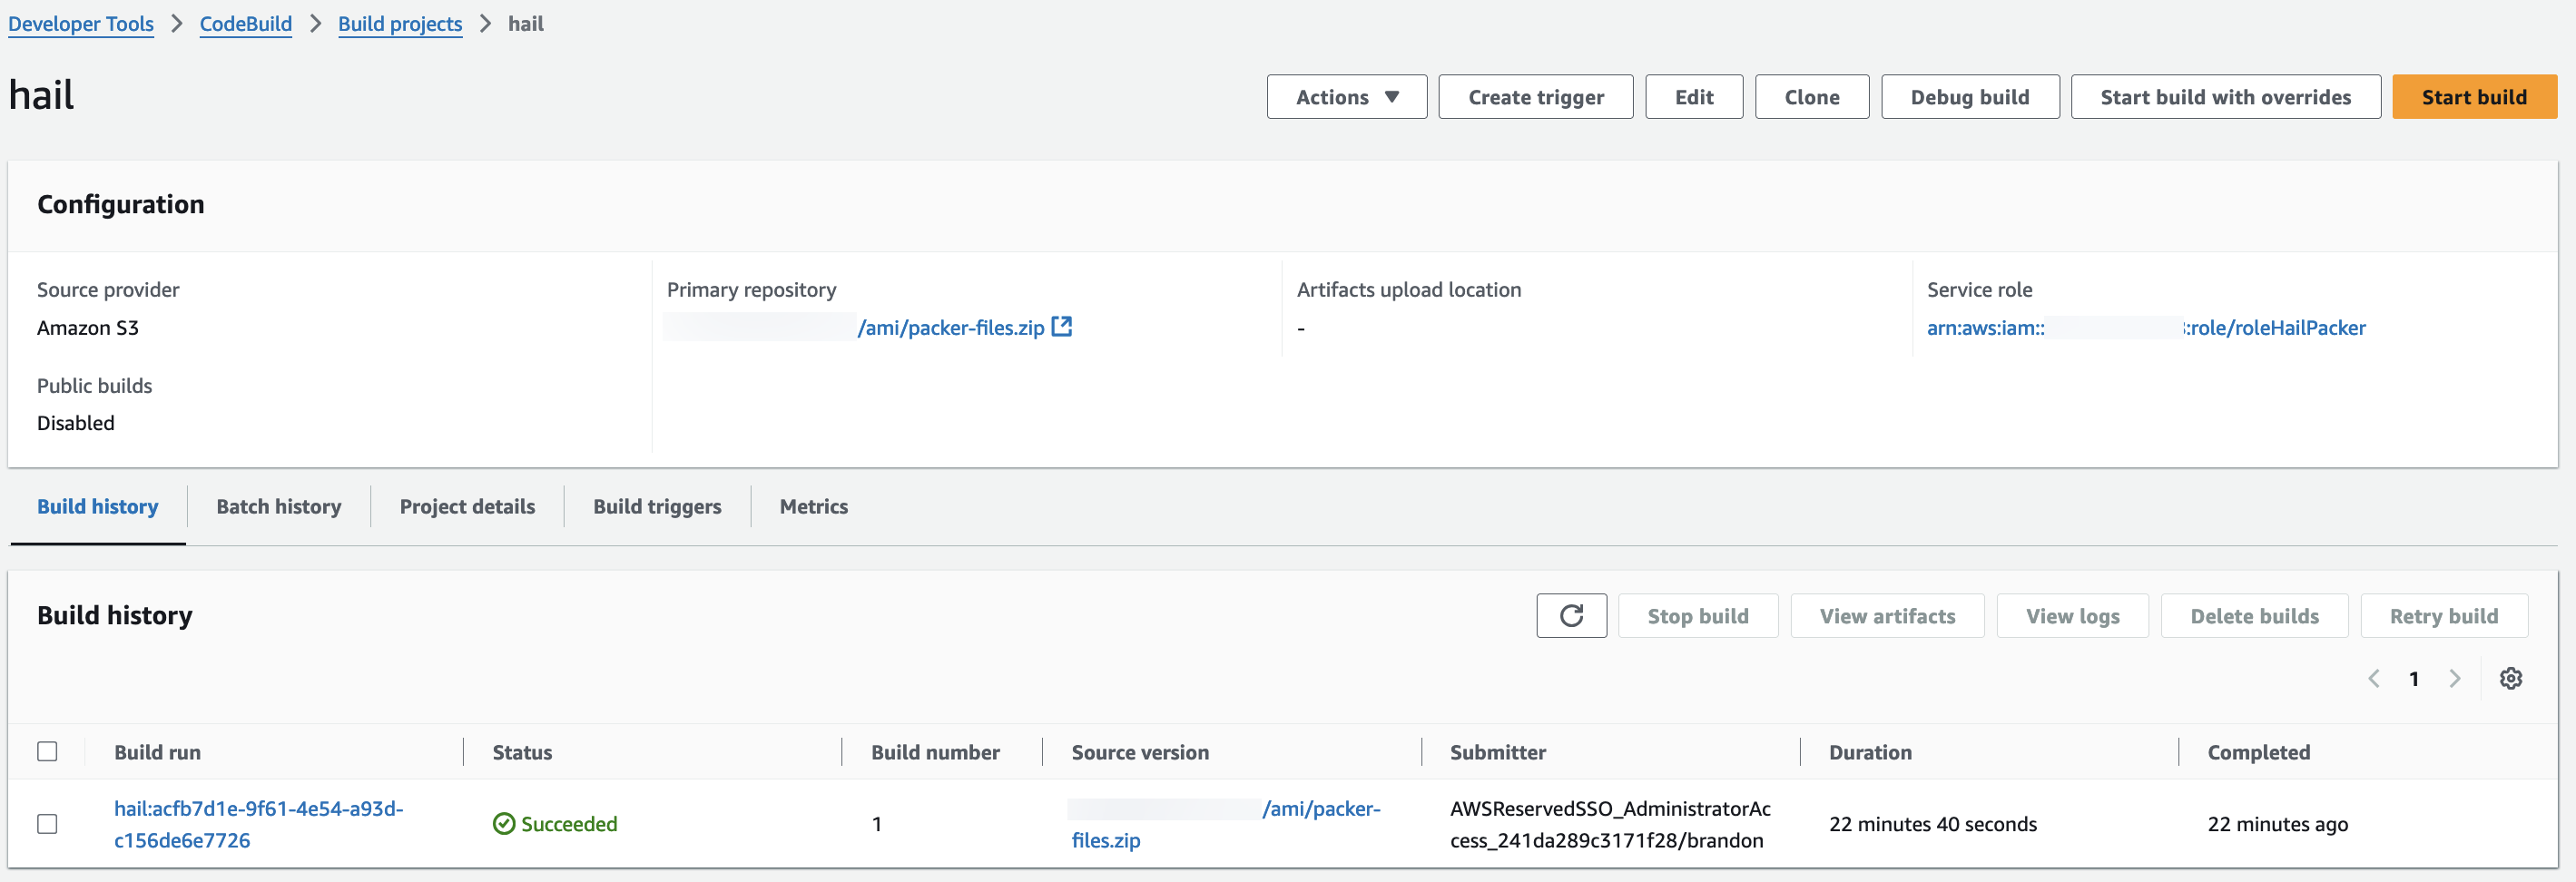
3\. Check the build status in CodeBuild
**Hail (without VEP):** The Hail image build completes in about 20 minutes.
[](https://www.aws-ps-tech.kr/uploads/images/gallery/2024-12/9Wlimage.png)
[](https://www.aws-ps-tech.kr/uploads/images/gallery/2024-12/VdYimage.png)
**Hail (VEP)**: The VEP version build takes approximately 1 hour and 38 minutes to complete.


You can find the \*\*AMI results\*\* in either the AMI menu of [Amazon EC2 console](https://console.aws.amazon.com/ec2/) or CodeBuild logs.
[](https://www.aws-ps-tech.kr/uploads/images/gallery/2024-12/IgJimage.png)
# **EMR Cluster Setup and Jupyter Environment Configuration**
## EMR Cluster Setup
1\. In the CloudFormation service console's Outputs tab, click the portfolio.
[](https://www.aws-ps-tech.kr/uploads/images/gallery/2024-12/9emimage.png)
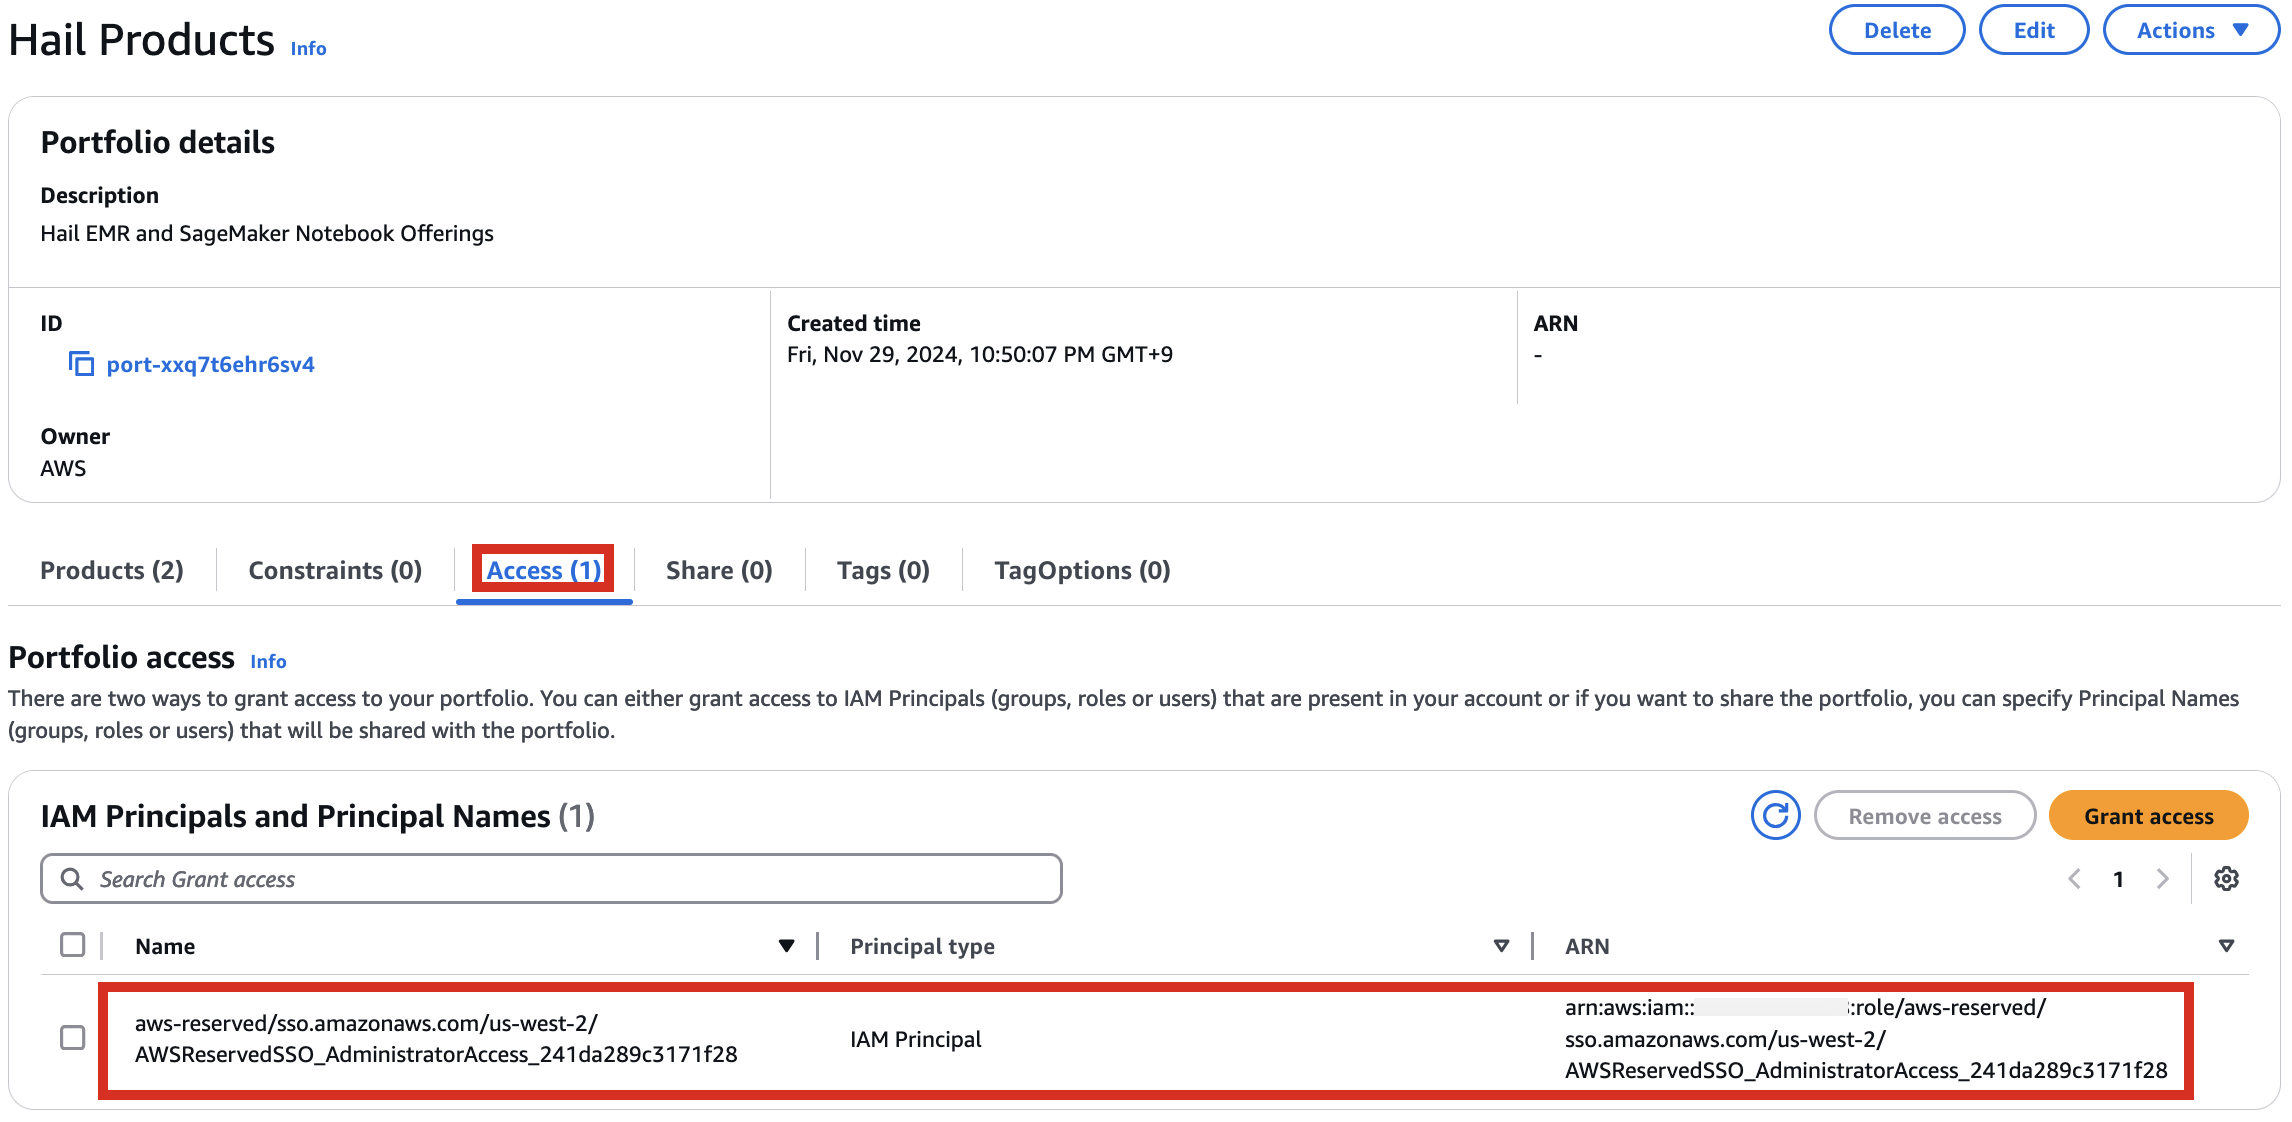
2\. In the portfolio of AWS Service Catalog, locate the relevant Product, click the Access tab, then select Grant access.
[](https://www.aws-ps-tech.kr/uploads/images/gallery/2024-12/qjKimage.png)
3\. Add permissions. Check the user that suits you and grant them access to Hail Products. Search for it, select it, and click Grant access.
[](https://www.aws-ps-tech.kr/uploads/images/gallery/2024-12/A2zimage.png)
[](https://www.aws-ps-tech.kr/uploads/images/gallery/2024-12/0lWimage.png)
4\. After confirming access permissions, navigate to the Product in the Provisioning menu.
[](https://www.aws-ps-tech.kr/uploads/images/gallery/2024-12/UvRimage.png)
5\. With permissions granted, you should now see 2 Products listed.
[](https://www.aws-ps-tech.kr/uploads/images/gallery/2024-12/ZYiimage.png)
6\. Select the Hail EMR Cluster product and click Launch product.

7\. Enter the required launch information.
Either enter a name manually or click Generate name.

Specify the Hail AMI you created earlier. You can find the AMI ID in the EC2 service's AMIs section (as previously described).

Input the Cluster name and Hail AMI ID. You can leave all other settings at their default values.

8\. Click Launch product at the bottom of the page.

## SageMaker Notebook Setup
1\. Similarly, select Launch product in the Product menu.
[](https://www.aws-ps-tech.kr/uploads/images/gallery/2024-12/p2Eimage.png)
2\. Provide a name for your Hail notebook instance. Keep all other settings at their defaults.

3\. Click Launch product at the bottom of the page.

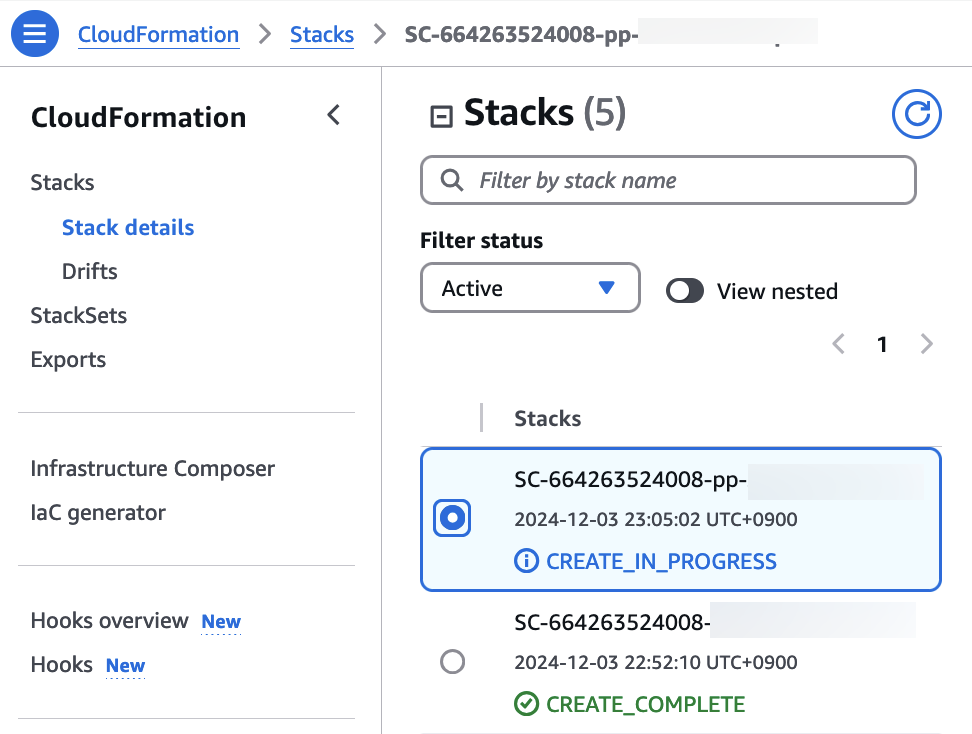
*\*Note: You can monitor the product deployment progress through CloudFormation.*
[](https://www.aws-ps-tech.kr/uploads/images/gallery/2024-12/CrLimage.png)
## numpy reinstall
The issue occurs when running as it is currently. **As of Mar 14, 2025**
Therefore, it is necessary to check the cluster created by Amazon EMR as shown below, connect to the Primary instance, delete and reinstall the numpy module.
[](https://www.aws-ps-tech.kr/uploads/images/gallery/2025-03/image.png)
[](https://www.aws-ps-tech.kr/uploads/images/gallery/2025-03/sxXimage.png)[](https://www.aws-ps-tech.kr/uploads/images/gallery/2025-03/xd0image.png)
[](https://www.aws-ps-tech.kr/uploads/images/gallery/2025-03/opximage.png)
```
sudo python3 -m pip uninstall -y numpy
sudo python3 -m pip install numpy -U
```
# GWAS Practice using Hail
1\. Launch your notebook. Find the URL in CloudFormation's Outputs tab. Clicking it will automatically connect you to your notebook instance in Amazon SageMaker.

2\. Select Open JupyterLab to start the notebook interface.

3\. We'll work with two notebooks in this practice session:
- common-notebooks/plotting-tutorail.ipynb
- common-notebooks/GWAS-tutorial.ipynb

Locate your previously created EMR cluster and update the Cluster Name in the second cell.
You can execute notebook cells in sequence by placing your cursor in the cell where you want to begin.

When the tutorial code runs successfully, you should see results similar to these:


# Additional Information
## VEP configuration
In the S3 bucket, select the json file object and click Copy S3 URI.

Ex: vep-configuration-GRCh37.json
```bash
{
"command": [
"/opt/ensembl-vep/vep",
"--format", "vcf",
"--dir_plugins", "/opt/vep/plugins",
"--dir_cache", "/opt/vep/cache",
"--json",
"--everything",
"--allele_number",
"--no_stats",
"--cache", "--offline",
"--minimal",
"--assembly", "GRCh37",
"--plugin", "LoF,human_ancestor_fa:/opt/vep/loftee_data/human_ancestor.fa.gz,filter_position:0.05,min_intron_size:15,conservation_file:/opt/vep/loftee_data/phylocsf_gerp.sql,gerp_file:/opt/vep/loftee_data/GERP_scores.final.sorted.txt.gz",
"-o", "STDOUT"
],
"env": {
"PERL5LIB": "/opt/vep"
},
"vep_json_schema": "Struct{assembly_name:String,allele_string:String,ancestral:String,colocated_variants:Array[Struct{aa_allele:String,aa_maf:Float64,afr_allele:String,afr_maf:Float64,allele_string:String,amr_allele:String,amr_maf:Float64,clin_sig:Array[String],end:Int32,eas_allele:String,eas_maf:Float64,ea_allele:String,ea_maf:Float64,eur_allele:String,eur_maf:Float64,exac_adj_allele:String,exac_adj_maf:Float64,exac_allele:String,exac_afr_allele:String,exac_afr_maf:Float64,exac_amr_allele:String,exac_amr_maf:Float64,exac_eas_allele:String,exac_eas_maf:Float64,exac_fin_allele:String,exac_fin_maf:Float64,exac_maf:Float64,exac_nfe_allele:String,exac_nfe_maf:Float64,exac_oth_allele:String,exac_oth_maf:Float64,exac_sas_allele:String,exac_sas_maf:Float64,id:String,minor_allele:String,minor_allele_freq:Float64,phenotype_or_disease:Int32,pubmed:Array[Int32],sas_allele:String,sas_maf:Float64,somatic:Int32,start:Int32,strand:Int32}],context:String,end:Int32,id:String,input:String,intergenic_consequences:Array[Struct{allele_num:Int32,consequence_terms:Array[String],impact:String,minimised:Int32,variant_allele:String}],most_severe_consequence:String,motif_feature_consequences:Array[Struct{allele_num:Int32,consequence_terms:Array[String],high_inf_pos:String,impact:String,minimised:Int32,motif_feature_id:String,motif_name:String,motif_pos:Int32,motif_score_change:Float64,strand:Int32,variant_allele:String}],regulatory_feature_consequences:Array[Struct{allele_num:Int32,biotype:String,consequence_terms:Array[String],impact:String,minimised:Int32,regulatory_feature_id:String,variant_allele:String}],seq_region_name:String,start:Int32,strand:Int32,transcript_consequences:Array[Struct{allele_num:Int32,amino_acids:String,appris:String,biotype:String,canonical:Int32,ccds:String,cdna_start:Int32,cdna_end:Int32,cds_end:Int32,cds_start:Int32,codons:String,consequence_terms:Array[String],distance:Int32,domains:Array[Struct{db:String,name:String}],exon:String,gene_id:String,gene_pheno:Int32,gene_symbol:String,gene_symbol_source:String,hgnc_id:String,hgvsc:String,hgvsp:String,hgvs_offset:Int32,impact:String,intron:String,lof:String,lof_flags:String,lof_filter:String,lof_info:String,minimised:Int32,polyphen_prediction:String,polyphen_score:Float64,protein_end:Int32,protein_start:Int32,protein_id:String,sift_prediction:String,sift_score:Float64,strand:Int32,swissprot:String,transcript_id:String,trembl:String,tsl:Int32,uniparc:String,variant_allele:String}],variant_class:String}"
}
```
You can modify and implement the following content in the **[vep-tutorial](https://github.com/hmkim/quickstart-hail/blob/main/sagemaker/common-notebooks/vep-tutorial.ipynb)** code using the S3 object URI you copied above.

## VEP Plugin Installation
If you need to modify VEP plugin installations (additions, etc.), you'll need to rebuild the AMI. The VEP installation code is in **[vep\_install.sh](https://github.com/hmkim/quickstart-hail/blob/main/packer-files/scripts/vep_install.sh)**. Modify this script and rebuild the AMI as needed.
For customizing Hail, VEP tool installation, and AMI building, refer to these resources:
- [Hail AMI Creation via AWS CodeBuild](https://github.com/hmkim/quickstart-hail/blob/main/docs/hail-ami.md)
- [vep-install.md](https://github.com/hmkim/quickstart-hail/blob/main/docs/vep-install.md)
- [Building a Custom Hail AMI](https://github.com/hmkim/quickstart-hail/blob/main/docs/ami-creation.md)
## Dynamically Expanding EMR Cluster EBS (HDFS) Volume
When working with large datasets, you may find the initially configured cluster volume capacity insufficient. You can dynamically expand the EBS volume by following the guidance in this blog post:
[https://aws.amazon.com/ko/blogs/big-data/dynamically-scale-up-storage-on-amazon-emr-clusters/](https://aws.amazon.com/ko/blogs/big-data/dynamically-scale-up-storage-on-amazon-emr-clusters/)
## FAQ
### Codebuild
CLIENT\_ERROR: error while downloading key ami/packer-files.zip, error: RequestError: send request failed caused by: Get "https://{bucket name}.s3.amazonaws.com/ami/packer-files.zip": dial tcp 3.5.30.46:443: i/o timeout for primary source